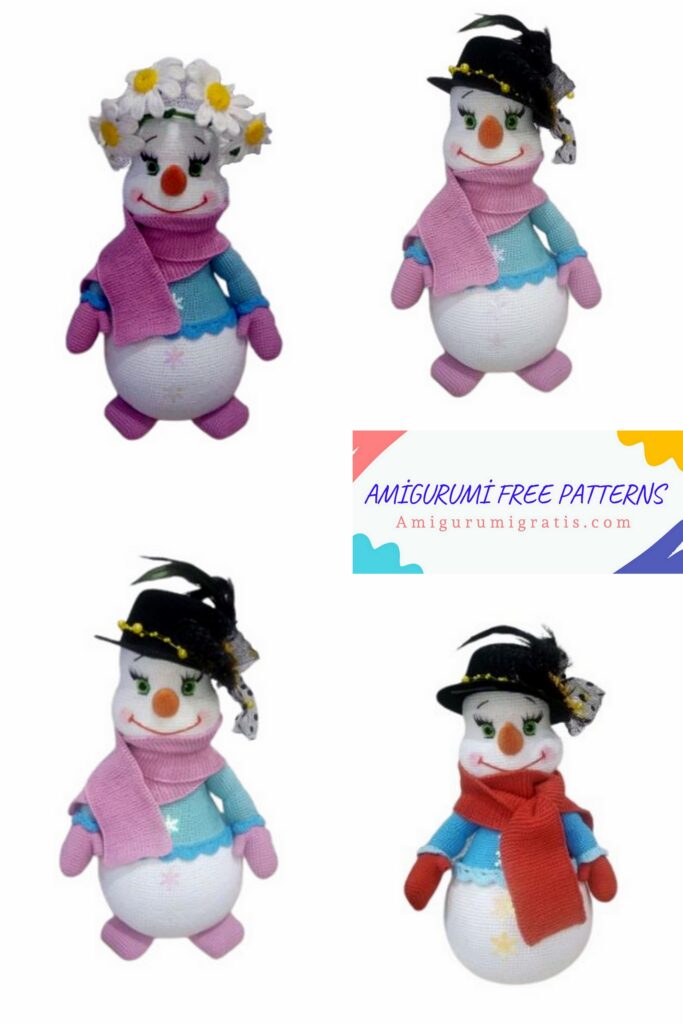
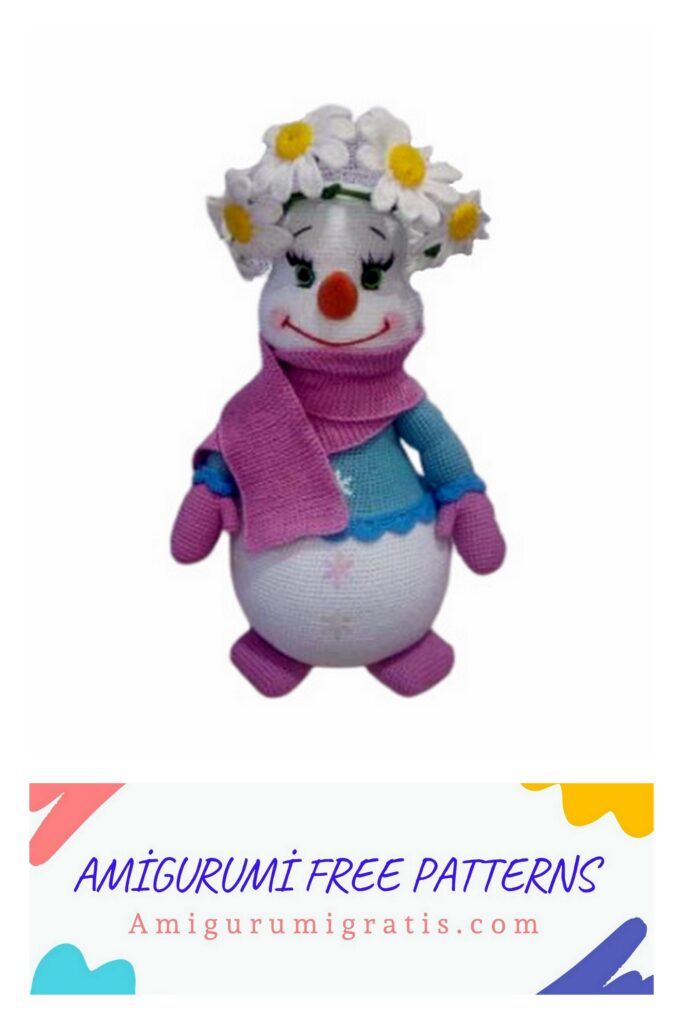
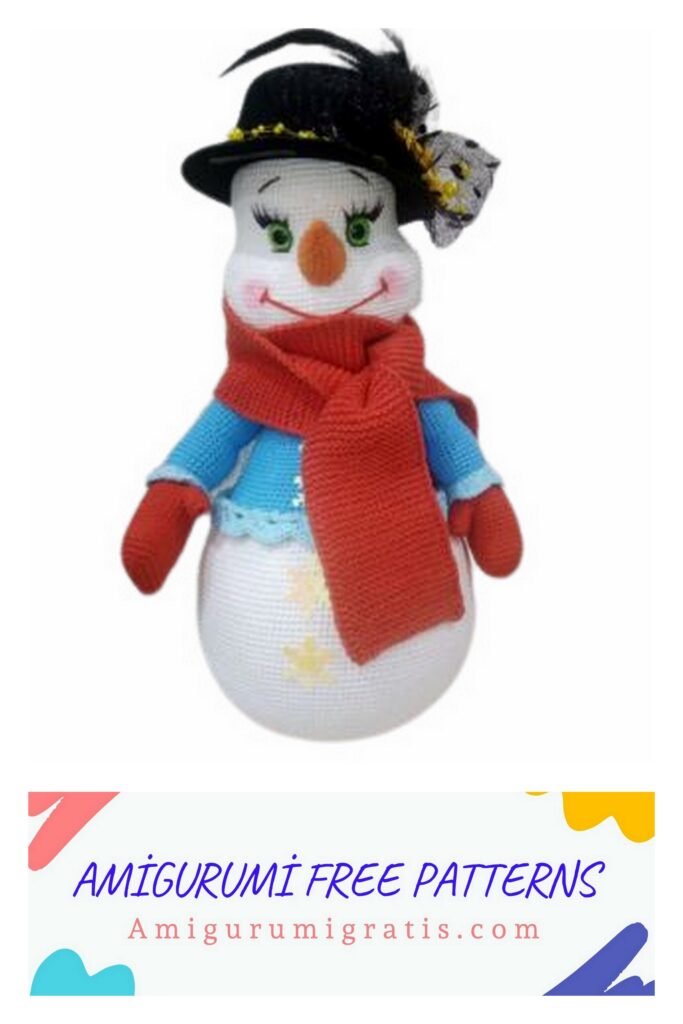
Madame Broshkina
When knitting from the indicated materials and the same density as mine, the height of the toy is 35 cm.
List of required materials
Note: This list of materials is for reference only.
advisory character. You can use yarn
different both in composition and in color.
YarnArt Jeans white (No. 62) – 2 – 2.5 skeins;
YarnArt Jeans blue – 1 skein;
YarnArt Jeans pink – 1 skein;
YarnArt Jeans orange – quite a bit for the nose;
Eyes with a diameter of 12 mm;
Eyelashes;
Dry pastel for toning cheeks;
Filler (I have holofiber);
Hook suitable for your yarn (I knit No. 1.5);
Needle for stitching details;
Scissors;
Marker;
Needles number 2.
Conventions
Sc – single crochet;
İnc – increase;
Dec – decrease;
(…) * – number of repetitions;
(8, 16, …) – the number in brackets at the end of the row indicates the total number of loops in this row;
Dc – double crochet;
Ch – air loop;
Purl – facial loop;
Cr. – edge loop;
Sl-st – connecting column.
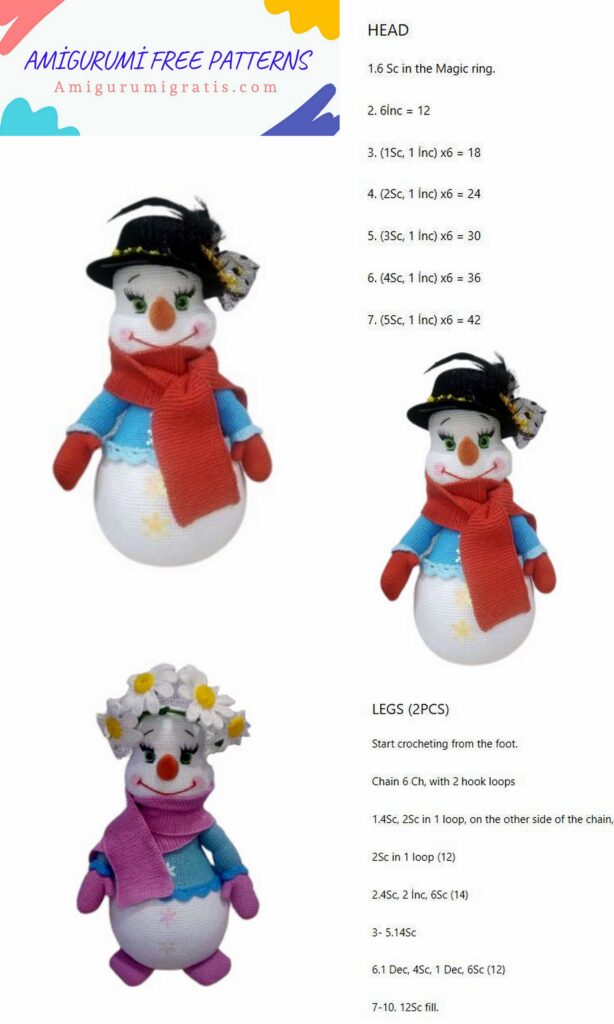
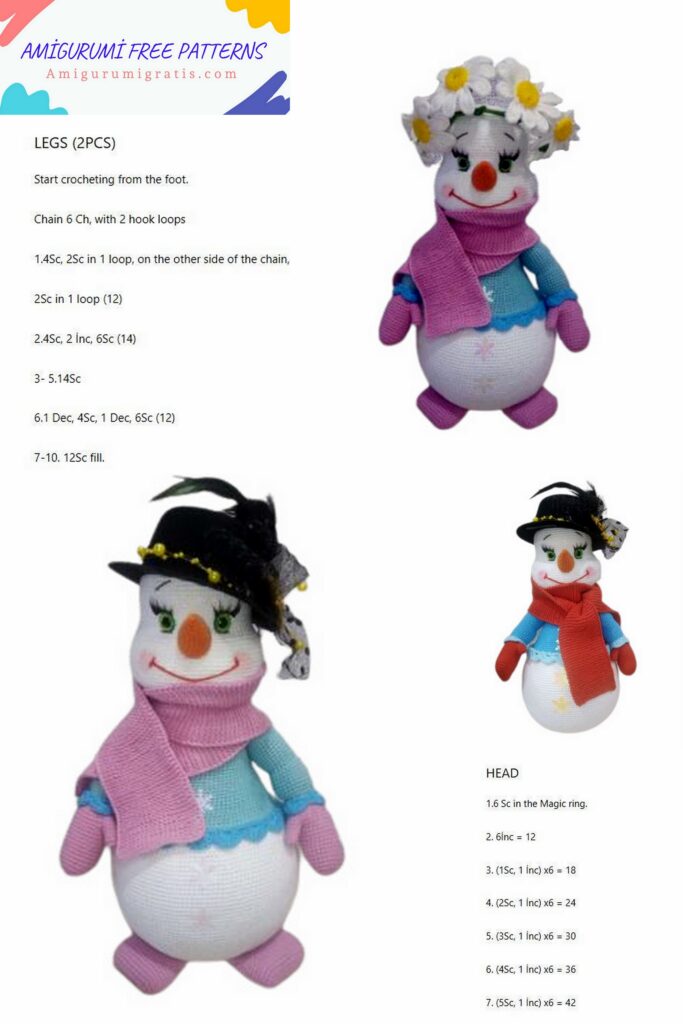
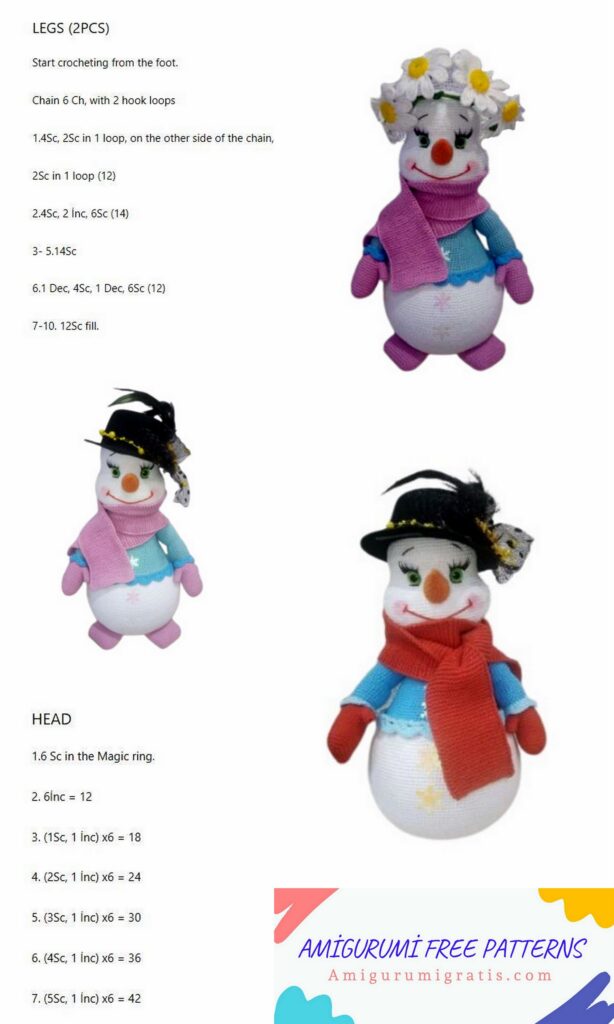
Head
Note: I knit with crosses and the description is made under the crosses. If you have a different knit, there may be a shift. There is nothing terrible in this. The most important rows for us: the 30th and 44th. In the 30th row between the eyes we knit 9 sl-st. See that you have them in the center and already count the increases from them. And in the 40th row, by the same analogy, there are decreases. The main thing is that the cheeks are at the same level relative to the eyes.
1. 8 sc into magic ring (8).
2. (inc) *8 (16).
3. (sc, inc) *8 (24).
4. (3 sc, inc) *6 (30).
5. 2 sc, inc, (4 sc, inc) *5, 2 sc (36).
6. (5 sc, inc) *6 (42).
7. 3 sc, inc, (6 sc, inc) *5, 3 sc (48).
8. (7 sc, inc) *6 (54).
9. 4 sc, inc, (8 sc, inc) *5, 4 sc (60).
10. (9 sc, inc) *6 (66).
11. 5 sc, inc, (10 sc, inc) *5, 5 sc (72).
12. (11 sc, inc) *6 (78).
13. 6 sc, inc, (12 sc, inc) *5, 6 sc (84).
14. (13 sc, inc) *6 (90).
15 – 19 (5 rows). 90 sc (90).
20. (13 sc, dec) *6 (84).
21.84 sc (84).
22. 6 sc, dec, (12 sc, dec) *5, 6 sc (78).
23 – 24 (2 rows). 78 sc (78).
25. 31 sc, 2 ch, 2 sts of the previous row, skip, 11 sc, 2 ch, 2 sts of the previous row, skip 32 sc (78).
26 – 27 (2 rows). 78 sc (78).
28. 6 sc, inc, (12 sc, inc) *5, 6 sc (84).
29. (13 sc, inc) *6 (90).
At this stage, you can insert the eyes.
30. 20 sc, (sc, inc) *10, 9 sl-st, (inc, sc) *10, 21 sc (110).
31 – 43 (13 rows). 110 sc (110).
44. 21 sc, (sc, dec) *10, 9 sc, (dec, sc) *10, 20 sc (90).
45. (13 sc, dec) *6 (84).
46. 6 sc, dec, (12 sc, dec) *5, 6 sc (78).
47. (11 sc, dec) *6 (72).
48. 5 sc, dec, (10 sc, dec) *5, 5 sc (66).
49. (9 sc, dec) *6 (60).
50. 4 sc, dec, (8 sc, dec) *5, 4 sc (54).
51. (7 sc, dec) *6 (48).
52. 3 sc, dec, (6 sc, dec) *5, 3 sc (42).
53. (5 sc, dec) *6 (36).
At the end of the 53rd row we make sl-st, cut the thread, leaving a long tail for sewing the head to the body.

spout
Note: leave the initial tail longer (for sewing).
1. 6 sc into magic ring (6).
2. (inc) *6 (12).
3. (sc, inc) *6 (18).
4. The whole row is knitted behind the back wall of the loop: 18 sc (18).
5 – 8 (4 rows). 18 sc (18).
9. (4 sc, dec) *3 (15).
10 – 11 (2 rows). 15 sc (15).
12. (3 sc, dec) *3 (12).
13.12 sc (12).
14. (2 sc, dec) *3 (9).
15.9 sc (9).
16. (sc, dec) *3 (6).
17. (dec) *3 (3).
We tighten the remaining loops with a needle, hide the tail.
Eye tightening
There is nothing complicated here. In the photo, pins show the points where I insert and withdraw the needle. Initially, I insert the needle into the opening of the neck and take it out from the outside of the left eye. Then I enter from the inside of the same eye and bring it out to the outside of the right eye. I enter from the inside of the same eye and bring it out into the opening of the neck. I pull, I tie a knot. I do the tightening with a nylon thread. Then with a brown thread I embroider 2 stitches under the eyes (for greater expressiveness).
Glue eyelashes, embroider eyebrows.
Next we need to sew on the nose. We have half loops left in the 4th row.
It is in this 4th row that I sew the nose to the head. I try on the nose symmetrically to the eye, prick it with pins and make stitches. Then I tint the cheeks (I tinted small circles, you can do more as you like) and embroider the mouth. As for the smile, I also want to say:
you can embroider a small mouth, you can embroider a big one, you can embroider not in the center, but on the side. It all depends on your imagination. You can make a tightening of the mouth, I did not.
Left handle
I want to make a small clarification: I knitted two snowmen at once.
Therefore, do not be confused by the fact that in some photos, for example, the mitten is first red, then the same photo, but it is already in pink.
Attention: I will stuff the handles when I completely tie them.

Begin knit in red (color of mittens).
We collect 10 o’clock. Starting from the second loop from the hook, we knit:
1. inc, 7 sc, 3 sc in 1 st, 6 sc, inc (20).
2. (inc) *2, 7 sc, (inc) *3, 7 sc, inc (26).
3. (sc, inc) *2, 7 sc, (sc, inc) *3, 7 sc, sc, inc (32).
4 -14 (11 rows). 32 sc (32).
15. In this row we knit a finger: 6 sc, 8 ch, in the second loop from the hook (along the chain) we knit 9 sc. Now take a break from the mitten and focus on these 9 sc. We need to tie a finger out of them. To do this, we knit 5 rows of 9 sc in a circle. A chain of 8 ch will be knitted inside. We tied a finger, we continue along the mitten: 26 sc (41).
16. 5 sc, decrease (grab one half loop of the handle, one half loop of the finger), 7 sc on the finger, 3rd dec (for this decrease, we grab not 2 half loops, as usual, but 3 (see photo)), 10 sc , dec, 12 sc (37).
17. 4 sc, 3rd decrease, 5 sc, 3rd decrease, 9 sc, dec, 11 sc (32).
18. 2 sc, dec, 15 sc, dec, 11 sc (30).
19. (3 sc, dec) *6 (24).
20 – 21 (2 rows). 24 sc (24).
22. Change the thread to blue, pink can be cut off, it is no longer needed: 24 sc (24).
23. We knit the entire row behind the back wall of the loop: 24 sc (24).
24. (3 sc, inc) *6 (30).
25 – 31 (7 rows). 30 sc (30).
32. (3 sc, dec) *6 (24).
33. We knit the entire row for the front half loops: 24 sc (24).
34. (3 sc, inc) *6 (30).
35 – 46 (12 rows). 30 sc (30).
We do sl-st, we cut the thread.
Right handle
From the 1st to the 14th row, inclusive, we knit in the same way as the left handle.
15. 15 sc, 8 ch, in the second loop from the hook we knit 9 sc. Next, we knit a finger (5 rows of 9 sc) and continue along the arm: 17 sc (41).
16. 1 sc, dec, 10 sc, 3rd dec (2 sts by hand, 1 st from finger), 7 sc on finger, dec, 16 sc (37).
17. 2 sc, dec, 7 sc, 3rd dec, 5 sc, 3rd dec, 15 sc (32).
18. 1 sc, dec, 15 sc, dec, 12 sc (30).
From the 19th to the 46th row, inclusive, we knit in the same way as the left hand.
Now we return to the 23rd row (we knitted this row for the back wall of the loop. The front walls remained free, we will tie them).
We turn the handle with a mitten away from us. We attach a thread of a contrasting color and start tying:
1.24 sc (24).
2. sc, 3 ch, skip 2 loops of the previous row, knit sc in the third.
Again we dial 3 ch, skip 2 loops of the previous row, in the third we knit sc. And so on to the end of the row. We get arches (I have 8 of them).
3. In the first arch we knit 8 dc, in the second – 1 sc. In the third arch again 8 dc, in the fourth – 1 sc. And so on to the end of the row.
Now, when the handles are ready, I insert the wire into them and stuff them.
Body
We start knitting in white.
1. 8 sc into magic ring (8).
2. (inc) *8 (16).
3. (sc, inc) *8 (24).
4. (3 sc, inc) *6 (30).
5. 2 sc, inc, (4 sc, inc) *5, 2 sc (36).
6. (5 sc, inc) *6 (42).
7. 3 sc, inc, (6 sc, inc) *5, 3 sc (48).
8. (7 sc, inc) *6 (54).
9. 4 sc, inc, (8 sc, inc) *5, 4 sc (60).
10. (9 sc, inc) *6 (66).
11. 5 sc, inc, (10 sc, inc) *5, 5 sc (72).
12. (11 sc, inc) *6 (78).
13. 6 sc, inc, (12 sc, inc) *5, 6 sc (84).
14. (13 sc, inc) *6 (90).
15. 7 sc, inc, (14 sc, inc) *5, 7 sc (96).
16. (15 sc, inc) *6 (102).
17. 8 sc, inc, (16 sc, inc) *5, 8 sc (108).
18. (17 sc, inc) *6 (114).
19. 9 sc, inc, (18 sc, inc) *5, 9 sc (120).
20. (19 sc, inc) *6 (126).
21. 10 sc, inc, (20 sc, inc) *5, 10 sc (132).
22. (21 sc, inc) *6 (138).
23. 11 sc, inc, (22 sc, inc) *5, 11 sc (144).
24. (23 sc, inc) *6 (150).
25 – 49 (25 rows). 150 sc (150).
50. (23 sc, dec) *6 (144).
51. 11 sc, dec, (22 sc, dec) *5, 11 sc (138).
52. (21 sc, dec) *6 (132).
53. 10 sc, dec, (20 sc, dec) *5, 10 sc (126).
54. (19 sc, dec) *6 (120).
55. 9 sc, dec, (18 sc, dec) *5, 9 sc (114).
Change the thread to blue (the color of the sleeves).
56. (17 sc, dec) *6 (108).
57. The whole row is knitted for the back half loop: 8 sc, dec, (16 sc, dec) * 5, 8 sc (102).
58. (15 sc, dec) *6 (96).
59 – 60 (2 rows). 96 sc (96).
61. 7 sc, dec, (14 sc, dec) *5, 7 sc (90).
62 – 63 (2 rows). 90 sc (90).
64. (13 sc, dec) *6 (84).
65 – 66 (2 rows). 84 sc (84).
67. 6 sc, dec, (12 sc, dec) *5, 6 sc (78).
68 – 69 (2 rows). 78 sc (78).
70. (11 sc, dec) *6 72 (72).
71 – 80 (10 rows). 72 sc (72).
At this point, I will return to row 57 (where we left the front half loops) and tie this row with a contrast thread in the same way as we tied the sleeves.
Tip: when tying a row along the body, this beauty can wrap itself. To prevent this from happening, you need to add 1 more row.
This is how we tied the sleeves:
1.24 sc (24).
2. sc, 3 ch, skip 2 loops of the previous row, knit sc in the third.
Again we dial 3 ch, skip 2 loops of the previous row, in the third we knit sc. And so on to the end of the row. We get arches (I have 8 of them).
3. In the first arch we knit 8 dc, in the second – 1 sc. In the third arch again 8 dc, in the fourth – 1 sc. And so on to the end of the row.
We will knit a row along the body in the same way, but between the 2nd and 3rd rows we will insert 1 more row. In the 2nd row I got 36 arches.
3 row: In the first arch we knit sc, then 3 ch, in the next arch again sc and again 3 ch and so on until the end of the row.
4 row: repeat the 3rd row of tying the sleeves.
We begin to fill the detail.
81. In this row we will knit handles: 15 sc, 10 sc on the left arm and body, 26 sc, 10 sc on the right arm and body, 11 sc (92).
82. 14 sc, dec (one half loop from the body, the other from the arm), 18 sc in the arm, dec (one half loop from the body, the second from the body), 24 sc, dec (one half loop from the body, the second from the arm), 18 sc on the arm, dec (one half loop from the arm, the second from the body), 10 sc (88).
83. 13 sc, dec/1 (I’ll explain what dec/1 means below), 16 sc, dec/1, 22 sc, dec/1, 16 sc, dec/1, 9 sc (80).
How we do the decrease: we have 3 sc in front of us (not 2, as in the usual decrease). We grab the front half loop of the first column, skip the second loop (we skip it completely, we don’t need it) and grab the front half loop of the third column, we knit the usual decrease. Thus, we will immediately decrease 2 loops. And so in each row where dec / 1 is indicated. Be sure to make sure that each next dec/1 is above the previous one. We should form a straight line. In the photo, the hook is inserted into the loop that we will skip.
84. 12 sc, dec/1, 14 sc, dec/1, 20 sc, dec/1, 14 sc, dec/1, 8 sc (72).
85. 11 sc, dec/1, 12 sc, dec/1, 18 sc, dec/1, 12 sc, dec/1, 7 sc (64).
86. 10 sc, dec/1, 10 sc, dec/1, 16 sc, dec/1, 10 sc, dec/1, 6 sc (56).
87. 9 sc, dec/1, 8 sc, dec/1, 14 sc, dec/1, 8 sc, dec/1, 5 sc (48).
Add filler to the handles and body.
Change the thread to white.
88. We knit the whole row for the back half loops: 48 sc (48).
89. (6 sc, dec) *6 (42).
90. (5 sc, dec) *6 (36).
91 – 96 (6 rows). 36 sc (36).
At the end we make sl-st, cut the thread, leaving a long tail for sewing.
We return to the 88th row (where we have half loops left) and we tie it in the same way as mittens. Here, so that the harness does not wrap up, I will sew the arches to the body with a few stitches of the same contrasting thread.
The body is ready! Now you can sew on the head.
Legs (the same color as the mittens).
Note: we fill the legs very loosely!
We collect 15 ch and knit from the second loop from the hook:
1. inc, 12 sc, 3 sc in 1 st, 11 sc, inc (30).
2. (inc) * 2, 12 sc, (inc) * 3, 12 sc, inc (36).
3. (sc, inc) *2, 12 sc, (sc, inc) *3, 12 sc, sc, inc (42).
4 – 10 (7 rows). 42 sc (42).
11. dec, sc, dec, 17 sc, dec, sc, dec, 15 sc (38).
12.38 sc (38).
13 sc, dec, 17 sc, dec, 16 sc (36).
14.36 sc (36).
Align the part, fold in half (I knitted 3 offset loops) and knit 18 sc together for both sides. We cut the thread, leaving a tail for sewing.
We knit another such detail.
Now I sew the legs to the body. I put the snowman (he himself is not standing yet) and put the legs under the body so as to make it stable.
I fix with pins and sew.
Scarf
On knitting needles No. 2 we collect 20 loops and knit:
1st and all subsequent rows: cr, 18 purl, cr (20).
My scarf is about 75 cm long. You can knit longer or shorter.
You can decorate our snowman with such snowflakes. I glue each snowflake on the mittens and on the torso, creating the illusion of buttons.