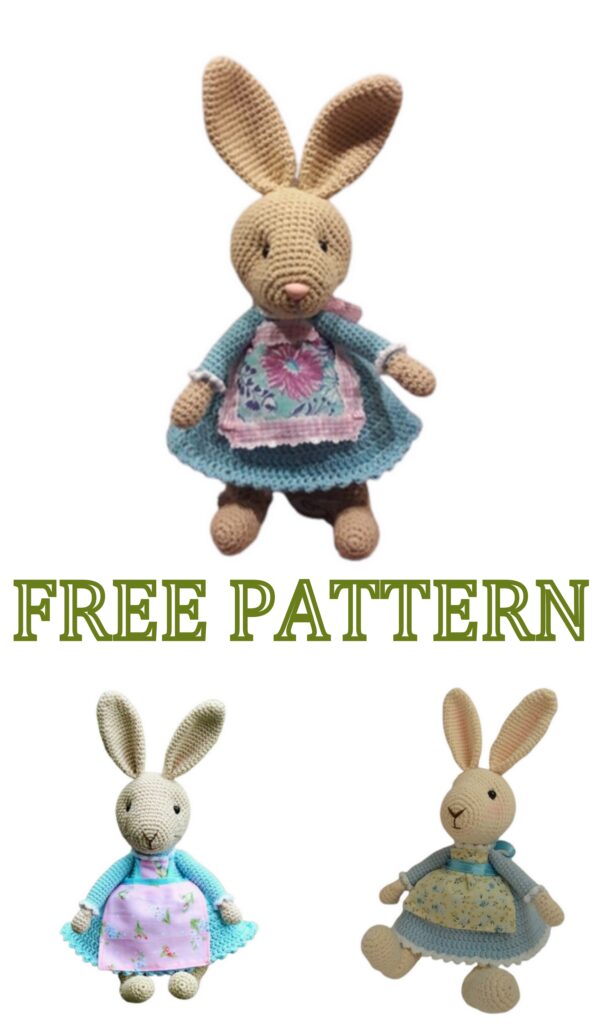
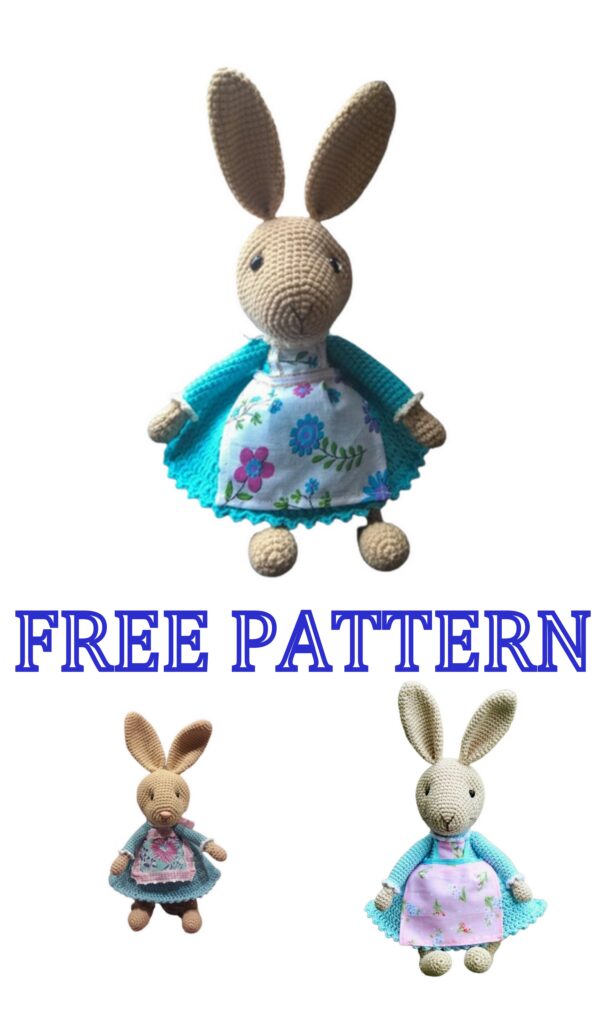
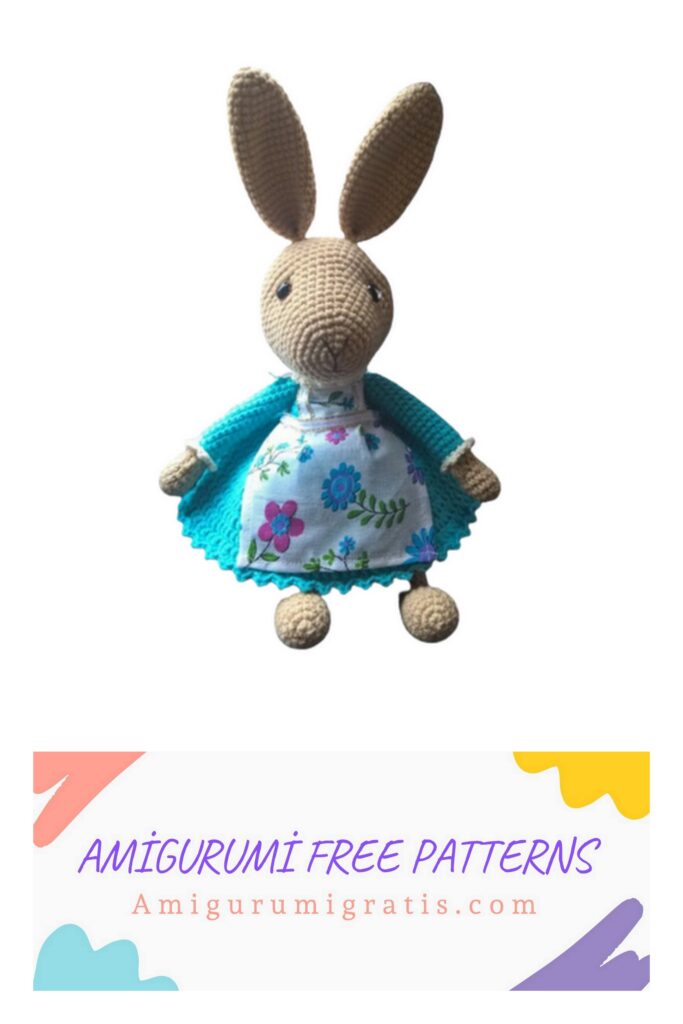
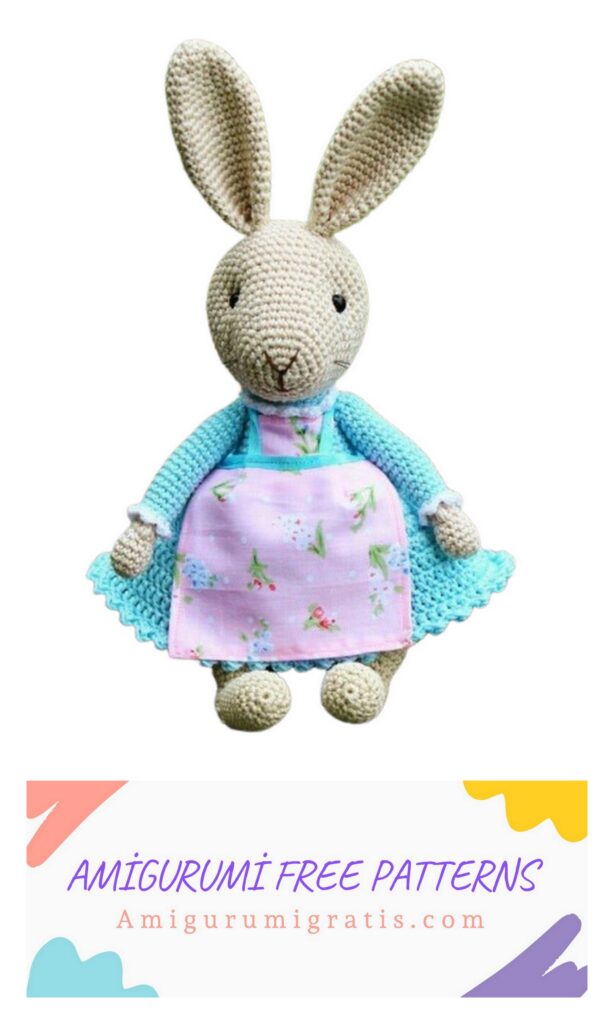
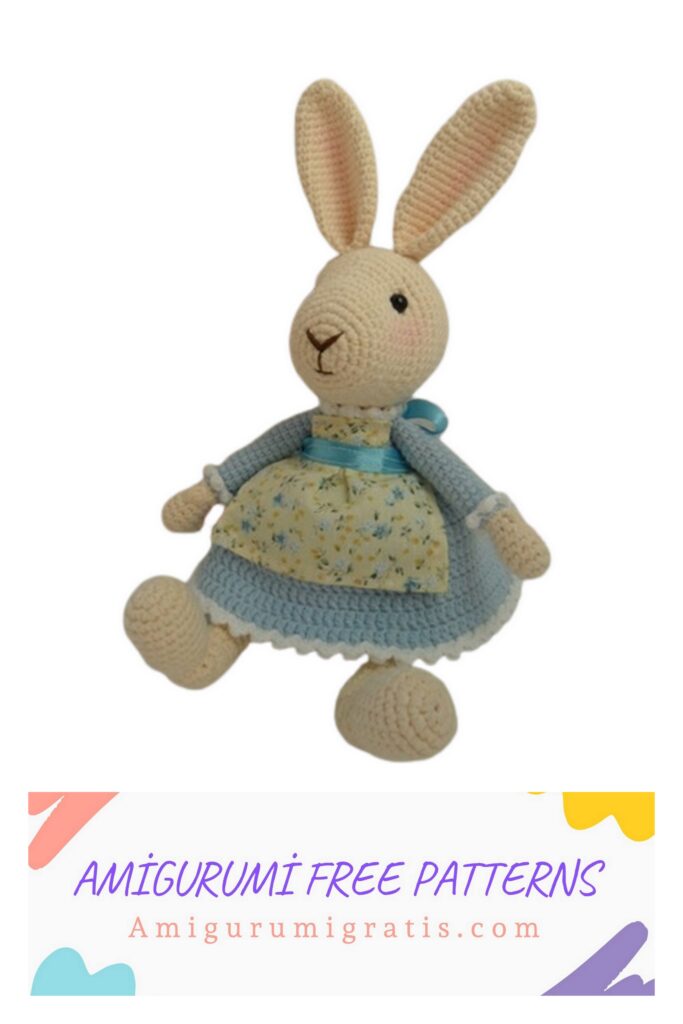
Bunny Mom We continue to share the most beautiful and free amigurumi patterns for you. You can visit our website for Amigurumi Bunny Mom Free Pattern and more patterns. Amigurumi Bunny Mom Free
Abbreviations
SC – single crochet
İNC – increase
DEC – decrease
DC – double crochet
CH – air loop
SL-ST – connecting post
Necessary materials:
1. Yarn of the main color (I have a light beige Egitto Titan Wool 120 m / 50 g) 2 skeins.
2. Yarn of additional color (I have blue Egitto Titan Wool 120 m / 50 g) 1 skein.
3. A little white cotton fine yarn for ruffles (I have white Yarn Art Begonia 169 m / 50 g)
4. Hooks №2, 1.5
5. Filler – holofiber.
6. Screw eyes 8 mm.
7. Black fishing line (bought at a fishing store).
9. A small piece of cotton fabric for the apron, a satin thin ribbon.
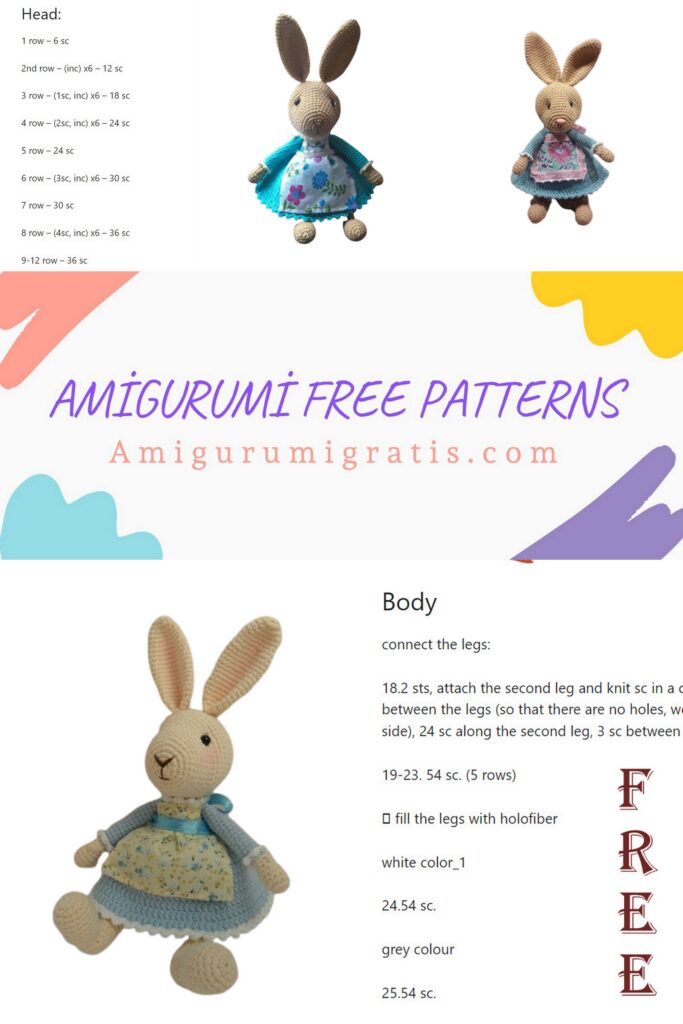
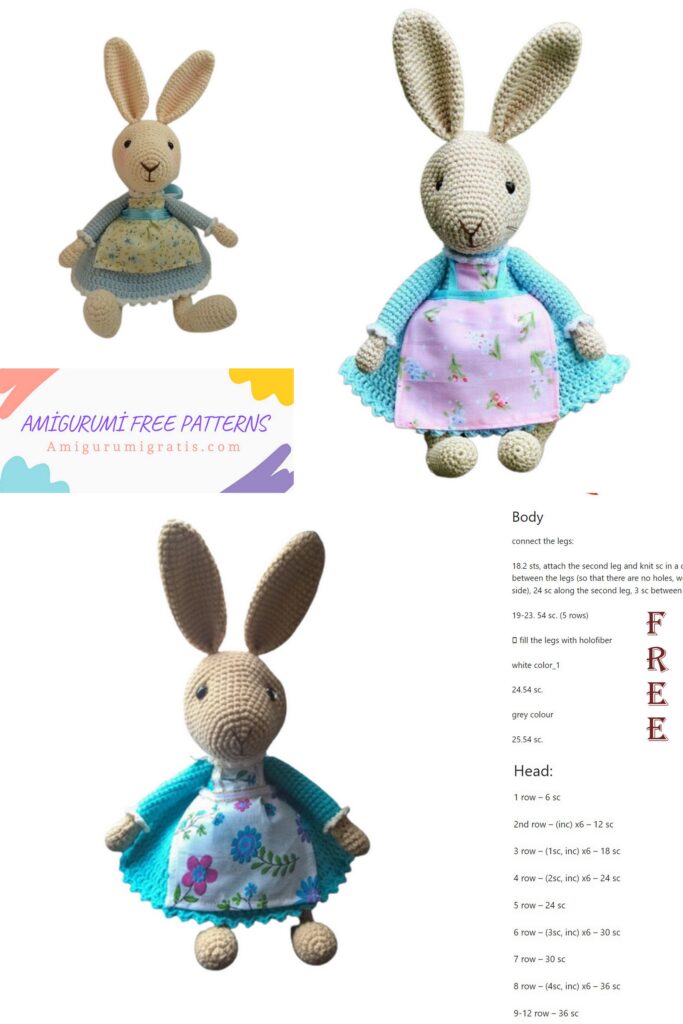
Head:
We knit with a thread of the main color.
1 row: 6 SC in an amigurumi ring
2 row: 6 İNC (12)
3 row: (1 SC, İNC) x repeat 6 times (18)
4 row: (2 SC, İNC) x repeat 6 times (24)
5 row: (3 SC, İNC) x repeat 6 times (30)
6-7 row: we knit without changes 30 SC
8 row: (4 SC, İNC) x repeat 6 times (36)
9-10 row: 36 SC
11 row: (5 SC, İNC) x repeat 6 times (42)
12 row: 42 SC
13 row: (6 SC, İNC) x repeat 6 times (48)
14 row: (7 SC, İNC) x repeat 6 times (54)
15-21 rows (7 rows): knit without changes 54 SC
22 row: (7 SC, DEC) x repeat 6 times (48)
23 row: (6 SC, DEC) x repeat 6 times (42)
24 row: (5 SC, DEC) x repeat 6 times (36)
25 row: (4 SC, DEC) x repeat 6 times (30)
We start to fill.
26 row: (3 SC, DEC) x repeat 6 times (24)
27 row: (2 SC, DEC) x repeat 6 times (18)
28 row: (1 SC, DEC) x repeat 6 times (12)
We fill to the end.
29 row: 6 DEC
Tighten the hinges, close the hole!
I have screw eyes, those that are fastened from the inside, so I fastened them when my head was still not full. I fastened approximately between 12-13 rows (the distance between the eyes is 12 columns).
After I knitted and filled the head, I made small tightenings in the eye area. Since I attached the eyes earlier, I made the tightening, as it were, a little over the peephole. Who will sew on the eyes, first we make a tightening, then we sew on the eyes.

Ears (2pcs):
We knit with a thread of the main color. We do not fill.
1 row: 6 SC in an amigurumi ring
2 row: 6 İNC (12)
3 row: we knit without changes 12 SC
4 row: (1 SC, İNC) x 6 times (18)
5-7 row: we knit without changes 18 SC
8 row: (2 SC, İNC) x 6 times (24)
9-21 rows (13 rows): knit without changes 24 SC
22 row: (2 SC, DEC) x 6 times (18)
23 row: we knit without changes 18 SC
Fold the edges of the eyelet together, knit SC.
Leave the thread for stitching.
Body + Dress:
We start knitting with a thread of the main color.
1 row: 6 SC in an amigurumi ring
2 row: 6 İNC (12)
3 row: (1 SC, İNC) x 6 times (18)
4 row: (2 SC, İNC) x 6 times (24)
5 row: (3 SC, İNC) x 6 times (30)
6 row: (4 SC, İNC) x 6 times (36)
7 row: (5 SC, İNC) x 6 times (42)
8 row: (6 SC, İNC) x 6 times (48)
9-16 row (8 rows): knit without changes 48 SC
17 row: (6 SC, DEC) x 6 times (42)
18-20 row: knit without changes 42 SC
Change the color of the thread to an additional one.
21 row: (5 SC, DEC) x 6 times (36)
22 row: knit behind the back wall 36 SC
23 row: we knit without changes 36 SC
24 row: (4 SC, DEC) x 6 times (30)
25-26 row: we knit without changes 30 SC
27 row: (3 SC, DEC) x 6 times (24)
28-29 row: we knit without changes 24 SC
30 row: knit behind the back wall 24 SC
We cut off the thread. Leave the end for stitching.
In the 30th row, in which we knitted behind the back wall, we knit the collar behind the front wall. I knitted with a thin white cotton thread against
clockwise:
Row 1: Inch CH, SC in each st to end of row, SL-ST at end
2nd row: CH rise, (SC, DC, SC) in one loop, SL-ST in the next loop, again (SC, DC, SC) and SL-ST in the next loop …. and so we alternate until the end of the row ( we should get arches). at the end of SL-ST, hide the thread.
In the 22nd row, where we knitted behind the back wall, behind the front wall, counterclockwise, we will begin to knit a skirt, with a thread of the same color as
upper body:
1 row: 3 CH insteps, İNC from DC in each st of the row. As a result, we must
you get 72 DC, SL-ST at the end of the row.
2-4 row: 3 CH instep, work unchanged 72 DC, SL-ST at the end of each row
5 row: 3 CH lifting, (11 DC, İNC) x repeat 6 times (78), SL-ST at the end.
6 row: 3 CH insteps, work unchanged 78 DC, SL-ST at the end.
7 row: 3 CH lifting, (12 DC, İNC) x repeat 6 times (84), SL-ST at the end.
8 row: 3 CH insteps, work unchanged 84 DC, SL-ST at the end.
9 row: 3 CH lifting, (13 DC, İNC) x repeat 6 times (90), SL-ST at the end.
10 row: 3 CH insteps, work unchanged 90 DC, SL-ST at the end.
11th row: CH rise, (SC, DC, SC) in one loop, SL-ST in the next loop,
again (SC, DC, SC) and SL-ST in the next loop …. and so we alternate to the end row (we should get arches). at the end of SL-ST, hide the thread.
Front paws (2pcs):
We start knitting with a thread of the main color.
1 row: 6 SC in an amigurumi ring
2 row: 6 İNC (12)
3-5 row: we knit without changes 12 SC
6 row: (2 SC, DEC) x 3 times (9)
7th row: 4 SC (1 SC in each st of the previous row), bobble of 3 DC knitted together in the next st (this is a finger), more
4 sc.
8 row: we knit without changes 9 SC
We fill.
Change the color of the thread to an additional one.
9 row: (2 SC, İNC) x 3 times (12)
10 row: knit for the back floor loop 12 SC
We fill by knitting every 4-5 rows.
11-25 row: we knit without changes 12 SC
We fill to the end.
26 row: 6 DEC
Pull the hinges, close the hole.
Leave the thread for stitching.
10 row, where we knitted for the back tie a half-loop with a ruffle. Cm.
collar in the “Body” section.
Hind legs (2pcs):
We knit with a thread of the main color.
ATTENTION! We fill the top of the foot quite a bit, you can say half, so that when compressed, we have a bulge formed only on one side, on the outside, on the inside there should be a small depression.
1 row: 6 SC in an amigurumi ring
2 row: 6 İNC (12)
3 row: (1 SC, İNC) x 6 times (18)
4-10 row (7 rows): 18 SC
11 row: (1 SC, DEC) x 6 times (12)
12 row: we knit without changes 12 SC
We fill
We start knitting the heel, (knits like
heel to toe, straight canvas, turning rows)
work 4 SC, SL-ST in next st, inch CH, turn work
work in the opposite direction 5 SC, SL-ST in the next loop, turn
knitting
6 SC, SL-ST in next st, turn work
7 SC, SL-ST in next st, turn work
8 SC, SL-ST in next st, turn work
9 SC, SL-ST in the next stitch, turn the knitting and at this point
put a marker and continue to knit in a circle (the direction of knitting on this
moment should be the same as at the beginning of knitting the foot and the number of loops
should remain as it was at the beginning of knitting heels 12 SC)
13-15 row: we knit without changes 12 SC
16 row: (3 SC, İNC) x repeat 3 times (15)
17-19 row: we knit without changes 15 SC
20 row: (4 SC, İNC) x repeat 3 times (18)
21-23 row: knit without changes 18 SC
We fill.
24 row: (2 SC, İNC) x repeat 6 times (24)
25 row: (3 SC, İNC) x repeat 6 times (30)
26-31 rows (6 rows): knit without changes 30 SC
32 row: (3 SC, DEC) x repeat 6 times (24)
33 row: (2 SC, DEC) x repeat 6 times (18)
We fill.
34 row: (1 SC, DEC) x repeat 6 times (12)
35 row: 6 DEC
Assembly and decoration of the toy:
– Sew all the details as shown in the photo.
– Before sewing, fold the ears together and sew them with 1-2 stitches.
– Embroider the nose.
– I fastened the mustache in such a way as when we hide the thread inside the part, inserting and withdrawing the needle with the line several times until we feel that the line
stays on tight and doesn’t stretch. After carefully cut off the excess ends.
Don’t forget about symmetry.
Apron:
For the top, I used a piece of fabric 5×5 cm
For bottom 10×12 cm
We process the top on a sewing machine and sew satin ribbons on the sides, which will be tied around the neck.
We process the bottom on a sewing machine and make two grooves in the middle.
With the help of a satin ribbon, we sew the top and bottom together, thereby leaving two more ends of the tape for ties at the waist. Amigurumi Bunny Mom Free