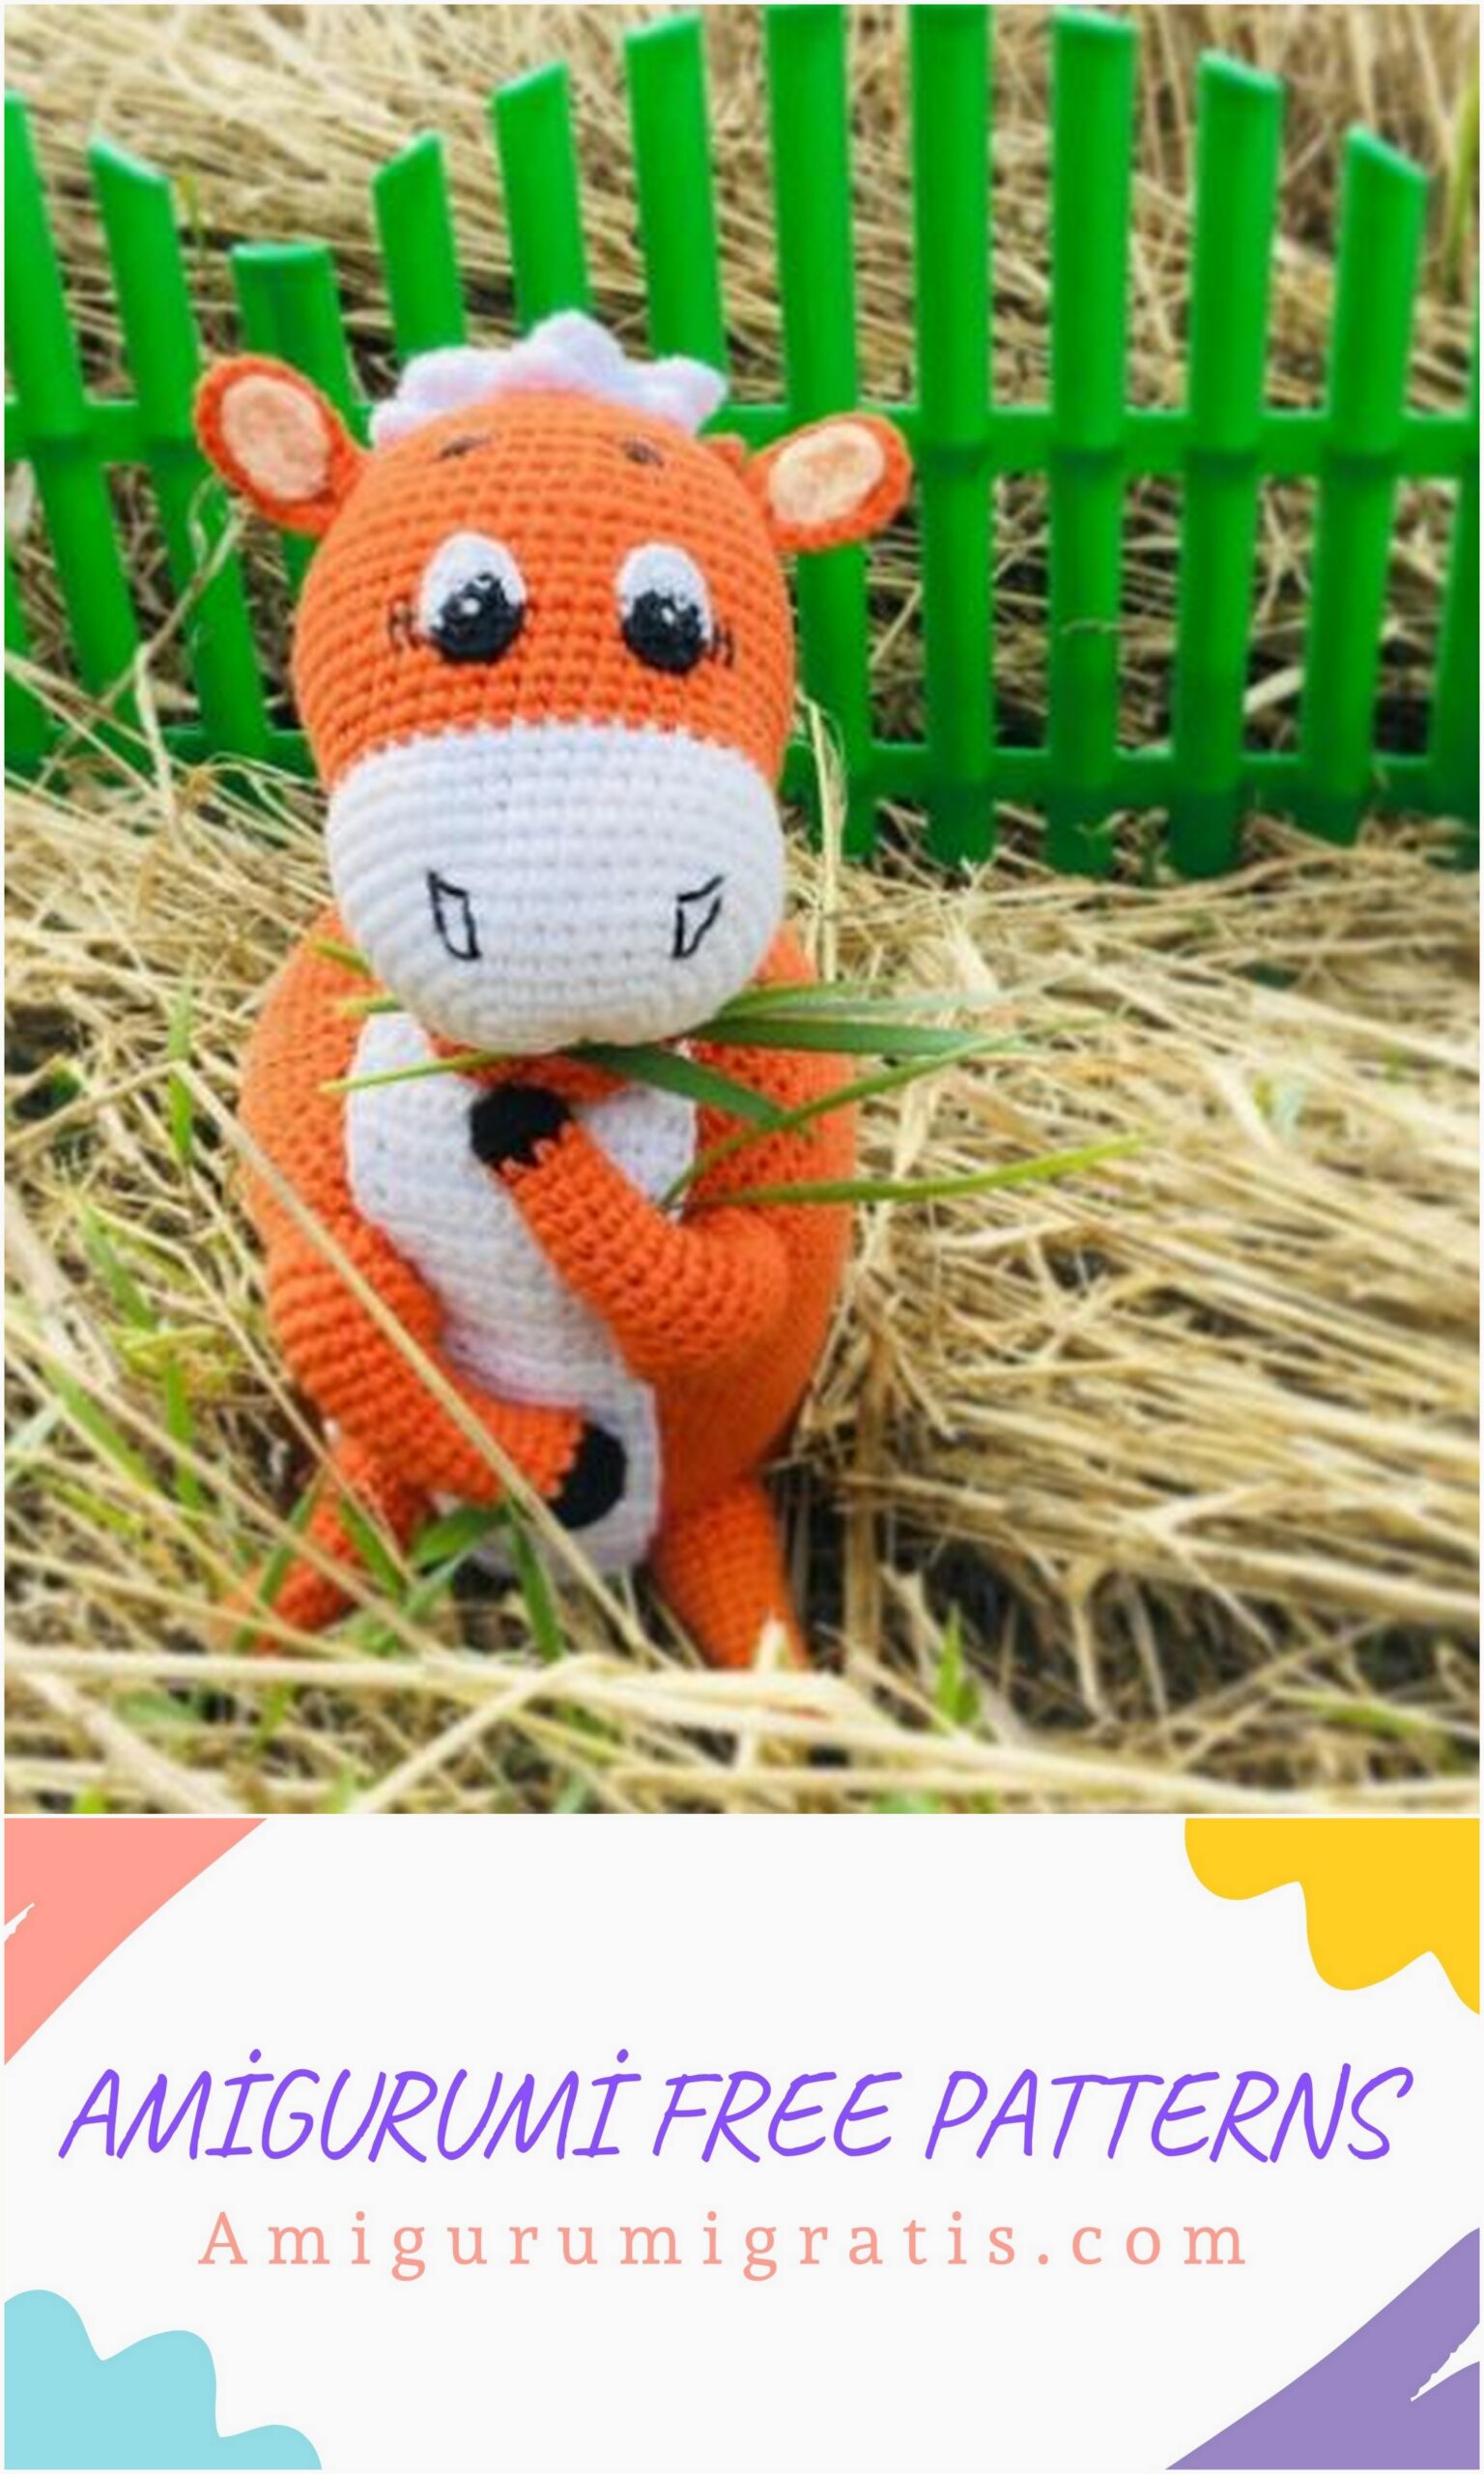
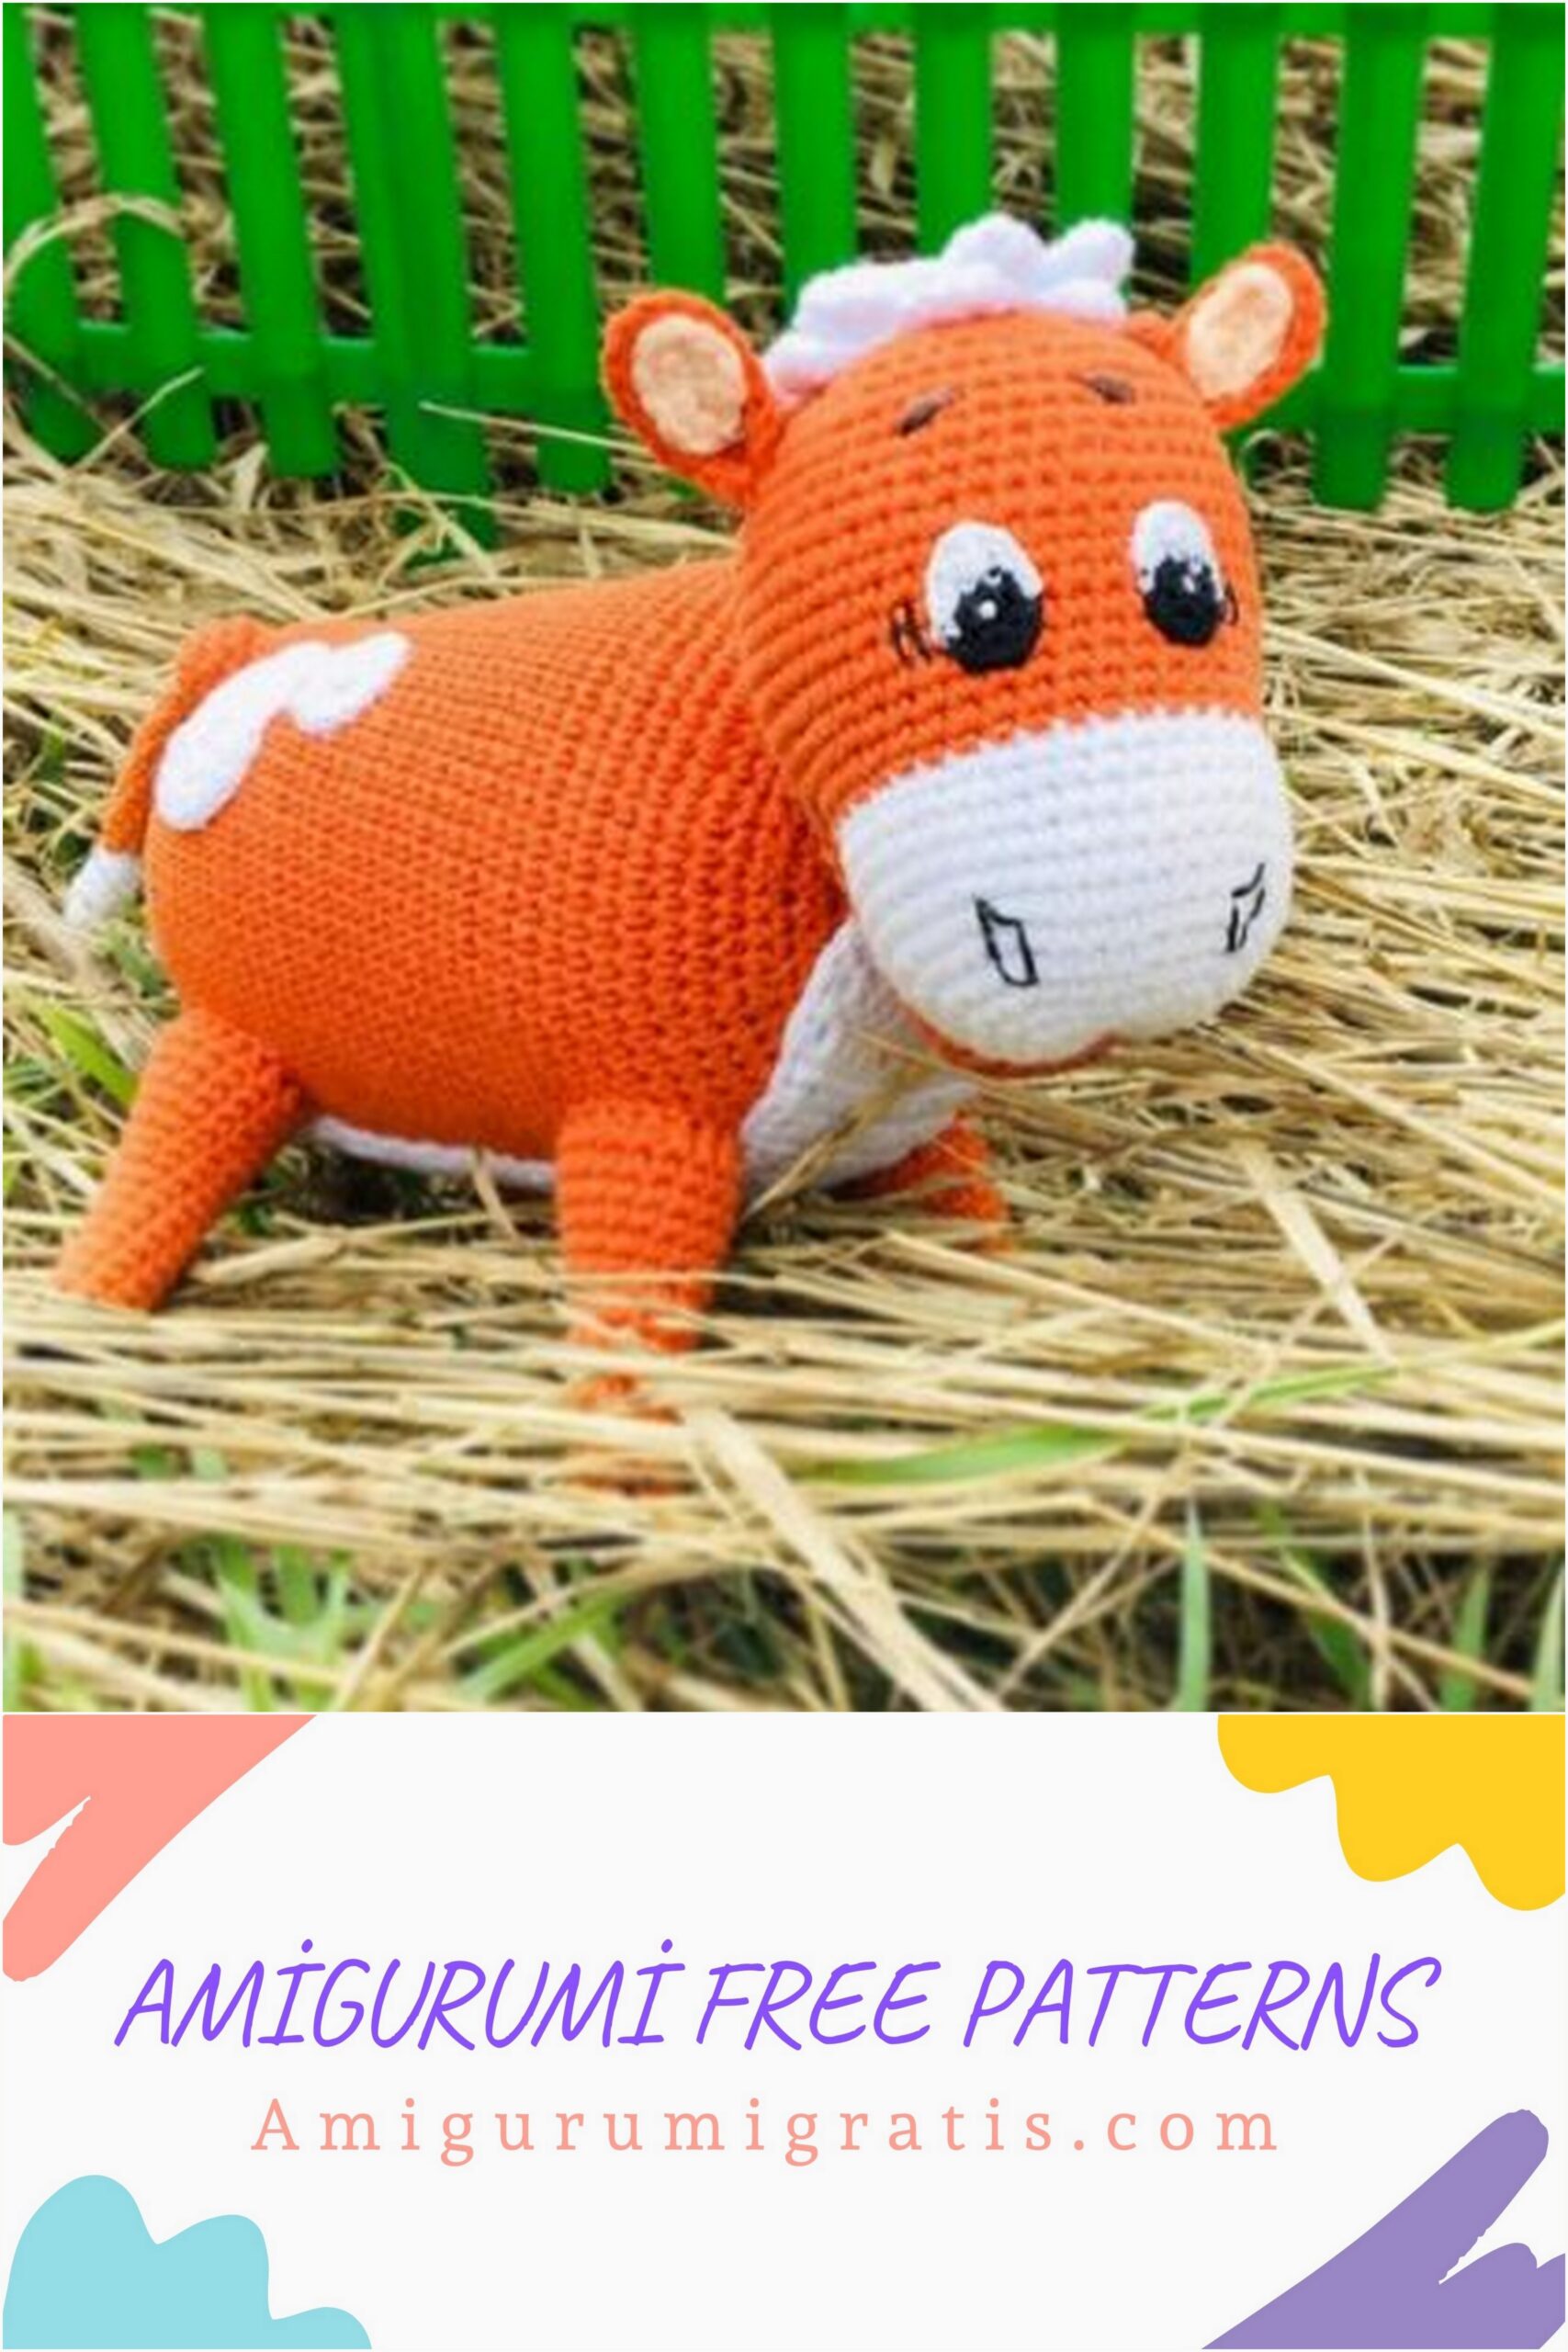
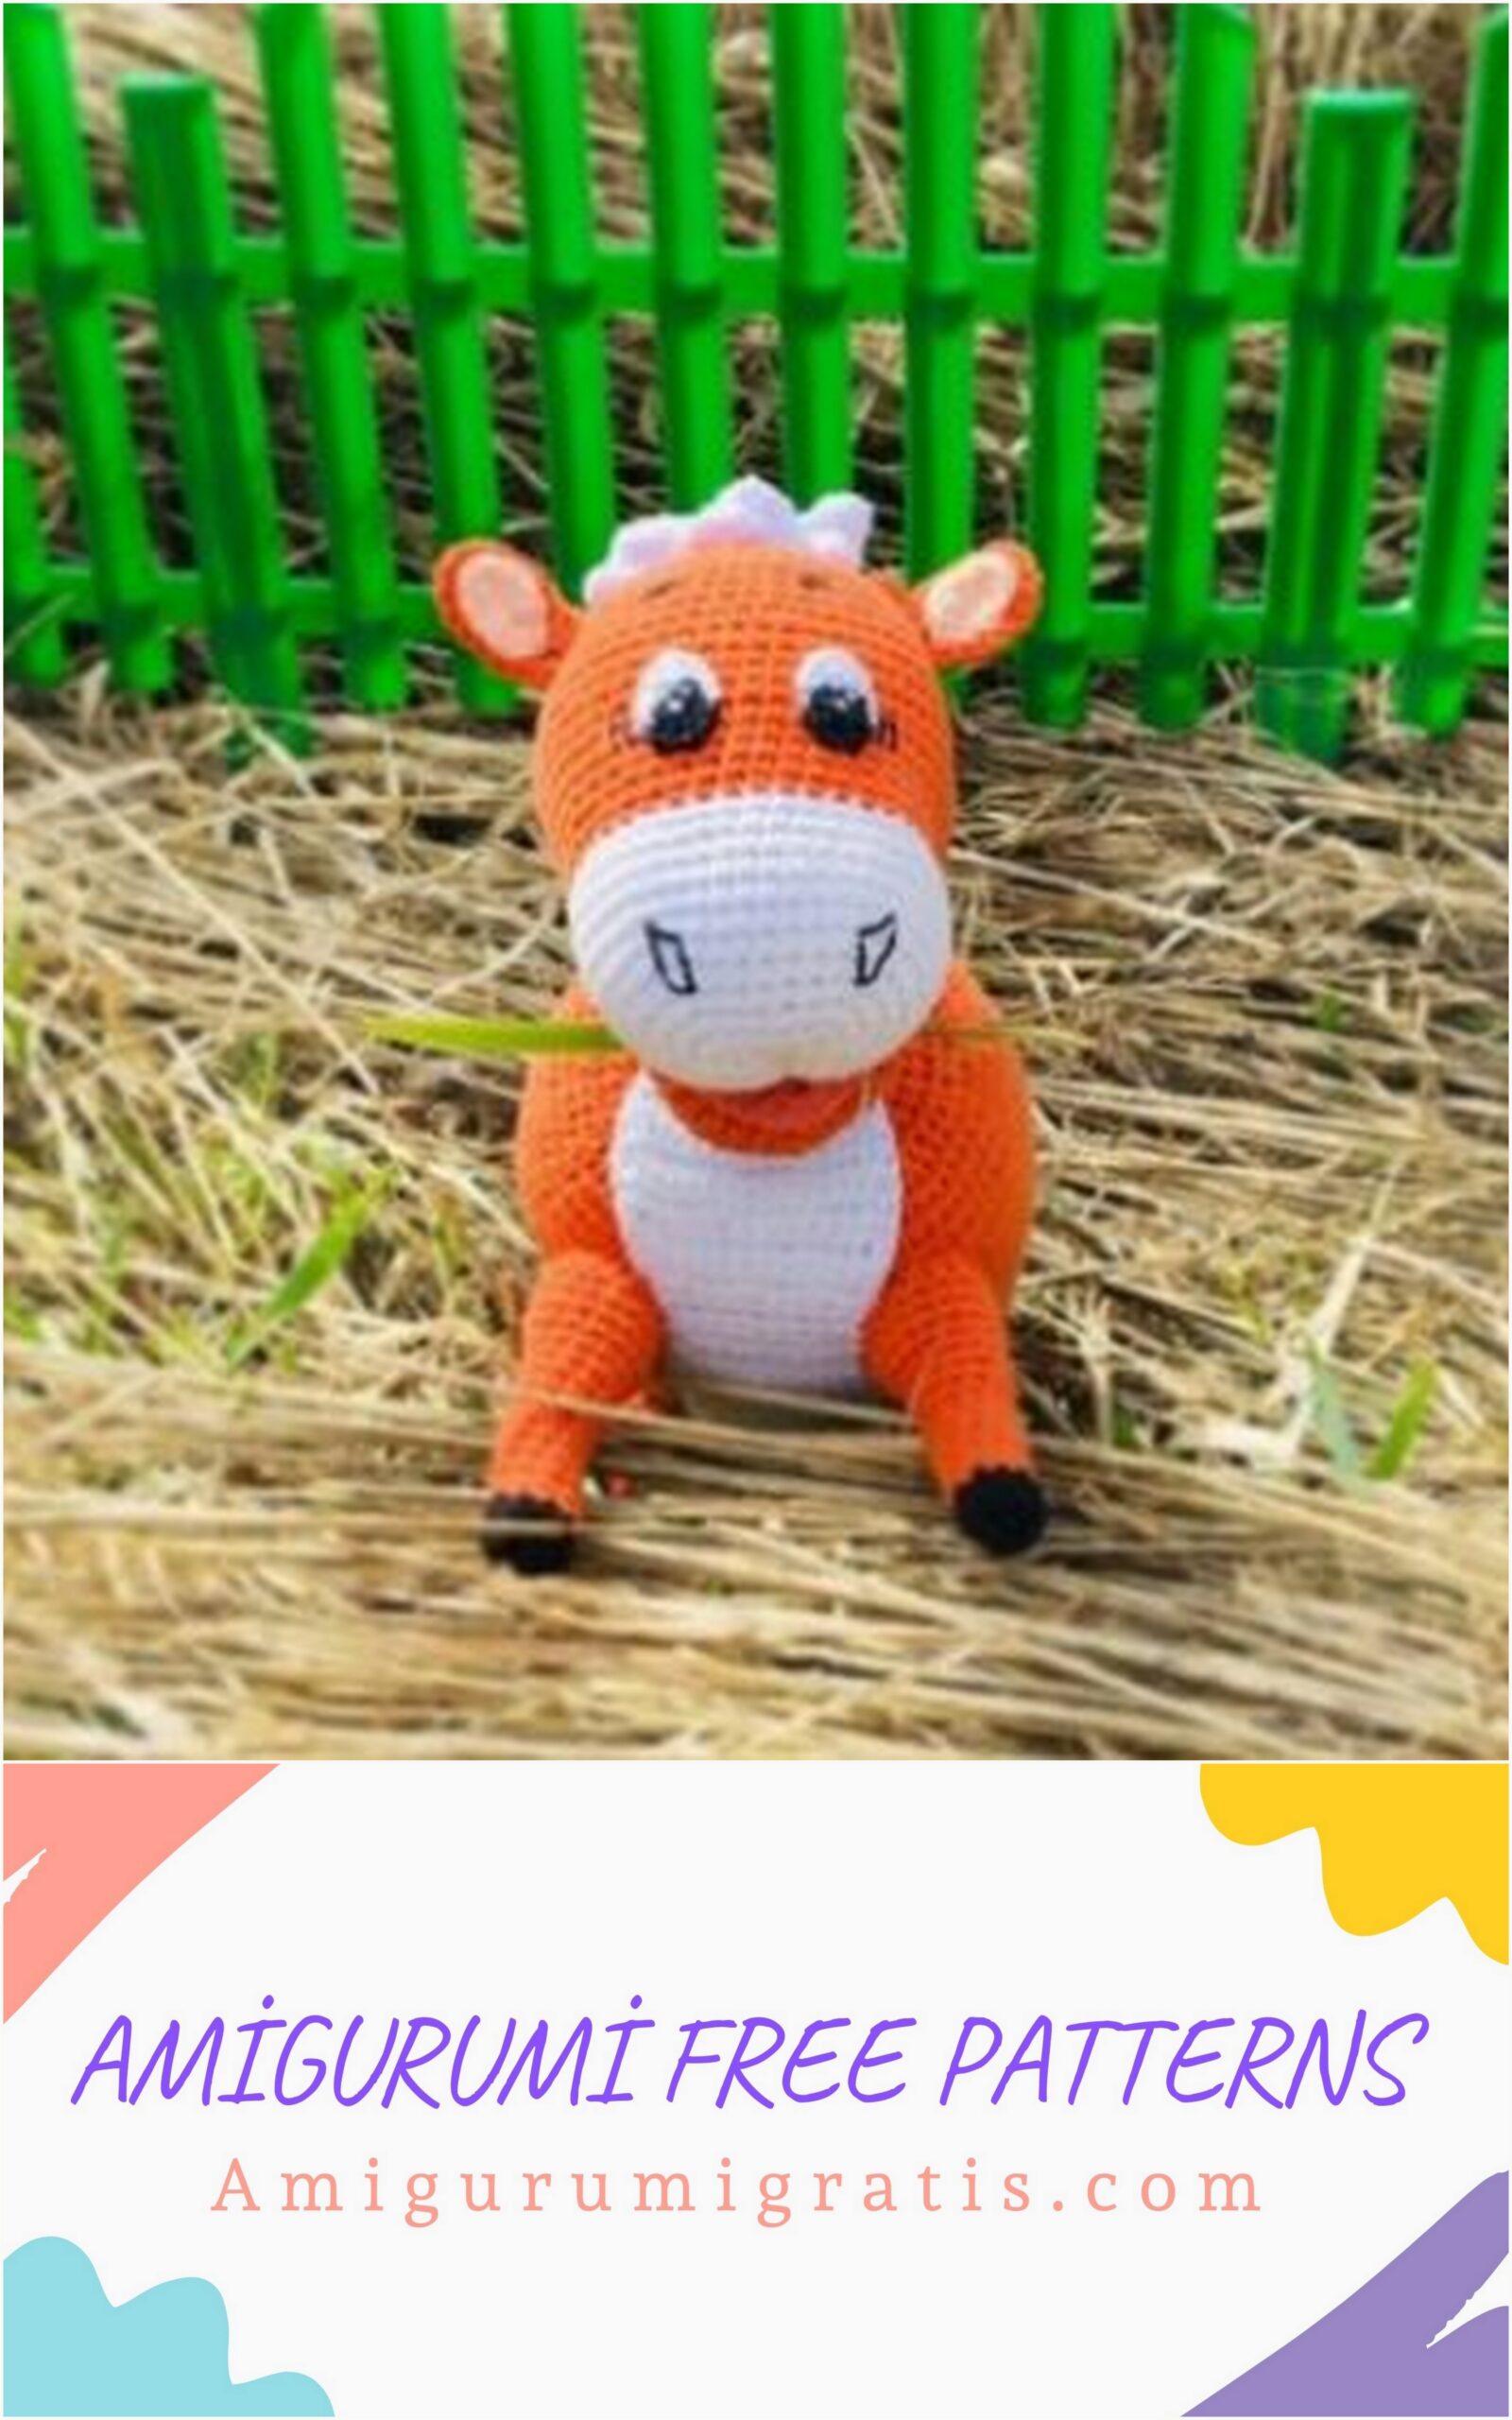
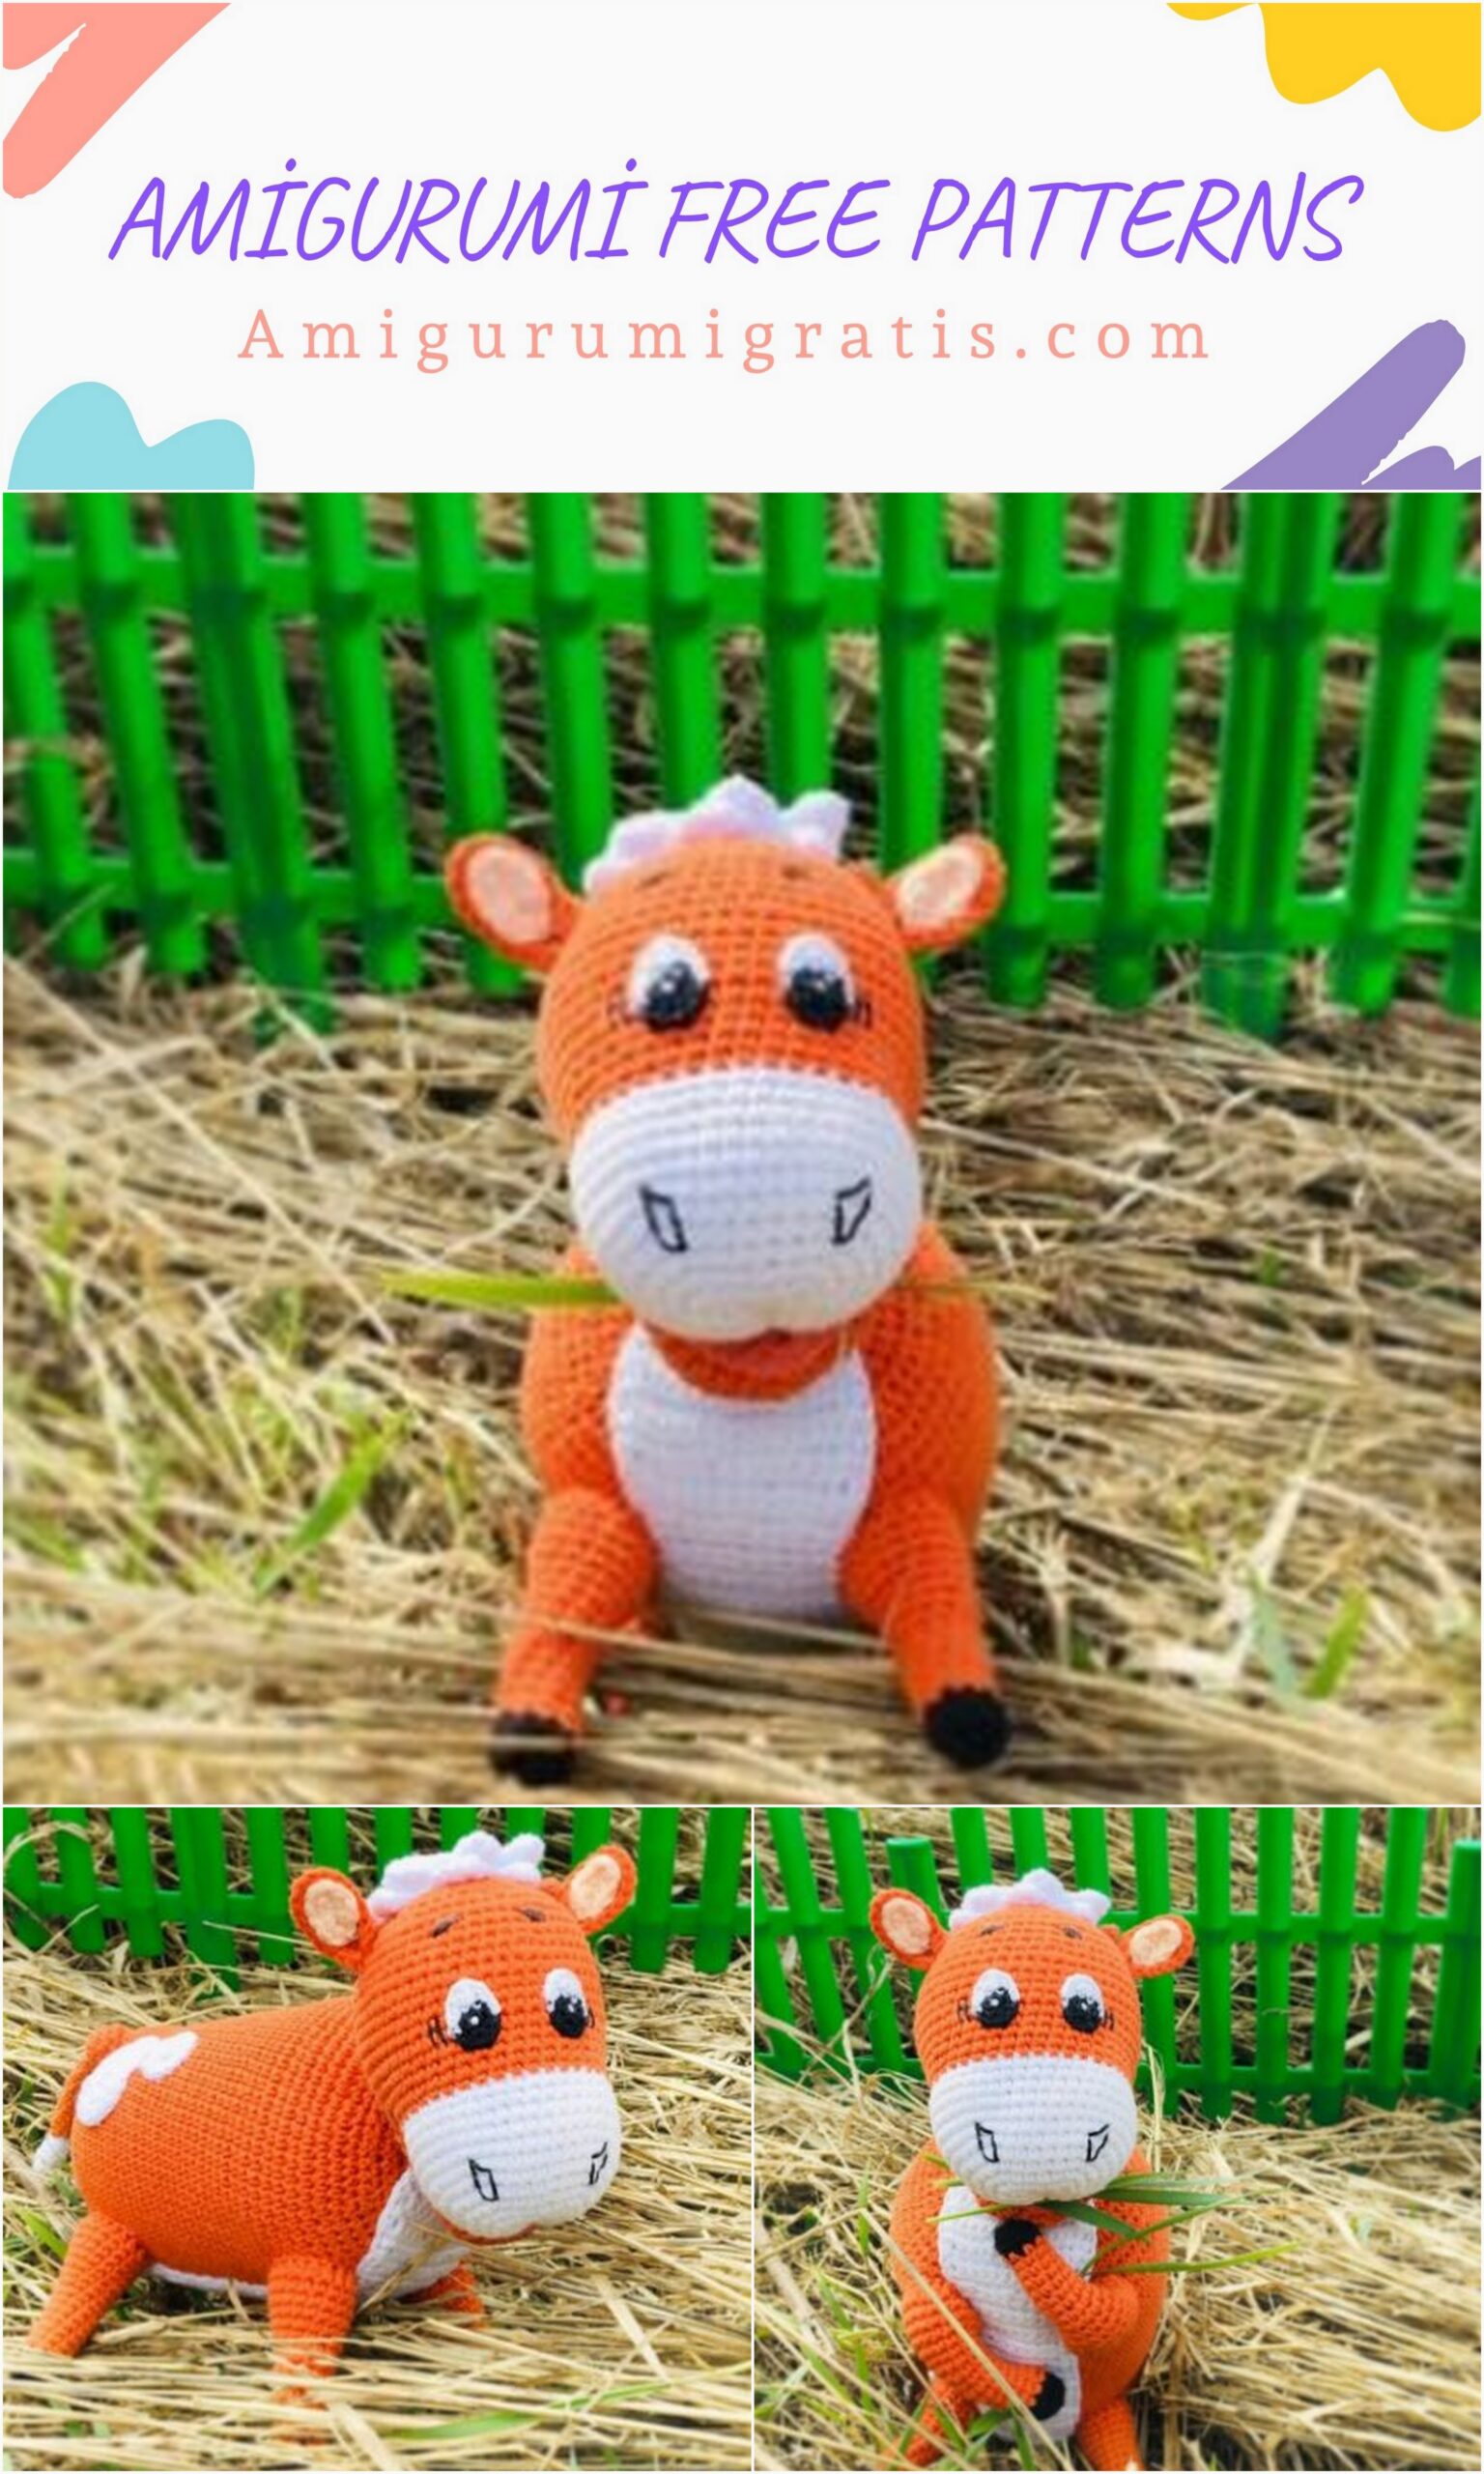
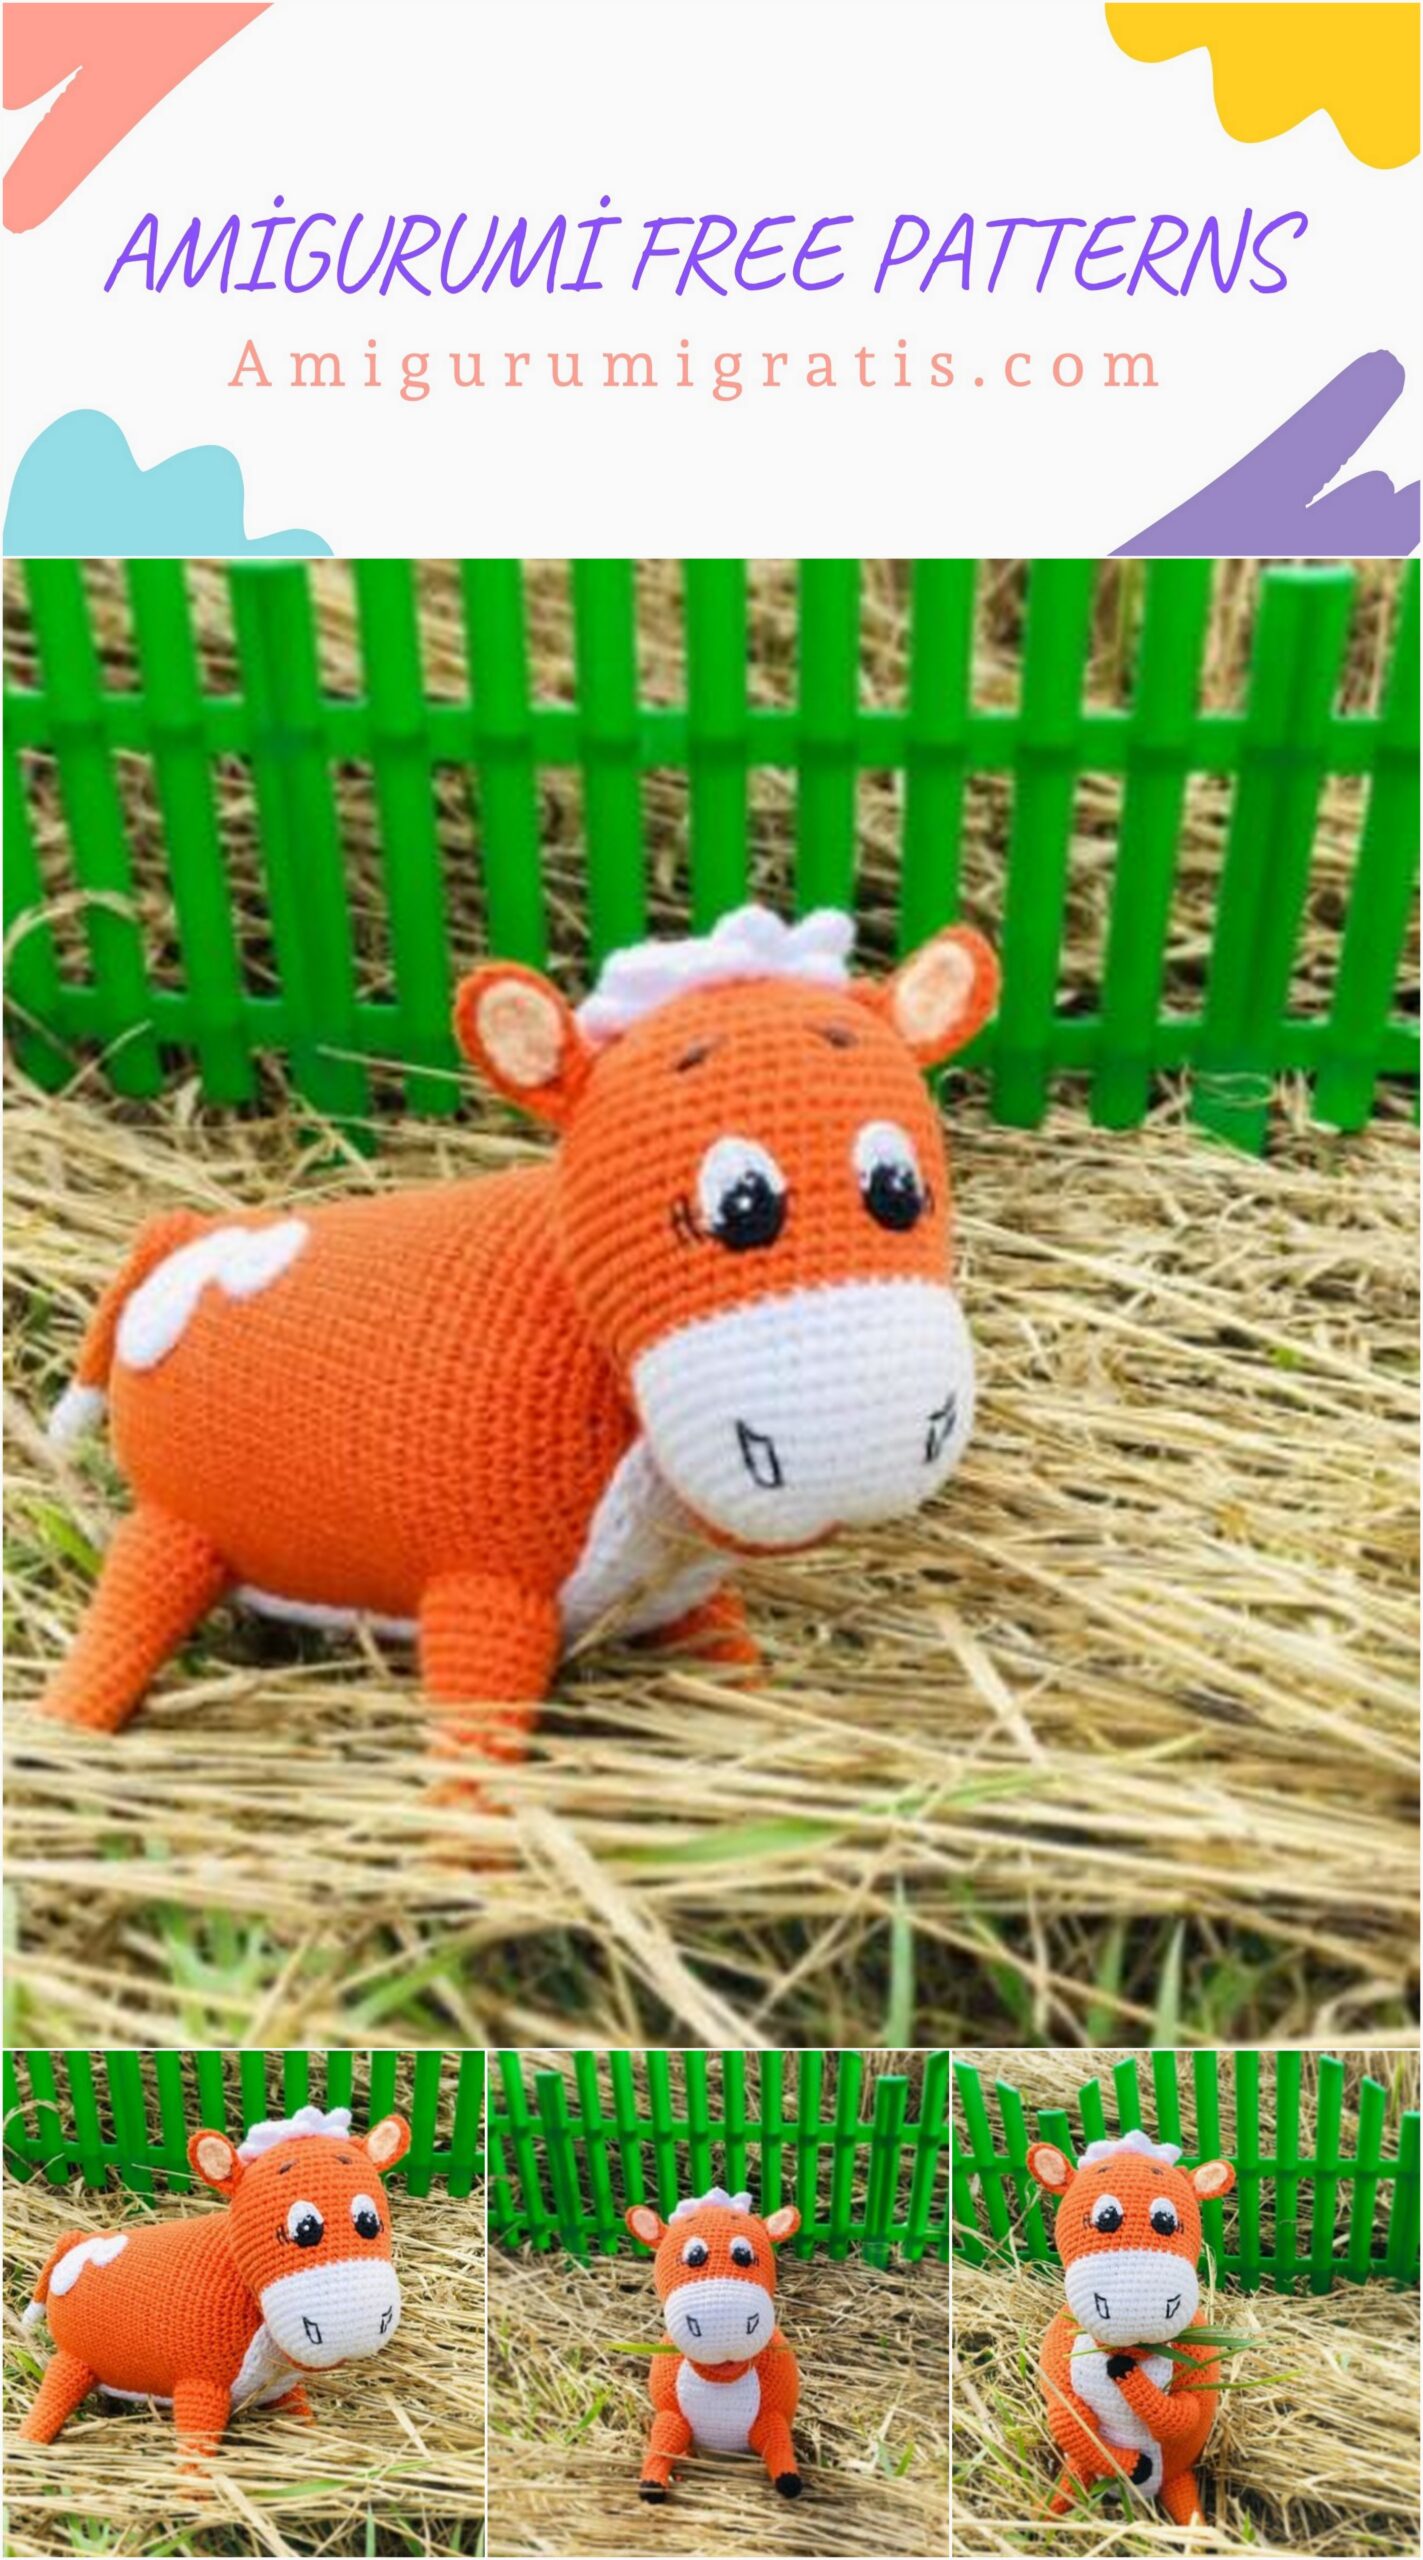
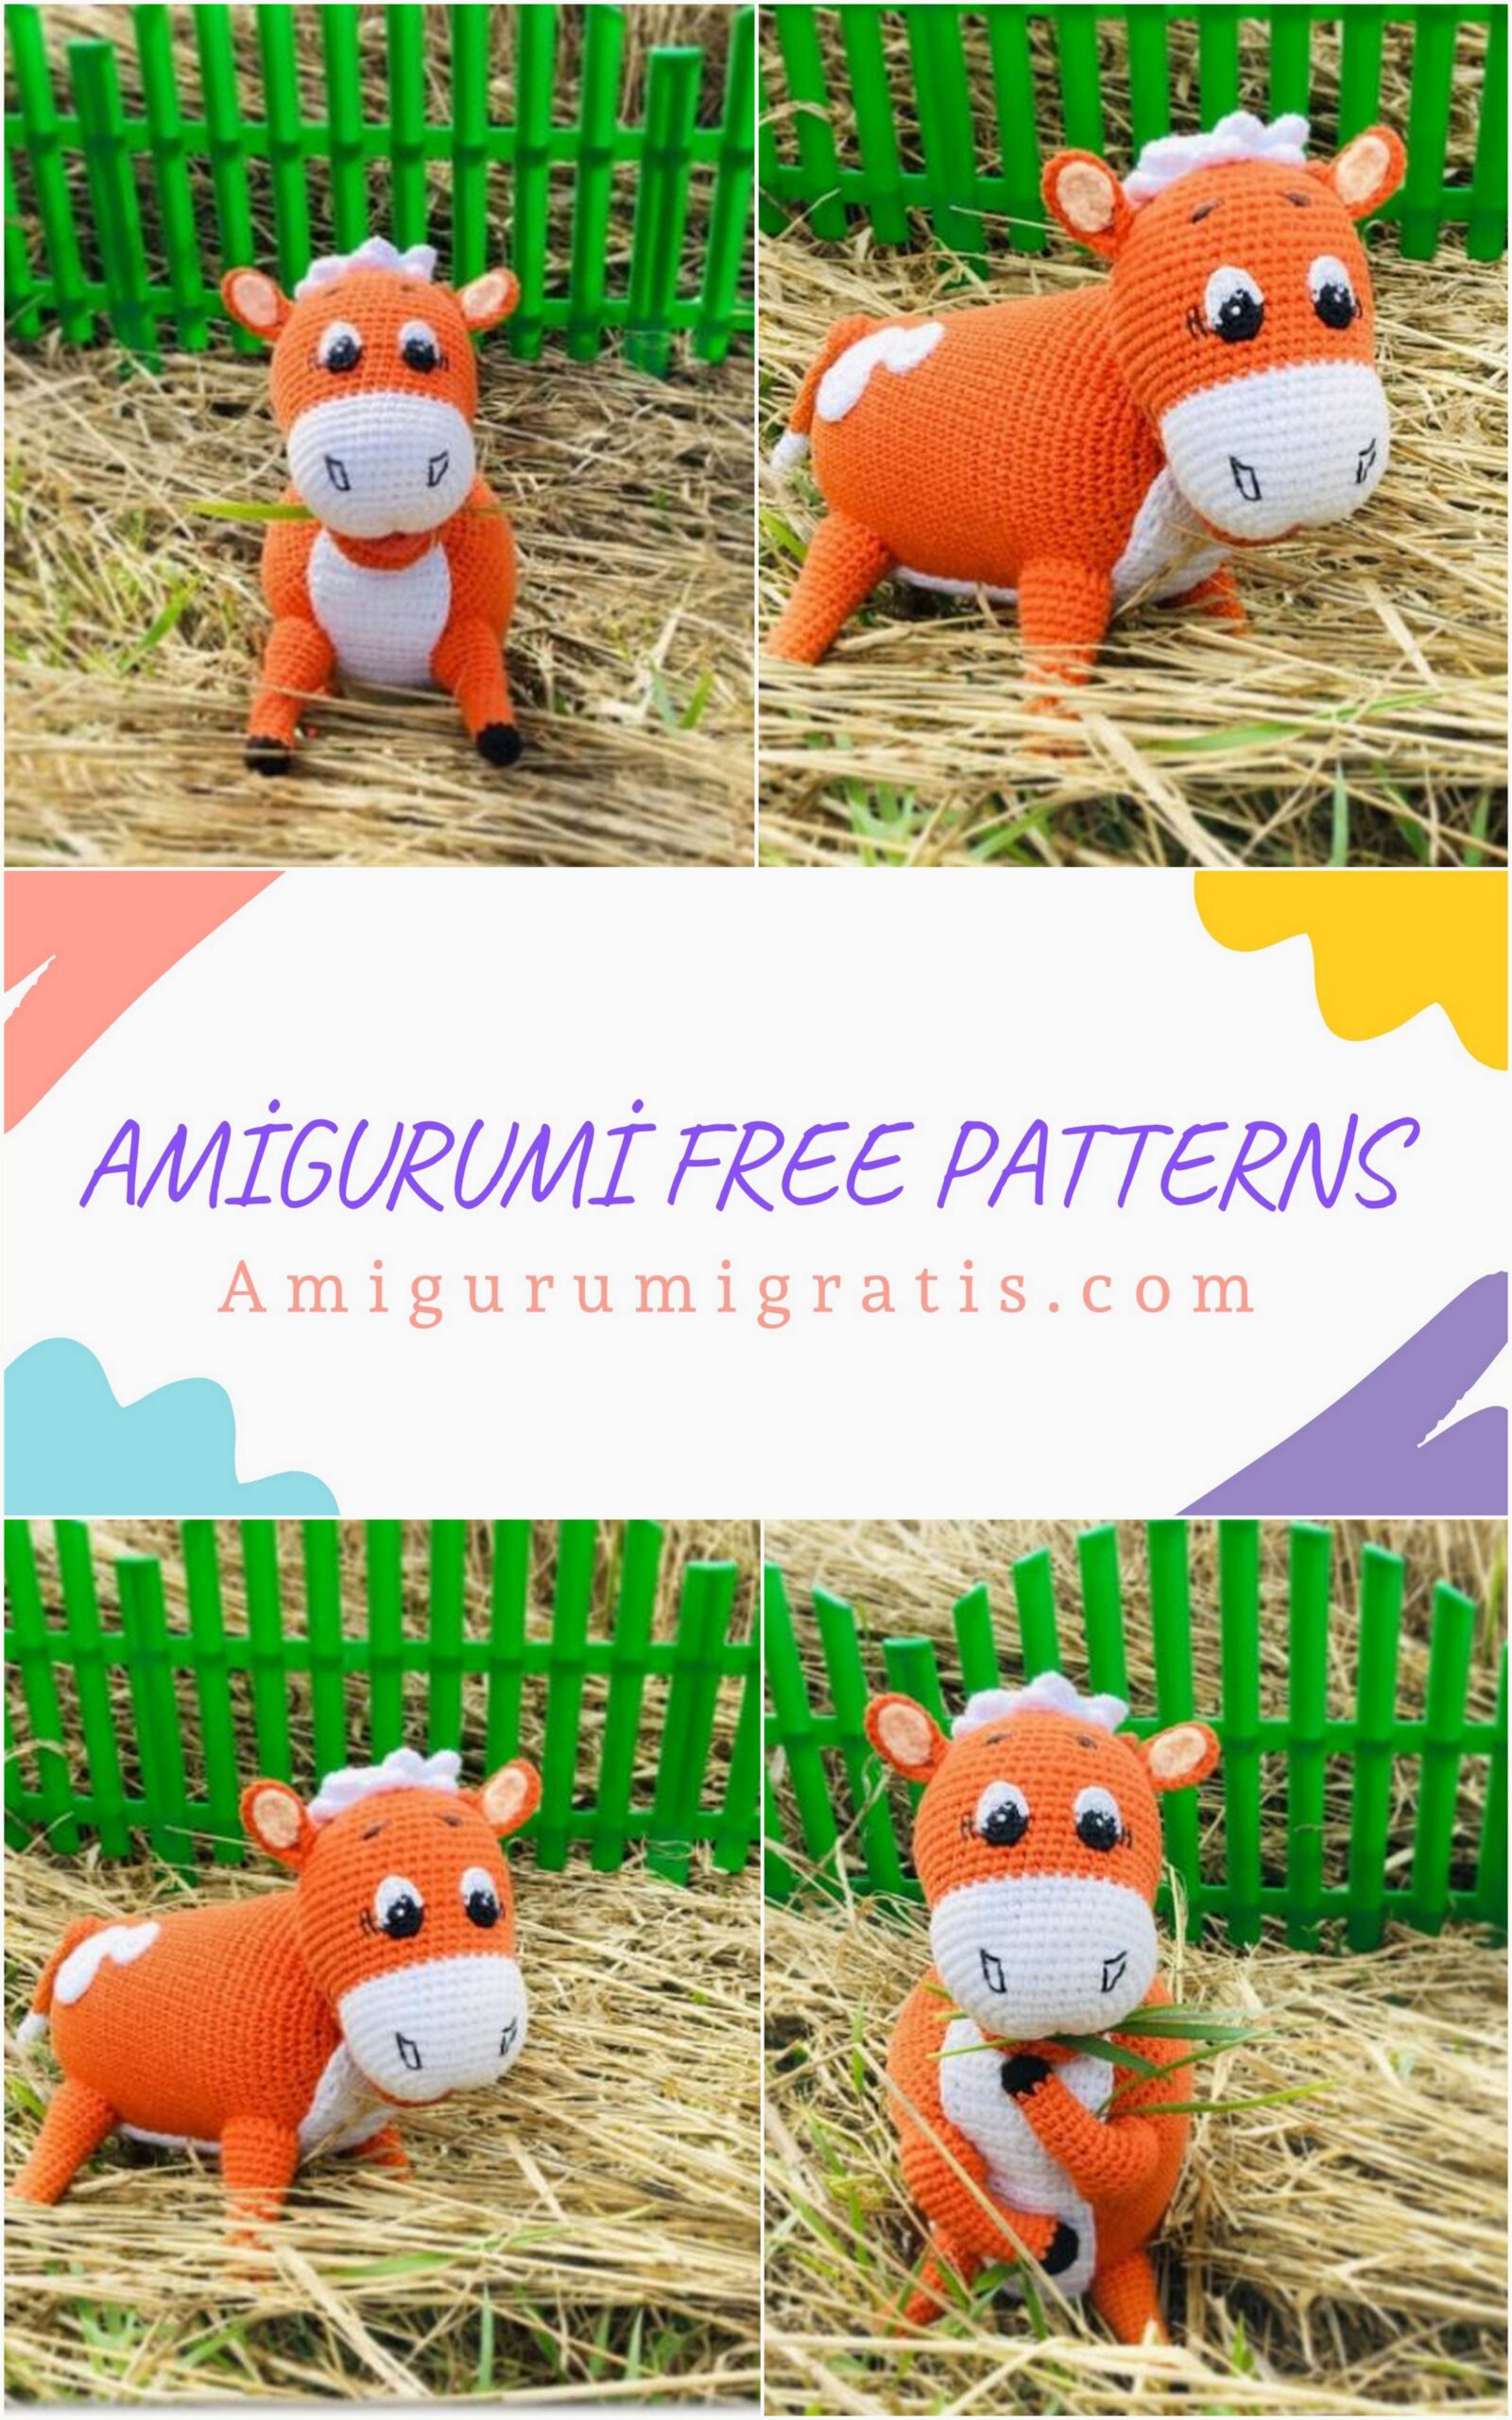
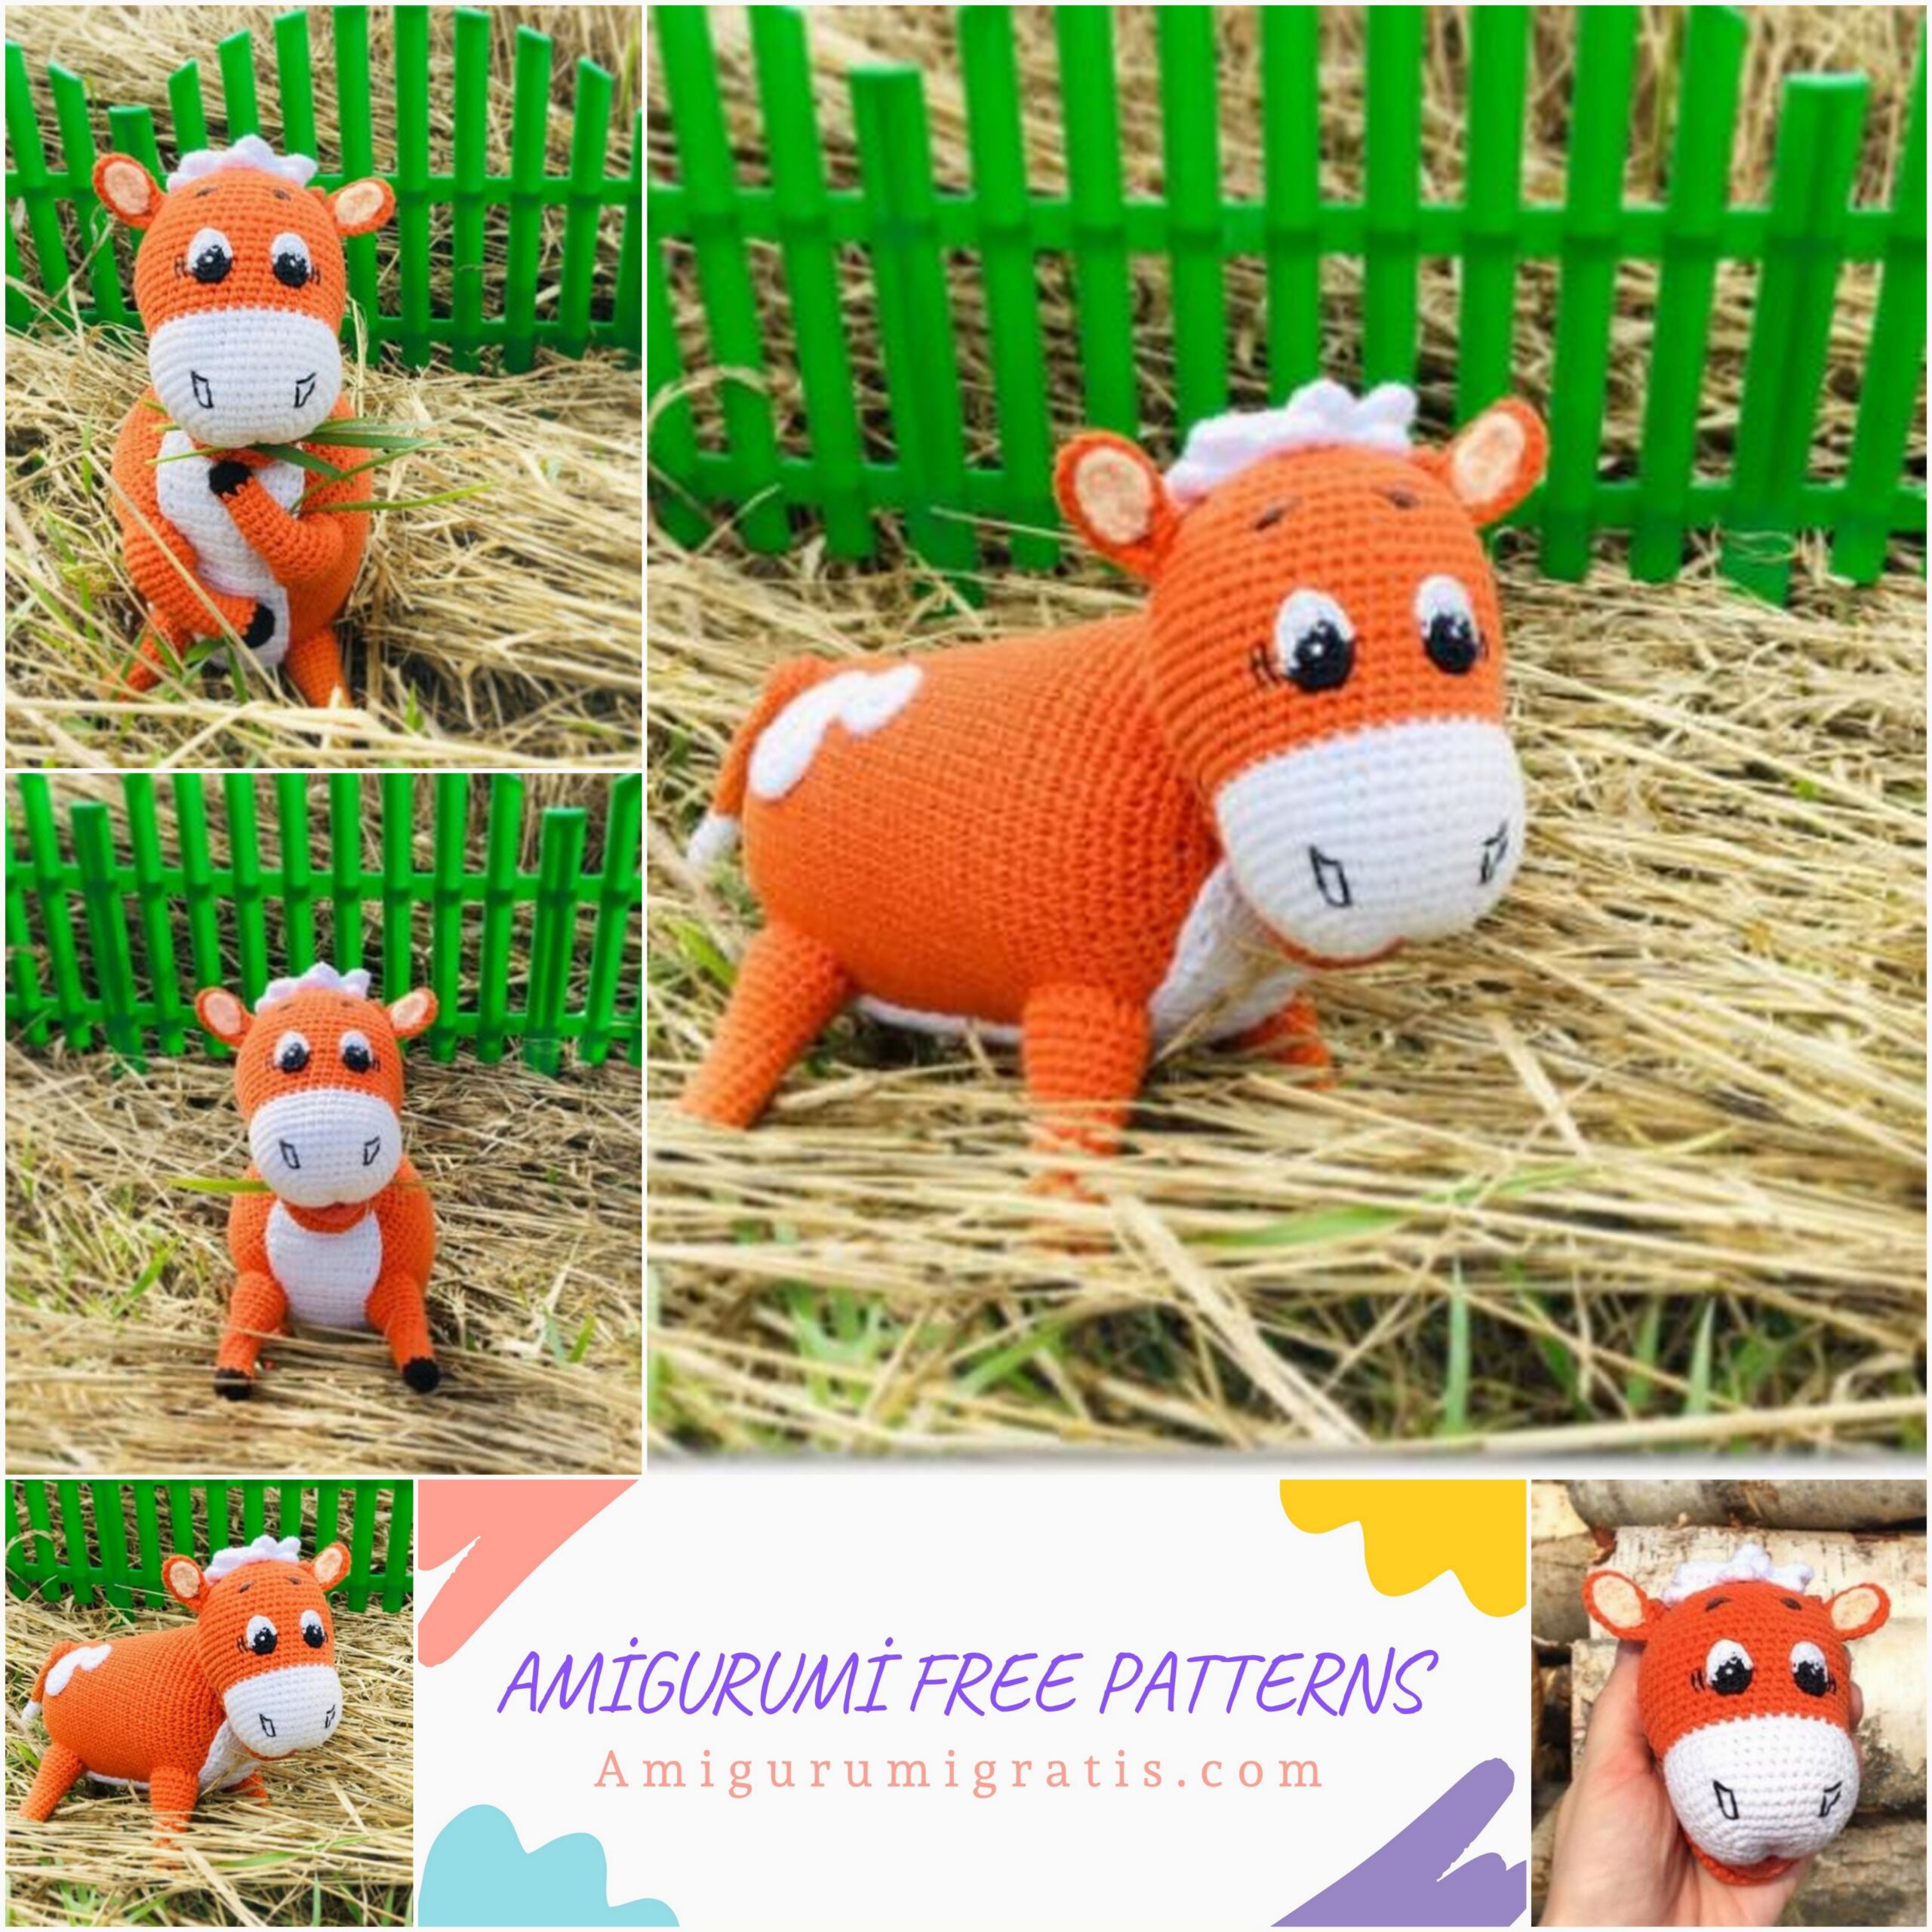
We share a cute cow pattern for free. You can visit our website for free amigurumi patterns from each other.
Pattern – Egorova Galina
Attention!
This workshop requires basic crochet skills. Knitting difficulty is medium.
Note:
1. The toy is knitted in a spiral without lifting loops, unless otherwise indicated.
2. At the beginning of the row, use a marker or thread of a different color to help mark the first loop of each new row.
Necessary materials and tools:
1. “Yarn art jeans” – number 85 – red color (2 skeins).
2. “Yarn art jeans” or “Alize cotton gold” – white.
3. “Yarn art jeans” or “Alize cotton gold” – black color (for hooves).
4. “Alize cotton gold” – number 89 – “Terracotta” (for horns, you can use a brown thread).
5. “Alize cotton gold” – number 38 – coral color (for the tongue, you can use red color).
6. “Yarn art jeans” – number 73 – “Peach” (for the inside of the ears).
7. Any brown thread is for embroidering eyebrows (I used “Yarn art jeans”).
8. “Iris” – black color (for knitting the pupil and making the muzzle).
9. “Iris” – white color (for knitting eye protein).
10. Hook number 1.5 (main)
11. Hook number 1.25 (for knitting the eye).
12. Holofiber or sintepuh.
13. The wire is optional, if you want the paws to be movable. I did not use wire.
14. Pins with beads.
15. Needle for stitching parts.
16. Scissors.
Legend:
ch – air loop
ss – connecting column
sc – single crochet
inc – increase
dec – decrease
HDC – half crochet
(…) – the number of loops in a row
Knitting Description:
Small spot (“Yarn art jeans”, or “Alize cotton gold” – white color, hook number 1,5) – 2 details:
1 row. 4 CH, we knit a loop from the second from the hook (we will tie a chain from CH in a circle) – 2 sc, 3 sc into 1 loop, 1 sc, inc (8)
2 row. inc, 1 sc, 3 inc, 1 sc, 2 inc (14)
Leave the thread for sewing, cut, fasten.
Big spot (“Yarn art jeans” or “Alize cotton gold” – white, hook number 1,5) – 2 details:
1 row. 6 CH, we knit a loop from the second from the hook (we will tie a chain from CH in a circle) – 4 sc, 3 sc into 1 loop, 3 sc, inc (12)
2 row. inc HDC, 3 HDC, 3 inc HDC, 1 HDC, 2 sc, 2 inc HDC (18)
3 row. 1 HDC, inc HDC, 3 HDC, (1 HDC, inc HDC) * 3 times, 1 sc, 2 ss, 1 sc, inc HDC, 1 HDC, inc sc (24)
Leave the thread for sewing, cut, fasten.
Hooves (“Yarn art jeans”, or “Alize cotton gold” – black color, hook number 1,5) – 4 parts:
1 row. 6 sc into magic ring (6)
2 row. 6 inc (12)
3 row. we knit for the back wall of loops – 12 sc
Change the color of the thread to red, knit legs:
4 row. (2 sc, dec, 2 sc) * 2 times (10)
5-10 rows. 10 sc
11 row. (2 sc, inc, 2 sc) * 2 times (12)
12 row. 12 sc
13 row. (5 sc, inc) * 2 times (14)
14 row. (3 sc, inc, 3 sc) * 2 times (16)
15 row. 16 sc
16 row. (7 sc, inc) * 2 times (18)
17 row. 18 sc
We cut the thread, fix it.
Tail:
“Yarn art jeans” or “Alize cotton gold” – white color, hook number 1,5.
1 row. 3 sc into magic ring (3)
2 row. 3 inc (6)
3 row. (1 sc, inc) * 3 times (9)
4 row. 9 sc
5 row. (1 sc, dec) * 3 times (6)
6 row (1 sc, dec) * 2 times (4)
Change the color to red.
7 row. 4 inc (8)
8-24 rows. 8 sc (17 rows)
We cut the thread, fix it.
Sciatic tubercle (“Yarn art jeans” – red color) – 2 parts:
1 row. 6 sc into magic ring (6)
2 row. (1 sc, inc) * 3 times (9)
3 row. (1 sc, inc, 1 sc) * 3 times (12)
4 row. 12 sc
We cut the thread, fix it.
Circle (“Yarn art jeans” – red color):
1 row. 6 sc into magic ring (6)
2 row. 6 inc (12)
3 row. (1 sc, inc) * 6 times (18)
4 row. (1 sc, inc, 1 sc) * 6 times (24)
5 row. (3 sc, inc) * 6 times (30)
6 row. (2 sc, inc, 2 sc) * 6 times (36)
7 row. (5 sc, inc) * 6 times, ss (42)
8 row. turn, 1 CH, 4 sc (4)
9 row. turn, 1 CH, 2 dec (2)
Now we will connect the tail and the ischial tubercles, we will knit with the thread “Yarn art jeans” – red color, hook number 1.5.
Take one detail of the hillock, attach it to the tail, knit together 2 sc:
It looks like this from the outside:
Then we knit 2 sc on the tail. Next, we attach the second tubercle to the tail, knit 2 sc, connecting the tail and the tubercle, then we knit 2 sc along the remaining tail loops:
We knit ss, now we will attach a circle to the resulting part. We turn the knitting, we knit 2 sc, connecting 2 loops of the tail and 2 loops of the part that we tied over the circle:
Next, we will knit in a circle, knit 2 sc, connecting 2 loops of the tuber and 2 side loops of the part that we knitted over the circle:
Next, we knit 1 sc, connecting 1 loop of the hillock and 1 loop of the circle:
Next, we knit in a circle – (5 sc, inc) * 6 times. Now we count 3 loops from the second tuber, which we will connect with the circle, and connect the third loop of the tuber to the remaining loop of the circle:
Connect the remaining 2 loops of the hillock and the side of the part above the circle – 2 sc:
We cut the thread, fix it.
Now we put the part to ourselves, as in the photo, count 3 loops from the bottom of the tuber, attach a thread to the 3rd loop, knit in a circle, we will consider this the first row of the body:
1 row. along the first hillock – 3 sc, in a circle – (3 sc, inc, 3 sc) * 6 times, along the second hillock – 3 sc, 2 dec, along the tail – 2 sc, on the first hillock – 2 dec (60)
2 row. (4 sc, inc, 4 sc) * 6 times, 6 sc (66)
3 row. (9 sc, inc) * 6 times, 6 sc (72)
4-5 rows. 72 sc
6 row. 66 sc, 3 dec (69)
7-36 rows. 69 sc (30 rows)
Now we fold the part in half, the center line will go in the middle of the two knolls, and mark the center 9 loops with pins:
We tie the single crochet to the second pin, from it we will begin to knit a new row. The subsequent rows will be knitted in rotary rows. In the following rows, you must make invisible decreases so that knitting looks neat. In odd rows, we knit a decrease, knitting 2 columns for the front wall of the loops – we introduce the hook for one front half loop, then immediately insert the hook for the second front half loop, grab the working thread, draw through 2 half loops, then again pick up the working thread and stretch through 2 loops on hook:
In the even rows, we will make reductions for the back half-loops:
37 row. (4 sc, dec, 4 sc) * 6 times (54), 9 loops are not knitted.
38 row. Rotate, 1 CH, (7 sc, dec) * 6 times (48)
39 row. Rotate, 1 CH, (3 sc, dec, 3 sc) * 6 times (42)
40 row. Rotate, 1 CH, (5 sc, dec) * 6 times (36)
41 row. Rotate, 1 CH, (2 sc, dec, 2 sc) * 6 times (30)
42 row. Rotate, 1 CH, (3 sc, dec) * 6 times (24)
43 row. Rotate, 1 CH, (1 sc, dec, 1 sc) * 6 times (18)
44 row. Rotate, 1 CH, (1 sc, dec) * 6 times (12)
45 row. Turn, 1 CH, 6 dec (6)
46 row. We knit 3 loops together – 2 times (2)
We knit ss, cut the thread, fix it.
Neck: attach the thread after 9 loops that we left:
1 row. First, we knit in the front – 21 sc, then another 9 sc we knit for the front wall of the loops along the loops that we previously left.
If in front you get a little more or a little less than 21 sc, you need to adjust it to 21 loops, for this you need to either make one or two decreases, or one or two increments, all in this row you get 30 sc.
2-4 rows. 30 sc
Leave the thread for sewing on the head, cut, fasten.
Now on the body we mark 4 points for the legs. First, we will make stitches with a thread of contrasting color in the center of the abdomen:
Now set the pins to the places where we will later have the legs:
Now on the legs we note the central loops. On two legs the loops will be on the right, on two legs on the left, relative to the place where we changed the color of the thread from black to red:
Chest (“Alize cotton gold” or “Yarn art jeans” – white, hook 1.5), we will knit in rotary rows:
1 row. 4 CH, knit from the second loop from the hook – 3 sc (3)
2 row. Turn, 1 CH, 3 sc
3 row. Turn, 1 CH, 3 inc (6)
4 row. Turn, 1 CH, (1 sc, inc) * 3 times (9)
5 row. Turn, 1 CH, (1 sc, inc, 1 sc) * 3 times (12)
6 row. Turn, 1 CH, (inc, 3 sc) * 3 times (15)
7-10 rows. Turn, 1 CH, 15 sc
11 row. Rotate, 1 CH, (3 sc, dec) * 3 times (12)
12-14 rows. Turn, 1 CH, 12 sc
15 row. Rotate, 1 CH, (1 sc, dec, 1 sc) * 3 times (9)
16 row. Turn, 1 CH, 9 sc
17 row. We put in front of our chest and paw, as in the photo. 1 CH, we knit 1 sc into that loop of the leg into which we have the thread inserted. Of the two loops marked with thread, this is the one located farther from the place where the color of the black thread changes to red:
Then twist and knit 9 sc across the chest
18 row. We knit 2 sc along the loops of the second leg, the place of changing the color of the thread should look in the same direction as on the leg that we knitted first.
Then turn, 9 sc across the chest:
19 row. 1 sc into the second, marked with a thread, loop of the first leg, 9 sc:
20-40 rows. Turn, 1 CH, 9 sc (21 rows)
41 row. 1 CH, attach the third leg, knit 1 sc along the leg, we look so that the place of changing the thread color looks in the same direction as on the other legs:
Then we knit 9 sc across the chest.
42 row. We knit 2 sc along the marked loops of the fourth leg:
Then 9 sc across the chest.
43 row. We knit 1 sc on the remaining marked loop of the third leg, 9 sc on the chest:
44-45 rows. Turn, 1 CH, 9 sc
46 row. dec, 5 sc, dec (7)
47 row. dec, 3 sc, dec (5)
48 row. dec, 1 sc, dec (3)
Next, do not cut the thread, tie the part in a circle:
5 sc:
2 ss looped legs:
23 sc:
2 ss looped legs, 15 sc:
İnc in the corner, 1 sc, inc:
15 sc:
2 ss for looped legs, 23 sc, 2 ss for looped legs, 5 sc, ss:
Now we tie the legs, attach the thread to one of the legs:
We knit: ss, sc, 12 HDC, sc, ss, leave the thread for sewing, cut, fasten. Thus we knit on all legs.
Now the resulting part (chest with legs) will pin two pins to the stomach. The legs will be located in the places where we previously installed pins. You need to install one pin in the neck, the second at the back:
Now we sew the chest, the legs until we sew:
Now we sew each leg, in the course of sewing we stuff denser with filler:
You can sew several stitches in red over white stitches:
We sew stains on two sides symmetrically:
Horns (“Alize cotton gold” – “Terracotta” color, hook number 1,5) – 2 parts:
1 row. 4 sc into magic ring (4)
2 row. (1 sc, inc) * 2 times (6)
3 row. 6 sc
Leave the thread for sewing, cut, fasten.
The inner part of the eyelet (“Yarn art jeans” – “Peach” color, hook n omer 1.5) – 2 parts:
5 CH, knit from sec loop from the hook (we will tie the chain from CH in a circle) – 3 sc, 3 sc into 1 loop, 2 sc, inc (10)
Leave the thread for sewing, cut, fasten.
The outer part of the eyelet (“Yarn art jeans” – red color, hook number 1.5) – 2 parts:
1 row. 7 CH, we knit a loop from the second from the hook (we will tie a chain from CH in a circle) – 5 sc, 3 sc into 1 loop, 4 sc, inc (14)
2 row. inc, 4 sc, 3 inc, 4 sc, 2 inc (20)
Leave the thread for sewing, cut, fasten.
Now connect the inner and outer ears:
Eyes – 2 parts:
“Iris” – black color, hook number 1.25.
1 row. 6 sc into magic ring (6)
2 row. 6 inc (12)
Change the color of the thread to white, knit in rotary rows:
3 row. 3 sc (3)
4 row. Turn, 1 CH, 3 sc
5 row. Turn, 1 CH, dec, 1 sc (2)
We cut the thread, fix it.
We count from the place where we started to knit with a white thread, 2 sc, attach the white thread:
We knit ss, sc in a circle, tying the white part connected by us earlier:
Thus we tie to the pupil, then to the pupil 1 sc, ss:
We embroider the flare with white thread:
Hairstyle (“Alize cotton gold” or “Yarn art jeans” – white color, hook number 1,5) – 2 details:
1 row. 4 CH, we knit a loop from the second from the hook (we will tie a chain from CH in a circle) – 2 sc, 3 sc into 1 loop, 1 sc, inc (8)
2 row. inc, 1 sc, 3 inc, 1 sc, 2 inc (14)
3 row. 1 sc, inc, 1 sc, (1 sc, inc) * 3 times, 1 sc, (1 sc, inc) * 2 times (20)
Next, we knit in rotary rows:
1 row. 2 sc
2 row. Turn, 1 CH, 2 sc
3 row. Turn, 1 CH, dec (1)
We cut the thread, fix it, skip one loop, knit:
1 row. 3 sc
2 row. Turn, 1 CH, 3 sc
3 row. Turn, 1 CH, 1 sc, dec (2)
4 row. Turn, 1 CH, dec (1)
We cut the thread, fix it, skip one loop, knit:
1 row. 2 sc
2 row. Turn, 1 CH, 2 sc
3 row. Turn, 1 CH, dec (1)
We cut the thread, fix it, skip one loop, knit:
1 row. 3 sc
2 row. Turn, 1 CH, 1 sc, dec (2)
3 row. Turn, 1 CH, dec (1)
We cut the thread, fix it, skip one loop, knit:
1 row. 2 sc
2 row. Turn, 1 CH, 2 sc
3 row. Turn, 1 CH, dec (1)
We cut the thread, fix it, skip one loop, knit:
1 row. 2 sc
2 row. Turn, 1 CH, 2 sc
3 row. Turn, 1 CH, dec (1)
We cut the thread, fix it.
Now we will tie the part in a circle sc, at the vertices we knit 3 sc:
Tongue (“Alize cotton gold” – coral color, hook number 1,5) – we will knit in rotary rows:
1 row. 3 CH, knit from the second loop from the hook – 2 sc (2)
2 row. Turn, 1 CH, 2 inc (4)
3 row. Turn, 1 CH, 1 sc, 2 inc, 1 sc (6)
4 row. Turn, 1 CH, (1 sc, inc, 1 sc) * 2 times (8)
5 row. Turn, 1 CH, inc, 6 sc, inc (10)
6-8 rows. 10 sc
Tying – 1 CH, we knit a part sc in a circle, in two corners we knit 2 sc, we cut the thread, fix it.
Chin (“Yarn art jeans” – red color, hook number 1,5):
1 row. 6 sc into magic ring (6)
2 row. 6 inc (12)
3 row. (1 sc, inc) * 6 times (18)
4 row. (1 sc, inc, 1 sc) * 6 times (24)
5-8 rows. 24 sc
9 row. 12 sc, (1 sc, inc) * 6 times (30)
10 row. 12 sc, (1 sc, inc, 1 sc) * 6 times (36)
11-12 rows. 36 sc
We cut the thread, fix it.
Muzzle (“Alize cotton gold” or “Yarn art jeans” – white, hook number 1,5):
1 row. 7 CH, we knit a loop from the second from the hook (we will tie a chain from CH in a circle) – 5 sc, 3 sc into 1 loop, 4 sc, inc (14)
2 row. inc, 4 sc, 3 inc, 4 sc, 2 inc (20)
3 row. 1 sc, inc, 4 sc, (1 sc, inc) * 3 times, 4 sc, (1 sc, inc) * 2 times (26)
4 row. 1 sc, inc, 5 sc, (1 sc, inc, 1 sc) * 3 times, 4 sc, (1 sc, inc, 1 sc) * 2 times (32)
5 row. 3 sc, inc, 4 sc, (3 sc, inc) * 3 times, 4 sc, (3 sc, inc) * 2 times (38)
6 row. 2 sc, inc, 6 sc, (2 sc, inc, 2 sc) * 3 times, 4 sc, (2 sc, inc, 2 sc) * 2 times (44)
7-10 rows. 44 sc
11 row. 2 sc, dec, 6 sc, (2 sc, dec, 2 sc) * 3 times, 4 sc, (2 sc, dec, 2 sc) * 2 times (38)
Now we add the part in half along the line from CH, which we knitted at the beginning:
We have 18 loops on the one hand and 18 loops on the other. If necessary, we will knit a few more columns with a white thread, then we will attach a red thread and continue knitting from this place, we will knit in rotary rows:
1 row. 18 sc
2 row. Turn, 1 CH, dec, 14 sc, dec (16)
3 row. Rotate, 1 CH, dec, 12 sc, dec (14)
4 row. Rotate, 1 CH, dec, 10 sc, dec (12)
We cut the thread, fix it.
Now connect the 3 parts. First, we note 12 loops on the chin, for this we fold the part in half, as in the photo, the side with the increments will be behind. On the side without increments, we note the central 12 stitches as a thread:
On top of the detail we put the language:
We put a muzzle on top, the part that we knitted with a red color, and from the inside we sew three parts together – 12 loops of the tongue, 12 loops of the chin, which we marked with a thread and 12 loops of the muzzle.
Then we will sew the tongue to the backyard.
Attach the red thread to the place shown in the photo:
We knit a head:
1 row. 24 sc back:
4 sc on the side:
20 sc in the muzzle – we knit for the front wall of the loops:
4 sc on the side:
Total in the first row we got 52 sc.
2 row. 52 sc
Now connect the tongue, muzzle and the back of the chin.
First, note with pins 2 loops on the tongue and 2 loops on the face, like to in the photo:
Insert the needle from the inside into the place of one of the pins on the tongue, leave the other end of the thread sticking out from the inside, make a stitch through 2 stitches of the muzzle marked with pins:
Then we insert the needle into the place of the second pin in the tongue, we remove the needle inside the part.
We also fit the back of the chin with one stitch:
We pull the 2 ends of the thread, tie a knot. Continue to knit the head:
3-10 rows. 52 sc
11 row. (11 sc, dec) * 4 times (48)
12-14 rows. 48 sc
15 row. (3 sc, dec, 3 sc) * 6 times (42)
16 row. (5 sc, dec) * 6 times (36)
17 row. (2 sc, dec, 2 sc) * 6 times (30)
We stuff the part with filler, then we will continue to stuff along the knitting.
18 row. (3 sc, dec) * 6 times (24)
19 row. (1 sc, dec, 1 sc) * 6 times (18)
20 row. (1 sc, dec) * 6 times (12)
21 row. 6 dec (6)
We cut the thread, fix it, hide it inside the head.
Now we’ll make the face muzzle, insert the “Iris” thread into the needle
white, the needle is inserted at about the same place as in the photo:
We withdraw the needle in the center of the muzzle, leave the second end of the thread sticking out at the back of the head:
We introduce the needle in the bottom of the muzzle in the center:
We display the thread on the back of the head, tighten the 2 ends of the thread, tie a knot, cut off the excess ends of the threads, or hide inside the head:
Now sew the eyes. First, pin the eyes with pins to the head:
Sew on the eyes, then display the black thread “Iris” as in the photo:
Embroider nostrils:
We sew the hairstyle – 2 parts, so that the “hairs” do not coincide, for this you can turn the lower part face down to the head, the upper part must be facing out. And another important point, it is necessary that the chain from CH, with which we began to knit the hair, should be placed horizontally on the head, that is, in line with the horns and ears that we will later sew:
Sew the horns (next to the hairstyle), the ears (next to the horns), embroider the eyebrows with a brown thread, and also 2 stitches near each eye with a black “Iris” thread, as well as a smile near the tongue:
The head is ready:
Now we sew the head, for starters, we will set 4 pins on the back of the head, as in the photo:
Focusing on the installed buns, we sew the head to the neck. If necessary, you can install more pins.
Your Gavryusha is ready!