Preparation of materials and tools for work
This master class does not contain knitting lessons.
Basic crochet skills are expected.
The difficulty level is easy.
You will need the following yarn:
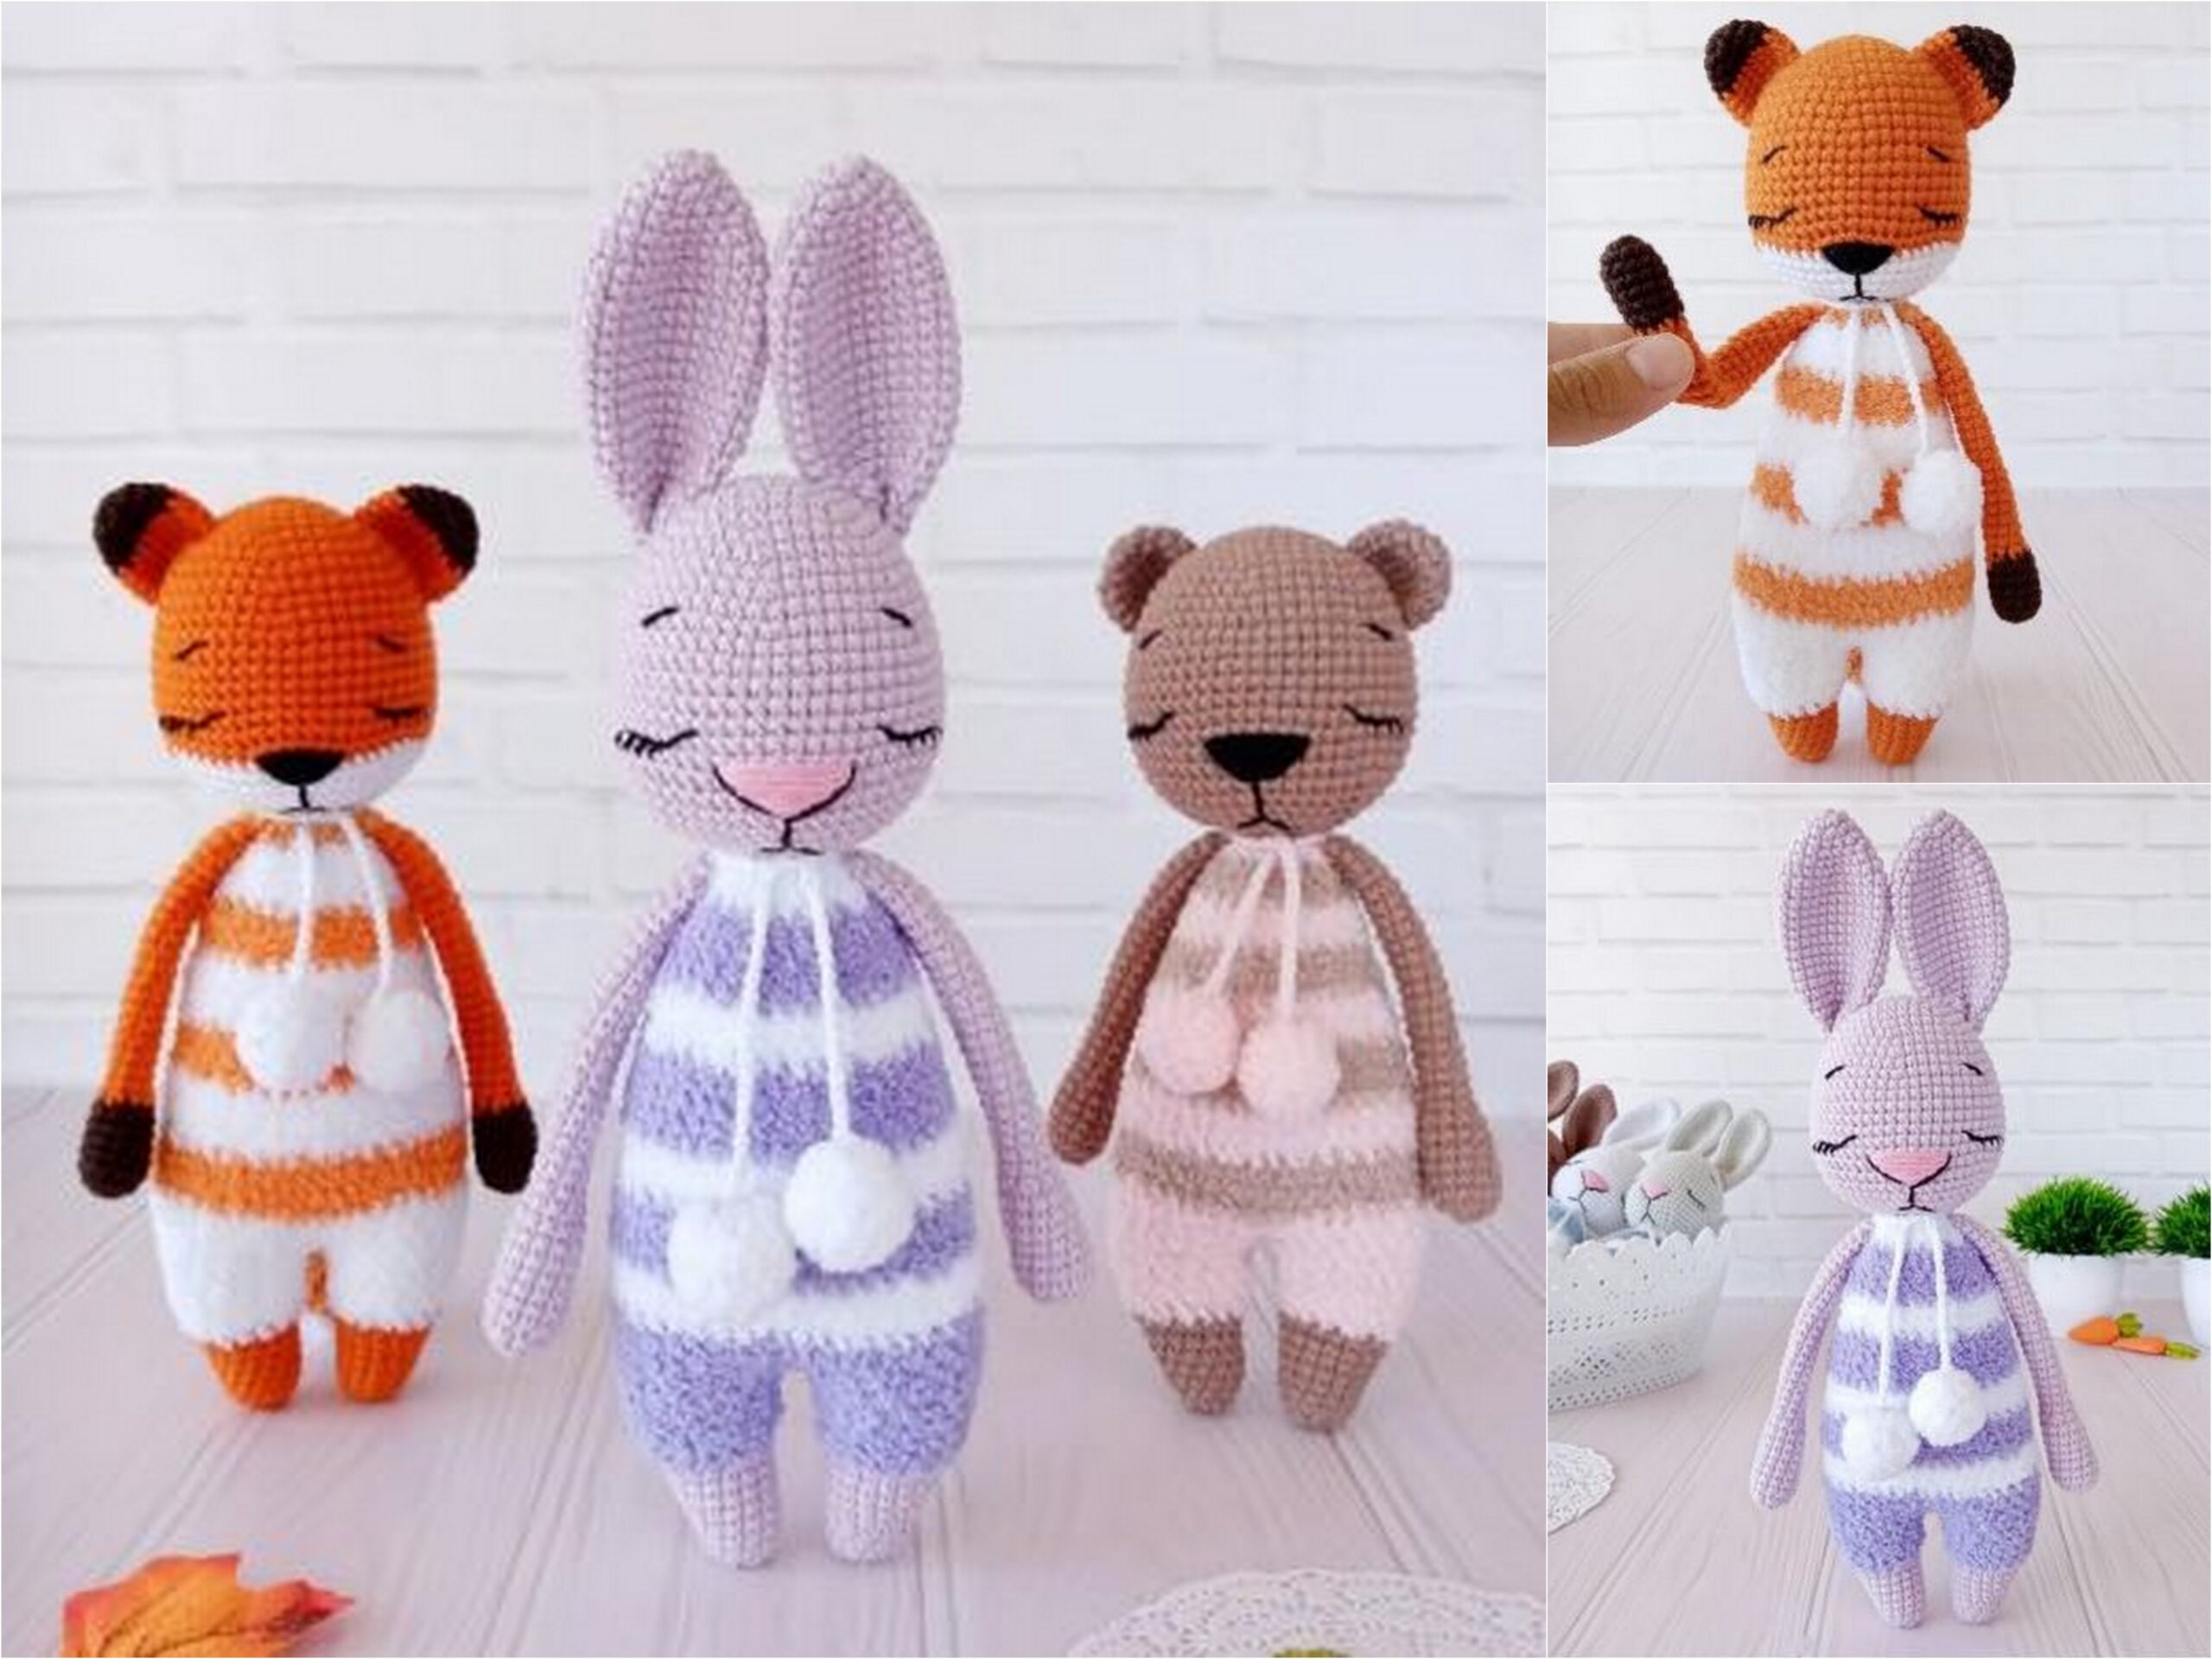
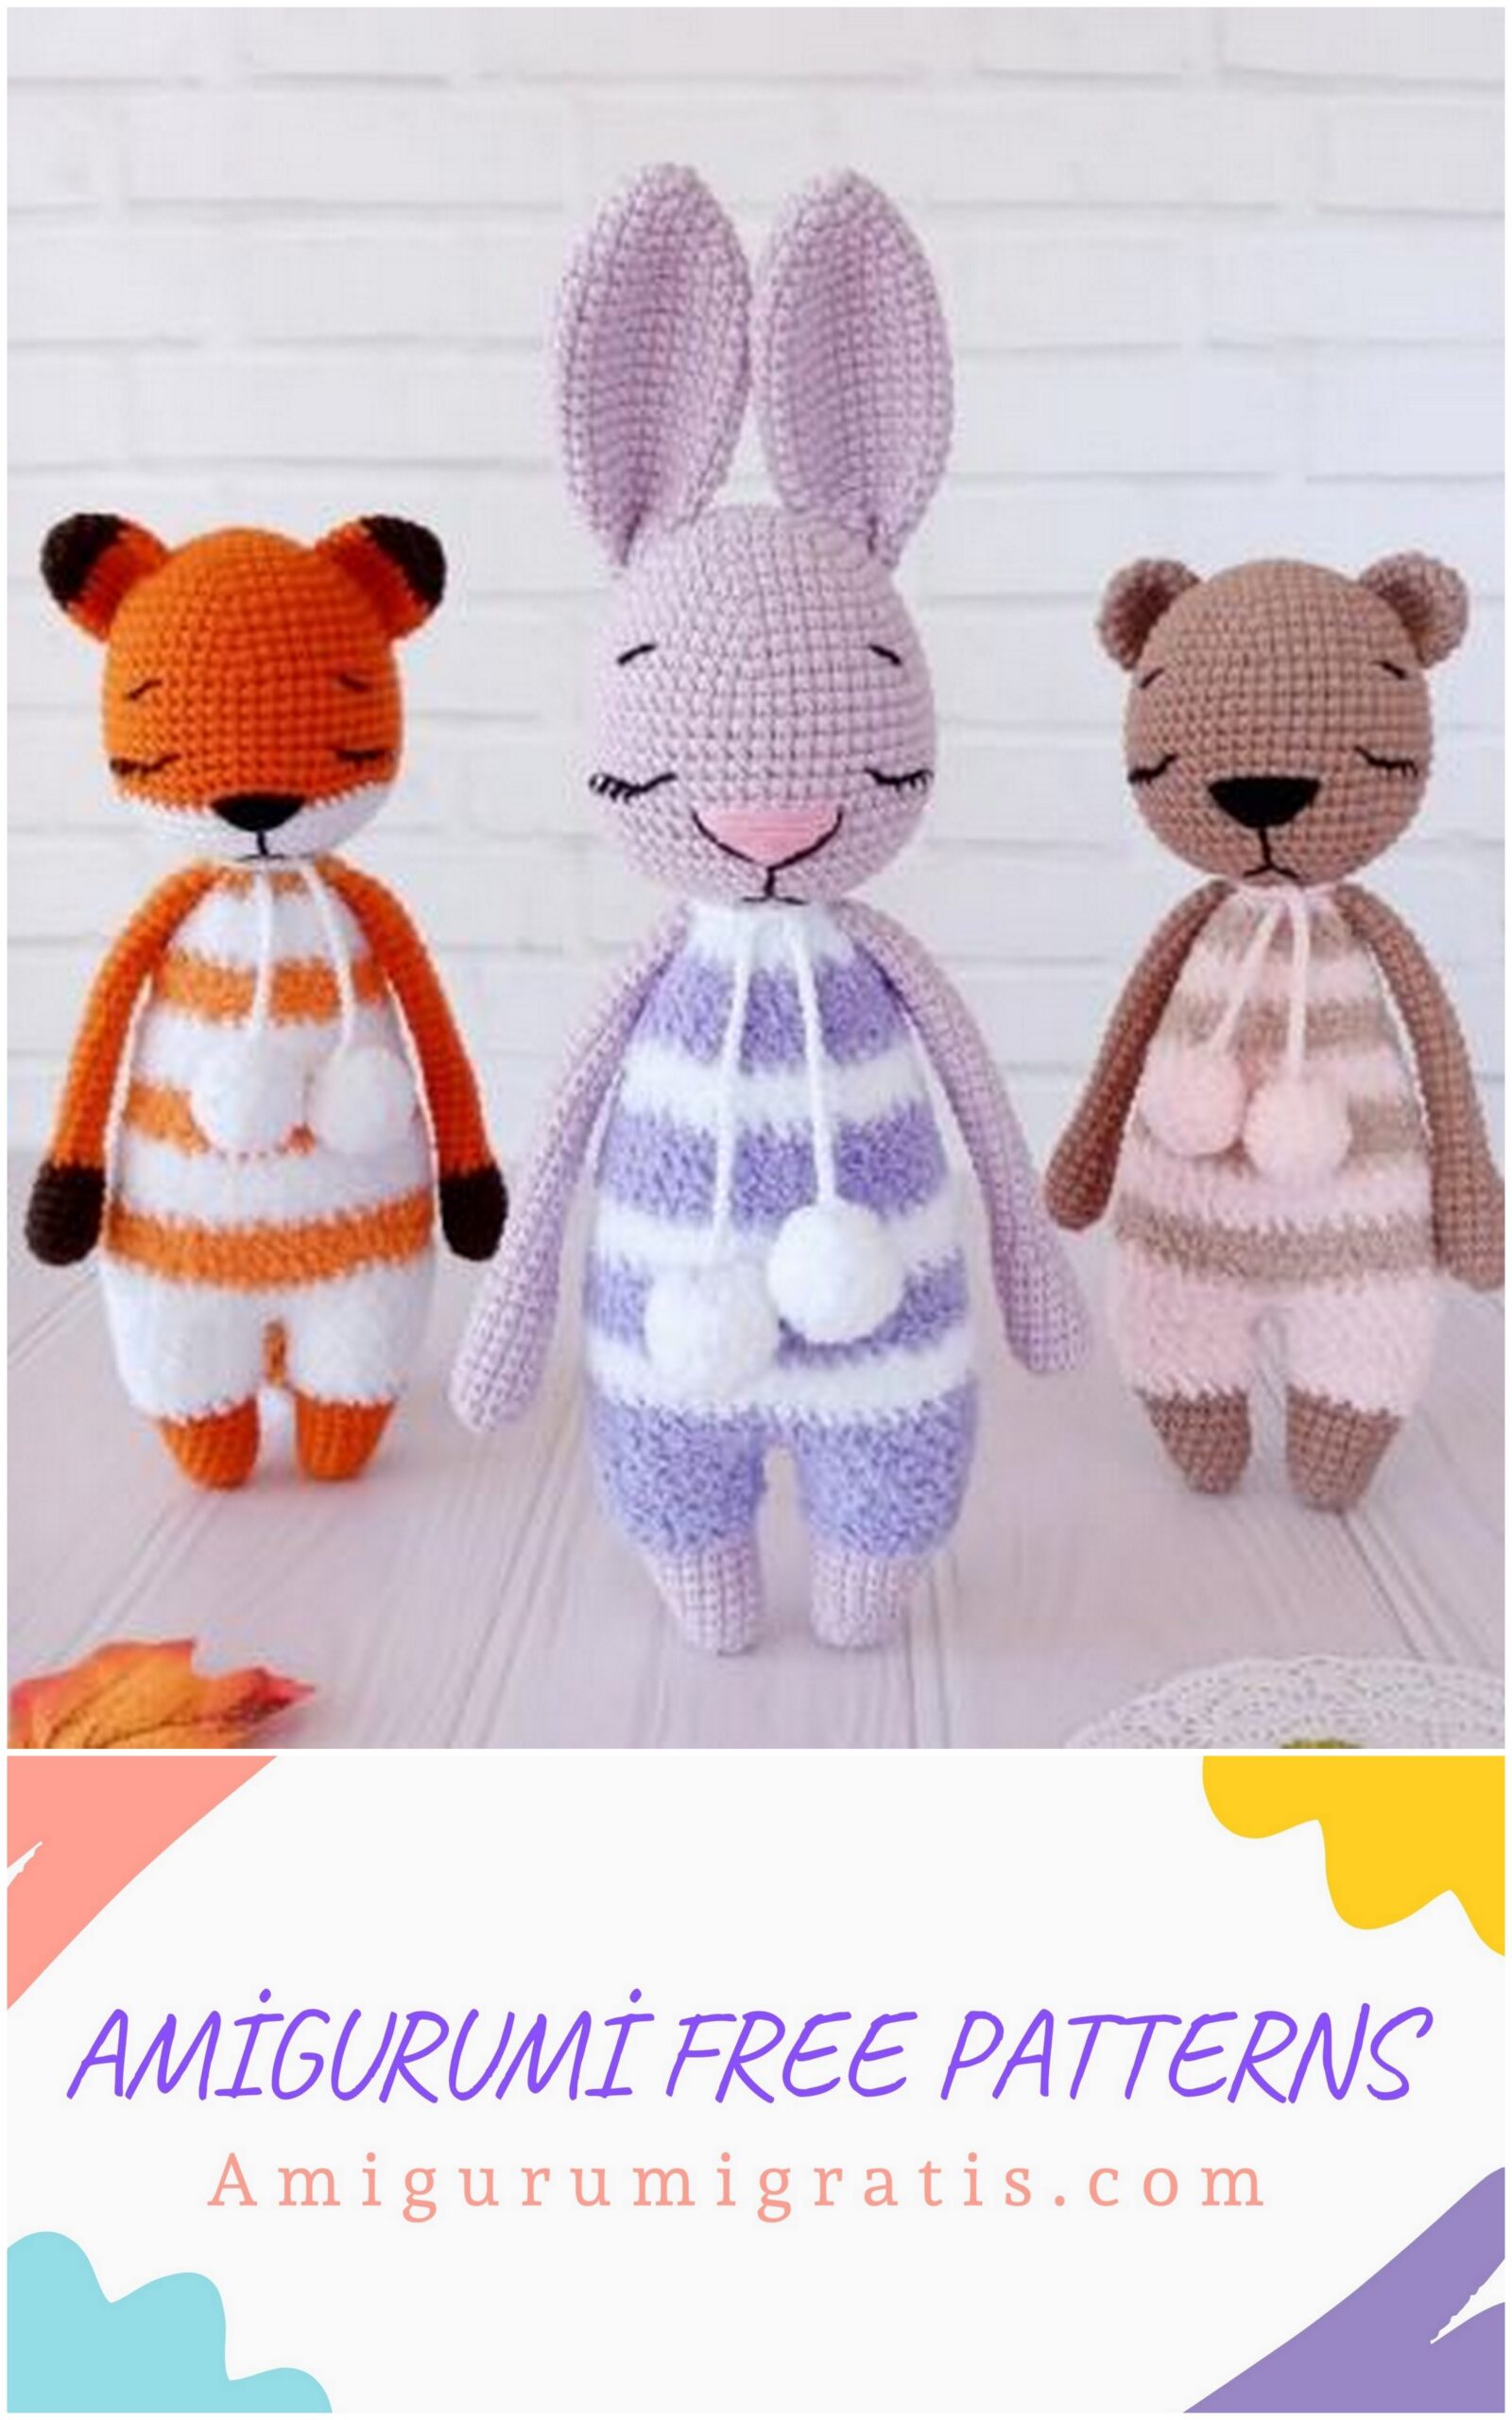
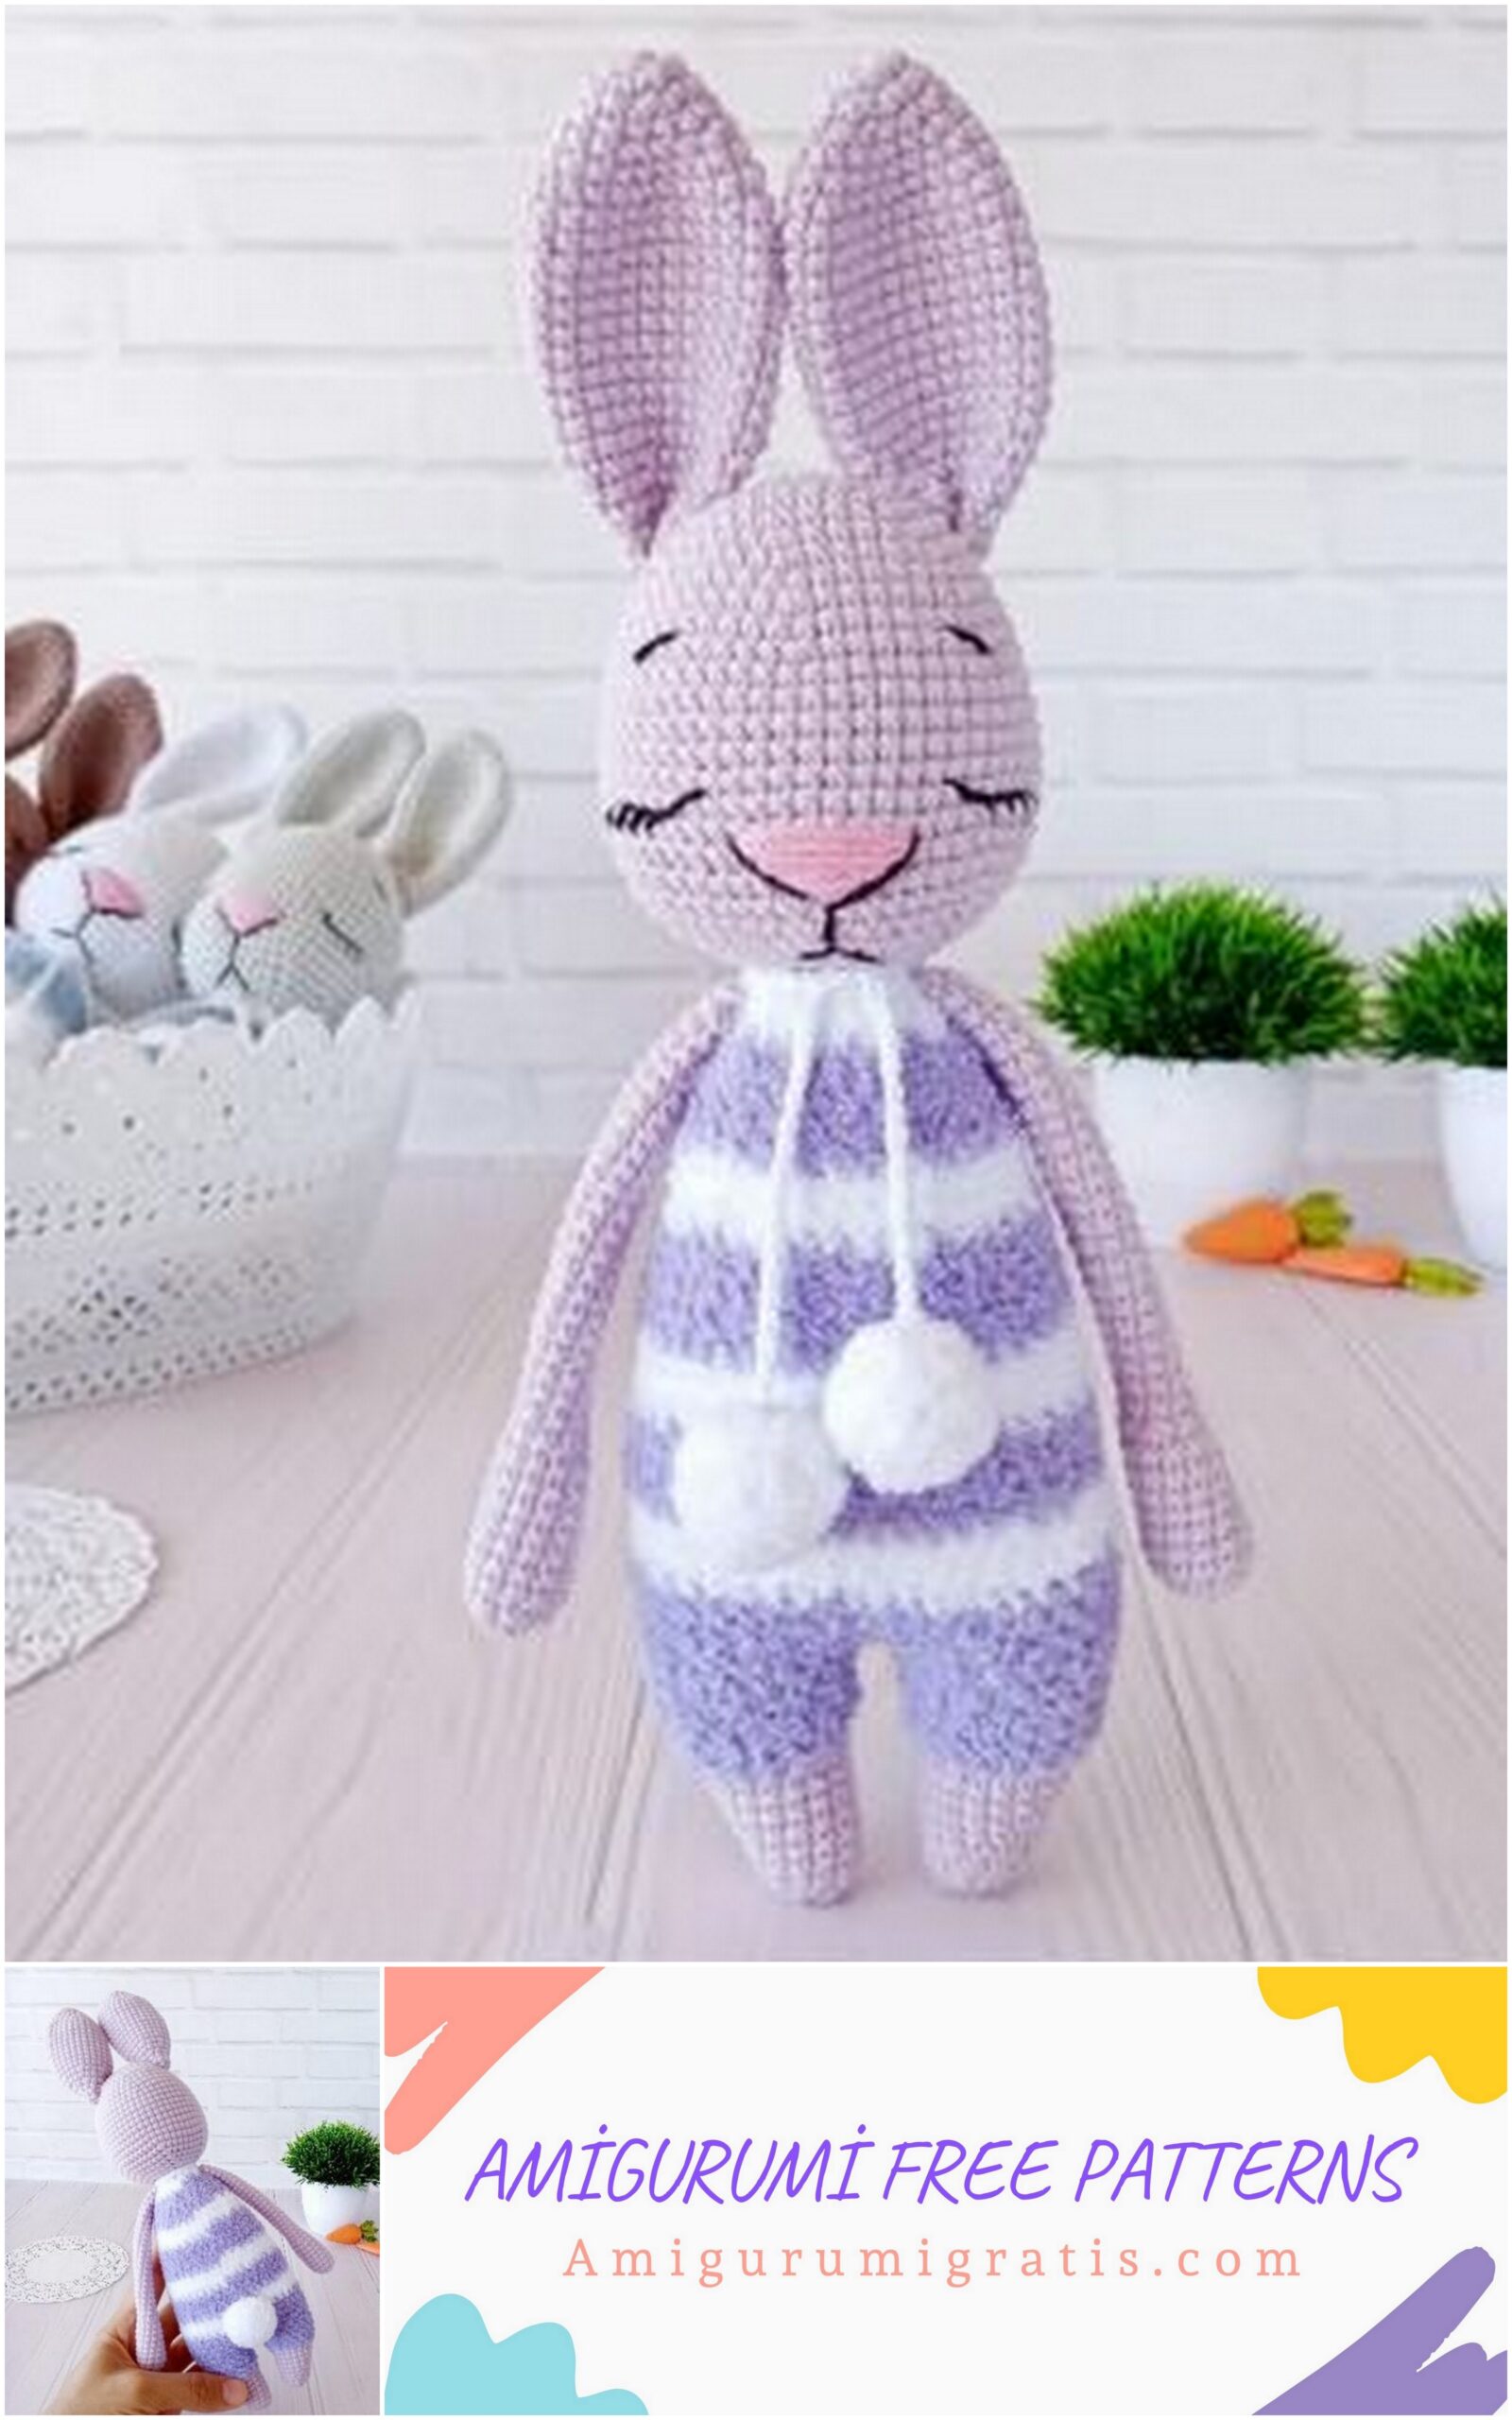
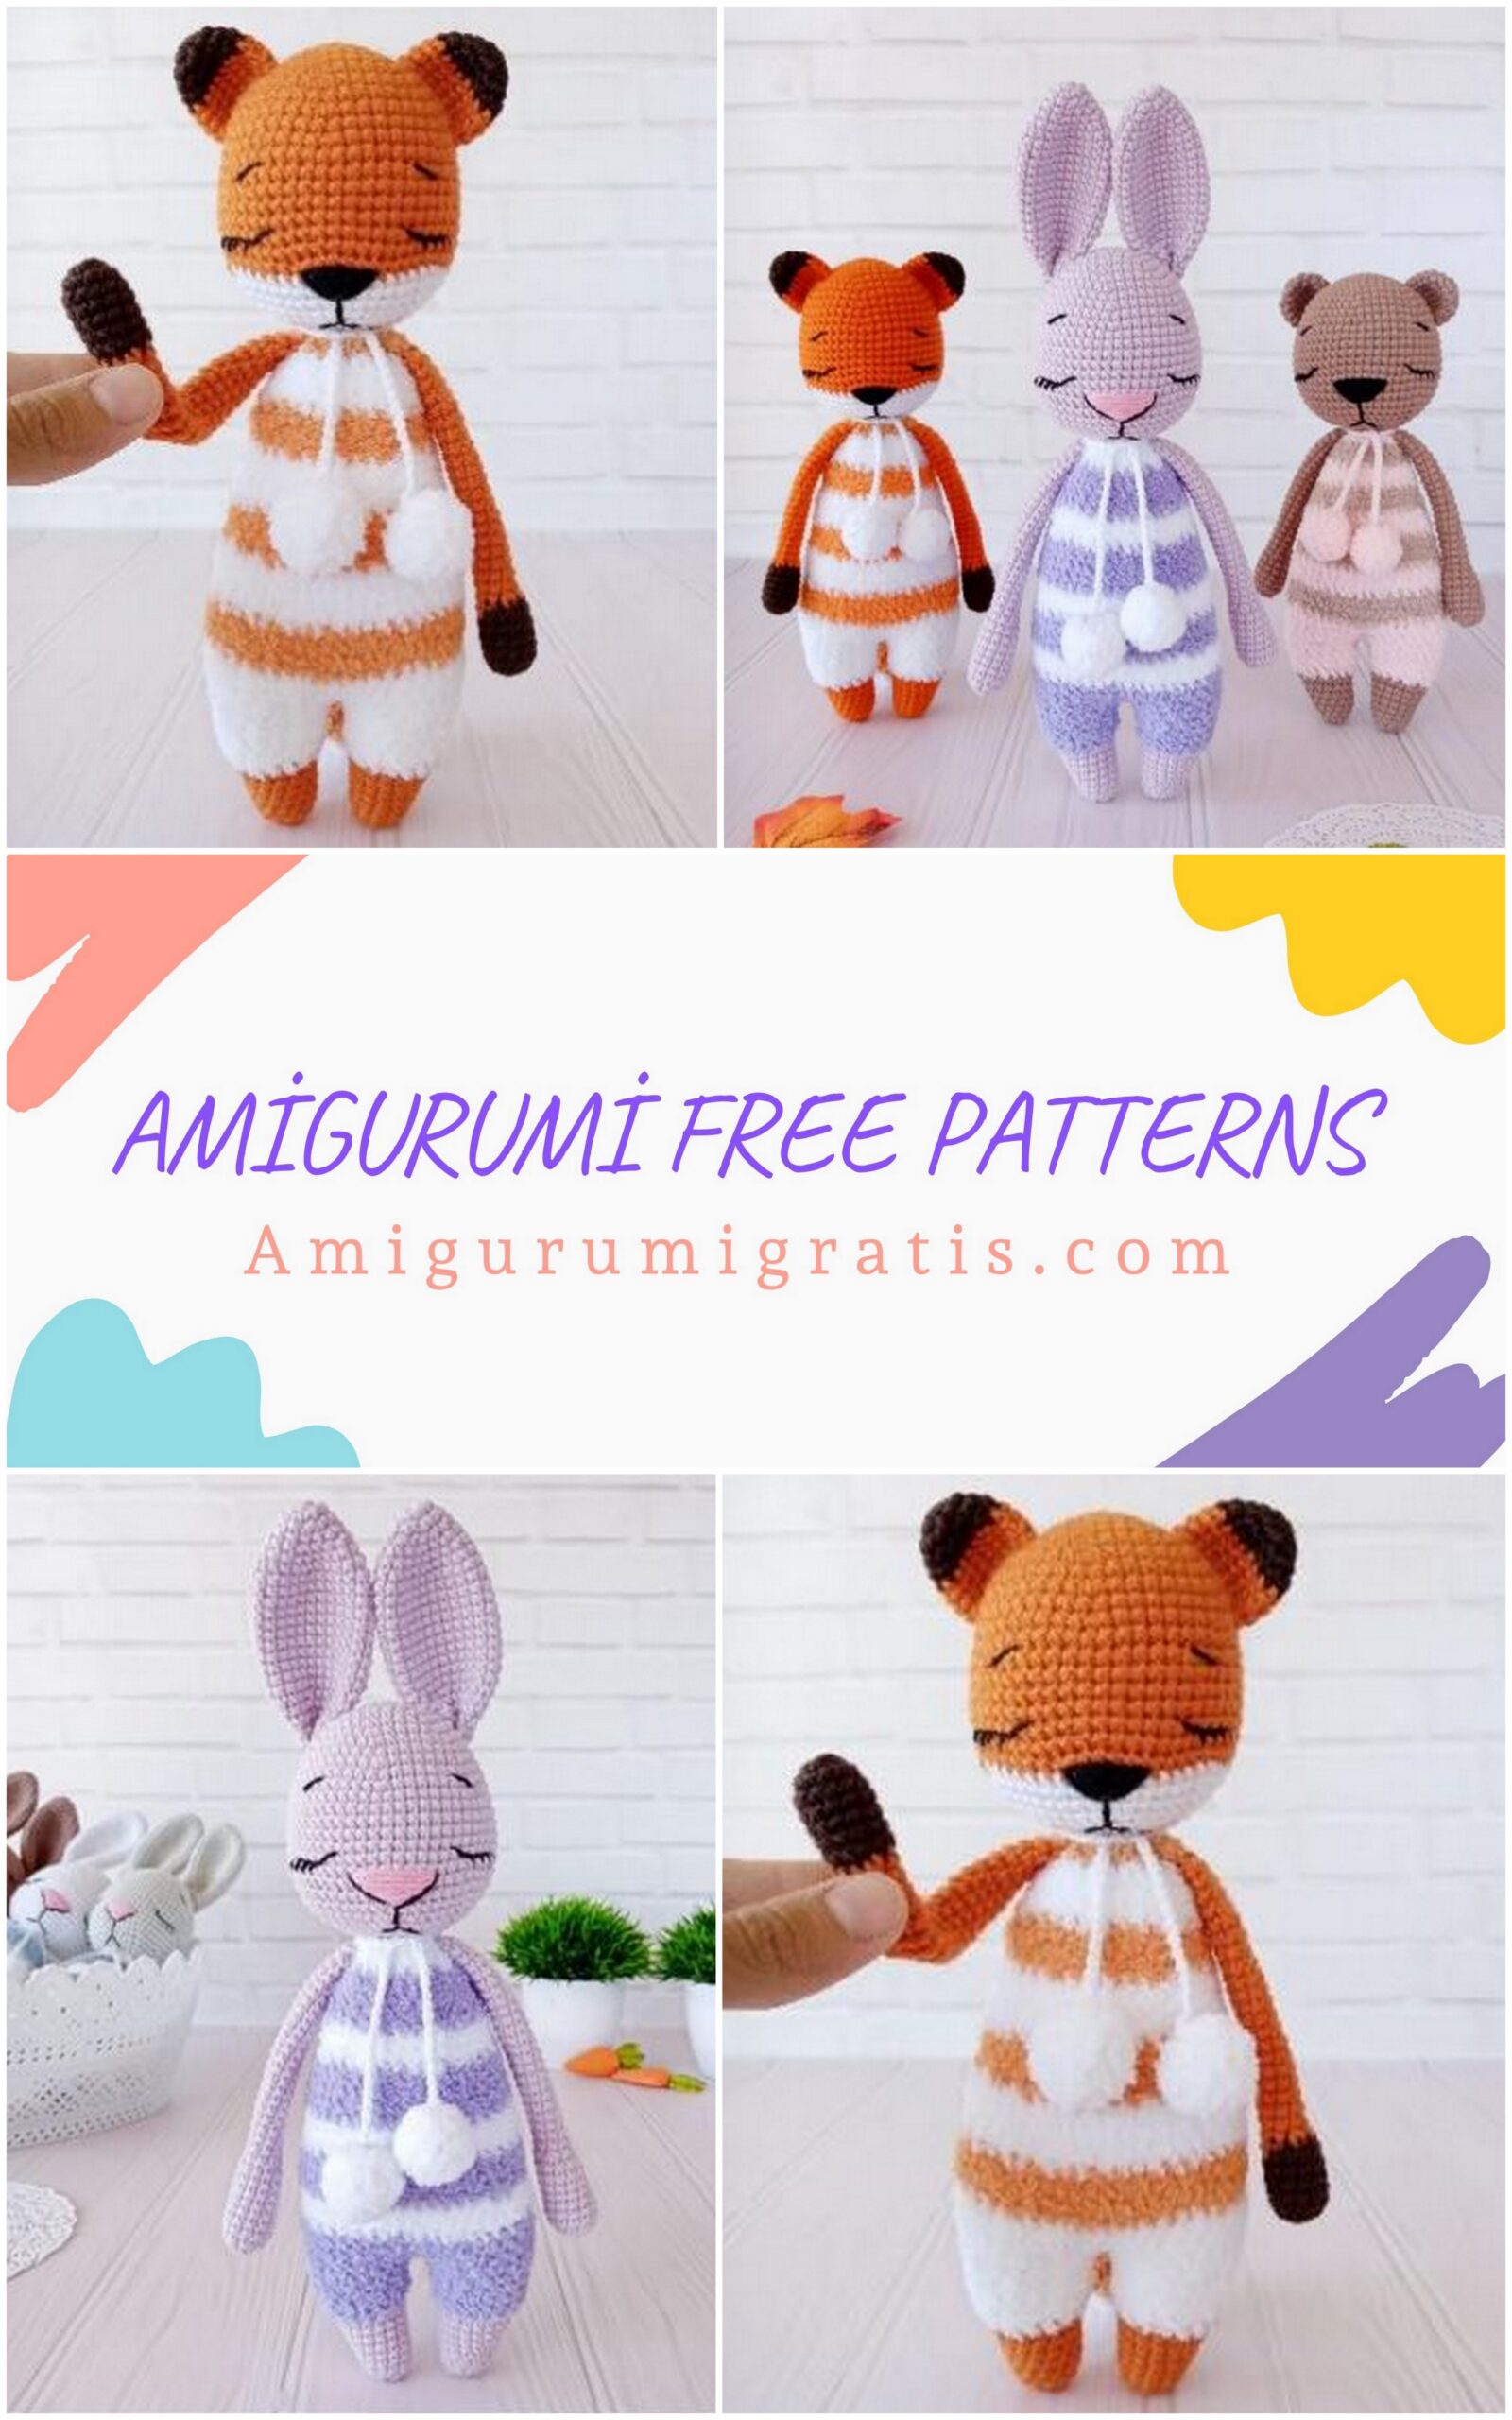
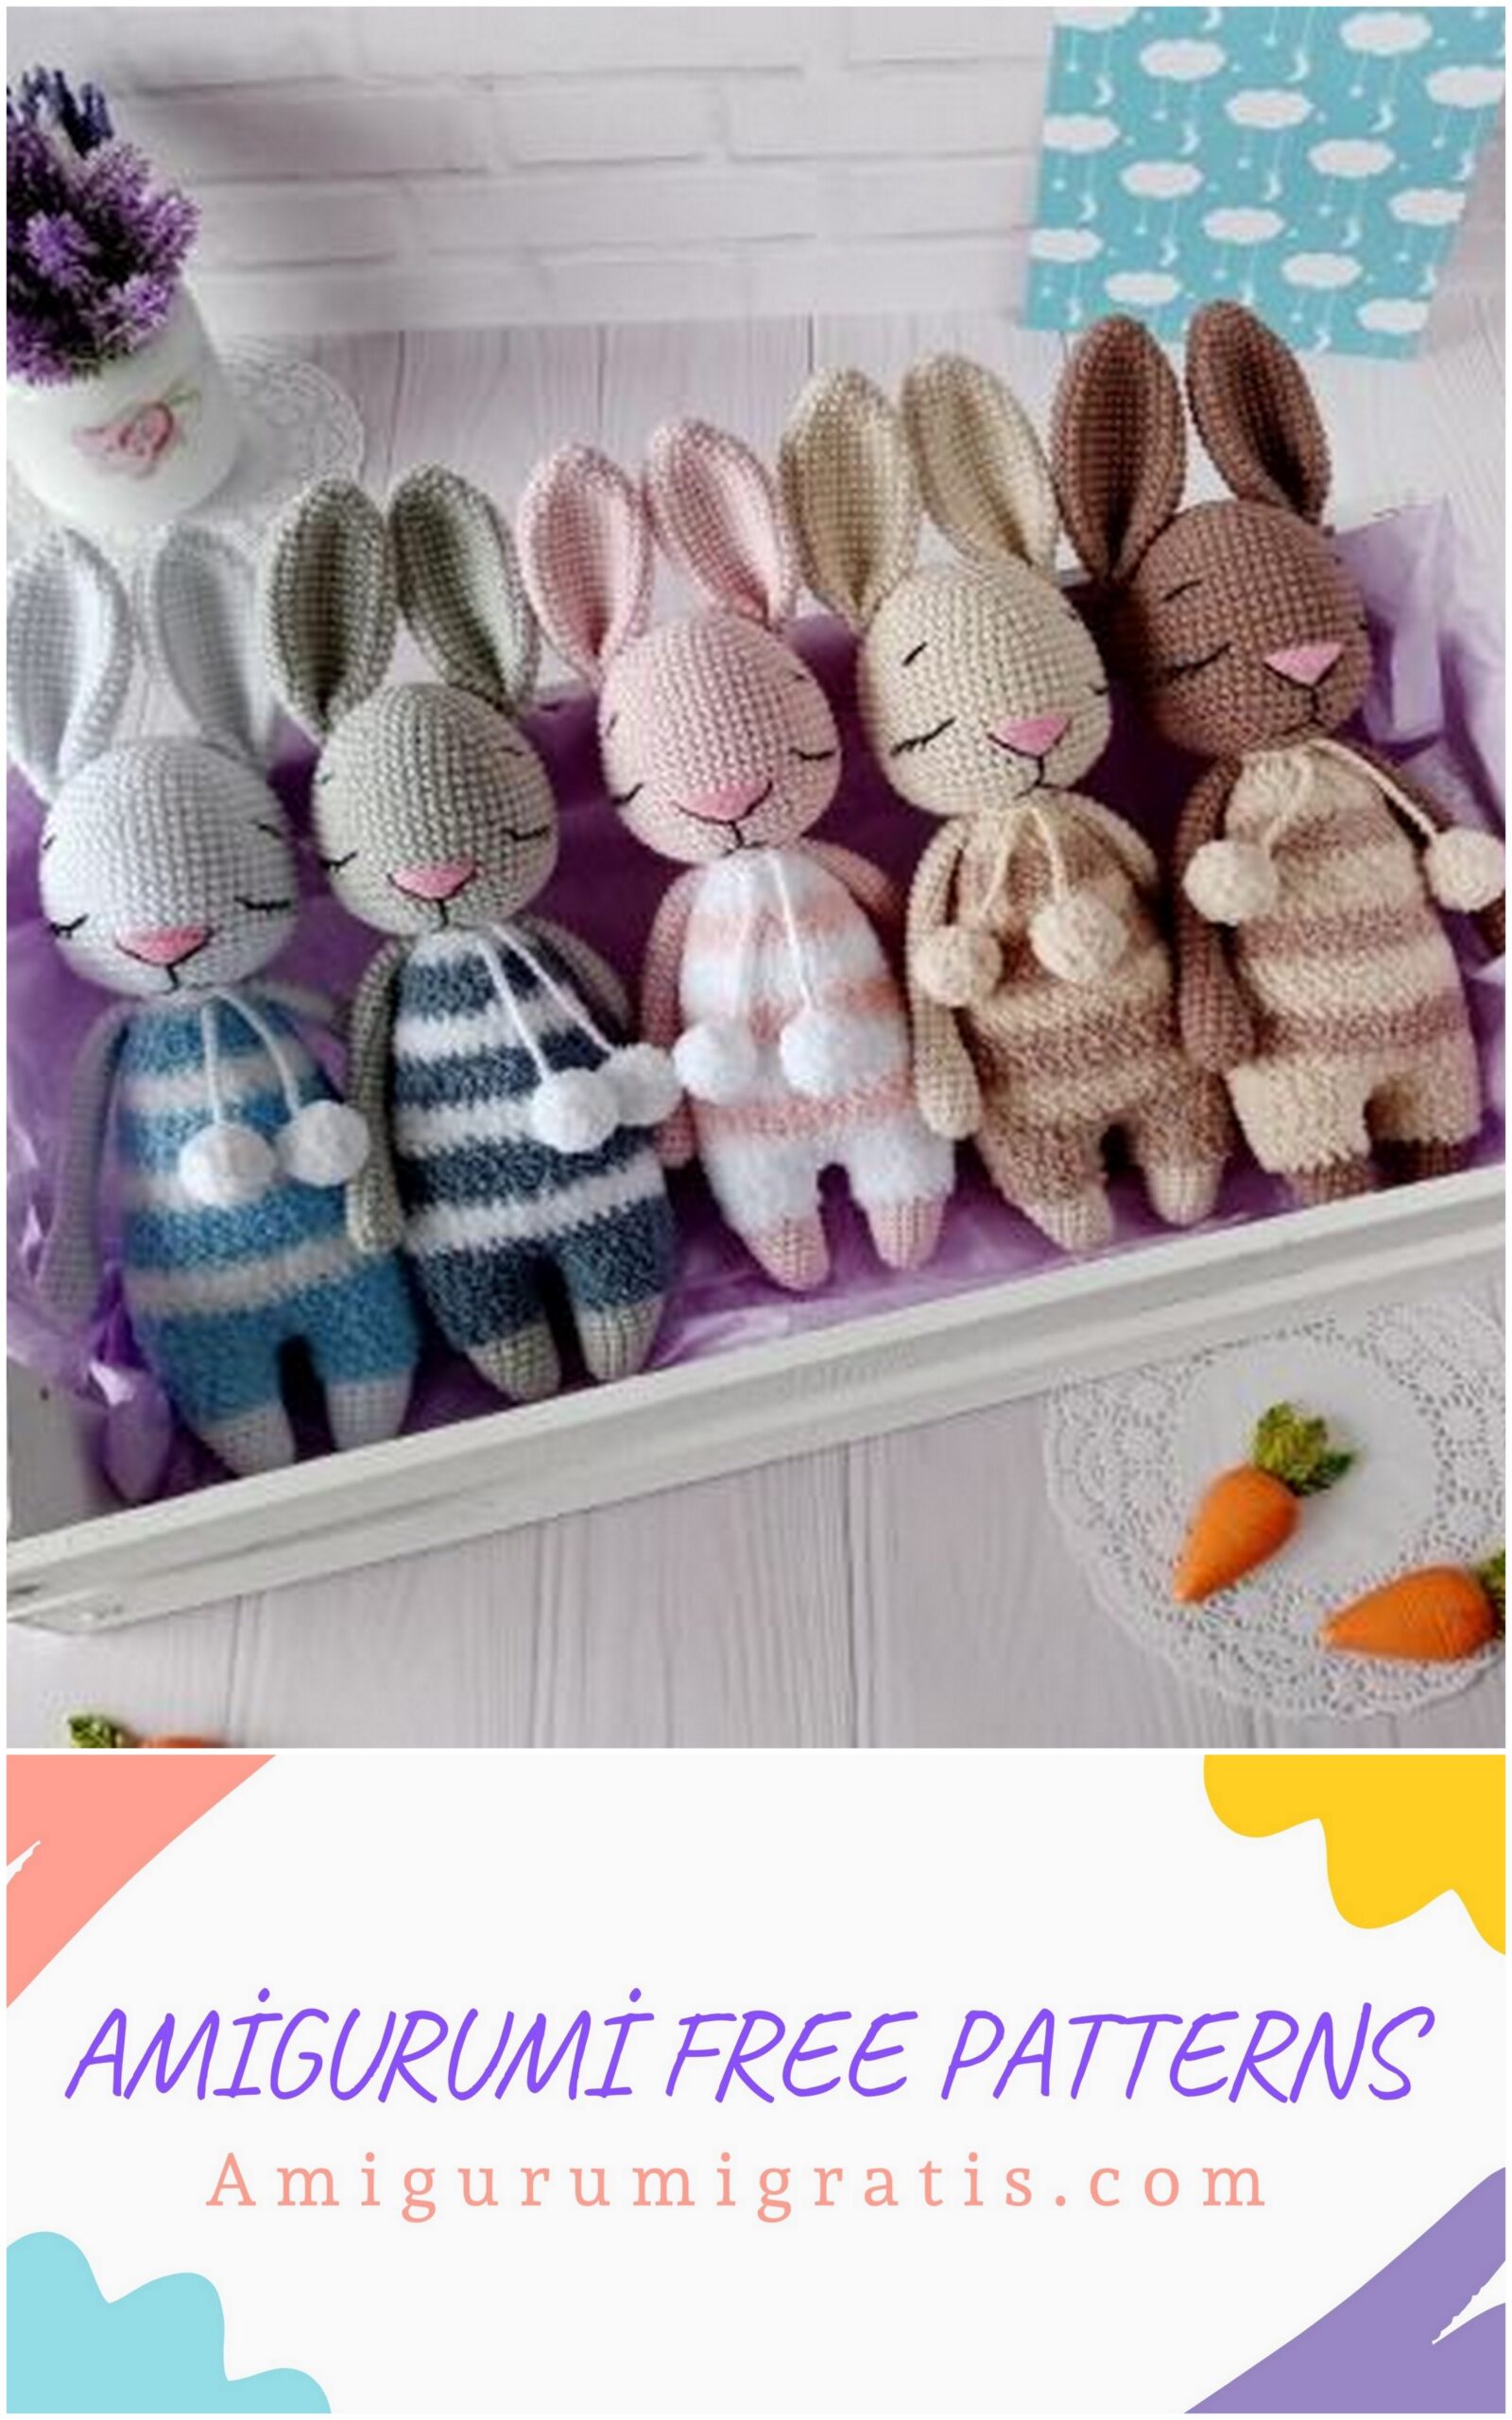
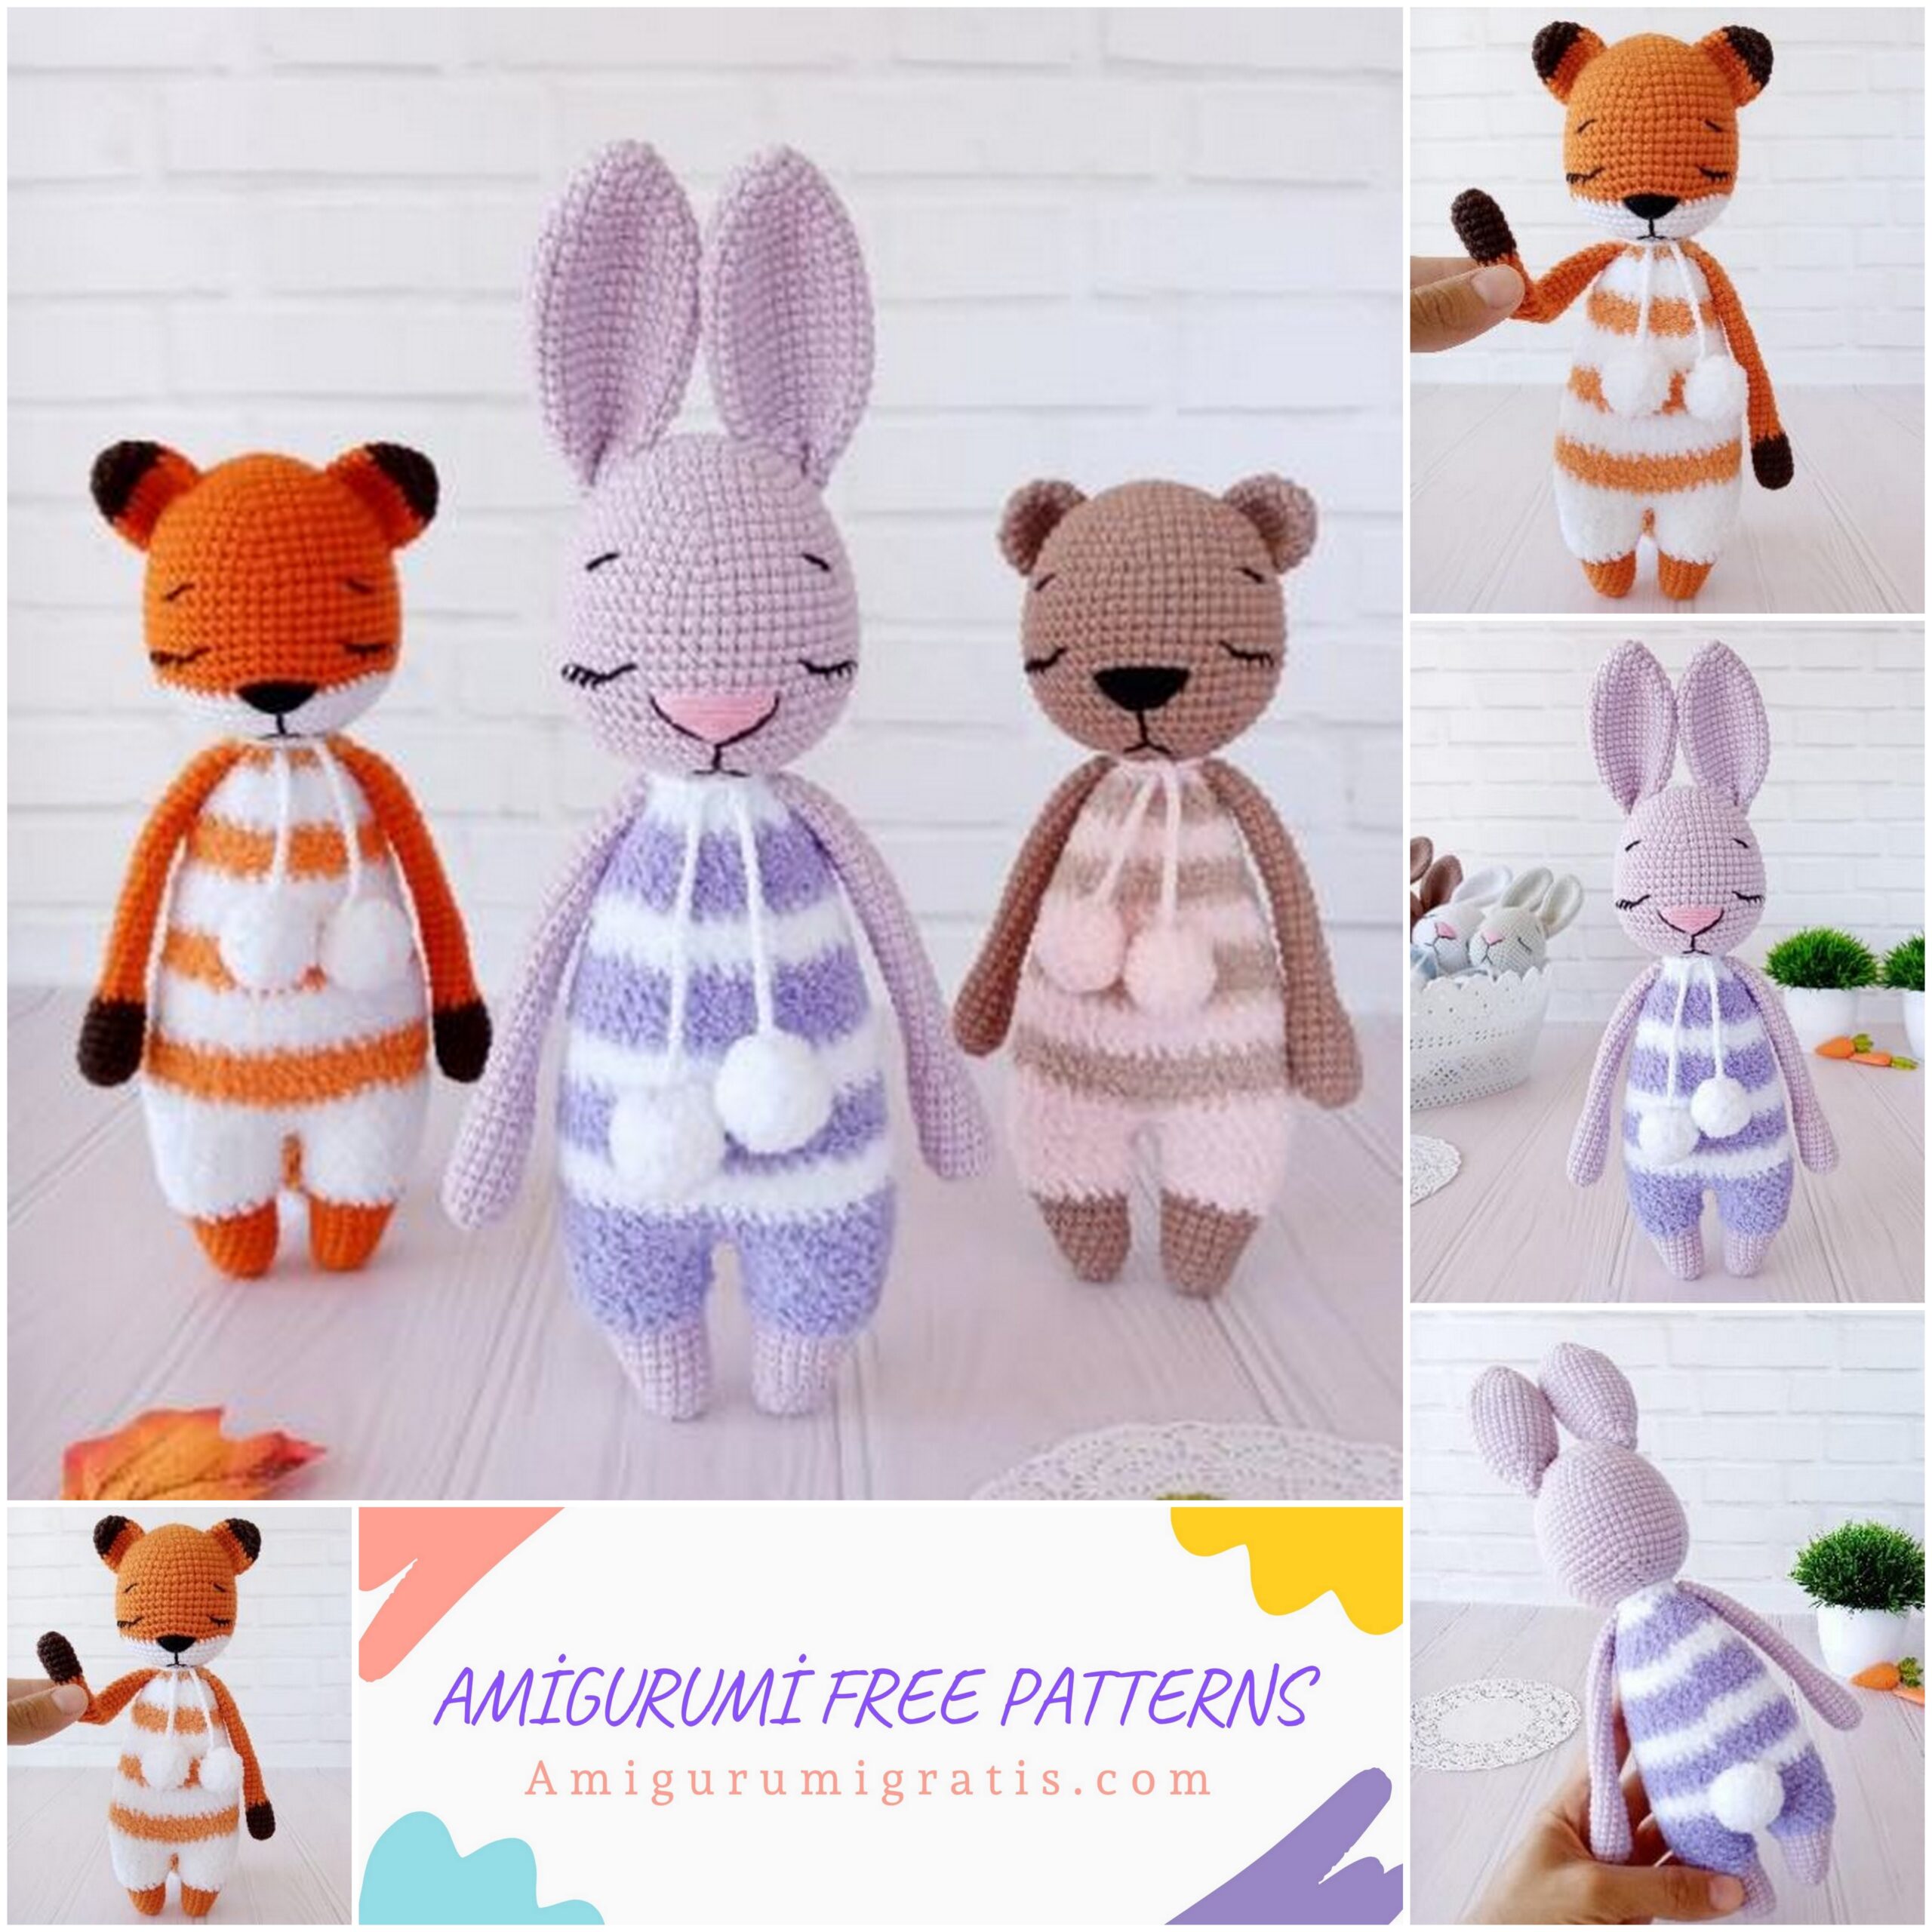
Option 1 “Bunny”
• Jeans YarnArt (55% cotton, 45% polyacrylic) lilac 19 – less skein for head and paws
• Alize Softy (100% micropolyester) lilac 158 and white 55 – a little from each skein for the striped body, ponytail and pompoms
• Jeans YarnArt (55% cotton, 45% polyacrylic) white 62, black 53, hot pink 42 – quite a bit to decorate the muzzle and details
Option 2 “Bear”
• Jeans YarnArt (55% cotton, 45% polyacrylic) coffee 71 – less skein per head and paws
• Alize Softy (100% micropolyester) coffee 617 and powder 340 for striped body, ponytail and pompoms
• Jeans YarnArt (55% cotton, 45% polyacrylic) pink 18 – for lace, black 53 – for muzzle decoration
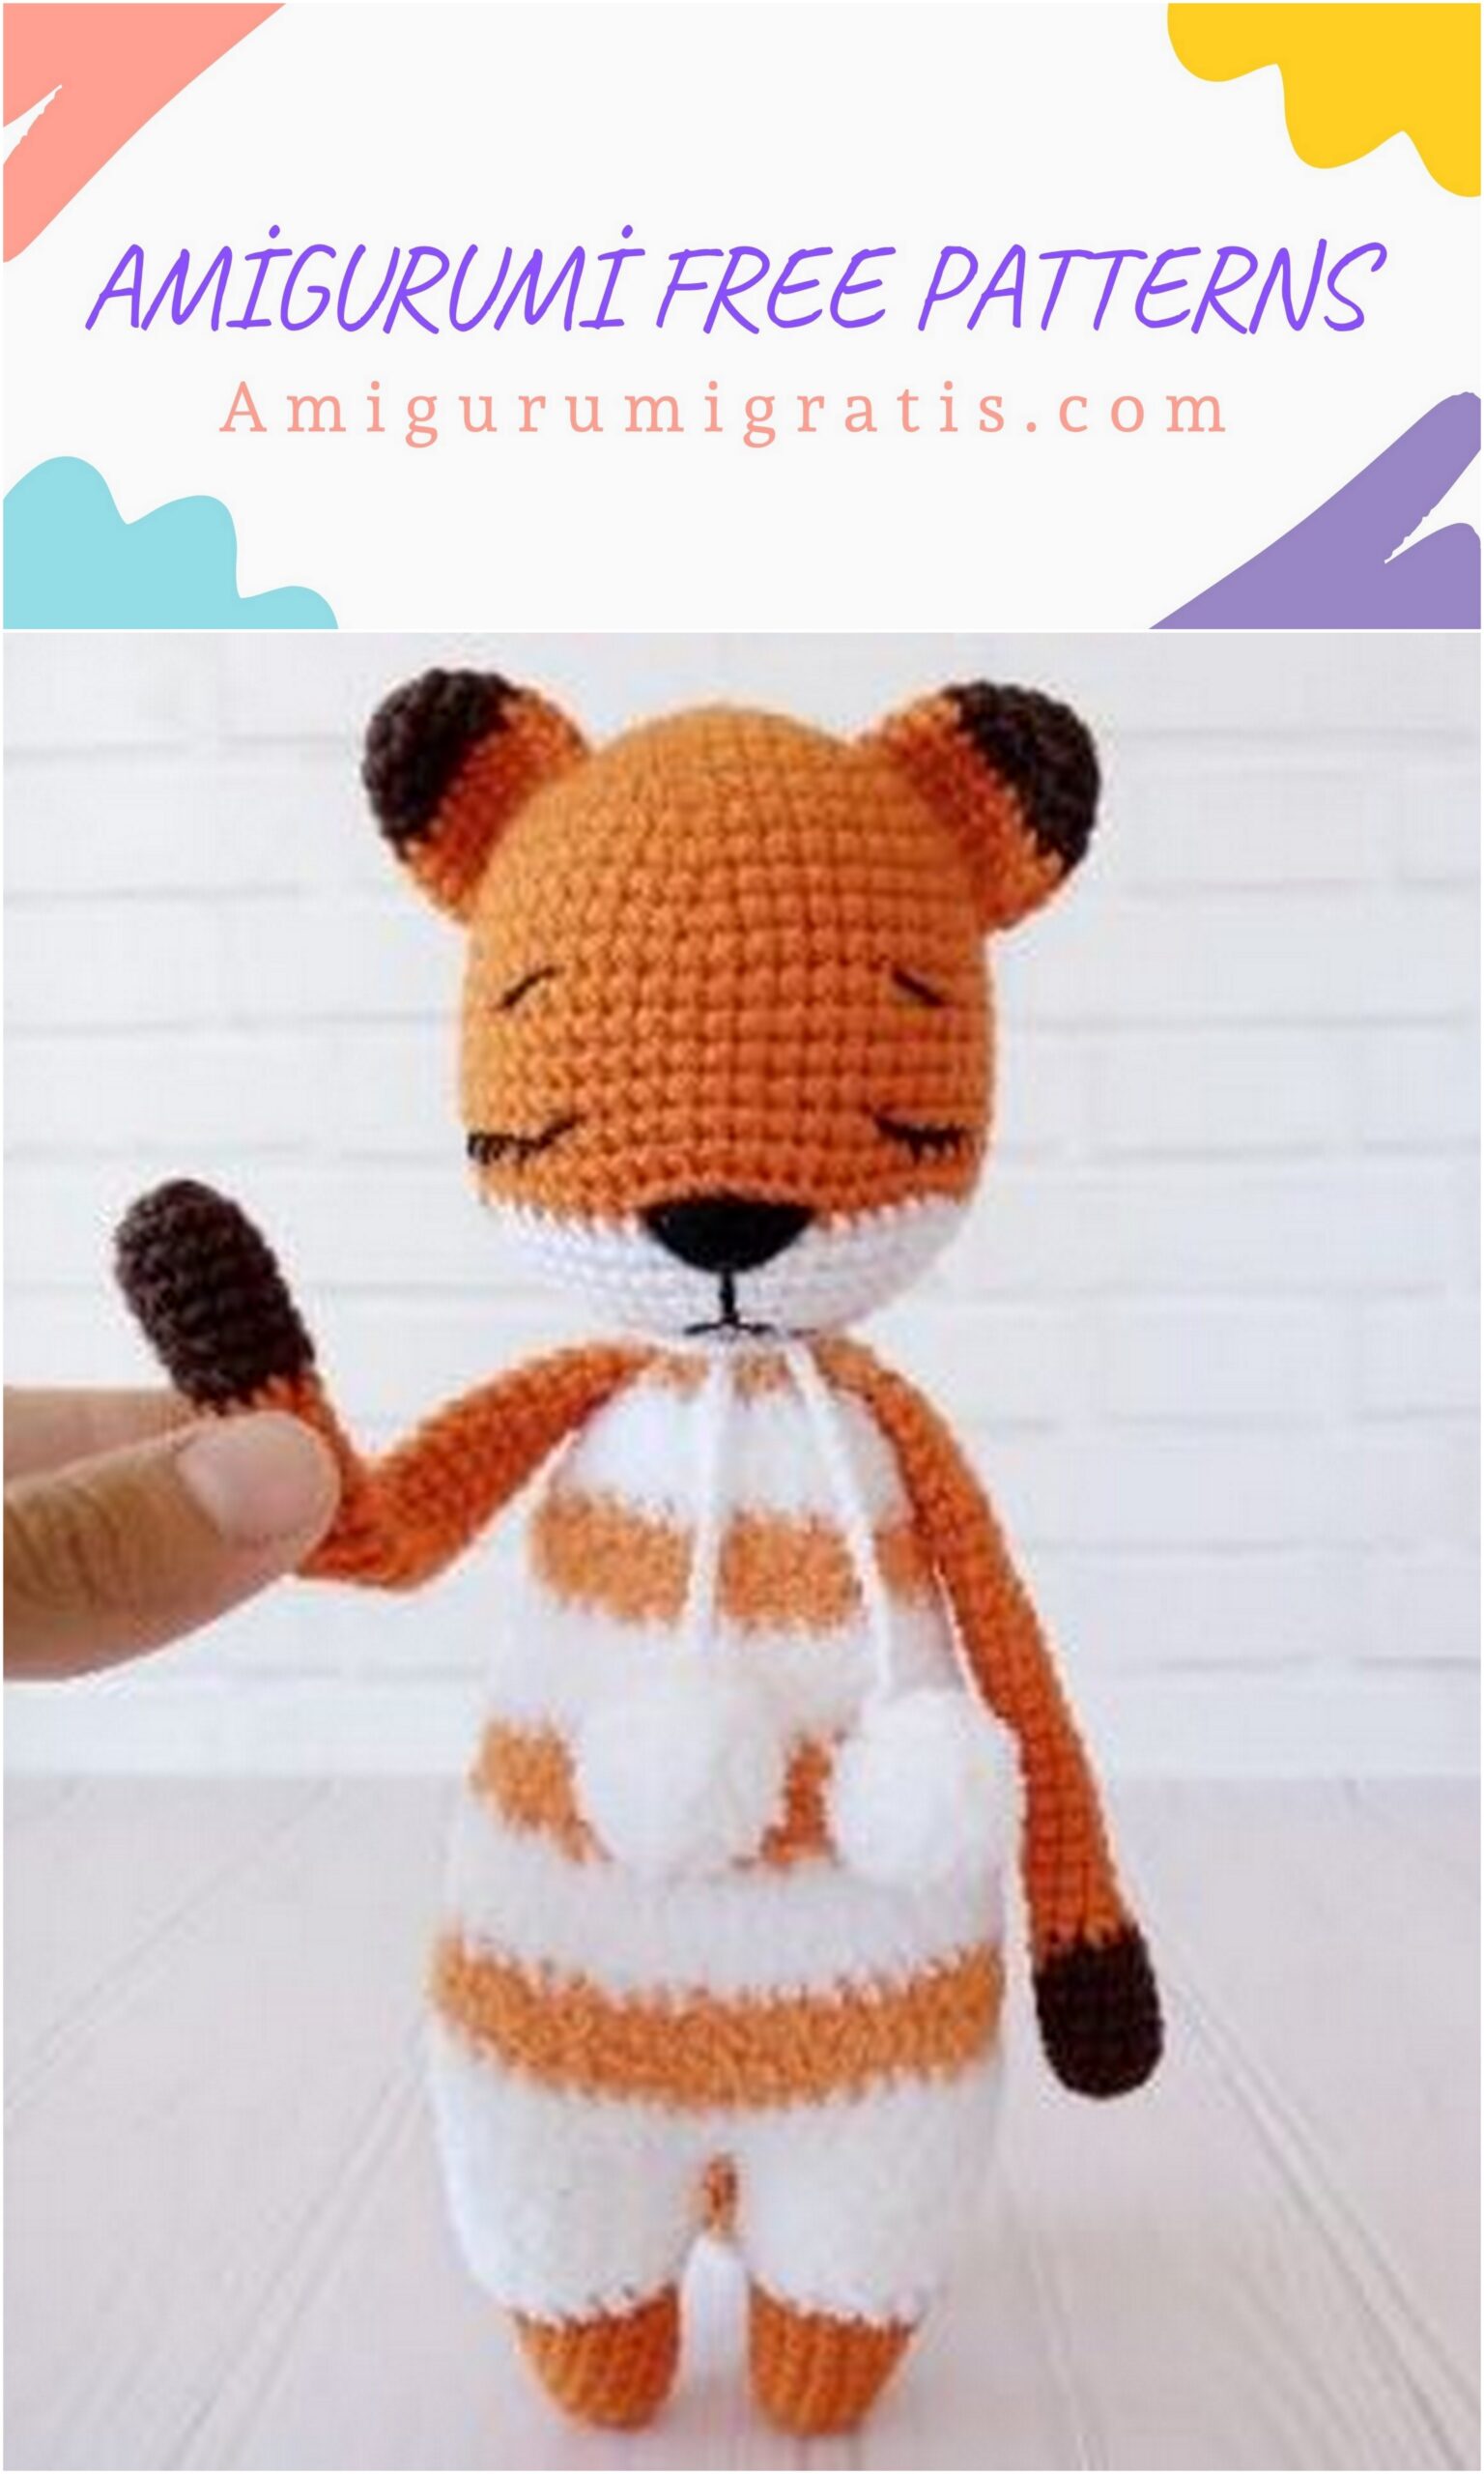
Option 3 “Fox”
• Jeans YarnArt (55% cotton, 45% polyacrylic) terracotta 85, white 62, chocolate 70 – a little on the head and paws
• Alize Softy (100% micropolyester) red 336 and white 55 for striped body, ponytail and pompoms
• Jeans YarnArt (55% cotton, 45% polyacrylic) white 62 – for lace, black 53 – for muzzle decoration
In addition to yarn, you will need the following materials and tools:
• The hook is one or two sizes smaller than indicated on the skein of yarn (in this work, a 1.75 mm hook was used)
• Filler – synthetic winterizer, synthetic winterizer or holofiber
• Tailor’s pins – for preliminary fastening of details.
• Needle – for sewing details
• Row counter (preferably) or paper with a pen to mark knitted rows
• Scissors
The full height of the toy, excluding the ears and using the specified materials, will be about 21-22 cm.
I present my own color scheme. If desired, you can use a different yarn and a combination of colors.
Symbols and recommendations for knitting
Symbols in the description:
CH – air loop
SC – single crochet
DEC – (decrease) knit 2 SC together
İNC – (increase) knit 2 SC in one loop
(12) – the number in brackets means the final number of loops in the row. The term amigurumi ring is also found in the text. There are several ways to knit an amigurumi ring, the following option was used for work, presented in the diagram:
Important nuances:
All parts are knitted in a spiral, that is, you do not need to make air loops for lifting.
In order not to lose the beginning of each row, with such knitting, it is imperative to use a marker.
As a marker to mark the beginning of the row, you can use improvised means, for example, a small pin or thread in a contrasting color.
Knitting in the amigurumi style should be tight, so the hook is taken one or two sizes less than the thickness of the yarn.
Knitting is done for both walls, unless otherwise indicated.
When decreasing, you need not just skip the loop by knitting the next one. It is necessary to thread through both loops and knit them together (as in the diagram below). In this way, unaesthetic holes can be avoided.
The process of creating a toy
Head
The yarn “jeans” is used (in this example, the color is lilac 19), the hook is 1.75 mm:
1st row: 6SC in amigurumi ring (6)
2 row: in each loop 2SC (12)
3 row: 1SC, İNC – repeat 6 times (18)
4 row: 2SC, İNC – repeat 6 times (24)
5 row: 3SC, İNC – repeat 6 times (30)
6 row: 4SC, İNC – repeat 6 times (36)
7 row: 5SC, İNC – repeat 6 times (42)
8 row: knit one row of SC without changes (42)
9 row: 6SC, İNC – repeat 6 times (48)
10 row: we knit one row of SC without changes (48)
11 row: 7SC, İNC – repeat 6 times (54)
12-20 row: knit 9 rows of SC without changes (54)
21 row: 7SC, DEC – repeat 6 times (48)
22 row: 6SC, DEC – repeat 6 times (42)
23 row: 5SC, DEC – repeat 6 times (36)
24 row: 4SC, DEC – repeat 6 times (30)
25 row: 3SC, DEC – repeat 6 times (24)
26 row: 2SC, DEC – repeat 6 times (18)
We cut the thread of sufficient length for sewing on the head, we stuff the part well
! For a bear and a fox, the head pattern is similar. But
fox cub the lower part of the head will be white.
From 1 to 18 rows we knit with the color “terracotta” 85, from 19 to 26 with white color “white” 62


torso
We knit the torso, starting with the legs from the jeans yarn 19. Then we move on to Softy
(colours lilac 158 and white 55)
We stuff the part in the process of knitting
The hook for both types of yarn is the same – 1.75 mm.
1st row: 6SC in amigurumi ring (6)
2 row: in each loop 2SC (12)
3 row: knit one row of SC without changes (12)
4th row: İNC, 11SC (13)
5 row: İNC, 12SC (14)
6th row: İNC, 13SC (15)
7 row: İNC, 14SC (16)
8 row: İNC, 15SC (17)
9 row: İNC, 16SC (18)
10 row: 9SC with Jeans yarn, then change to Lilac Softy and knit the remaining 9 SC (18)
Important! the countdown of the beginning of the row will now move to the junction of these two threads.
We cut the semi-cotton thread and tie it in a knot with the plush thread on the wrong side of the knitting.
Continue knitting with plush yarn.
11-13 row: (lilac color) we knit 4 rows of SC without changes (18)
Next, we break the thread and leave the first leg for now.
We knit the second leg in the same way as the first one up to the 13th row. We do not break the thread from the second leg, but knit 3 air loops (a jumper between the legs) and attach the first leg. We combine the details.
Please note that the reductions should be located on the outer sides (on the sides)
! Now, from the 14th row, the beginning of knitting will be counted from the jumper from the air loops
(Approximately in the middle you will need to install a marker). The back of the toy will be here and in the same place the color will change when knitting the strips.
! On plush yarn, loops are difficult to see and knitting is mostly intuitive. The marker will help to approximately observe the correct number of loops in a row.
! Tip: If at the end of the row, you lost or, on the contrary, counted extra loops (within 1-2), you should not worry or bandage the row. Decrease or add loops at the end of the row and try to correct in the next row)
Due to the texture of the yarn, such minor errors will not be visible.
! For additional control, use a row counter or write down the number of knitted rows on paper.
14-17 row: (siren) We combine the parts, knit 4 rows in a circle SC, knitting jumpers on one side and on the other. Total after combining the legs + jumper loops in a row should you get 42 loops (42)
18-20 row: (white) knit 3 rows of SC without changes (42)
21-24 row: (siren) knit 4 rows of SC without changes (42)
25-27 row: (white) knit 3 rows of SC without changes (42)
28-31 row: (siren) 4 rows SC (42)
32 row: (white) 5SC, DEC – repeat 6 times (36)
33-34 row: (white) knit 2 rows of SC without changes (36)
35 row: (siren) 4SC, DEC – repeat 6 times (30)
36-37 row: (siren) knit 2 rows of SC without changes (30)
38 row (siren) 3SC, DEC – repeat 6 times (24)
39-40 row: (white) knit 2 rows of SC without changes (24)
41 row (white) 2SC, DEC – repeat 6 times (18)
We finish knitting. We tie and remove the threads. The body must be well and densely stuffed
Front legs
We knit with yarn “jeans” 19 front paws, we stuff in the process of knitting:
1st row: 6SC in amigurumi ring (6)
2 row: in each loop 2SC (12)
3-8 row: knit 6 rows of SC without changes (12)
9 row: 2SC, DEC – repeat 3 times (9)
10-29 row we knit 20 rows of SC without changes (9)
We cut the thread, we knit the second paw in the same way.
We stuff only the lower part of the foot, leaving the “thin” part without stuffing.
Mishka and Fox’s paws are knitted in the same way.
The only paw tips of the chanterelle need to start with dark brown yarn (70 “chocolate”)
Knit 8 rows, to decrease and go to the main color “terracotta” 85
Ears
We knit the ears with jeans yarn 19 (two parts):
1 row: 6 SC in an amigurumi ring (6)
2 row: in each loop 2 SC (12)
3 row: knit one row of SC without changes (12)
4 row: 1 SC, İNC – repeat 6 times (18)
5 row: knit one row of SC without changes (18)
6 row: 2SC, İNC – repeat 6 times (24)
7-17 row: knit 11 rows of SC without changes (24)
18 row: 2SC, DEC – repeat 6 times (18)
19 row: we knit one row of SC without changes (18)
20 row: 1SC, DEC – repeat 6 times (12)
21-22 row: knit two rows of SC without changes (12)
Cut the thread long enough for stitching. We sew the ears. We fold the lower part, “pinch” and also fix it with yarn of the same color as the ears are connected. The ears of the bear are knitted as follows:
1 row: 6 SC in an amigurumi ring (6)
2 row: in each loop 2 SC (12)
3 row: 1 SC, İNC – repeat 6 times (18)
4-6 row: knit 3 rows of SC without changes (18)
Fold the ears into a flat shape and sew the edges
For the chanterelle, we start with brown 70 yarn:
1 row: 6 SC in an amigurumi ring (6)
2 row: in each loop 2 SC (12)
3 row: knit one row of SC without changes (12)
4 row: 1 SC, İNC – repeat 6 times (18)
Change color to terracotta 85
5-8 row: knit 4 rows of SC without changes (18)
Fold the ears into a flat shape and sew the edges
Tail
1 row: 6 SC in an amigurumi ring (6)
2 row: in each loop 2 SC (12)
3 row: 1 SC, İNC – repeat 6 times (18)
4-6 row: knit 3 rows of SC without changes (18)
We cut the thread.
For a bear we knit a similar tail
For a chanterelle, the tail is knitted according to the following pattern:
We start with the white “Softy” 55
1 row: 6 SC in an amigurumi ring (6)
2 row: in each loop 2 SC (12)
3 row: knit one row of SC without changes (12)
Switching to red color 336
4 row: 1 SC, İNC – repeat 6 times (18)
5-15 row: knit 11 rows of SC without changes (18)
16 row: 1SC, DEC, – repeat 6 times (12)
17-18 row: knit 2 rows of SC without changes (12)
We break the thread, the tails are ready.
pom poms
We knit small pom-pom balls from plush yarn (two parts)
1 row: 6 SC in an amigurumi ring (6)
2 row: in each loop 2 SC (12)
3-5 row: knit 3 rows of SC without changes (12)
6 row: DEC – repeat 6 times (6)
It is good to fill the ball with filler. Sew, pull off the hole, hide the ends of the threads. For a lace, cast on a chain of 60 air loops from jeans yarn of a suitable color. Sew pom-poms to the ends of the lace.
The resulting lace is simply tied around the neck of the toy.
Making and assembling toys
Sew on the head
For convenience, we fix the head on a knitting needle or a long needle.
We sew the body and head securely. We follow the even position of the parts.
Sew on the paws
We fold and sew up the hole on the paws for convenience.
We sew the paws to the body, observing symmetry.
The paws, of course, could be tied into the body, but they are light and, with this method of fastening, stick out slightly to the side. I like them better when they fit well to the body, so it is better to use a needle and yarn of the appropriate color.
We sew paws well. We hide the extra threads.
Sew on the ears
The ears are placed slightly at an angle to the center. We use pins for preliminary fastening. We are looking for the most even position for the ears. Also fasten the ears with a pin together. This is how the ears should look after sewing – reduced to each other.
If everything is even and on the same level, we sew the ears with yarn of the corresponding color.
We fix not only the base of the ears, but also stitch them in the place where the ears are adjacent to the head. We try to make as inconspicuous neat stitches as possible.
We make out the muzzle
We embroider a triangle nose with simple horizontal stitches from long to short. The length of the very first stitch starts from 7-8 loops and gradually fades away. Yarn for the nose of a bunny “jeans” hot pink 42. For a bear and a fox – black 53
We begin to embroider the nose between the 18th and 19th rows (i.e. two rows above the beginning of the decrease)
Spout length approx. 7 loops Height 2 rows
Do not make the triangle too high, embroider only within the height of 2 rows.
The nose will seem more voluminous due to the number of stitches. If we do not have enough volume, we make a few more stitches on top of the nose, without going beyond the 18th row.
For a chanterelle, it is better to embroider a smaller nose – the length of the widest part is 6 loops. The rest of the design is exactly the same.
Using black yarn we embroider the nose, mouth, sleeping eyes and eyebrows. It is advisable to immediately cut the thread longer to do everything at once.
! Black yarn is used of the same brand – “jeans”, the only thing is that it is a bit thick for embroidery. And details such as cilia, for example, look rough. Therefore, I split the yarn and remove one thread from it. You can immediately take the yarn thinner than the main, floss, or a simple black thread in several additions.
We emphasize the nose with black yarn, this will also hide small stitch errors along the edges. We embroider the mouth, and from it we move on to the eyes
Embroider eyelashes
Symmetrically embroider the other eye
We embroider eyebrows, hide the thread, the muzzle is ready
Sew on the tail
It remains only to sew the tail
We tie a lace with pompons around the neck, “comb” the plush fur with tape. Bunny is ready)