Abbreviations
MR – amigurumi ring;
CH – air loop;
sc – single crochet;
dc – single crochet;
hdc – half-column with one crochet;
inc – increase;
dec – decrease;
sl-st – connecting column;
FLO – front half loop (half loop closest to you);
BLO – back half loop (half loop further away from you).
MATERIALS:
- yarn “PEHORKA Openwork” color No. 68 one skein (50g / 280 m);
- Copper wire 1 mm – 70 cm;
- scissors;
- hook 0.6 mm;
- plaster fabric;
- pliers;
- filler synthetic winterizer or holofiber;
- skewers for stuffing of different sizes (you can use a toothpick or a match).
Attention!!!
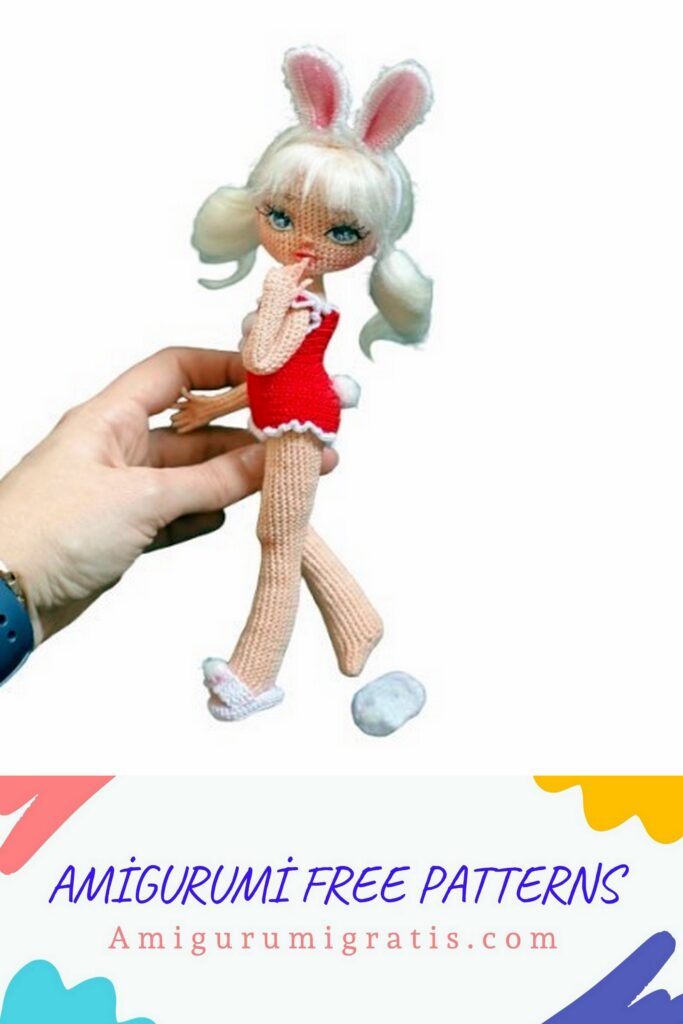
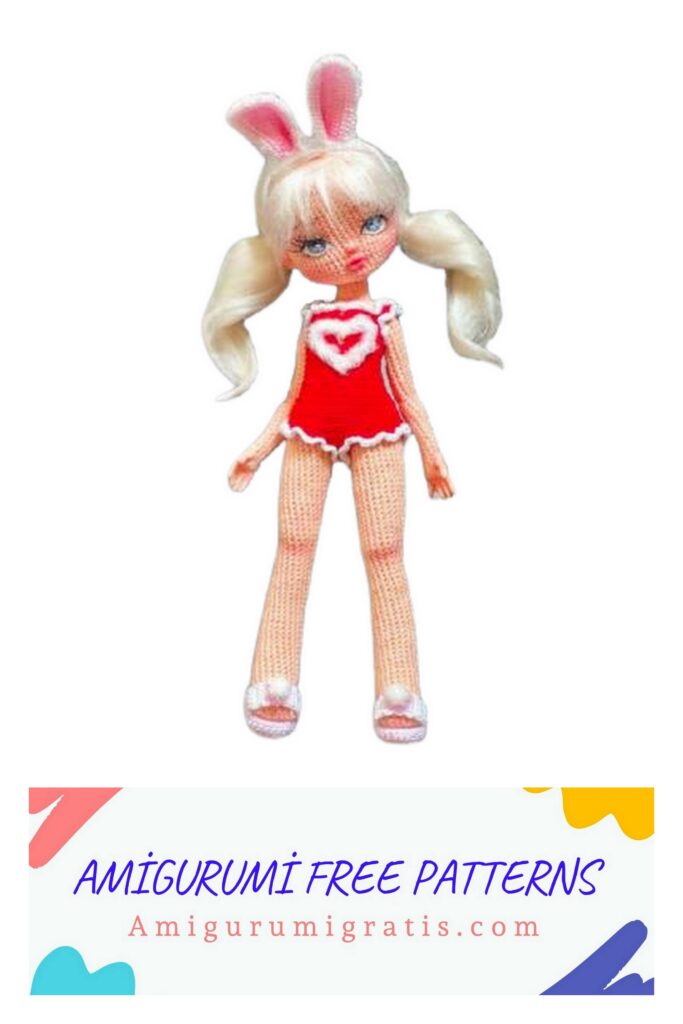
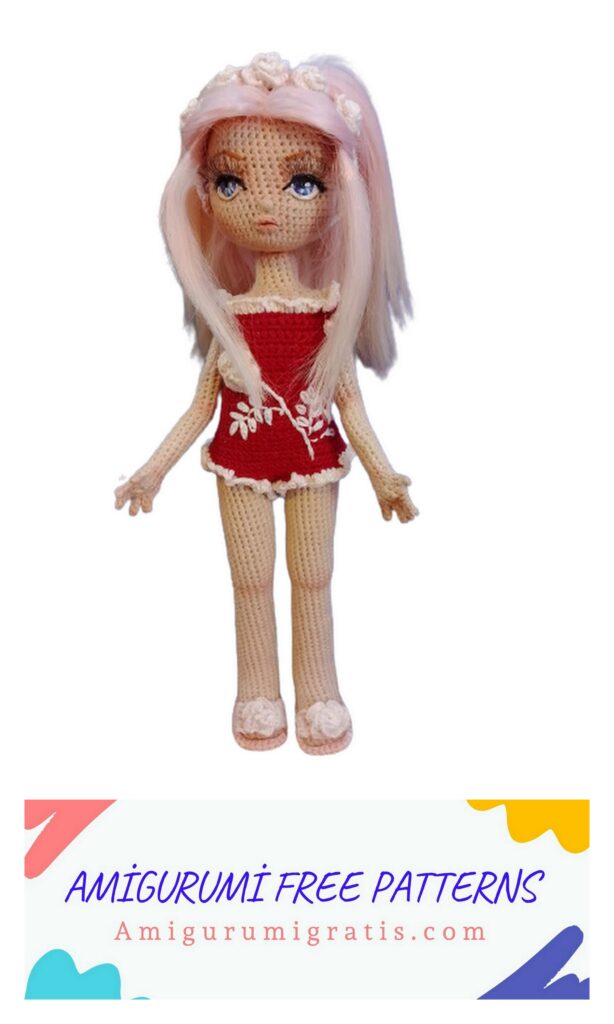
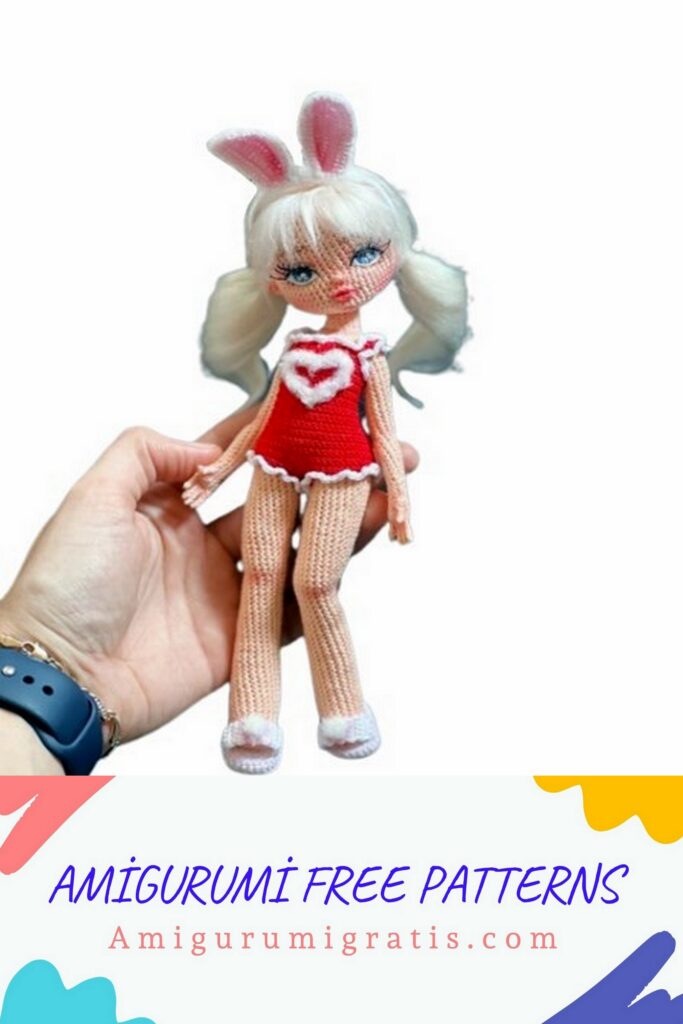
All knitting is done inside out, so the doll will come out neater, especially the face. When knitting with the above materials, you should get a doll about 14 cm. Use thinner or thicker materials if you want to change the size of the doll.
In the process of knitting, you may encounter the fact that the paired parts of the doll (legs, arms) may turn out to be of different lengths or thicknesses.
This is due to the fact that on different days or even within the same day, the tension of the thread in your hands changes. To avoid this problem, I advise you to knit two paired parts in parallel (i.e. knit several rows of one leg, then set it aside and knit several rows of the other leg).
In this MK, I knit with the so-called “ticks”. Such knitting comes out less dense. There is also knitting with “crosses”, it comes out more dense, but, for example, it will be very difficult to embroider a face. When knitting with “ticks”, the hook is wound under the thread, and when knitting with “crosses” above it, because of which the pattern of the front loops will be different (the pattern of the front loops in our case does not play a role, so we knit from the wrong side).
If in the process of knitting it happens that your knees (or nose for example) “leave” to the side, then just make a few offset loops to put the knee in the desired position, knit the rest of the row to the end according to the scheme, rearrange the marker to a new position and continue knitting according to the scheme as if there were no these bias loops.
Nothing will happen to the rows and nothing will change from this, so do not get lost in this situation. Also, according to the scheme, landmarks are placed at key points, in which case it will be possible to make offset loops so that further knitting will even out, until the next hint.
P.S. I use 2 sizes of skewers for stuffing (thick and thin). A thin skewer is more convenient for stuffing small parts. Also, for your convenience in stuffing, I advise you to break off the tips of the skewers, so it will be easier to ram the filler.
HANDS
RIGHT HAND:
LITTLE FINGER: 4 CH, 3 sl-st. (four)
UNTITLED: 5 CH, 4 sl-st. (five)
MEDIUM: 5CH, 4 sl-st. (five)
INDICATOR: 5 CH, 4 sl-st. (five)
1) 4 sc on one side of the polishes, (on the other side: sc, 2 inc, sc). (10) – put a marker
2) (5 CH, 4 sl-st), 10 sc. (10)
3) 2 sc in the thumb, 10 sc. (12)
4) (dec, 4 sc)*2. (10)
5) Dec, 8 sc. (nine)
6-9) 9 sc. (nine)
10) 5 sc, inc, 3 sc. (10)
11-16) 10 sc. (10)
17) dec, 8 sc. (nine)
18-31) 9 sc. (nine)
Work 3 more sc so that the row ends in the middle of the future armpit, then work sl-st, CH and cut the thread.
left hand:
INDICATOR: 5 CH, 4 sl-st. (five)
MEDIUM: 5 CH, 4 sl-st. (five)
UNTITLED: 5 CH, 4 sl-st. (five)
LITTLE FINGER: 4 CH, 3 sl-st. (four)
1) 4 sc on one side of the fingers, (on the other side: sc, 2 inc, sc). (10) – marker
2) 4 sc, (5 CH, 4 sl-st in a chain), 6 sc. (10)
3) 4 sc, 2 sc in the thumb, 6 sc. (12)
4) (4 sc, dec)*2. (10)
5) 4 sc, dec, 4 sc. (nine)
6-9) 9 sc. (nine)
10) inc, 8 sc. (10)
11-16) 10 sc. (10)
17) 5 sc, dec, 3 sc. (nine)
18-31) 9 sc. (nine)
Work 5 more sc so that the row ends in the middle of the future armpit, then work sl-st, CH and cut the thread.
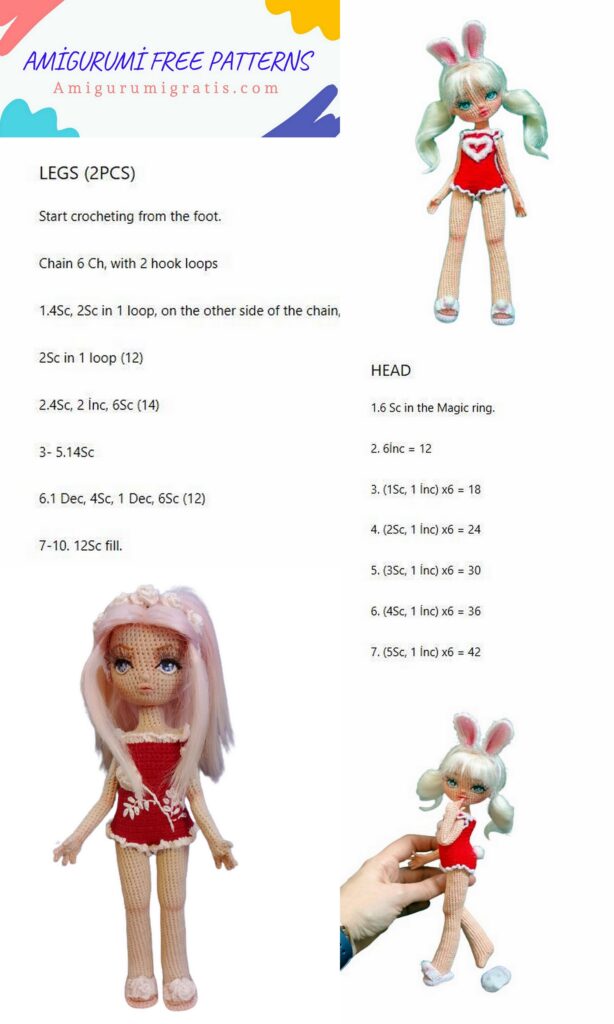
legs
left leg:
Work 7 CH, then from 2nd st from hook:
1) 5 sc, 3 sc in one stitch, 5 sc on the other side of the chain. (13) – marker
2) inc, 5 sc, inc, 6 sc. (15)
3) 8 sc, inc, 6 sc. (sixteen)
4) 5 sc, inc, 10 sc. (17)
5) 17 sc. (17)
6) 6 sc, inc, 10 sc. (eighteen)
Tie 1 CH and turn
HEEL:
1) 5 sc, CH, turn
2) 5 sc, CH, turn
3) 5 sc, turn
7) 2 sc, dec, sc, 3 sc on the side of the heel, 11 sc, dec, 3 sc on the side of the heel. (22)
8) sc, dec, 19 sc. (21)
9-13) 21 sc. (21)
14) sc, dec, 18 sc. (20)
15-19) 20 sc. (20)
Take a copper wire and cut 25 cm from it. Bend as shown in the video and wrap with a plaster. Leave 5-6 cm of wire without winding. Bend the wire a little and place it in the foot.
Stuff the top of the foot and heel.
20) sc, dec, 17 sc. (nineteen)
21-25) 19 sc. (nineteen)
26) sc, dec, 16 sc. (eighteen)
27-30) 18 sc. (eighteen)
31) sc, dec, 15 sc. (17)
32-35) 17 sc. (17)
36) 7 sc, inc, 2 sc, inc, 6 sc. (19) – stuff
37) inc, 18 sc. (20)
38-43) 20 sc. (20)
44) sc, inc, 18 sc. (21)
45-46) 21 sc. (21) – stuff
47) 2 sc, inc, 18 sc. (22)
48-49) 22 sc. (22)
50) 3 sc, inc, 18 sc. (23)
51-56) 23 sc. (23)
57) 11 sc – the row should end approximately in the middle of the middle of the inside of the thigh, but closer to the knee, if this is not the case, then knit more loops.
Make sl-st, CH cut the thread. Stuff your leg.
right leg:
Make 7 CH, then from the 2nd p., from the hook:
1) 5 sc, 3 sc in one stitch, 5 sc on the other side of the chain. (13) – marker
2) inc, 5 sc, inc, 6 sc. (15)
3) 8 sc, inc, 6 sc. (sixteen)
4) 12 sc, inc, 3 sc. (17)
5) 17 sc. (17)
6) 13 sc, inc, 3 sc. (eighteen)
Work 7 more sc and then turn
HEEL:
1) 5 sc, CH, turn.
2) 5 sc, CH, turn.
3) 5 sc, turn.
7) 2 sc, dec, sc, 3 sc on one side of the heel, dec, 11 sc, 3 sc on the other side of the heel. (22)
8) sc, dec, 19 sc. (21)
9-13) 21 sc. (21)
14) sc, dec, 18 sc. (20)
15-19) 20 sc. (20)
Cut 25 cm of the wire, bend it like the first one and wrap it with plaster. Place the wire in the foot and stuff the foot.
20) sc, dec, 17 sc. (nineteen)
21-25) 19 sc. (19) – stuff
26) sc, dec, 16 sc. (eighteen)
27-30) 18 sc. (eighteen)
31) sc, dec, 15 sc. (17)
32-35) 17 sc. (17)
36) 9 sc, inc, 2 sc, inc, 4 sc. (nineteen)
37) 2 sc, inc, 16 sc. (20)
38-43) 20 sc. (20) – fill
44) 3 sc, inc, 16 sc. (21)
45-46) 21 sc. (21)
47) 4 sc, inc, 16 sc. (22)
48-49) 22 sc. (22)
50) 5 sc, inc, 16 sc. (23)
51-56) 23 sc. (23) – stuff
Knit 2 more sc so that the row ends in the middle of the inside of the thigh (but closer to the knee). If necessary, tie more loops. DO NOT CUT THE THREAD!
Body
Work 2 CH from the right leg, then continue to knit on the left leg, starting from where you cut the thread on the left leg.
1) 11 sc, dec, 3 sc, 6 inc per BLO, sc, 2 sc per chain, sc, 6 inc per BLO, 3 sc, dec, 11 sc, 2 sc per chain. (60) – Marker
2) 60 sc. (60)
3) 15 sc, (inc, 2 sc)*4, 4 sc, (2 sc, inc)*4, 17 sc. (68)
4) 68. (68)
5) 11 sc, dec, 40 sc, dec, 13 sc. (66)
6) 66 sc. (66)
7) 19 sc, dec, 22 sc, dec, 21 sc. (64)
8) 11 sc, dec, 7 sc, dec, sc, skip 16 sts, sc, dec, 7 sc, dec, 13 sc. (44)
Twist the two wires from the legs together.
9) 13 sc, dec, 2 sc, dec, 5 sc, dec, 2 sc, dec, 14 sc. (40)
10) 13 sc, dec, 9 sc, dec, 14 sc. (38)
11) 13 sc, dec, sc, 2 dec, sc, dec, 15 sc. (34)
12) 13 sc, dec, 2 sc, dec, 15 sc. (32)
13) 12 sc, dec, 2 sc, dec, 14 sc. (thirty)
14) 11 sc, dec, 2 sc, dec, 13 sc. (28) – stuff the lower part tightly
15-16) 28 sc.(28)
17) 24 sc – marker
18) inc, 7 sc, inc, 19 sc. (thirty)
19) 17 sc, inc, 5 sc, inc, 6 sc. (32)
20) inc, sc, inc, 5 sc, inc, sc, inc, 21 sc. (36) 21) 36 sc. (36)
22) 2 sc, dec, 7 sc, dec, 23 sc. (34)
23) 34 sc. (34)
24) dec, 10 sc, dec, 16 sc, 2 sc body+right arm, 2 sc. (32)
25) 14 sc, 2 sc body + left arm, 12 sc, 7 sc on the right shoulder, 2 sc. (37)
Take the wire and bend it 0.5 cm from the end, then measure how much wire you need for the second hand and cut it off. bend the wire at the second end to the floor, see. Wrap the wire with plaster and place it in your hands.
Stuff your hands to the middle of the forearm.
26) dec, 8 sc, dec, 2 sc, 7 sc on the left shoulder, 21 sc. (40)
27-28) 40 sc. (40) – fill
29) 30 sc, 5 dec. (35)
30) 10 sc, 5 dec, 9 sc, 3 dec. (27)
31) dec, 6 sc, 4 dec, 7 sc, 2 dec. (20) – fill
32) dec, 5 sc, 3 dec, 7 sc. (sixteen)
33) 2 sc, dec, 12 sc. (15)
34-37) 15 sc. (15) – stuff the neck and wrap the wire remaining from the neck with a plaster
38) 15 sc. (15) – stuff the back of the neck
39) 5 dec, sc, 2 dec. (8)
40-54) 8 sc. (8)
Cut off excess wire and cut thread. Pull off the remaining hole with the rest of the thread, hide the tip inside the knitting.
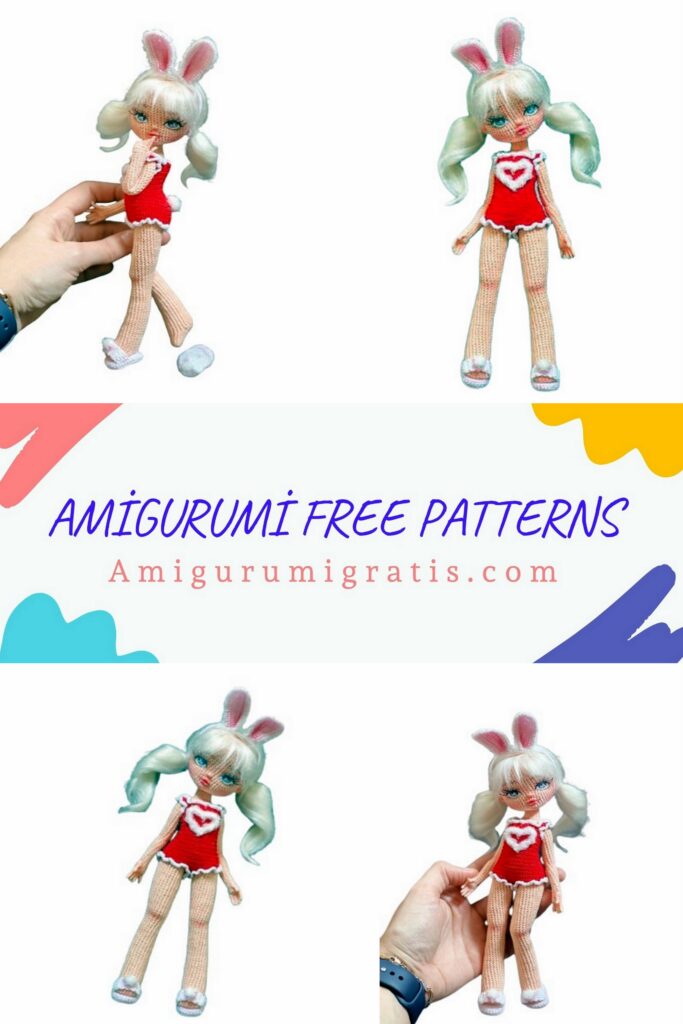
Shape the doll’s body with your fingers by shaping the curves and smoothing out the bumps.
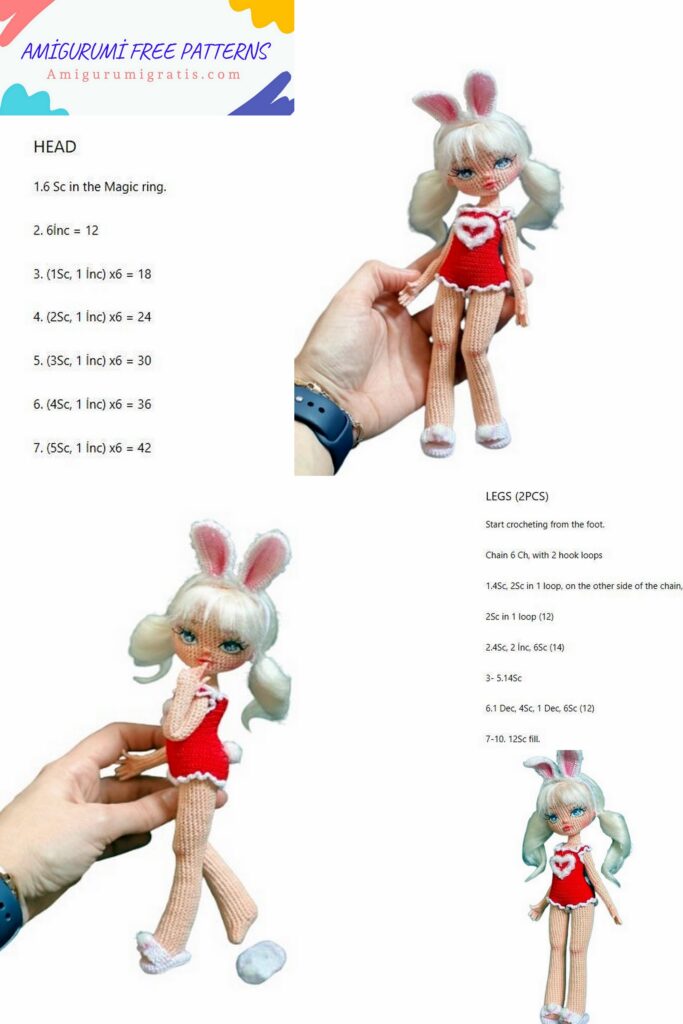
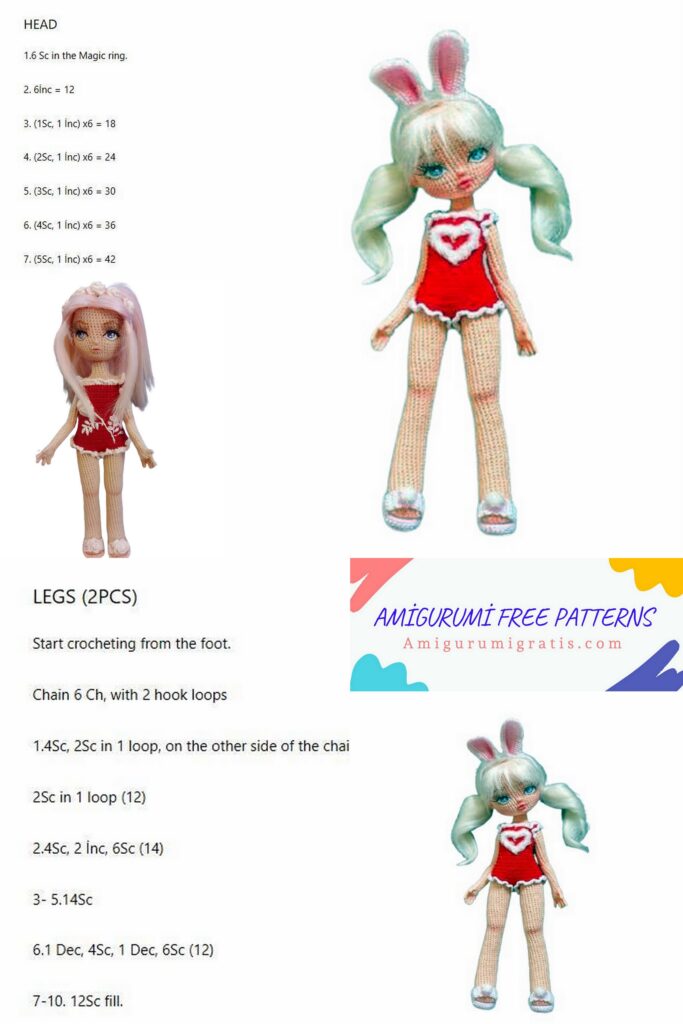
head
Make 11 CH, close the chain into a ring with a connecting post, then knit:
1-4) 11 sc. (eleven)
5) for FLO the whole row: 5 inc, 3 sc in one stitch, 5 inc. (23) – marker
6) (5 sc, 3 sc in one p.) * 3, 5 sc. (29)
7) 6 sc, 3 sc in one stitch, 7 sc, 3 sc in one stitch, 7 sc, 3 sc in one stitch, 6 sc. (35)
8) ( sc, inc) * 2, 3 sc, (3 sc in one p., 9 sc) * 2, 3 sc in one p., (inc, sc) * 2. (45)
9) sc, (inc, 2 sc)*2, 31 sc, (2 sc, inc)*2, sc. (49)
10) 24 sc, dec, 23 sc. (48)
11) 48 sc. (48)
12) (2 sc, inc)*3, 15 sc, inc, 15 sc, (inc, 2 sc)*2, inc, sc. (55)
13) 28 sc, (one st after BLO: sl-st, CH, sc,CH, sl-st), 26 sc. (55)
14) 28 sc, 1 sc in the nose, 26 sc. (55)
15) 21 sc, 2 dec, 7 sc, 2 dec, 19 sc. (51)
16-17) 51 sc. (51)
18) 21 sc, inc, 10 sc, inc, 18 sc. (53)
19-26) 53 sc. (53)
27) (dec, 8 sc)*5, 3 sc. (48)
28) (dec, 7 sc)*5, 3 sc. (43)
29) (dec, 6 sc)*5, 3 sc. (38)
30) (dec, 5 sc)* 5, 3 sc. (33)
31) (dec, 4 sc)*5, 3 sc. (28)
Push the first 4 rows inside the head. Put the head on the neck of the doll and stuff it.
32) (dec, 3 sc)*5, 3 sc. (23)
33) ( dec, 2 sc)*5, 3 sc. (18) – fill the top of the head
34) (dec, sc)*6. (12)
Add more stuffing to the top of the head The entire head should be stuffed tightly and evenly.
35) 6 dec. (6)
Cut the thread, close the hole with the rest of the thread. If necessary, add filler to the cheeks and chin through the opening at the bottom of the head. Sculpt the final contours of the head with your fingers, evenly distributing the filler inside. Put the head on the neck of the doll and do not fix it in any way even after embroidery.
FACE EMBROIDERY, HAIR FIXING
materials:
floss: black, white, brown, dark blue, blue, light blue;
scissors;
fabric marker;
needles;
glue F-6000 or B-6000 or E-6000.
Eye embroidery
toning
For toning but use dry pastel or blush. I mainly use makeup blush to tint the face and body of my dolls, as they have a light, translucent pigmentation and a good skin tone. Pastel can be used to accent lips or eyes, as it gives a richer color.
You will also need brushes of different sizes and matte acrylic varnish to cover the paintings (or PVA glue), to fix the tinting and fix the fingers.
If you do not plan to varnish your face and body after tinting, then you can apply more pigment. Well, if you use varnish, then the pigment should be applied less, since it darkens a little from the varnish.
I recommend toning the following areas of the face:
· Cheeks;
The protruding part of the chin;
· Ears;
Hair growth line
· The bridge of the nose;
Under the lower eyelid;
Over the upper eyelid;
· Under the lower lip;
In the corners of the lips;
· Between the lips (I like to apply red pastels);
· Under the nose;
Under the eyebrows (you can also tint the tip of the eyebrow a little so that there is a smooth color transition);
· It is also possible to tint the area of the iris under the upper eyelid with a dark color, if suddenly your chrysalis has too wide-open (surprised) eyes.
For the body, I also recommend applying a tone, as this will make the curves of the doll more expressive.
The tone is applied to the following areas:
Elbows and their bends;
· Hands;
· Palms;
· Armpits;
· Neck;
· Clavicles;
On the chest area
· Navel;
· Groin area;
· Buttocks;
Knees and bend under the knees;
· Ankles;
· Feet.
After tinting, you will need to fix the doll’s fingers with acrylic varnish or PVA glue. This process is also shown at the end of MIA video part 5.2: “Embroidery, hair, toning”.
Body
materials:
Pekhorka “Colored lace” No. 06 and No. 01 (50g \ 475m);
hook 0.6 mm;
needle;
Velcro (for fastening);
glue F-6000 or B-6000 or E-6000 (for gluing the ends of the threads).
First we will work with a red thread.
Work 47 CH, then from the 2nd stitch from the hook we knit:
1)-2) 46 sc, CH, turn. (46)
3) 7 sc, 6 CH, skip 8 stitches, 16 sc, 6 CH, skip 8 stitches, 7 sc, CH, turn. (42)
4) 7 sc, 6 sc in a chain, 16 sc, 6 sc in a chain, 7 sc, CH, turn. (42)
5) 15 sc, inc, 10 sc, inc, 15 sc, CH, turn. (44)
6)-11) 44 sc, CH, turn. (44)
12) 4 sc, inc, 34 sc, inc, 4 sc, CH, turn. (46)
13)-14) 46 sc, CH, turn. (46)
15) 6 sc, inc, 32 sc, inc, 6 sc. (48)
16) 5 sc, inc, 36 sc, inc, 5 sc, CH, turn. (50)
17) 8 sc, inc, 32 sc, inc, 8 sc, CH, turn. (52)
18) 4 sc, inc, 42 sc, inc, 4 sc, CH, turn. (54)
19) 7 sc, inc, 38 sc, inc, 7 sc, CH, turn. (56)
20) 6 sc, inc, 42 sc, inc, 6 sc, CH, turn. (58)
21) 8 sc, inc, 40 sc, inc, 5 sc
Then put the last 3 loose stitches of this edge on the 3 stitches of the opposite edge and knit 3 sc through these two layers.
Then do sl-st, CH turn the knit.
22)-26) 57 sc, CH, turn. (57)
Cut the thread.
Count 11 sts to the right from the end of the 26th row and fasten the thread.
BACK OF BODYSUIT:
1) 22 sc, turn. (22)
2) 3 sl-st, CH, 16 sc, turn. (sixteen)
3) 3 sl-st, CH, 10 sc, turn. (10)
4) 3 sl-st, CH, 4 sc, turn. (four)
5)-7) 4 sc, CH, turn. (four)
Cut the thread.
Count 6 loops from the first row of the back and fasten the thread (shown by the arrow).
BODY FRONT:
1) 23 sc, turn. (23)
2) 5 sl-st, CH, 13 sc, turn. (13)
3) 3 sl-st, CH, 7 sc, turn. (7)
4) 2 sl-st, CH, 4 sc, turn. (four)
5)-8) 4 sc, CH, turn. (four)
Cut the thread.
fasten the thread
here
Sew front and back together.
Then we decorate the edges of the bodysuit with white thread. for this, we knit 3 sc in each loop to the end of the edge. We also sew adhesive tape on the back.
You can also knit a “rabbit tail” from fluffy yarn.
Just knit a ball from it and sew it to the bodysuit.
You can decorate the body as you wish. I decorated the body of my doll with the same fluffy yarn, sewing it on the front in the shape of a heart.
headband with ears
materials:
flat wire;
Pekhorka “Colored lace” No. 180 and No. 01 (50g \ 475m)
hook 0.6 mm;
needle;
glue F-6000 or B-6000 or E-6000.
EARS:
Tie 2 pairs of ears (2 ears should be white and 2 more pink).
Work 20 CH, then in 3rd st from hook:
1) 7 dc, 8 tr, 2 dc, 3 dc in the last loop of the chain, then on the other side 2 dc, 8 tr, 7 dc, 2 CH, turn. (37)
2) 18 dc, 3 dc in one stitch, 18 dc. (39)
Use the same pattern to knit 3 more ears.
Then sew the ears (1 white + 1 pink).
Then you need to cut off 11 cm of flat wire, apply glue to it and wrap it with white thread.
You can also sew the edge of the ears with fluffy thread, and then sew them to the base wire. Additionally, shade the inside of the ears with pink pastel.
SHOES
materials:
Pekhorka “Openwork” (50g / 280 m);
hook 0.6 mm;
needle.
INSOLES:
Work 6CH, then from 2nd st from hook:
1) inc, 3 sc, 4 sc in the last loop, on the other side of the chain 3 sc, inc, sl-st, CH. (fourteen)
2) 2 inc, 3 sc, 4 inc, 3 sc, 2 inc, sl-st, CH. (22)
3) sc, 2 inc, 5 sc, 2 inc, 2 sc, 2 inc, 5 sc, 2 inc, sc, sl-st. (thirty)
Cut the thread. Make the second sole in the same way. .
SOLE-BASE:
Work 6 CH, then from 2nd st, from hook:
1) inc, 3 sc, 4 sc in the last st, 3 sc, inc, sl-st, CH. (fourteen)
2) 2 inc, 3 sc, 4 inc, 3 sc, 2 inc, sl-st, CH. (22)
3) sc, 2 inc, 5 sc, 2 inc, 2 sc, 2 inc, 5 sc, 2 inc, sc, sl-st. (thirty)
4) 2 sc, inc, sc, inc, 5 sc, (inc, sc)*2, sl-st for FLO, CH. – the row should end at this point, in fact in the middle
5) 34 sc for FLO, sl-st, CH. (34)
6) 34 sc, sl-st. (34)
Cut the thread, leaving the tip of 30 centimeters for sewing.
Place one part of the insole inside the base sole, then cover it on top with the second part of the sole and sew the edges of the base sole and the upper sole (see photo below).
TOP PART:
Work 5 CH, then from 2nd st, from hook:
1)-13) 4 sc, CH, turn. (four)
Sew the top to the sole. You can also knit a ball of fluffy yarn to decorate the shoes.
Knit the second slipper in the same pattern. Additionally, you can protonate slippers with dry pastel to make them look more expressive.