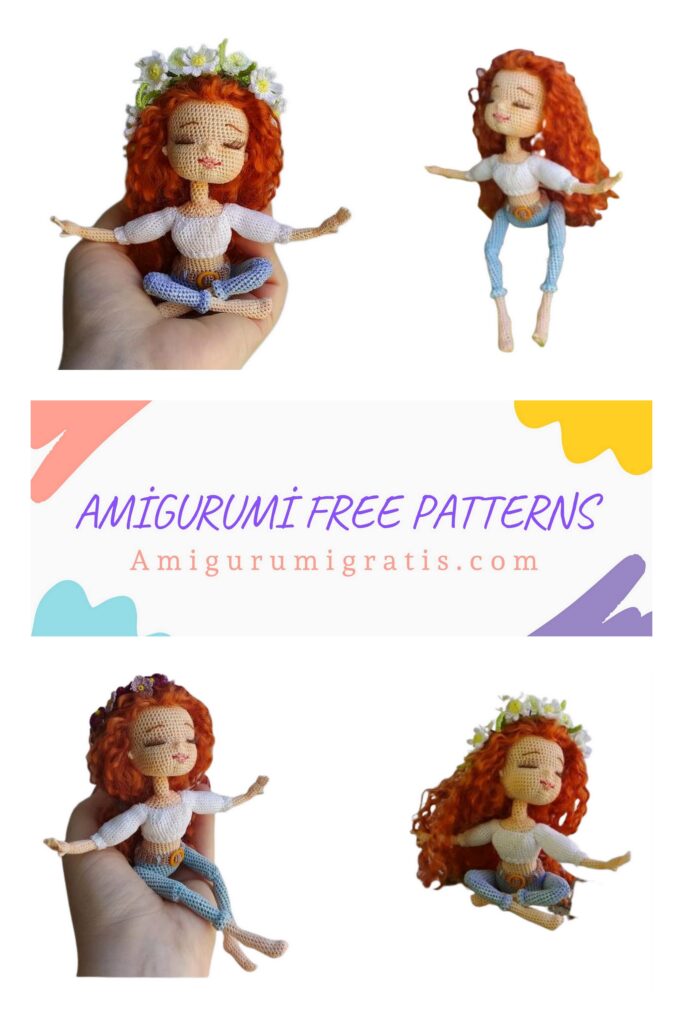
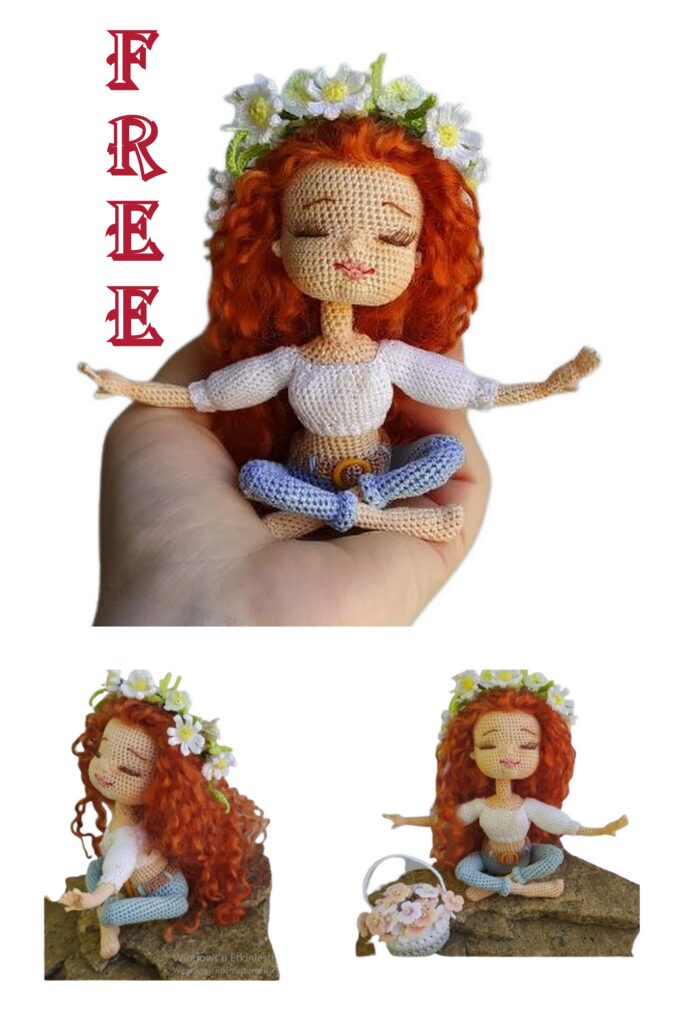
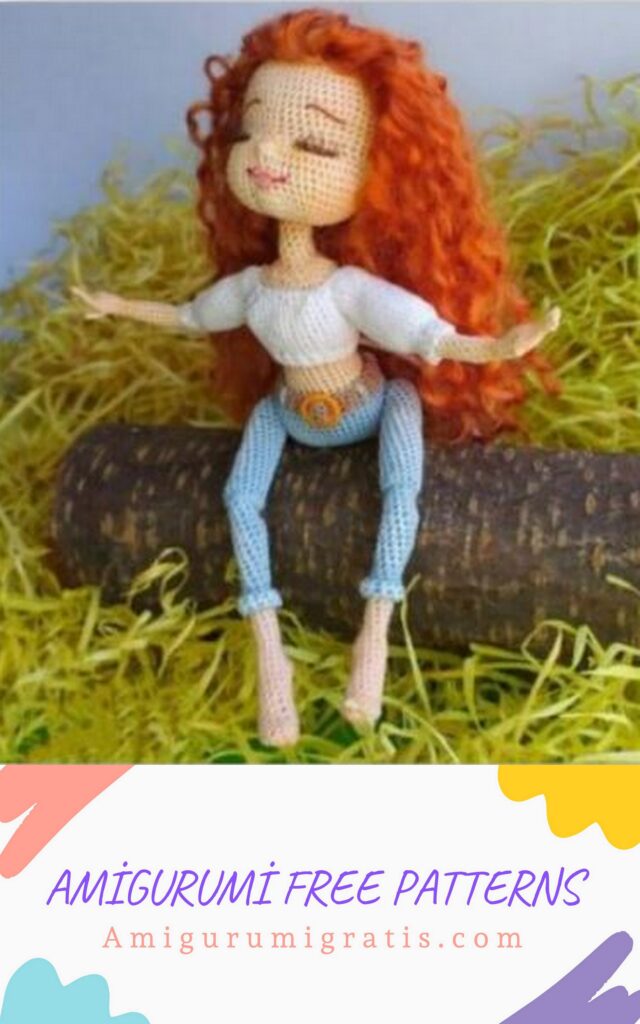
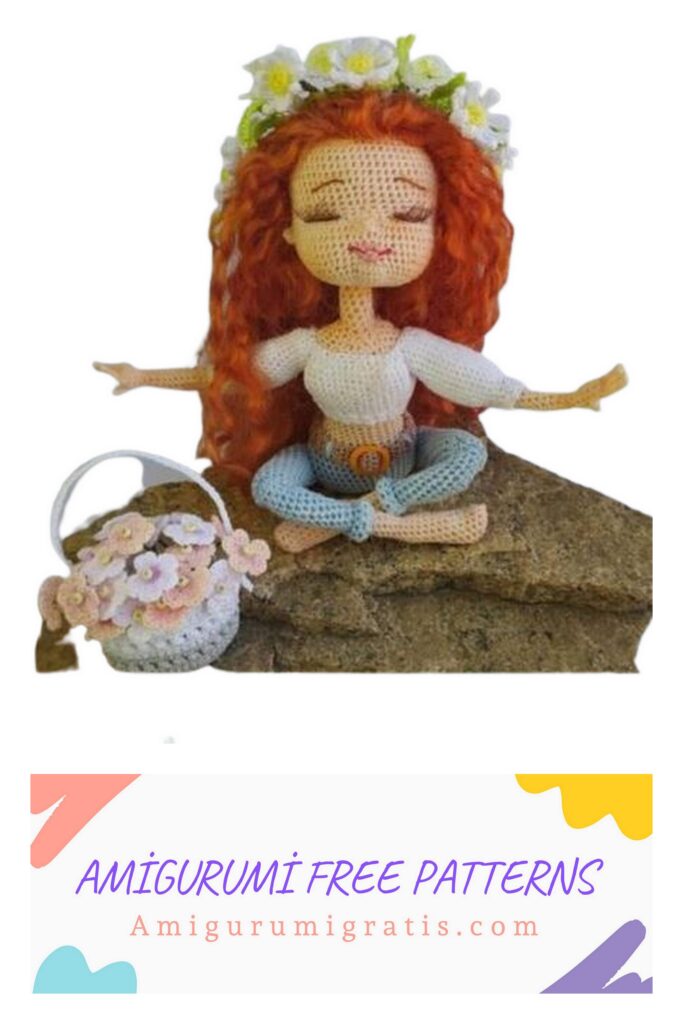
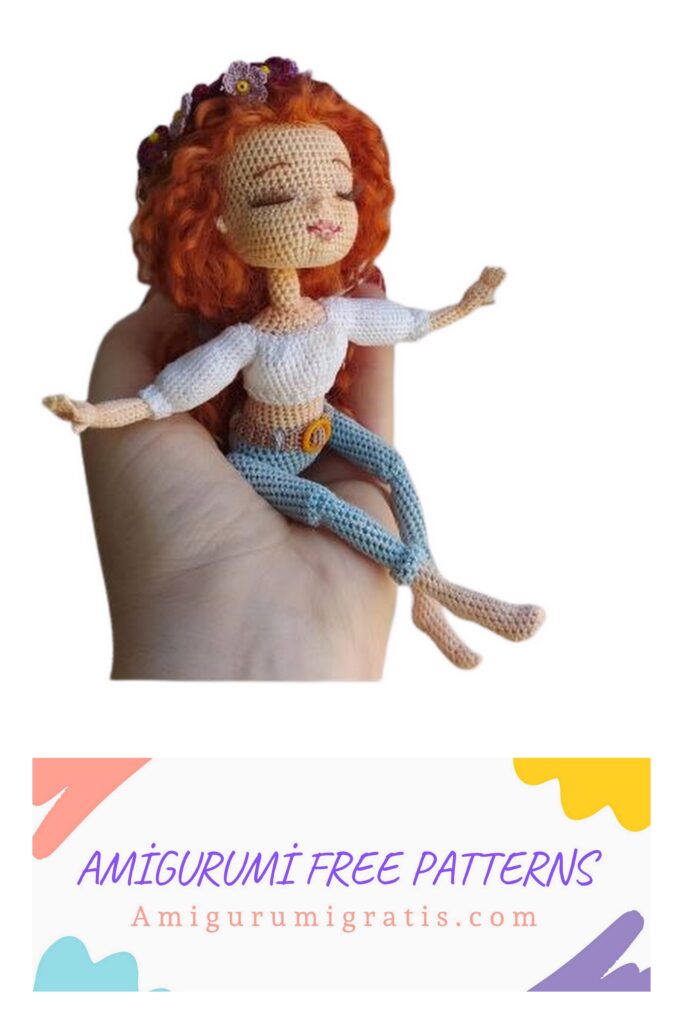
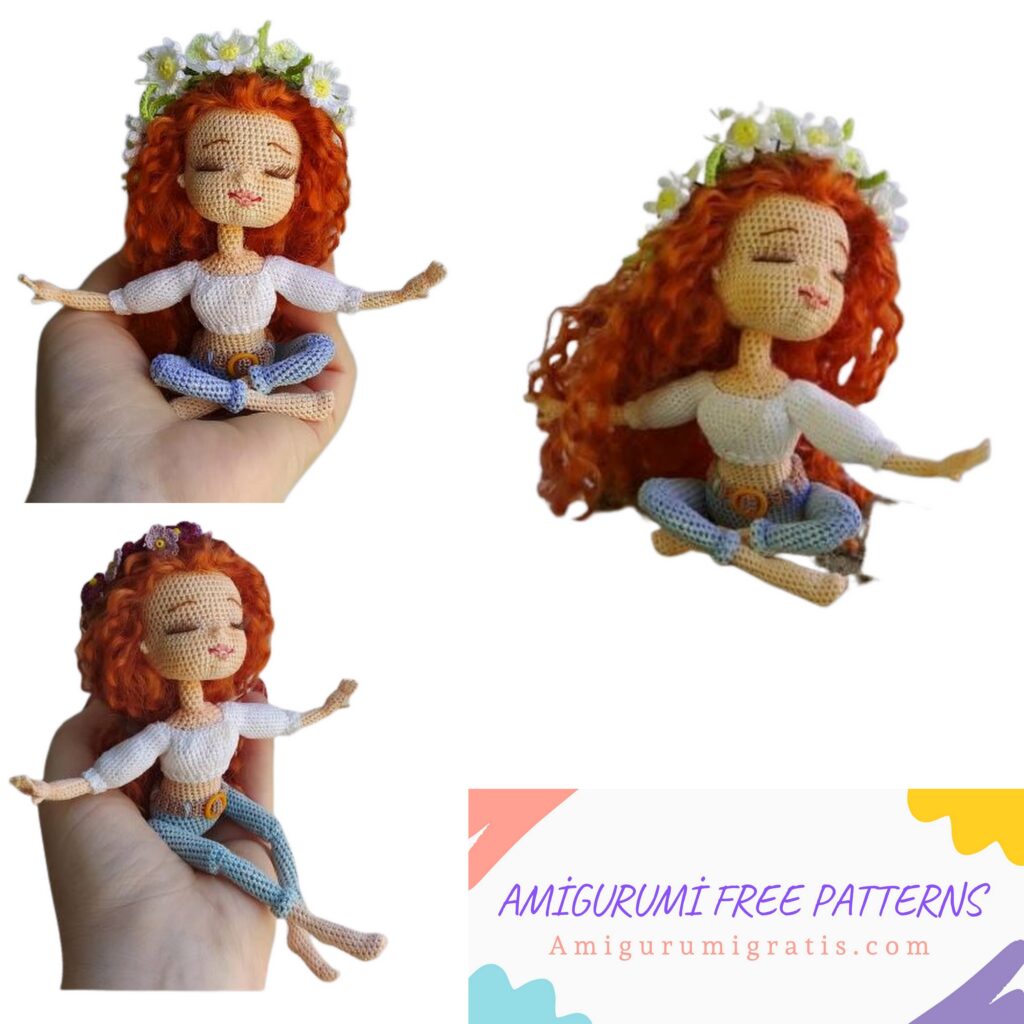
We continue to share the best amigurumi patterns. You can visit our website for Amigurumi Jasmine Doll free pattern.
Affordable Creativity
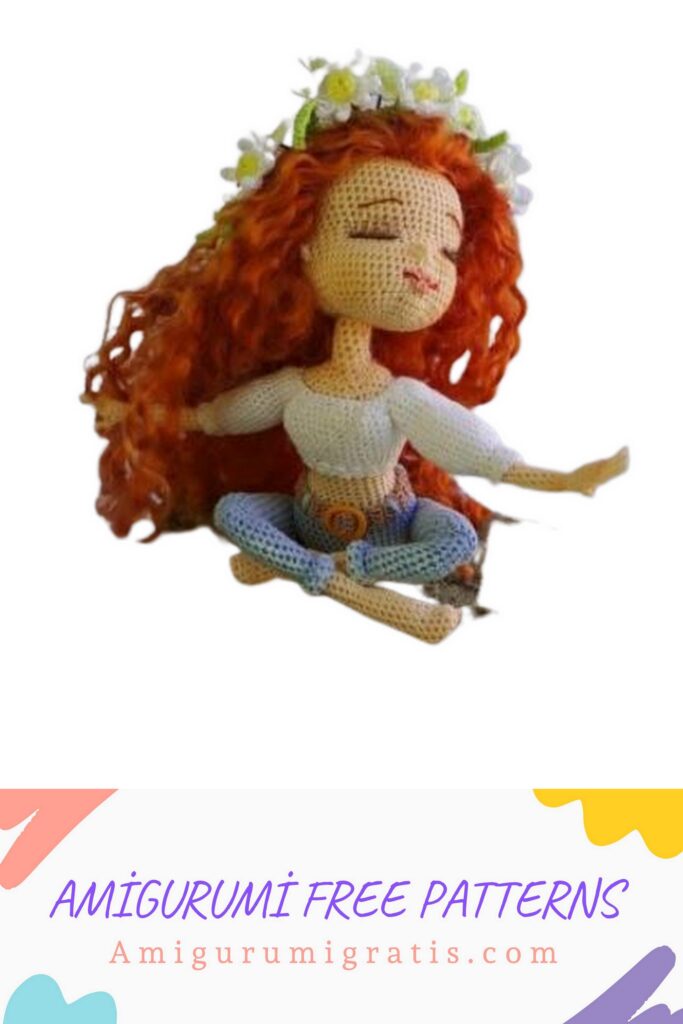
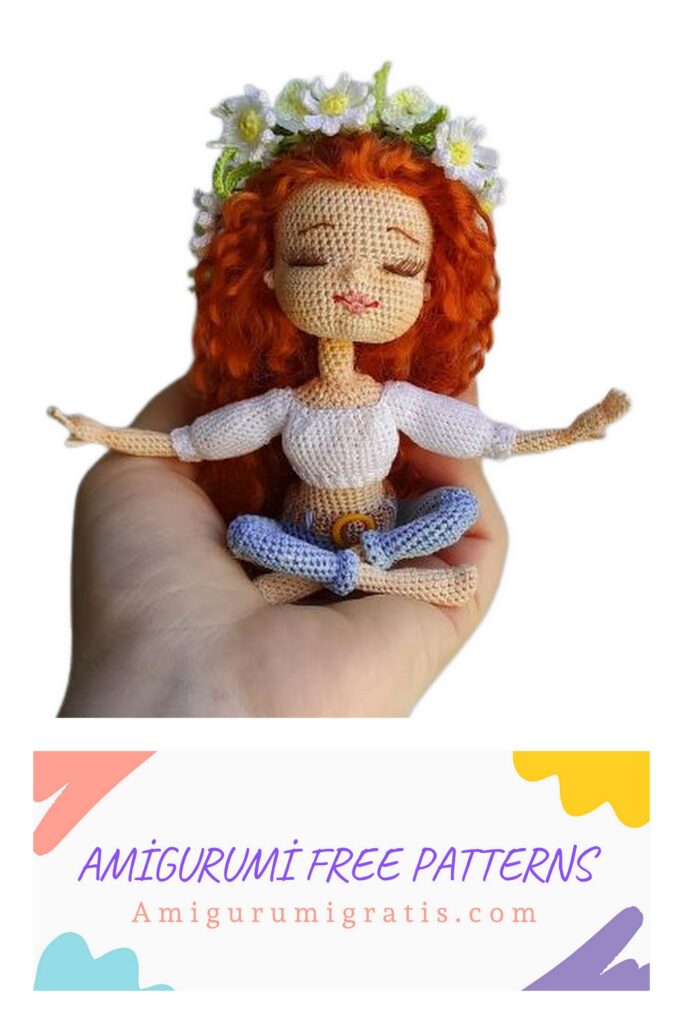
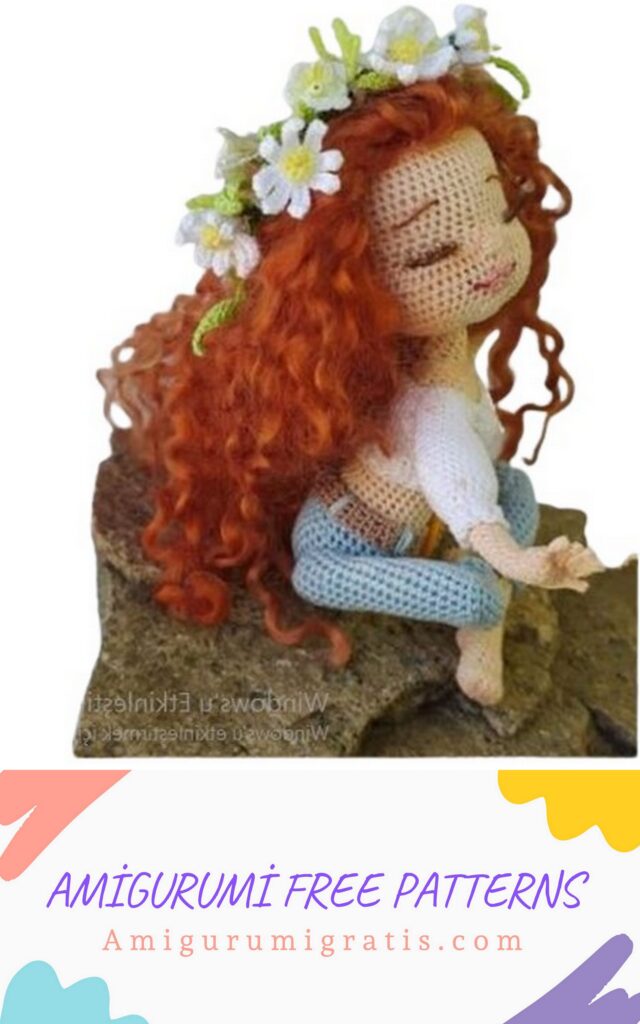
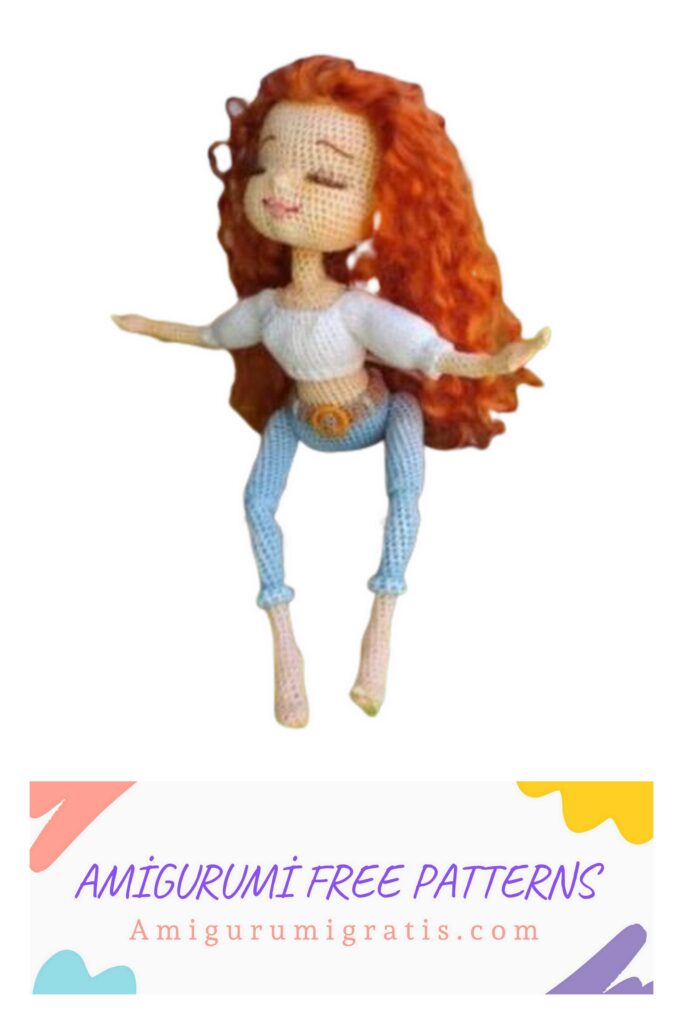
Jasmine – spring girl
miniature knitted doll
(knitting description, hook)
Materials and tools for work:
Videos on materials
Knitting yarn 100% cotton. I have this:
Doll: yarnart canarias (5303, peach color)
Composition 100%: Cotton. The weight of the skein is 20 g. The length of the thread is 203 m. Hair: wool of angora goat, llama, hair dye.
Jeans: yatnart canarias, color 4917
Blouse: yarnart canarias, color 1000 Belt: thin brown threads.
Materials and tools for work:
Chamomile wreath:
Yarnart canarias yarn (white 1000, green 5352).
Mouline thread is light yellow.
The thinnest floral wire 2-3pcs Yellow beads
Ready stamens
Wreath with lilac flowers:
Yarnart canarias yarn (burgundy 0112, purple 6309, lingonberry 4931)
Materials and tools for work:
Filler for stuffing (synthetic fluff or holofiber)
Wire for the frame: copper, cross-section 1.5 mm., Chenille wire for handles.
Belt buckle or polymer clay.
Hook corresponding to the thickness of the yarn chosen for knitting (I have 0.7)
For clothes and flowers hook 0.5.
A thread of peach floss, white and burgundy for the mouth, brown for the eyebrows.
For the peephole: Ready eyelashes.
Buttons with 4 holes 1 cm in diameter = 4 pcs.
Glue Moment gel, PVA, needle, scissors, nippers, shadows or dry pastels and a tinting brush, tweezers and sticks for filling with filler,
The height of the finished toy from these materials is 9 cm sitting, 17 cm in full height.
Abbreviations used:
sc- single crochet
inc. – an increase (we knit 2sc in 1 loop)
DC -a column with a crochet
dec – decrease (2 columns for one vertex)
ch. – air loop
pshn – lush column
ch – lifting loop
sl-st – connection loop
pst – half-column
Difficulty level: above average
Jasmine crochet seamy side to the front side.
I would like to ask you:
1. If in the published stage it is written that there is a video, watch it! I understand that many girls are experienced, but the video can make your work easier and avoid possible mistakes)
2. Do not rush, it is better slowly, but efficiently
3. Knit only with new, straight threads.
4. Make imperceptible decreases
5. Fill the doll with small portions of the filler.
6. The doll is knitted on the wrong side! It is necessary!
Light loops and good mood!
FOOT, SHIN
(description + video )
Left:
Peach yarn
Row 1: chain of 5 ch
Row 2: from the second from the loop hook 3 sc, 4 sc in one loop, 3 sc = 10
Row 3: (4 sc, inc) x 2 = 12
Row 4: 12 sc
Row 5: DEC, 10 sc = 11
Row 6: 11 sc
Row 7: 9 sc, dec = 10
Row 8 – 9: 10 sc
Row 10: 7 sc, 2 inc for the back half loops (heel), 1 sc = 12
Row 11: 7 sc, inc, 2 sc, inc, 1 sc = 14
Row 12: 14 sc
Row 13: 8 sc, 2 dec, 2 sc = 12
Row 14: 7 sc, 2 dec, 1 sc = 10
We cut off the wire about 9 cm, bend it as in the photo. We insert the frame, fill the foot a little at the place of takeoff and heel.
Row 15: 4 sc, 3 DEC = 7
Row 16: 5 sc, inc, 1 sc = 8
Row 17 – 21 (5 rows): 8 sc
Change the thread to blue and continue to knit the shin.
Row 22: 8 sc
Row 23: 7 sc, inc = 9
Row 24: 9 sc
Row 25: 7 sc, inc, 1 sc = 10
Fill with filler as you knit.
Row 26: 10 sc
Row 27: 7 sc, inc, 2 sc = 11
Row 28 – 29: 11 sc
Row 30: 7 sc, inc, 3 sc = 12
Row 31 – 32: 12 sc
Row 33: DEC, 6 sc, 2 DEC = 9 (back off)
Row 34 – 37: 9 sc
Cut off the frame. We insert a bead into the knitted hole of a suitable size. We knit further, making
decreases, thereby tying the bead to the end. Cut the thread, hide.
Right:
Peach yarn
Row 1: chain of 5 ch
Row 2: from the second from the loop hook 3 sc, 4 sc in one loop, 3 sc = 10
Row 3: (4 sc, inc) x 2 = 12
Row 4: 12 sc
Row 5: DEC, 10 sc = 11
Row 6: 11 sc
Row 7: 2 sc, dec, 7 sc = 10
Row 8 – 9: 10 sc
Row 10: 2 sc, 2 inc for the back half loops (heel), 6 sc = 12
Row 11: 2 sc, inc, 2 sc, inc, 6 sc = 14
Row 12: 14 sc
Row 13: 3 sc, 2 dec, 7 sc = 12
Row 14: 2 sc, 2 dec, 6 sc = 10
We cut off the wire about 9 cm, bend it as in the photo. We insert the frame, fill the foot a little at the place of takeoff and heel.
Row 15: 2 sc, 3 dec, 2 sc = 7
Row 16: 3 sc, inc, 3 sc = 8
Row 17 – 21 (5 rows): 8 sc
Change the thread to blue and continue to knit the shin.
Row 22: 8 sc
Row 23: 3 sc, inc, 4 sc = 9
Row 24: 9 sc
Row 25: 4 sc, inc, 4 sc = 10
Fill with filler as you knit
Row 26: 10 sc
Row 27: 5 sc, inc, 4 sc = 11
Row 28 – 29: 11 sc
Row 30: 6 sc, inc, 4 sc = 12
Row 31 – 32: 12 sc
Row 33: 3 sc, 3 dec, 3 sc = 9 (back off) Row
34 – 37: 9 sc
Cut off the frame. We insert a bead into the knitted hole of a suitable size. The holes of the bead should be on the sides of the leg. We knit further, making decreases, thereby tying the bead to the end. Cut the thread, hide.
HIP
(description + video )
Blue thread (2 identical parts)
Row 1: 6 sc in the spacecraft
Row 2: (1 sc, inc) x 3 = 9
Row 3: (2 sc, inc) x 3 = 12
Row 4: (5 sc, inc) x 2 = 14
Row 5 – 10 (6 rows): 14 sc
We select the diameter of the button for the hole in the thigh.
We put in a strong thread.
We introduce the hook from the outside, stepping back from the edge of 5 rows, grab the button threads and stretch them.
Row 11 – 12: 14 sc
Row 13: 6 sc, dec, 6 sc = 13
Row 14 – 24 (11 rows): 13 sc
It is not too tight to fill the thigh, so as not to swell. Knit another 4 sc, cut off the thread, leaving the long end.
CONNECTING THE THIGH AND THE SHIN
( VIDEO )
LINING THE BOTTOM OF JEANS
(description + video )
With blue thread: starting from the back, from the side of the heel. We introduce the hook into the edge where the thread color change begins, grab the working thread and pull it out. Next, we knit in a circle along the leg.
Row 1: 1 CH, 7 SC = 8
Row 2: 2 sc, inc, 4 sc, inc = 10
Row 3: 10 sc
Row 4: 1 sc, inc (behind), 8 sc = 11
Row 5: 10 sc, 1 sc
PENS
(description + video RIGHT HANDLE )
Right palm:
We start knitting with the index finger, finish with the little finger.
Chain of 6 ch, 5 cs along the chain (index)
Without cutting off the thread we knit 7 ch, 6 cs along the chain (middle) 6 ch, 5 cs along the chain (unnamed) 5 CH, 4 ss along the chain (little finger)
Row 1: ch 1, on the other side: in the half-loops of each finger we knit 3 times, 2 sc.
On the other side: in the half-loop of the base of the fingers we knit 2 times 2 sc and 1 sc in the base of the little finger = 12 sc
Row 2: 12 sc
Row 3: 8 sc, 5 CH, 4 ss along the chain (thumb), 4 sc = 12
Row 4: 8 sc, (skip the thumb), 4 sc = 12
Row 5: 2 dec (side), 2 sc, 2 dec (near the thumb), 2 sc =8
Fill your palm with filler.
Row 6: 4 sc, dec, 2 sc = 7
Row 7: 7 sc
Row 8: inc, 6 sc = 8
Row 9 – 20 (12 rows): 8 sc
Row 21: 1 sc, inc, 2 sc, inc, 3 sc = 10
Row 22: 2 sc, 2 dec, 4 sc = 8
Row 23 – 25: 8 sc
Row 26: 2 sc, inc, 5 sc = 9
Row 27 – 29: 9 sc
Row 30: inc, 3 sc, inc, 4 sc = 11
Row 31 – 34: 11
Knit another 4 sc offsets to the inside of the arm, 1 sl-st.
Cut the thread.
(description + video LEFT HANDLE )
Left palm:
We start knitting with the little finger, finish with the index finger.
A chain of 5 ch, 4 cs along the chain (little finger) Without cutting off the thread, we knit 6 ch, 5 cs along the chain (unnamed)
7 CH, 6 sl-st along the chain (medium)
6 CH, 5 sl-st along the chain (index)
Row 1: ch 1, on the other side: in the half-loops of each finger we knit 3 times, 2 sc.
On the other side: in the half-loop of the base of the fingers we knit 2 times 2 sc and 1 sc in the base of the index finger = 12 sc
Row 2: 12 sc
Marker near the index finger.
Row 3: 11 sc, 5 CH, 4 sl-st along the chain (thumb), 1 sc = 12
Row 4: 11 sc (skip the thumb), 1 sc = 12 Row 5: DEC, 2 sc, 2 DEC, 2 sc, DEC = 8
Fill your palm with filler.
Row 6: 6 sc, dec = 7
Row 7: 7 sc
Row 8: 3 sc, inc, 3 sc = 8
Row 9 – 20 (12 rows): 8 sc
Row 21: 1 PRS, İnc, 4 PRS, İnc, 1 PRS = 10
Row 22: dec, 6 sc, dec = 8
Row 23 – 25: 8 sc
Row 26: 1 sc, inc, 6 sc = 9
Row 27 – 29: 9 sc
Row 30: 3 sc, inc, 4 sc, inc = 11
Row 31 – 34: 11
Knit the required amount of offset sc to the inner side of the arm, 1 cc.
Cut the thread.
BODY + LEG FIXING
(description + 2 videos) FASTENERS BODY
Important In the first video, where I fasten the legs at the very beginning, I made a reservation that we begin to fasten by knitting 11 rows … WE NEED TO KNIT 13 rows! Knit 13 rows over the text description and start watching the video!
Blue thread:
Row 1: We knit a chain of 6 in., From the second loop from the hook: inc, 3 sc, 4 sc in one loop, 5 sc on the other side = 14
Row 2: 2 inc, 1 sc, inc, 1 sc, 4 inc, 1 sc, inc, 1 sc, 2 inc = 24
Knit about 6 sb of offset, put a marker. It should be in the middle of the back. Always keep an eye on the marker!
Row 3: 3 sc, inc, 4 sc, inc, 6 sc, inc, 4 sc, inc, 3 sc = 28
Row 4: (4 sc, inc) x 2, 8 sc, (inc, 4 sc) x 2 = 32
Row 5: (5 sc, inc) x 2, (2 sc, inc) x 2, 2 sc, (inc, 5 sc) x 2 = 38
Row 6: 14 sc, (inc, 2 sc) x 3, inc, 14 sc = 42
Row 7 – 11:42 sc
Marker in the center of the back!
Row 12: (5 sc, dec) x 2, 14 sc, (dec, 5 sc) x 2 = 38
Row 13: 38 sc
We fix the legs! ( see video )
To do this, you need to count from the edge of the first row (chain of 6 CH) 9 or 10 rows to the side, put a pin. Using a crochet hook, pull the threads of the legs into the body. Check that the leg is seated correctly. We thread the threads into the button located from the inside of the body. Make sure that the threads were threaded into the second button in the same order as in the first. To do this, it is enough to pull the thread and then it will become clear.
We tie the threads in pairs and very tightly into several knots.
We fix the second leg in the same way.
Row 14: (4 sc, dec) x 2, 14 sc, (dec, 4 sc) x 2 = 34
Row 15: 1 sc, 2 dec, 24 sc, 2 dec, 1 sc = 30
Change the thread to a flesh-colored thread.
Row 16: 30 sc
Row 17: 7 sc, dec, 12 sc, dec, 7 sc = 28
Row 18 – 24 (7 rows): 28 sc
Lightly fill the bottom and bottom.
Row 25: 9 sc, 4 inc, 2 sc, 4 inc, 9 sc = 36
Row 26 – 29: 36 sc
Row 30: 5 sc, 3 sc with a handle, 10 dec, 3 sc with a handle, 5 sc = 26
Row 31: 5 sc, 8 sc on the handle, 10 sc, 8 sc on the handle, 5 sc = 36
Prepare the wire frame. Watch the video! Its length and thickness will depend on the size of your doll. (I have a length of 30 cm, section 1.5)
Bend the frame in half, twist it and insert it into the body, fill the body tightly with filler, thereby securing the frame in the center.
Insert the frame into the handles, secure in the body frame.
Row 32: 4 sc, dec, 6 sc, dec, 8 sc, dec, 6 sc, dec, 4 sc = 32
Row 33: (1 sc, dec) x 2, 3 sc, (dec, 1 sc) x 4 , dec, 3 sc, (dec, 1 sc) x 2= 23
Row 34: 5 DEC, 3 sc, 5 DEC = 13
Row 35: 2 sc, 2 sc, 1 sc, 2 sc, 2 sc = 9
If you have a thick wire neck screw, cut 1 wire, leaving one. Look at the latest photos, where the wire is sticking out of an already tied neck, or at the very end of the video. Row 36 – 44: 9 sc (neck)
BLOUSE
(description + video )
Sleeve (2 parts):
A chain of 4 chs, leaving a 10cm thread for sewing.
We knit in pivoting rows from the second loop from the hook as follows:
Row 1 – 12 row: 3 sc behind the back wall of the loop of the previous row, in the ascent, turn the product. It turns out an elastic band. Try on the doll.
Close knitting in a circle, knit along the edge 12 sc.
Row 13: (1 sc, inc) x 6 = 18
Row 14: (3 sc, inc) x 2, 2 sc, (3 sc, inc) x 2 = 22
Row 15: 22 sc
Row 16: (6 sc, inc) x 3, 1 sc = 25
Row 17 – 22 (6 rows): 25 sc
Row 23:(6 sc, dec) x 3, 1 sc = 22
Row 24: 22 sc
Row 25: (5 sc, dec) x 3, 1 sc = 19
Row 26 – 28: 19 sc
Finish sl-st.
BASE OF THE JACKET
We knit from the bottom up.
A chain of 4 chs, leaving a 10cm thread for sewing.
We knit in pivoting rows from the second loop from the hook as follows:
Row 1 – 36 row: 3 sc behind the back wall of the loop of the previous row, in the ascent, turn the product. It turns out an elastic band. Try on the doll just above the waist.
Close knitting in a circle.
Row 1: knit along the edge 36 sc.
Row 2: (5 sc, inc) x 6 = 42 Row 3: 42 sc
Row 4: (6 sc, inc) x 6 = 48
Row 5 – 7:48
Row 8: 8 sc, 6 sc with loops of the right sleeve, 20 sc in front, 6 sc with loops of the left sleeve, 8 sc = 48
Row 9: 8 sc, 13 sc on the right sleeve, 20 sc in front, 13 sc on the left sleeve, 8 sc = 62
Put a jacket on the doll, gently pushing the handles into the sleeves. Next, we knit directly on the doll.
Row 10: (2 sc, dec) x 5, 1 sc, (dec, 2 sc) x 2, 2 sc, (dec, 2 sc) x 2, dec, 1 sc, (dec, 2 sc) x 5 = 47
Row 11: (1 sc, dec) x 7, 5 sc, (dec, 1 sc) x 7 = 33
Finish sl-st. Sew the edges of the cuffs.
JEANS BELT
With brown yarn we knit a chain of 4 CH. We knit in pivoting rows from the second loop from the hook, 3 sc= 46 rows. The length of the belt should
match the length of the hem of the jeans at the waist.
Polymer clay buckle (see photo)
Thread the belt through the buckle, put it on the doll and sew the edges.
We embroider loops under the belt with blue thread (see photo)
HEAD
(description + video )
The head is knitted from the bottom up, that is, from the neck to the crown. Fill your head with filler as you knit. Pay special attention to your cheeks. Fill your head tightly!
Row 1: 2 ch, 5 sc in the first loop = 5
Row 2: inc x 5 = 10
Row 3: inc x 10 = 20
Row 4: (1 sc, inc) x 10 = 30
Row 5: we knit a chain of 6 CH, skip 4 loops of the previous row and into the fifth: (2 sc, inc) x 8, 2 sc, 3 sc along the chain from cp = 39
We put a marker! This will be the middle of the back of the head.
We never move the marker again!
Row 6: 3 sc on a chain from CH, inc, 3 sc, inc, 24 sc, (inc, 3 sc) x 2 = 44
Row 7: 44 sc
Row 8: (inc, 2 sc) × 6, sc, 3 dec, sc, (2 sc, inc) × 6 = 53
Row 9: (4 sc, inc) × 2 times, 32 sc, (inc, 4 sc ) × 2 times, sc = 57
Row 10: 57 sc
Row 11: 28 sc, inc, 28 sc = 58
In the next row, the spout will be knitted.
Row 12: 28 sc, 6 sc in 1 loop, 29 sc = 63
Row 13: 28 sc, 3 dec (for the front half loops), 29 sc = 60
Row 14: 17 sc, 5 dec, sc, 2 dec, sc, 5 dec, 17 sc = 48
Row 15:23 sc, dec, 23 sc = 47
Row 16: 16 sc, (inc, 6 sc,) x 2, inc, 16 sc = 50
Row 17: 8 sc, (inc, 10 sc) x 3, inc, 8 sc = 54
Row18: 54 sc
Row 19: (8 sc, inc) x 6 = 60
Row 20 – 24 (5 rows): 60 sc
To drip inside the nose glue gel (if you will shape the nose), not current IMPORTANT! and use pliers to form a nose.
Row 25: (8 sc, dec) × 6 = 54
Row 26: (7 sc, dec) × 6 = 48
Row 27: (6 sc, dec) × 6 = 42
Row 28: (5 sc, dec) × 6 = 36
Row 29: (4 sc, dec) × 6 = 30
Row 30: (3 sc, dec) × 6 = 24
Fill your head very tightly with filler, pushing with a stick into the cheeks and chin. Form knitted head bumps.
Row 31: (2 sc, dec) × 6 = 18
Row 32: (1 sc, dec) × 6 = 12
Make 5 more kills, leaving the hole open. Cut the thread, hide it in the head.
Along the edge of the neck hole, dial 10 sc and knit about 5 rows. Turn the resulting tube inside your head, helping yourself with a wooden stick.
LETTING OUT EARS
(description + video )
The ears are located at the level of the nose, at a distance of 16 columns. Count 16 tbsp for the left ear. We put a pin.
We introduce the hook from the side of the face, stepping back from
the pin 1 column, grab the thread, knit 1 ch.
Then, a row above, we knit 2 double crochets in one loop.
Using a needle, we pull the thread into a loop (from where 2 DC were knitted), then insert the needle into the loop from the hook and tighten the thread, but not tight.
Confused? Better watch the video, everything is easier there)))
Right ear.
We count 16 columns from the spout to the left and put a pin, but shift it one more row higher. We again insert the needle into the upper base of the ear and bring it out to the place where the pin of the right ear is located.
We introduce the hook from the side of the face, stepping back from the pin 1 column, grab the thread, knit 1 ch.
Then in the same loop we knit 2 double crochets in one loop. We step back 1 row and introduce a needle with a thread, tightening the eyelet according to the same principle as the left one. Cut the thread, hide it in the head.
LIP EMBROIDERY
(photo + video )
FASTENING A HEAD TO BODY
(The head is spinning. Watch the video )
We take a long needle (more than the length of the doll’s head) and thread a very strong thread into it.
I have a doll from yarnart canarias, I inserted exactly this thread. Cut the thread long, about 60 – 70 cm. In two folds. If the thread is thick, you can do it in 1 addition. Pierce the neck as in photo 1. Pull the thread.
Cut, fold the two double ends, and thread the needle back into the eyelet.
Insert the needle with threads into the hole in the head under the neck. Lead into the hole at the top of the head. Remove the needle. Use a screwing motion to fit the head to the desired neck length. Don’t go too long or too short.
Tie the threads at the top of your head. Push the threads into the hole in the head. Amigurumi Jasmine Doll
COLOR HAIR
I painted with the most inexpensive estel paint.
I spread the dry strands on a bag, applied the mixture evenly with a brush (you can use a toothbrush). Shake the strands properly, close with a package. Leave on for 20 minutes, periodically checking for uniformity of staining.
Rinse under running water with shampoo, apply hair balm. Just spread out on a towel and leave to dry.
I didn’t comb the strands to keep the curls.
ADHESIVE HAIR
(watch the video)
CLOSED EYES
(description + video )
The length of each ciliary band is approximately 5-6 columns.
The distance between the eyes is 6 columns. Mark with a Brown pencil the place where the eyelashes will be glued. Lubricate the very edge of the tape with moment-crystal glue and glue the cilia with tweezers and a needle.
EYEBROWS
Find the center between the eyes and go up 6 rows.
At this level, the eyebrows will be located with a distance of 7 columns. We put the pins.
We count to the sides for 4 tbsp and 1 row down. We put the pins.
We embroider the eyebrows in these places with a simple stitch with a thread close to the hair color.
fifty
WATER EYES
PENCILS
( VIDEO )
DOWNLOAD EYE TEMPLATE
FIXATION OF HANDS
( video )
Here you will need:
PVA glue
pliers or round nose pliers
Toning
(video)
You will need: eyeshadow or dry pastel and tinting brush
Wreath of chamomiles
Chamomile ( video )
Materials and tools for work:
1. Very fine knitting yarn. I have this: YARNART
CANARIAS, 100% MERCERIZED COTTON, 20 g 203 m
Color: white (1000)
Mouline thread is pale yellow.
2. Floristic wire is the thinnest
3. Glue moment crystal
4. Hook 0.5
Chamomile Center Description:
Row 1: 5 sc in MR
Row 2: inc x 5 = 10
Row 3: 10 sc
Cut the thread.
Wreath of chamomiles
Spring Flower Description + video :
Flower diameter – 1 cm
Materials and tools for work:
1. Very fine knitting yarn. I have this: YARNART
CANARIAS, 100% MERCERIZED COTTON, 20 g 203 m
Color: white (1000)
2. Floristic wire is the thinnest
3. Glue moment crystal
4. Hook 0.5
5. Round yellow beads, the smallest
6. Fine brush, yellow acrylic paints, water.
Row 1: 5 sc in spacecraft
Row 2: (2 CH, 2 DC, 2 CH, 1 SL-ST) x 5
Flowers (painting, assembly)
Tie the required number of flowers.
Pour water into a bowl, immerse the flowers in it, take them out and spread them wet on the table.
Dilute yellow acrylic paint with water. The water should be slightly tinted.
Dampen a thin brush with tinted water. Apply a brush to the center of the flower. The paint runs a little.
Leave to dry.
When the flowers are dry, we start assembling. Cut the floristic wire into 3 – 4 cm pieces.
Insert into the center of the flower, grease the tip of the wire with crystal moment glue.
Insert yellow beads on the tip.
Pull the beaded wire to the flower.
Wreath of chamomiles
Description of leaves:
Green yarn
A chain of 12 CH, from the second loop from the hook along the
chain: 1 sl-st, 2 sl-st, 5 HDC, 2 sl-st, 1 sl-st
Without cutting off the thread we knit 10 CH, from the second loop from the hook along the chain: 1 sl-st, 2 sc, 4 HDC, 1 sc, 1 sl-st
Without cutting off the thread, we knit a chain of 23 CH. Cut the thread.
Tie the required number of double leaves. I have 6.
Be sure to completely wet them with water, straighten the leaves. With PVA glue, saturate a chain of 23 CH. Allow to dry.
ASSEMBLING THE CHAMOMILE WREATH ( video )
Lilac wreath
Materials and tools for work:
1. Yarn yarnart canarias (burgundy 0112, purple 6309, lingonberry 4931)
2. Hook 0.5
See the description of the flower VIDEO
Just do not fasten the wire, just leave the threads about 5 cm long.
I knitted a chain of 84 CH (it is equal to the circumference of the head). From the second loop from the hook along the chain: 83 sb, sew the edges.
Amigurumi Jasmine Doll Fasten the flowers simply by threading them by the threads, tie them into knots, cut the threads. Fasten the flowers one after another.
Our lovely Jasmine ready! Amigurumi Jasmine Doll