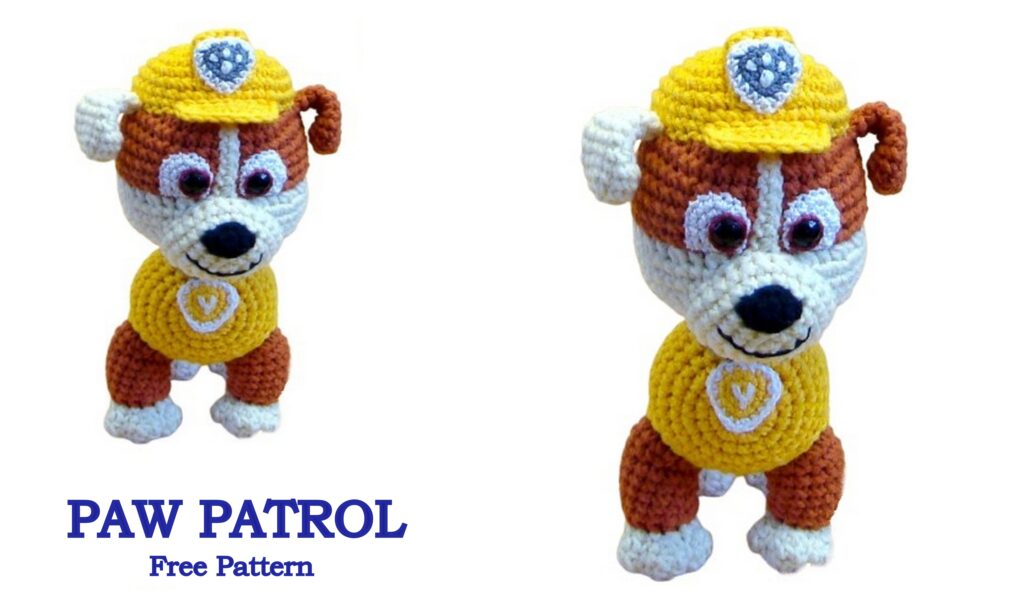
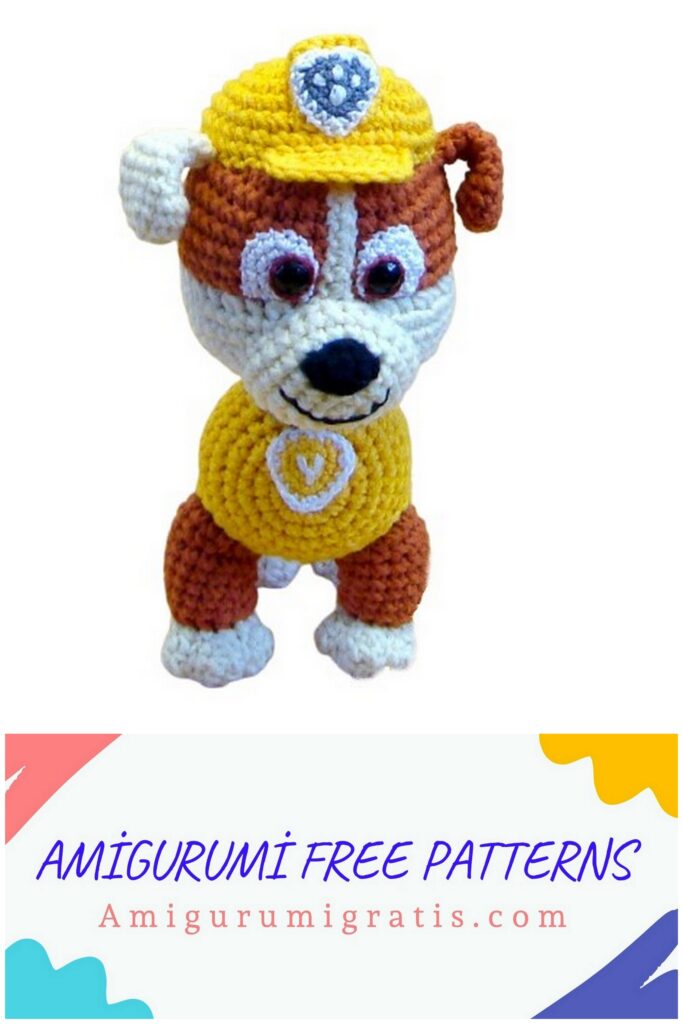
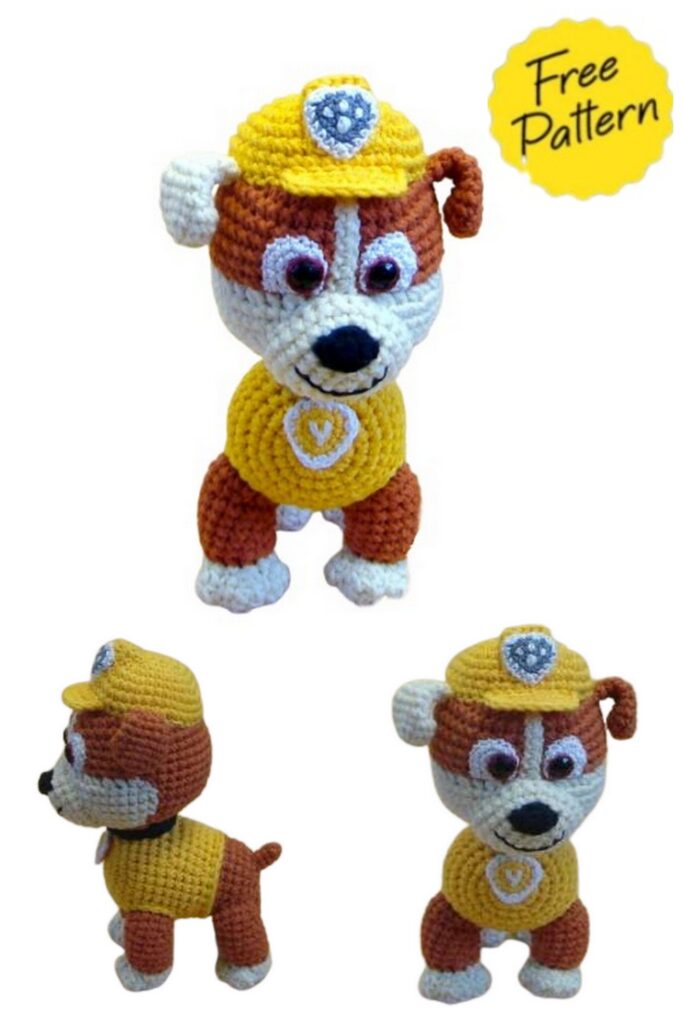
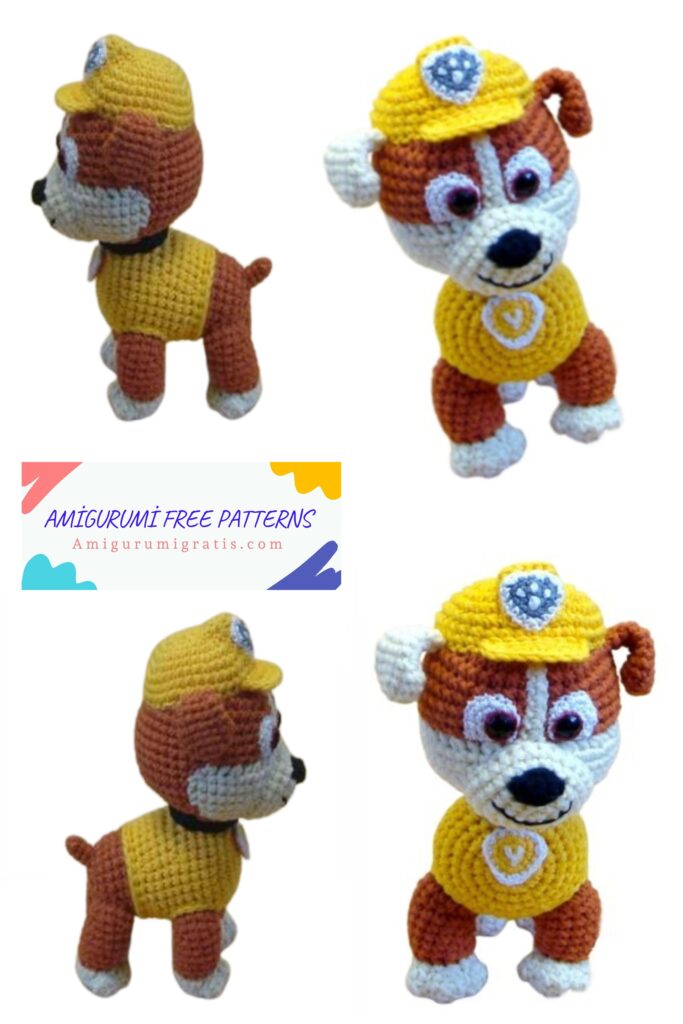
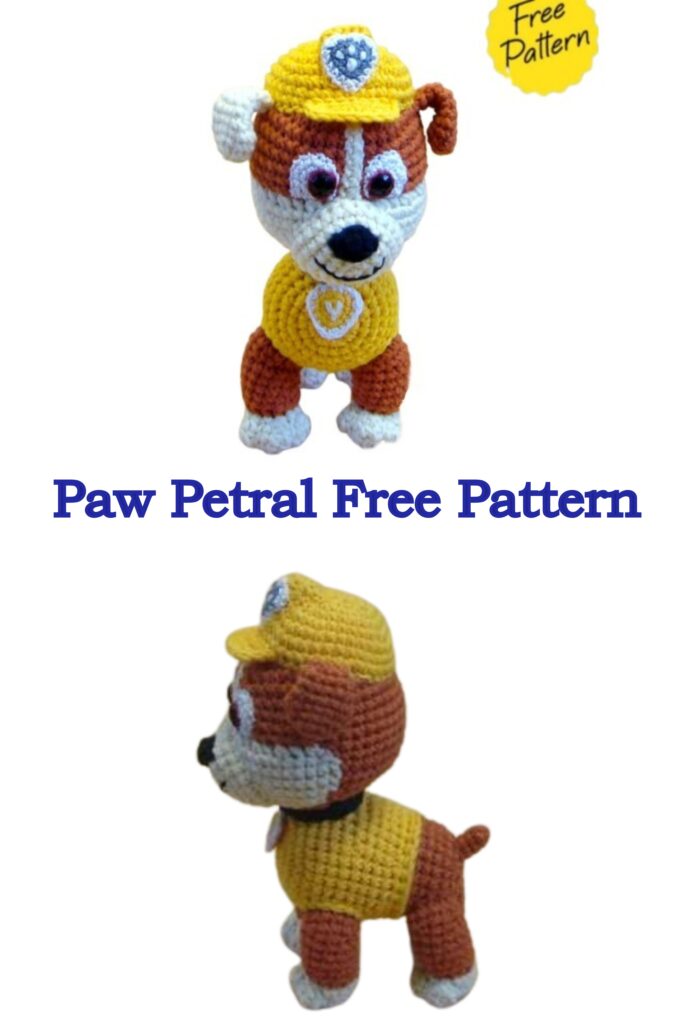
Height: 16 cm. Looking for an adorable Paw Petral Amigurumi pattern? You’re in the right place! This free amigurumi crochet pattern lets you create a cute and cuddly Paw Petral, perfect as a handmade gift, toy, or decoration. Designed for beginners and experienced crocheters, this pattern includes easy-to-follow instructions to help you make a soft, huggable companion. Grab your yarn and crochet hook, and start crafting your own Paw Petral amigurumi today – it’s fun, quick, and absolutely adorable!
Tools and Materials:
2.5 or 2 mm crochet hook. 1.5 or 1.25 mm crochet hook for eyes and emblems.
Filling: hollow fiber.
ALIZE Cotton Gold yarn, 55% cotton, 45% acrylic, 330 m/100 g. YarnArt Jeans is a similar yarn.
Colors: milky, brown, yellow, a touch of black.
Smoother black yarn (VITA cotton LIRA, GAZZAL BABY COTTON) for the nose.
A little thin black yarn for the mouth, white for the eyes, brown (or floss) for the iris, gray for the emblem, and a matching shirt color for the emblem. VITA cotton COCO is suitable, but you can use another yarn (at least 200 m/50 g). Alternatively, split the main yarn in half lengthwise.
Sew-on rhinestones, d = 8 mm.
Abbreviations
CH ( ) – chain stitch
SC ( ) – single crochet
SL-ST ( ) – slip stitch
İNC ( ) – increase
DEC ( ) – decrease
İnc 3in1 ( ) – 3 single crochets worked into the same stitch of the previous row
HDC ( ) – half double crochet
İNC HDC 3in1 ( ) – 3 half double crochets worked into the same stitch of the previous row
DEC HDC 3in1 ( ) – 3 half double crochets worked together
DEC DC 3in1 ( ) – 3 double crochets worked together
All pieces, unless otherwise noted, are worked in a spiral.
Paw Petral Body
(yellow, brown):
Start knitting with yellow.
Row 1: 6 SC into the amigurumi ring
Round 2: 6 İNC = 12 SC
Round 3: (İNC, 1 SC)*6 = 18 SC ( )*6 – repeat 6 times
Round 4: (2 SC, İNC)*6 = 24 SC
Round 5: (İNC, 3 SC)*6 = 30 SC
Round 6: (3 SC, İNC, 1 SC)*6 = 36 SC
Rounds 7-10: 36 SC
Round 11: (DEC, 10 SC)*3 = 33 SC
Round 12: 33 SC
Round 13: (5 SC, DEC, 4 SC)*3 = 30 SC
Round 14: 30 SC
Round 15: (DEC, 8 SC)*3 = 27 SC
Pull out the last loop longer so that it does not get lost, do not break the thread, leave it before knitting. Continue knitting with brown.
Row 16: Through the back loop (4 SC, DEC, 3 SC) * 3 = 24 SC
Row 17: 24 SC
Pull through the last loop again, leaving the brown yarn.
Make a yellow binding: through the remaining yellow front loops 26 SC, knit the last 27th stitch SL-ST, cut the yarn, pull the end through, place it through the next stitch inside the knitting, and tie a knot there with the starting end of the brown yarn. Continue knitting with brown yarn.
Rows 18-20: 24 SC
Stuff the body.
Row 21: (DEC, 1 SC) * 8 = 16 SC
Row 22: 8 DEC = 8 SC
Finish stuffing, cut the yarn, pass the end through the remaining stitches, and tighten the opening.

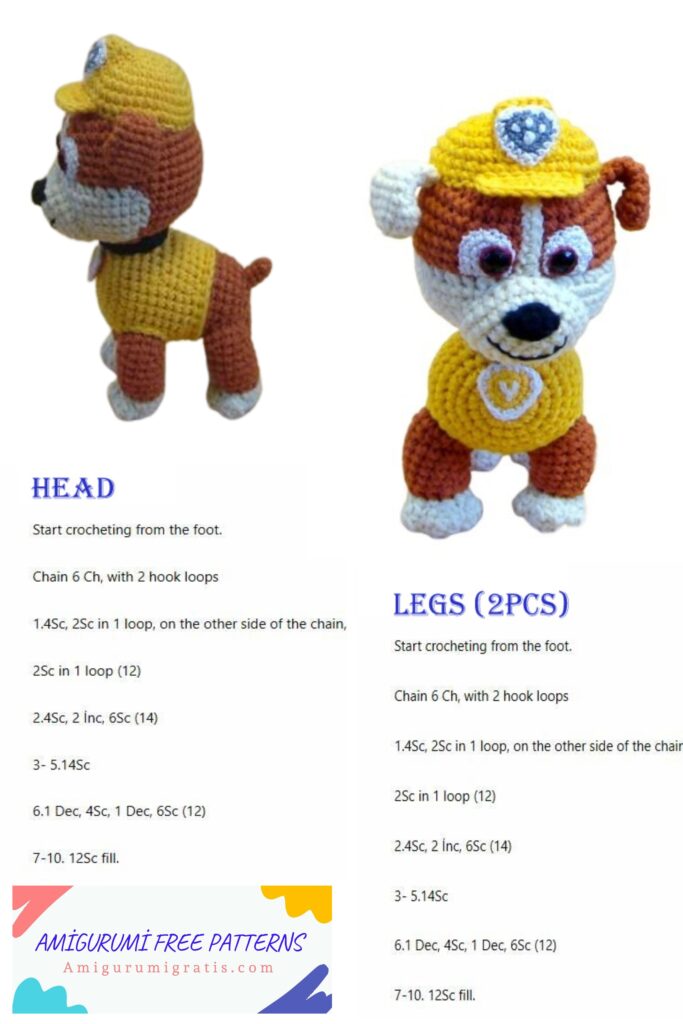
Paw Petral Paws
(milk, brown), 4 pcs:
Start knitting with milk color.
Row 1: 6 SC into the amigurumi ring
Row 2: 6 İNC = 12 SC
Row 3: SL-ST, (İNC HDC 3 in 1, SL-ST)*3, 5 SC = 18
Row 4: SL-ST, (3 HDC, SL-ST)*3, 5 SC = 18
Row 5: SL-ST, (DEC HDC 3 in 1, SL-ST)*3, 5 SC = 12
To make a 3 in 1 HDC decrease, pick up all three half double crochets on the hook, knit them all together at once, and pull tightly (but carefully) to avoid a hole forming.
Row 6: İNC, 6 SC, İNC, 3 SC, SL-ST = 14
Cut the yarn and fasten it off. Switch to the brown yarn. To knit the paw, we’ll need two brown yarns. You can pull the other end out of the middle of the ball; if this is difficult, unwind a small amount into a separate ball beforehand (the knots inside the toy are not visible, so use the leftovers later).
Row 7: Knit raised knit stitches on all paws.
The paws are knitted differently.
Right back, front:
Count forward from where you finished (as you knit).
4 stitches, attach the brown yarn between the 4th and 5th stitches, make a CH to raise the stitch – this is the first stitch of the next row.
4 stitches
Row 7: 9 raised knit stitches. SC, 4 raised knit stitches. SL-ST, 1 raised knit stitch. SC = 14
Row 8: 14 SC
Row 9: 4 SC, INSERT, 4 SC, 4 SL-ST, 1 SC = 15
Row 10: 15 SC
Row 11: 11 SC, 4 SL-ST = 15
Row 12: 15 SC
The additional rows we’ll be making next should be on the sides, on the opposite side from the fold due to the SL-ST. Knitting gauge may vary, so it’s best to check this.
Pull the main yarn loop longer to prevent it from getting lost. Count forward (one row of knitting) 5 stitches, join the second yarn (from the other ball) to the 6th stitch, and knit, starting with the next stitch after the 2 SC, SL-ST stitch. Cut the yarn, but don’t fasten it off; simply pull the end through.
From the first attachment, count back 1 more stitch, attach the yarn from the other ball to the 2nd stitch again, knit 6 SC, SL-ST, and pull the yarn tail through again.
Return to the set aside main yarn.
Row 13: 15 SC, SL-ST, cut the yarn, leaving a tail for sewing, and fasten.
Tie the ends of the secondary yarn inside the paw with knots (the beginning and end yarns together). 5 stitches.
Left back, front:
Count back from where you finished the milk part, 2 stitches, back (counter-clockwise), attach the brown yarn between the 2nd and 3rd stitches.
Row 7: 9 raised knit stitches, SC, 4 raised knit stitches, SL-ST, 1 raised knit stitch. SC = 14
Row 8: 14 SC
Row 9: 4 SC, İNC, 4 SC, 4 SL-ST, 1 SC = 15
Row 10: 15 SC
Row 11: 11 SC, 4 SL-ST = 15
Row 12: 15 SC
Pull out the loop so it doesn’t get lost. Count forward (as you knit) 4 stitches, attach the second thread to the 5th stitch, knit 2 SC, S L-ST,
cut the yarn and pull up the end.
From the first attachment, count back 1 stitch, attach the yarn from
another ball to the 2nd stitch, knit 6 SC, SL-ST, pull up the end of the yarn. Return to the set-aside main yarn.
Row 13: 15 SC, SL-ST, cut the yarn, leaving a tail for sewing, fasten.
Tie the ends inside the paw with knots (beginning and end).
Stuff and sew the paws. When sewing, pull the higher side part higher on the body, otherwise the paw will have an unsightly bump.
Do not sew all the way down, stuff the paw more tightly, then finish sewing. The back legs are almost flush.
4 stitches
≈ 6 rows from
the beginning of knitting
2 stitches
The four legs aren’t always sewn on smoothly, so don’t rush to break the thread after sewing on the last leg. You can use the remaining thread to pull any loose legs into place.
Using yellow thread, chain stitch the front legs in a circle at the sewing point. Work the stitch along the body, but close to the leg.
Paw Petral Tail
(brown):
Row 1: 6 SC into the amigurumi ring
Rows 2-4: 6 SC
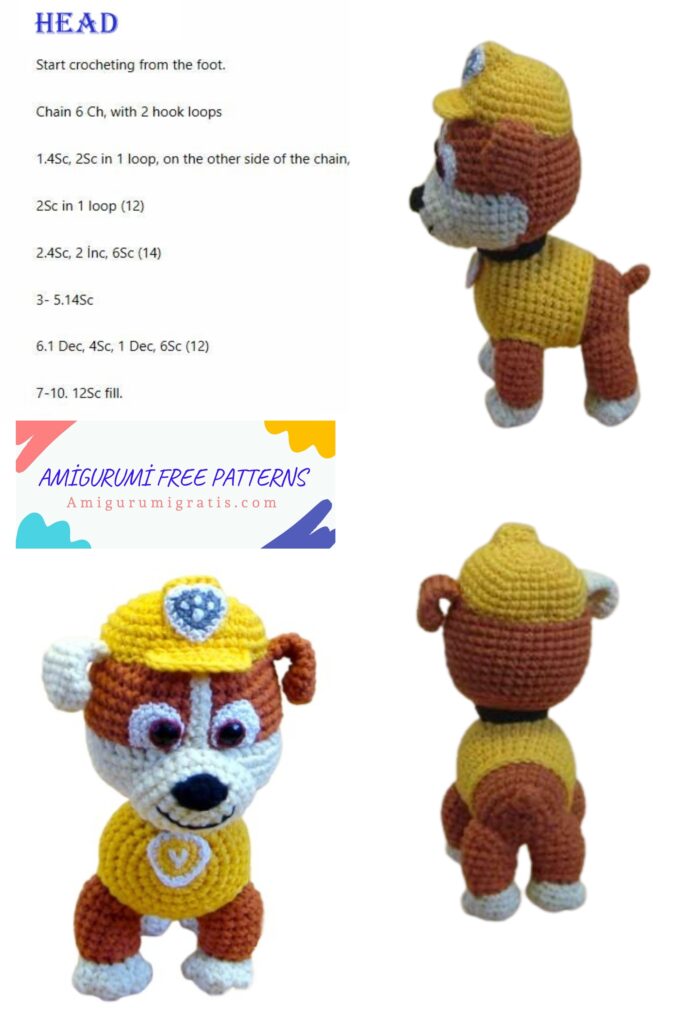
Cut the thread, leaving a tail for sewing, and secure. Stuff and sew on the tail. Head (brown, milk):
Start knitting with brown yarn.
Row 1: 6 SC into the amigurumi ring.
Row 2: 6 NC = 12 SC.
Row 3: (NC, 1 SC)*6 = 18 SC.
Row 4: (2 SC, NC)*6 = 24 SC.
Row 5: (2 SC, NC)*8 = 32 SC.
Row 6: (NC, 3 SC)*8 = 40 SC.
Rows 7-12: 40 SC.
Start knitting the milk part with the following rows. We’ll try to make the color transitions neat, so pay close attention to how and where the stitches are knitted.
Relief front stitch. SC – relief front stitch, which we knitted on the paws.
Always change yarn on the last stitch of the previous color.
Row 13: Brown: 10 SC, milk relief front stitch. Knit: İNC, 1 SC, İNC, 1 SC, İNC, 1 SC, İNC,
4 SC, İNC, 1 SC, İNC, 1 SC, İNC, 1 SC, İNC, brown: 12 SC = 48
Since the yarn overs will be large, constantly make sure that the yarn pulled through is not too taut, otherwise it will pull the knitting together.
Row 14: Brown: 9 SC, Milk: 1 raised Knit, 11 SC, 4 SC behind the back loop,
11 SC, 1 raised Knit, Brown: 11 SC = 48
Row 15: Brown: 9 SC, Milk: 28 SC, Brown: 11 SC = 48 SC
Row 16: Brown: 9 SC, 1 raised Knit. SC, milk: 27 SC, brown: 11 SC = 48
17-18 rows: brown: 10 SC, milk: 27 SC, brown: 11 SC = 48
Knit the 1st relief stitch
between the one already knitted and the next
Knit the 1st brown stitch in the far loop that has not yet been picked up
Knit the 1st relief stitch between the next two stitches
Knit the 1st regular stitch in the near loop that has already been picked up by the relief stitch
The last relief stitch between the one already knitted and the next brown stitch in the far loop that has not yet been picked up
Knit the relief stitch between the one already knitted and the next milk stitch in the far loop that has not yet been picked up
19 rows: brown: DEC, 4 SC, DEC, 2 SC, 1 relief stitch. SC, milk: 1 SC, (DEC, 4 SC)*4, brown: 1 relief knit SC, DEC, 4 SC, DEC, 3 SC = 40
Round 20: brown: 2 SC, DEC, 3 SC, DEC, milk: (3 SC, DEC)*4, 1 SC, brown: 2 SC, DEC, 3 SC, DEC, 1 SC = 32
Round 21: brown: DEC, 2 SC, DEC, 1 SC, milk: 1 SC, (DEC, 2 SC)*4, brown: (DEC, 2 SC)*2 = 24
Pull up all the yarn overs from the inside, stuff the head. You can cut the milk thread, continue with brown.
Round 22: regular stitches: 1 SC, DEC, 1 SC, relief Knit: 2 SC, DEC, (1 SC, DEC)*3, regular
St: 1 SC, DEC, 1 SC, DEC = 16
Rounds 23-24: 16 SC
Make a single crochet stitch, cut the yarn, leaving a tail for sewing, and fasten.
If something in the “transitions” of the muzzle doesn’t work out or you don’t like it, you can adjust it with regular small stitches with milk or brown yarn.
Knit a relief stitch between the one you’ve already knitted and the next milk stitch into the far loop that hasn’t yet been captured. Knit a relief stitch between the next two. Knit a regular stitch into the near loop that has already been captured. Knit a relief stitch into the far loop that hasn’t yet been captured. Knit a relief stitch between the next two.
Head stripe (milk):
Knit through the remaining front milk stitches. Join the yarn, catching two loops at a time, cast on 11 CH, starting from the second loop from the hook (the loop on the hook does not count).
Knit 10 SC into one side of the chain, attach SL-ST, catching the two remaining loops at once. Cut the yarn, leaving a tail for sewing, and fasten.
The head is quite large, so we’ll reinforce the neck.
After 6 rows, insert 2 cotton swabs into the holes between the stitches in the middle of the body.
Then 5 more swabs going back.
6 rows
Stuff the head thoroughly, focusing on the cheeks.
Use your finger to make an indentation in the stuffing in the center of the head. Place the head on the swabs and sew it in place.
Be sure to keep the stripe on the head facing forward when sewing. When the head is almost sewn on, stuff the neck around the sticks (it’s best to use blunt scissors) and then finish sewing.
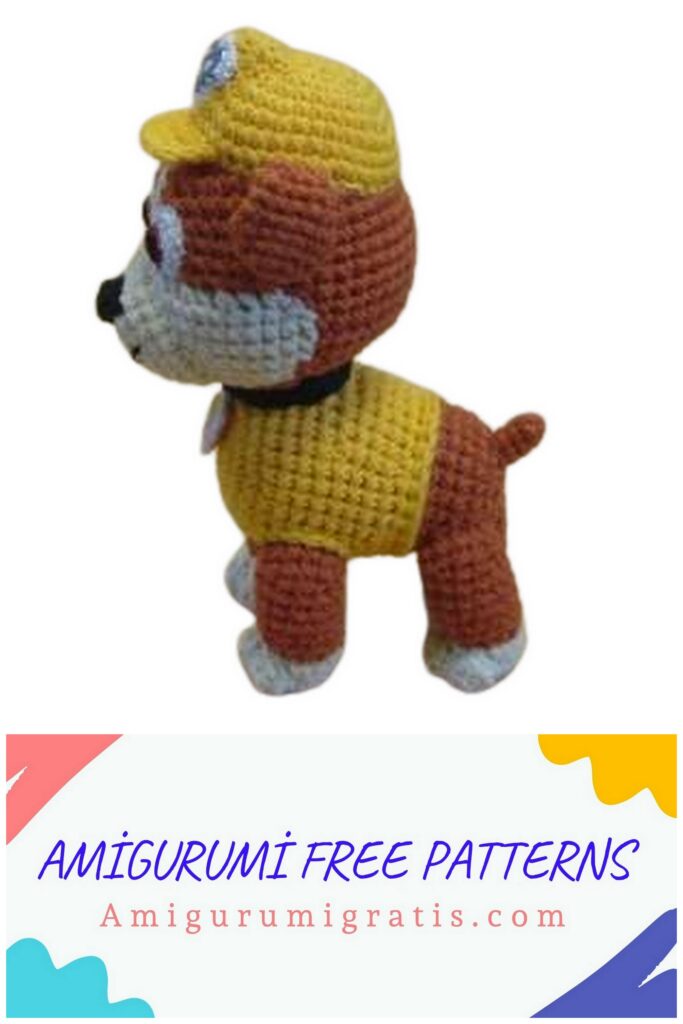
Collar (black):
Row 1: Knit ≈ 16 SCs around the neck, directly across the body. Adjusting is not necessary; ±1-2 SCs is acceptable.
Row 2: Knit another row of SCs using the cast-on stitches.
Make a SL-ST stitch, cut the yarn, pull out the end, and remove it. Through the next stitch, tie the black thread to the starting end of the collar, and tuck the ends into the knitting.
Sew the strip to the head, pulling it slightly upward. Muzzle (milk):
Row 1: 6 SC into the amigurumi ring
Row 2: (Inc 3 in 1, 1 SC) * 3 = 12 SC
Row 3: Inc, 1 SC, Inc, 2 SC, Inc 3 in 1, 2 SC, Inc, 1 SC, Inc, 1 SC = 18 SC
Row 4: 1 SC, Inc, 1 SC, Inc, 4 SC, Inc 3 in 1, 4 SC, Inc, 1 SC, Inc, 2 SC = 24 SC
Row 5: 3 SC, Inc, 15 SC, Inc, 4 SC = 26 SC
Row 6: 26 SC
Make a SL-ST, cut the thread, leaving a tail for sewing, and fasten. Lightly stuff the muzzle, pin it in place to keep it in place, and sew it with the corner facing up.
Don’t sew it all the way down; when a small opening remains, stuff it more tightly and finish sewing.
Nose (black):
For the nose, use a smoother yarn.
Row 1: 6 SC into the amigurumi ring
Row 2: (Inc, 1 SC)*2, Inc, SL-ST = 9
Cut the yarn, leaving a tail for sewing, and fasten it.
Sew it two rows up from the starting ring.
Eyes
(white), 2 pcs:
For the eyes, use a thin crochet hook (1.5 or 1.25 mm) and thin yarn. Row 1: 6 SC into the amigurumi ring
Row 2: 6 INS = 12 SC
Row 3: INS, 1 SC, INS, 2 SC, INS, 1 SC, INS (second increase stitch)
work SL-ST) – incomplete row
Cut the thread, leaving a tail for sewing, and secure. The unfinished row is the underside of the eye.
Sew it almost flush with the muzzle and head.
Sew the rhinestones inward and downward, but spaced back from the edge of the eye to accommodate the iris. Sew 2 stitches with double-thick spool thread; this is enough. With each stitch, pull the thread tightly (but carefully) to ensure the rhinestone fits snugly. You can secure the thread on the black nose (it’s not visible there) or on the top of the head (we’ll cover it with a helmet).
Helmet (yellow):
Row 1: 6 SC into the amigurumi ring
Row 2: 6 NC = 12 SC
Row 3: (NC, 1 SC)*6 = 18 SC
Row 4: (2 SC, NC)*6 = 24 SC
Row 5: (NC 3in1, 5 SC)*4 = 32 SC
Row 6: (NC, 1 SC, NC, 5 SC)*2, (1 SC, NC, 6 SC)*2 = 38 SC
Rows 7-9: 38 SC
Knit approximately 4 more SC, shifting the knitting to the corner (check that it is a corner); we will knit the visor.
− Knit 8 relief knit SC (start in the near loop, which is already captured by the post), turn the knitting. Do not make a CH at the end of the row. – Starting from the 2nd loop from the hook (the loop on the hook does not count), knit 7 purl stitches (SC), then turn the work. The purl stitches are worked the same as regular stitches, except insert the hook from behind the work and pick up the yarn in front.
– Starting from the 2nd loop from the hook, knit 6 SC, cut the yarn, and fasten off.
Wrap the visor with SC, attaching it to the helmet, making NC stitches in the corners.
Pin it to the crown, trying to create a square, stuff it, and sew it in place.
Sew it to the front using the “braid” under the visor.
Knit another helmet piece:
Row 1: 5 CH into the chain, knit back and forth in rows.
Begin knitting the following rows from the 2nd loop from the hook (the loop on the hook does not count). At the end of each row, make a CH and turn the knitting.
Rows 2-5: 4 SC
Row 6: Knit in raised purl stitches. Since we are knitting practically between the stitches, we grab the last stitch from the side.
Row 6: 4 raised purl stitches SC
Rows 7-8: 4 SC
Knit the piece along three sides with SC, making 3-in-1 NC stitches in the corners, and 3-in-1 DEC stitches DC on both sides (2 on the long side, 1 on the short side).
Make the last stitch of the last increase with an SL-ST stitch, cut the thread, leaving a tail for sewing, and fasten.
Stuff the resulting patch and sew it to the helmet, approximately a row away from the visor, with the long side facing forward. Ears (milk, brown), 2 pcs:
One ear is milk, the other is brown.
Row 1: 6 SC into the amigurumi ring
Row 2: (2 NC, 1 SC) * 2 = 10 SC
Row 3: (2 SC, NC, 2 SC) * 2 = 12 SC
Rows 4-5: 12 SC
Row 6: (DEC, 4 SC) * 2 = 10 SC
Rows 7-8: 10 SC
Row 9: (DEC, 3 SC) * 2 = 8 SC
Rows 10-11: 8 SC
Make a SL-ST stitch, cut the thread, leaving a tail for sewing, and fasten. Do not stuff the ears.
Sew the ears on the sides close to the helmet, immediately on both sides, so that they stick up. Using the same thread, use small stitches to quilt the ear all the way to the tip. Pull the thread taut so the ear bends, secure, and tuck it inside.
Using a thin brown thread (quadruple floss is fine)
embroider the iris around the rhinestone using a chain stitch. Make the stitch close, but not too tight, otherwise the braid will disappear under the rhinestone.
Collar Emblem
(yellow, white):
For the emblem, use a 1.25 – 1.5 mm hook and a thin thread in the same color as the blouse (in this version, we divide the main yellow thread in half lengthwise).
Row 1: 6 SC into the amigurumi ring
Row 2: PR, 1 SC, İNC 3 in 1, 1 SC, İNC, 1 SC = 10 SC
Row 3: 1 SC, İNC, 2 SC, İNC 3 in 1, 2 SC, İNC, SL-ST – incomplete row
Knit identical pieces, embroidering one with thin white thread:
− Insert a pin one row below the starting ring, make 3 loose stitches around it in the same place
− Remove the pin, bring the thread out at this place
− Make 3 stitches down in the same place, tie the ends of the thread on the wrong side
Fold the pieces wrong sides together and tie them together with thin white thread. Start with a post between the ends. What we knitted earlier is shown in red.
We follow the pattern (description) for Row 4.
Row 1: 6 SC into the amigurumi ring
Row 2: İNC, 1 SC, İNC 3in1, 1 SC, İNC, 1 SC = 10 SC
Row 3: 1 SC, İNC, 2 SC, İNC 3in1, 2 SC, İNC, SL-ST – incomplete row
Row 4: 2 SC, 2 İNC, 3 SC, İNC 3in1, 3 SC, 2 İNC, 1 SC, SL-ST
We tuck all the ends of the threads inside while tying.
We make the last SL-ST into the loop where we hooked the first stitch.
We cut the thread, leaving a tail for sewing, and fasten it off.
Wrap the yarn around the collar with three stitches (each time grabbing the emblem at the top).
Wrap it a couple of times above the emblem to keep the stitches together. Bring the thread down through the body, where we also grab the emblem with a small stitch and secure the thread.
Head Emblem (Gray):
For the emblem, use a 1.25-1.5 mm hook and thin gray thread. Knit one piece according to the orange emblem pattern.
Knit 1-3 rows of yarn. Embroider. 3 chain stitches from the bottom through every 1.5 rows into the same eyelets. Also chain stitch through the same eyelets just above, 2 stitches up
every other row, and 2 diagonal stitches per corner.
Bind with thin white thread according to the pattern for the yellow pieces (Row 4). Cut the thread, leaving a tail for sewing, and secure it. Sew it onto the helmet patch.
Embroider the mouth with thin black thread using chain stitch, 2 rows down from the nose.
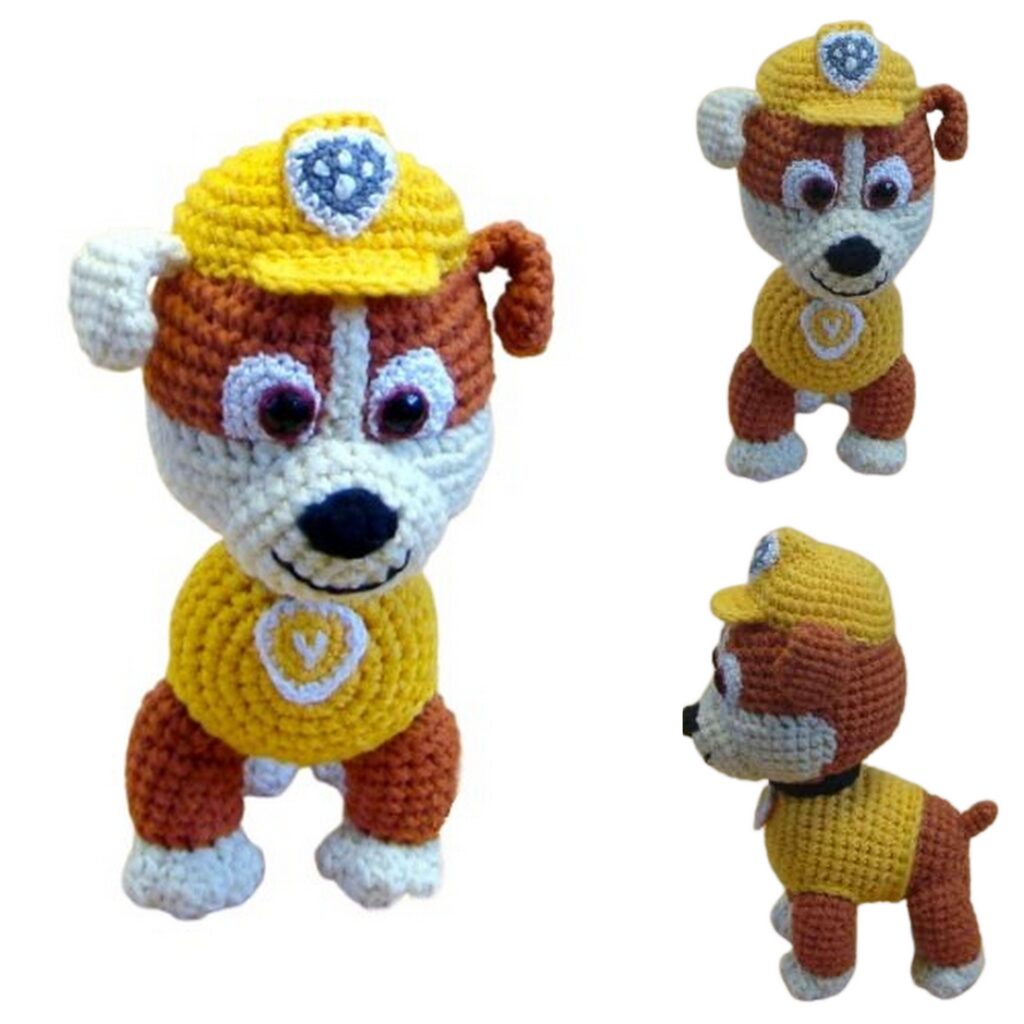
THE BRAVE MAN IS READY!