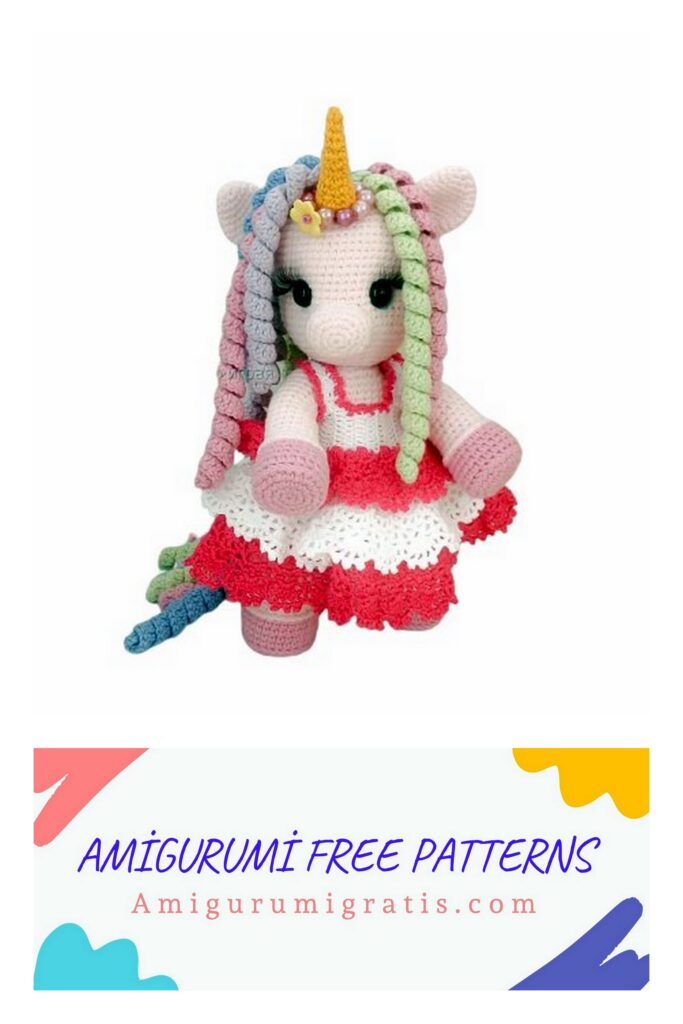
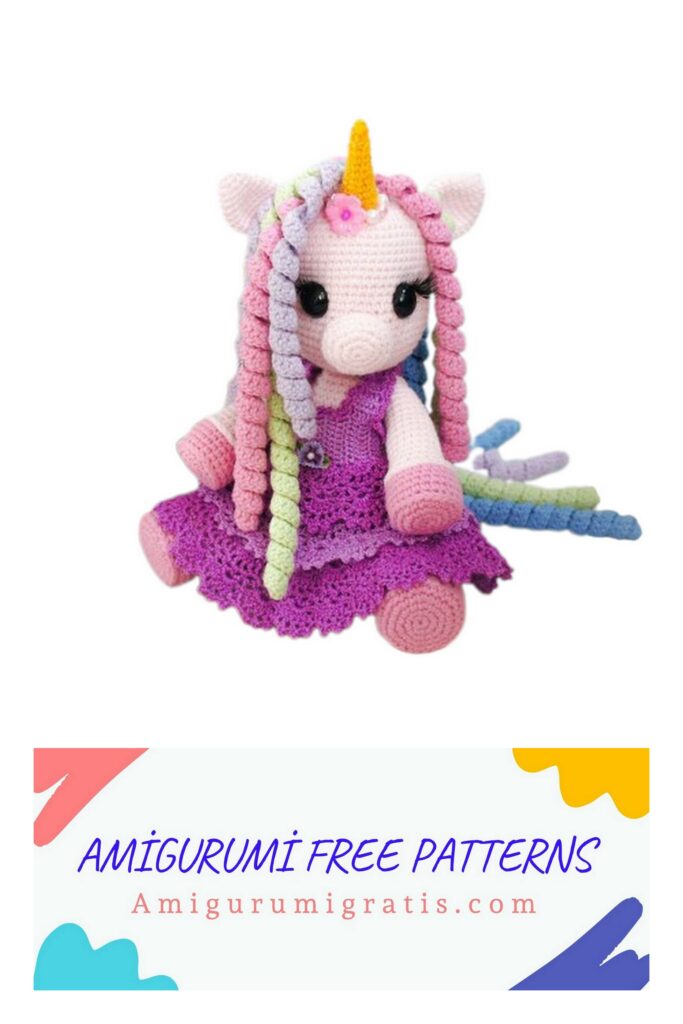
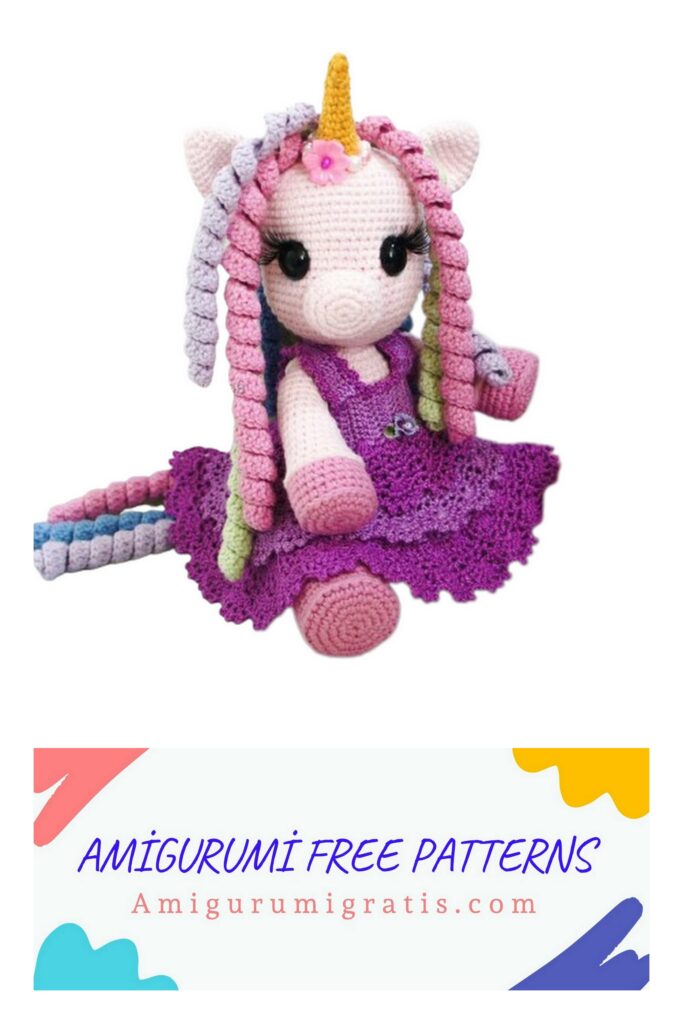
Hello, your child will love the Amigurumi Unicorn Baby Free pattern, follow it for the most beautiful current patterns. Growth 23-25 cm when using these materials
Necessary materials:
Yarn “Cotton Gold” from Alize or “JEANS” (YarnART)
- the main color is pink 1 motochek, 50 gr.
- blue, green, lilac, hot pink – about half a skein, 25 gr.
hook 1.75
For the peephole:
- half beads or eyes on a secure mount, size 12 or 14 mm.,
- Firth blue or blue,
- cilia.
Filler – syntepuh (holofiber),
- thread for tightening (I have dental floss),
- long needle
- a joint for fastening 2.0 or 2.5 cm,
or cotter pin from 2.5 to 3.5 cm in size, disks for cotter pin with a diameter of 2.0 cm.
(2.5 cm.) And 3.0 – 3.5 cm. (You can have two disks of 2.0 – 2.5 cm.)
- glue moment crystal (gel)
- plastic to strengthen the legs,
- beads for decoration.
For the dress: iris yarn of any color 2 hanks, hook 1.25
Abbreviations
Magic ring – amigurumi ring
Sc – single crochet
Dc – double crochet
İnc – increase (knit 2 columns from one
İnc previous row)
Dec – decrease (knit 2 columns together)
Sl-st – connecting column
Ch – air loop
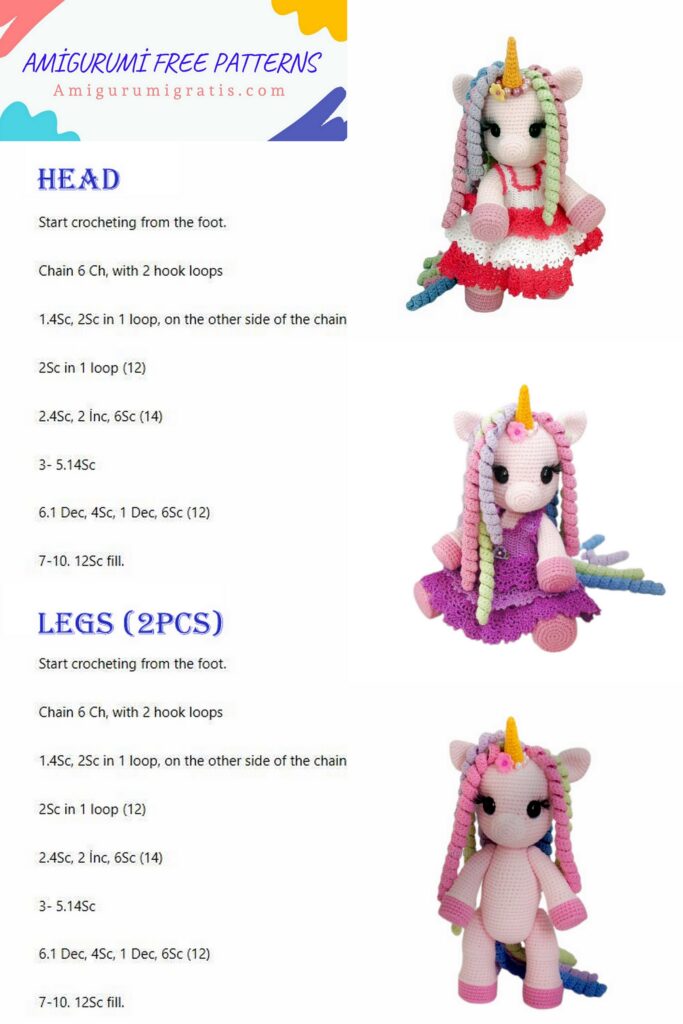
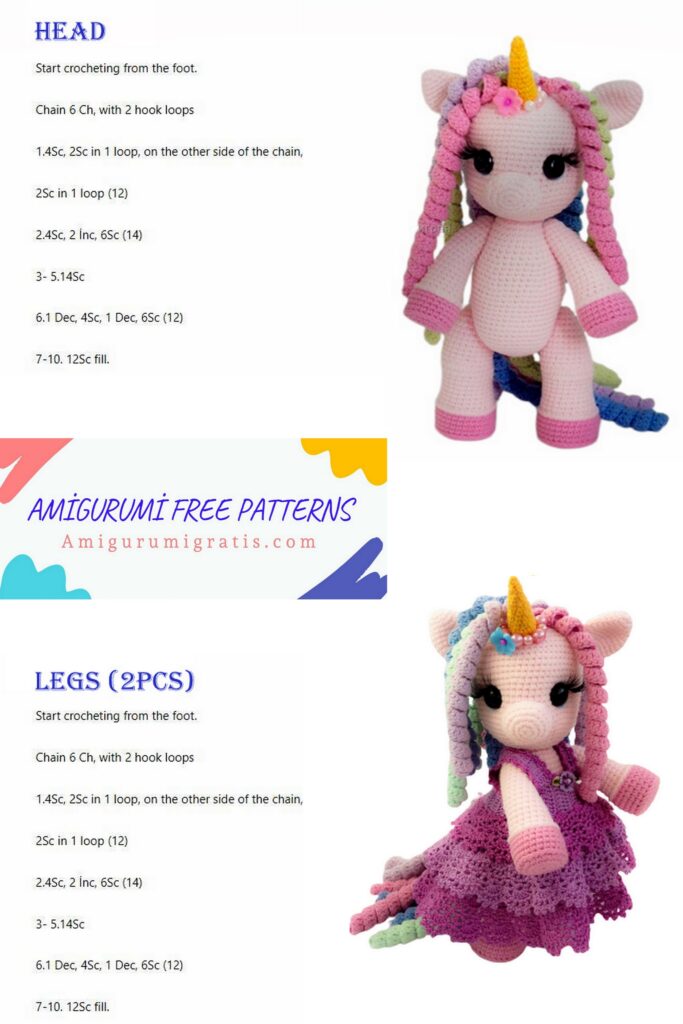
Front legs (2 parts):
Color: Hot Pink
1r. 6Sc in Magic ring (6)
2 p. 6 increases (12)
3 p. (1Sc, İnc) * 6 times (18)
4 p. (2Sc, İnc) * 6 times (24)
5 p. 24Sc knit perpendicular
6-9r. 24Sc
Change the thread to pink (main), while leaving a long end for tying a row (about 40 – 45 cm.) and bring it to the front side
10 p. 24Sl-st tie for the back half loops. We try not to tighten much
11 p. (2Sc, Dec) * 6 (18) – knit for the back half loops.
Return to the left thread for tying and tie with connecting columns (Sl-st) on the left front half loops of the 10th row (main color), pull the thread inward and fasten!
Cut circles from plastic or cardboard on the diameter of the legs and paste.
We try on the size, circle the base of the leg, cut out a circle, try on.
If everything suits, the base is tight, but does not bulge, not stretches the sole, boldly cut the second circle.
12-17r. 18Sc
It’s convenient to fill the leg, check how the liner lies.
18 p. 3Dec, 12Sc (15) – for the right leg
(For the left leg, decrease at the end of the row – 12Sc, 3Dec)
19-25r. 15Sc
26 p. (3Sc, Dec) * 3 (12)
Fill the leg, carefully work out the place of the bend, roll right into
hands, give the desired shape.
27 RUR 12Sc
28 p. 6Dec (6)
Close the hole, hide the thread
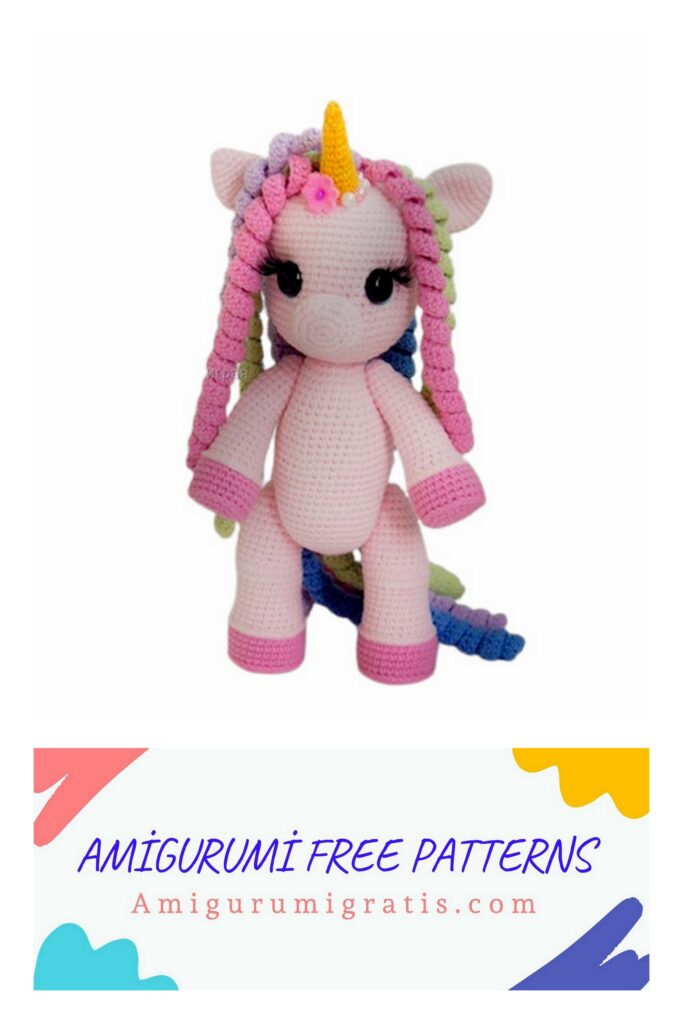
Rear legs (2 parts):
Color: Hot Pink
1r. 6Sc in Magic ring (6)
2 p. 6 increases (12)
3 p. (1Sc, İnc) * 6 times (18)
4 p. (2Sc, İnc) * 6 times (24)
5 p. (3Sc, İnc) * 6 times (30)
6 p. 30Sc knit perpendicular
7-10r. 30Sc
Change the thread to pink (main), while leaving a long end for tying a row (about 45-50 cm.) and bring it to the front side.
11 p. 30Sl-st tie for back half loops
12 p. (3Sc, Dec) * 6 (24) to connect for the back half loops
Return to the left thread for tying and tie with connecting
with columns (Sl-st) on the left front half loops of the 11th row, pull out thread inside and fasten!
Cut circles from plastic or cardboard on the diameter of the legs and paste.
13-19r. 24Sc
20 RUR 9Sc, 6İnc, 6Sc, 3Sl-st (30)
21 RUR 3Sl-st, 24Sc, 3Sl-st (30)
22 p. 3Sl-st, 6Sc, 6Dec, 9Sc (24)
Fill the leg, align the liner.
23-29 RUR 24Sc
30 RUR (2Sc, Dec) * 6 (18)
31 RUR 18Sc
32 RUR (1Sc, Dec) * 6 (12)
Fill the leg, carefully work out the place of the bend, knee, ride right in the hands, give the desired shape.
33 RUR 6Dec (6)
Close the hole, hide the thread.
Head
NOTE: if you use a joint to attach your head, then for
the convenience of securing it, immediately tie the first 9 rows of the body from the other end of the ball and fix the joint (connect the head and torso) to stuffing head. Then continue to knit your head to the end.
1p. 6Sc in Magic ring (6)
2 p. 6 increases (12)
3 p. (1Sc, İnc) * 6 times (18)
4 p. (2Sc, İnc) * 6 times (24)
5 p. (3Sc, İnc) * 6 times (30)
6 p. (4Sc, İnc) * 6 times (36)
7 p. (5Sc, İnc) * 6 times (42)
8 p. (6Sc, İnc) * 6 times (48)
9 p. (7Sc, İnc) * 6 times (54)
10-17r. 54Sc
18 p. (8Sc, İnc) * 6 times (60)
19-24r. 60Sc
25 RUR (8Sc, Dec) * 6 times (54)
26 p. (7Sc, Dec) * 6 times (48)
27 RUR (6Sc, Dec) * 6 times (42)
28 p. (5Sc, Dec) * 6 times (36)
Install a joint or cotter pin,
detail to fill.
29 RUR (4Sc, Dec) * 6 times (30)
30 RUR (3Sc, Dec) * 6 times (24)
31 RUR (2Sc, Dec) * 6 times (18)
Stuff your head to the end
32 RUR (1Sc, Dec) * 6 times (12)
33 RUR 6 Dec (6)
Close the hole, hide the thread.
Corpuscle:
I knit on top!
We knit with a soft pink thread (main),
1r. 6Sc in Magic ring (6)
2 p. 6 İncibs (12)
3 p. (1Sc, İnc) * 6 times (18)
4 p. (2Sc, İnc) * 6 times (24)
5 p. (3Sc, İnc) * 6 times (30)
6-9r. 30Sc
Attach the head by securing the cotter pin.
10 p. (4Sc, İnc) * 6 times (36)
11 p. 36Sc
12 p. (5Sc, İnc) * 6 times (42)
13 RUR 42Sc
14 p. (6Sc, İnc) * 6 times (48)
15-26 r. 48Sc
27 RUR (6Sc, Dec) * 6 times (42)
28 p. (5Sc, Dec) * 6 times (36)
29 RUR (4Sc, Dec) * 6 times (30)
Detail fill
30 RUR (3Sc, Dec) * 6 times (24)
31 RUR (2Sc, Dec) * 6 times (18)
32 RUR (1Sc, Dec) * 6 times (12)
33 RUR 6 Dec (6)
Close the hole, hide the thread.
Muzzle
We knit with a soft pink thread (main),
1r. 6Sc in Magic ring (6)
2 p. 6 increases (12)
3 p. (1Sc, İnc) * 6 times (18)
4 p. (3Sc, 3Sc in one loops, 4Sc, 3Sc in one loop) * 2 times (26)
5-6r. 26Sc (you can tie another row as desired)
Leave a long end for sewing.
Horn:
In yellow, you can add shine.
Chain of 12Ch, close in a circle (leave the end for sewing)
1-2r. 12Sc
3 p. Dec, 10Sc (11)
4 p. Dec, 9Sc (10)
5 p. 10Sc
6 p. Dec, 8Sc (9)
7 p. Dec, 7Sc (8)
8 p. 8Sc
9 p. Dec, 6Sc (7)
10 p. Dec, 5Sc (6)
11 p. Dec, 4Sc (5)
12 p. Dec, 3Sc (4)
Next, close the needle sharply.
Ears (2 parts):
We knit with a soft pink thread (main),
1r. 6Sc in Magic ring (6)
2 p. (İnc, 1Sc) * 3 times (9)
3 p. (İnc, 2Sc) * 3 times (12)
4 p. (İnc, 3Sc) * 3 times (15)
5 p. (İnc, 4Sc) * 3 times (18)
6 p. (İnc, 5Sc) * 3 times (21)
7 p. (İnc, 6Sc) * 3 times (24)
8 p. 24Sc
9 p. (6Sc, Dec) * 3 times (21)
10 p. (5Sc, Dec) * 3 times (18)
11 p. (4Sc, Dec) * 3 times (15)
12 p. (3Sc, Dec) * 3 times (12)
13 RUR (2Sc, Dec) * 3 times (9)
14 p. (1Sc, Dec) * 3 times (6)
Leave the end for sewing.
SPIRALS:
Dial 80-100 Ch
1r. Dc, increase, Dc, increase …. repeat to the end of the row.
Tie 12 pieces for the head and 8 for the tail.
Curls can be knitted separately and then sewn during assembly, and
You can knit directly from the head, if it is convenient for you.
Assembly:
Thoroughly fill, tighten and close the holes, threads
hide the remaining.
Sew on the muzzle. Remember to add filler. I
I sew the muzzle lower, the lower edge of the muzzle is located about 7-8 row of head. The muzzle is a little rectangular, position, respectively, exactly.
Sew on a horn
Make eye make-ups.
They are located just at the level of the upper edge of the muzzle, in
side to retreat about 3 columns on each side.
Then sew on the curls, if you did not fasten them immediately.
Sew on the ears (the lower edge of the eyelet is attached at about 22-23 a row of the head and on the side (in height) sew the eyelet to the 25th row).
We make out the eyes:
Cut eye liner from felt, color blue or turquoise.
At the eye, we bite off the leg for fastening with pliers and remain alone eye – half beads. Glue a felt backing to your eyes and glue eyes to the head in places of tightening.
Stick cilia. BUT! better stick them at the very end, after assembly.
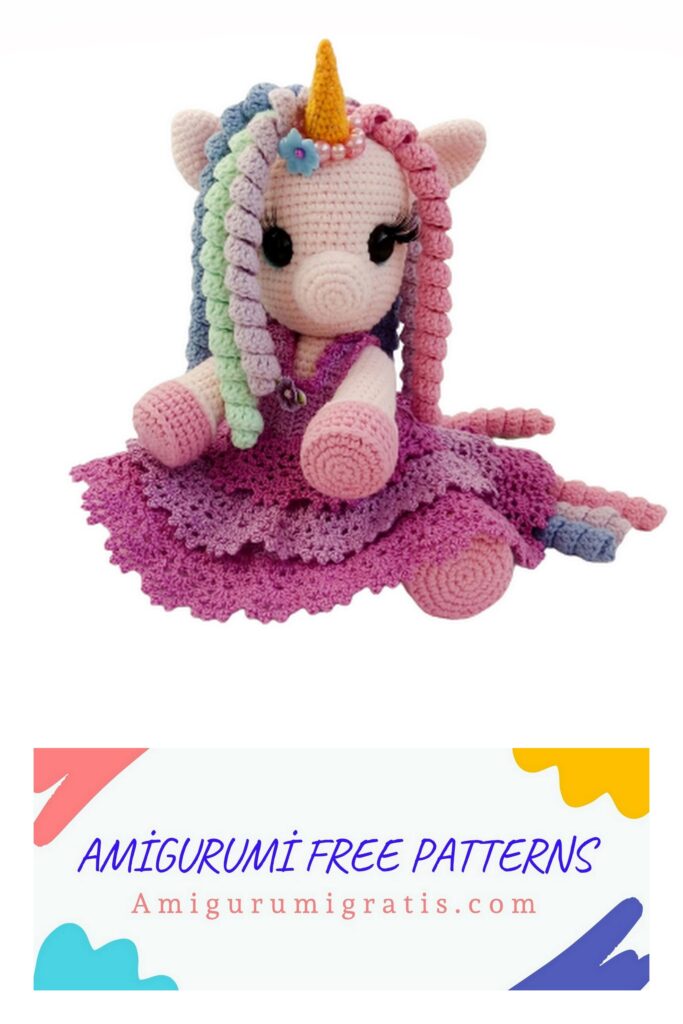
DRESS.
(the sundress is connected based on the description of the dress for the doll from talem21)
Yarn “iris” in two colors, hook 1.25
We start to knit with a yoke.
Dial a chain of 8Ch + 2 lifting loops and knit in rotary rows on 8Dc about 30 rows (you need to try on a unicorn, so how the thickness can be different).
Next, we knit the base – the grid: (Dc, Ch) * repeat the desired amount until end of row and so on 10 rows. Moreover, to expand the hem make an arbitrary increase in the grid (knit additional Dc and Ch) something like this:
in the 2nd row – make an increase in each 5 column,
in the 3rd row – make an increase in each 7 column
in the 4th row – make an increase in each 9 column
in the 6th row – make an increase in each 11 column
in the 7th row – make an increase in each 13 columns
in the 9th row – make an increase in every 15 columns
Then we knit the upper tier according to the same strapping scheme (we introduce the hook for the yoke loop) and the middle tier – in the fifth row.
Straps
Try on a dress and mark the location of the straps in front, considering that their initial width is 5 columns.
Then, right on the yoke, in the marked place, knit 5Dc, turn, 5dc, rotate, dec, 3dc, rotate, 4dc, rotate, dec, 2dc, rotate, 3Dc, rotate, 3Dc to the desired length (approximately 5-6 rows).
Try on, if the length of the strap is enough, then pull the thread, trim and sew the strap on the back, close to the clasp.
Check if a hoof passes through your little strap!
The second is connected in the same way.
Next, tie the entire top of the sarafan: (Sc, Sc, 3Ch) * desired number of times.
When tying the edges of the coquette on the back, make loops on one side (air loops), try on the diameter of your button, and on the other hand tie Sc.
Sew on buttons.
PANTIES
Dial 34Ch + 3Ch to lift or approximately 8 cm (half waist) and knit 3 rows with an elastic band alternating Dc convex and DC concave.
4-5r. 34dc
6 p. Dec, 30Dc, Dec,
7 p. Dec, 28Dc, Dec,
Next, we continue to knit the rotary rows, making 2 decreases with
each side until 10 columns remain.
- Knit 2 rows directly on 10Dc.
Then we continue to knit the rotary rows Dc, but already do increments on each side, one – 2 rows,
- and on each side 2 increments before the total columns will reach 30
Try on if the tail reaches the height, knit a hole for ponytails – for this, we connect each side of the back of the panties
separately:
– 2 increments, 12Dc, rotate,
– Knit 2 or 3 rows of 16Dc,
– Knit 3 rows with an elastic band 1 * 1.
Tie the left side the same way, skipping 2 columns, but the first row mirror – first knit 12Dc, then 2 increments.
Ponytail hole to tie Sc, making on one side buttonhole (you can tie the ties).
Sew side seams, tie in a circle for beauty: (2Sc, 3Ch) * desired number of times.
Sew on a button.