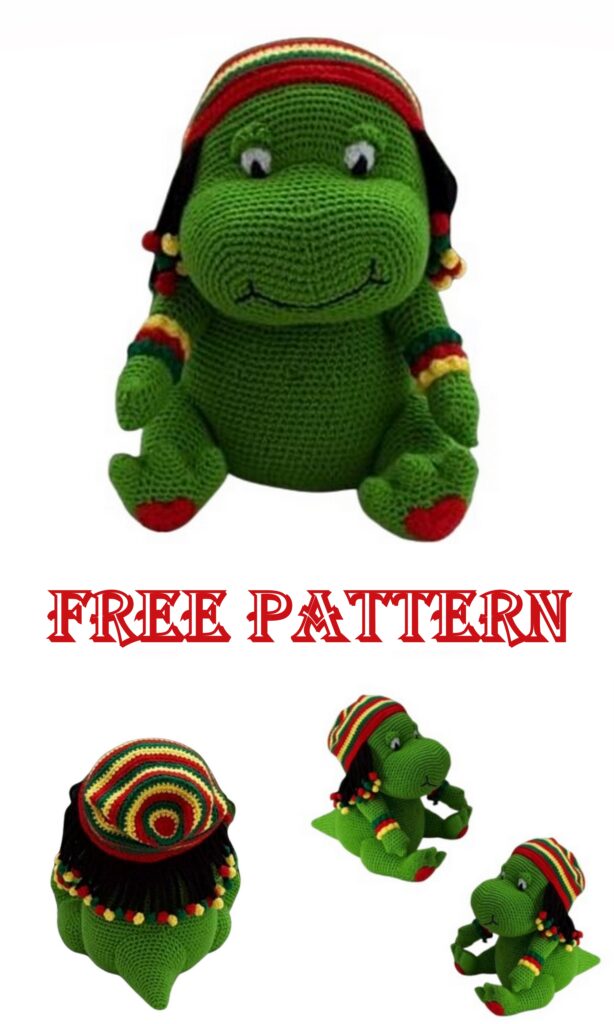
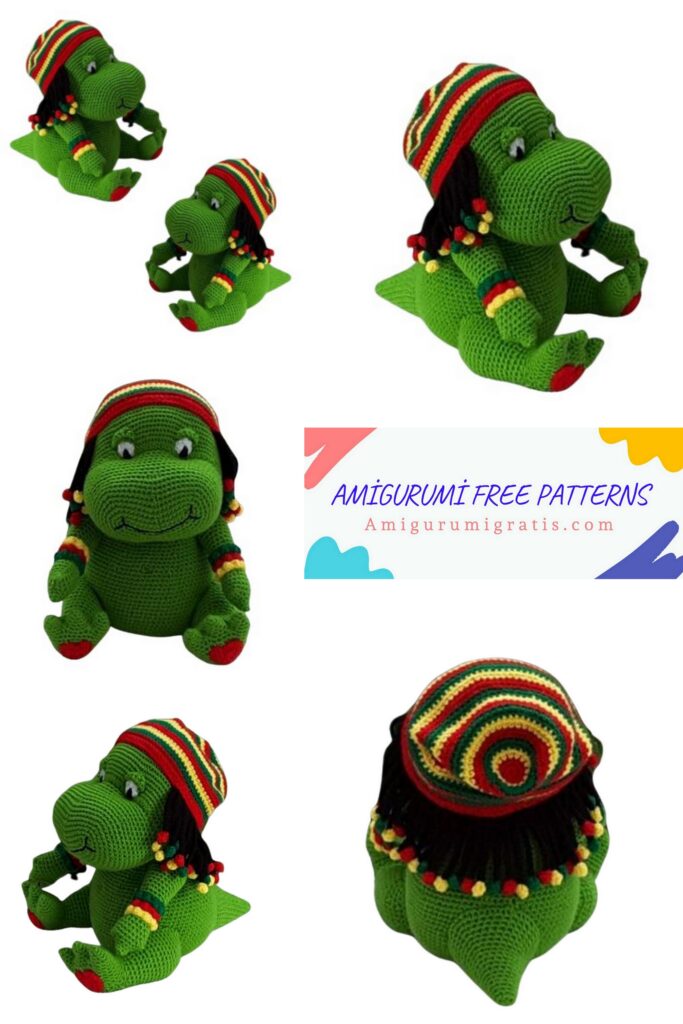
You can visit our website for Amigurumi Bob Marley T-Rex free pattern.
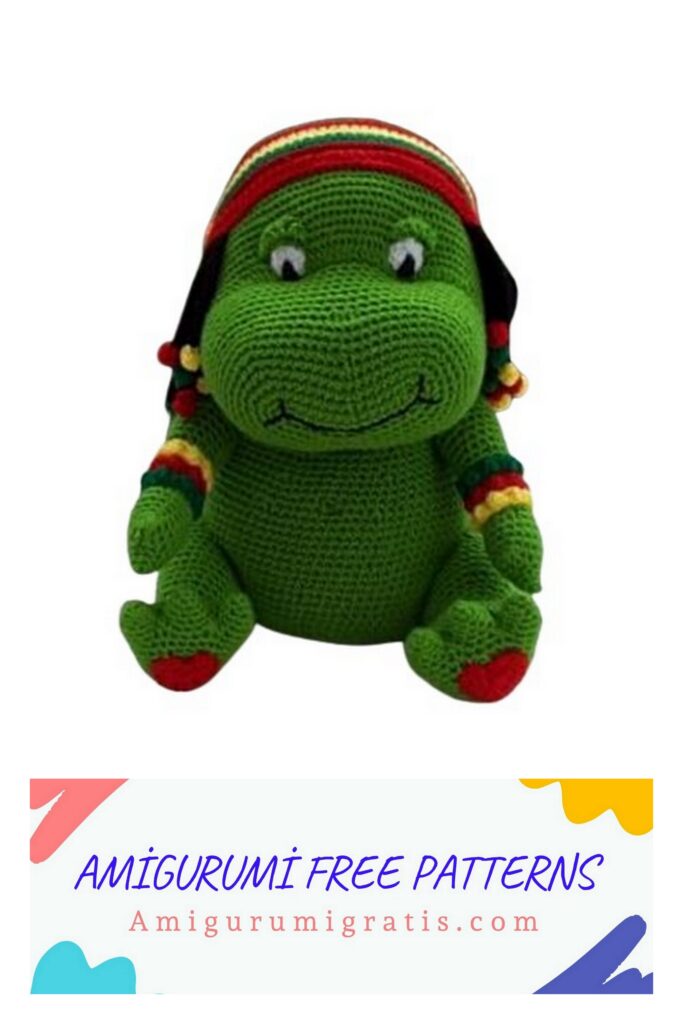
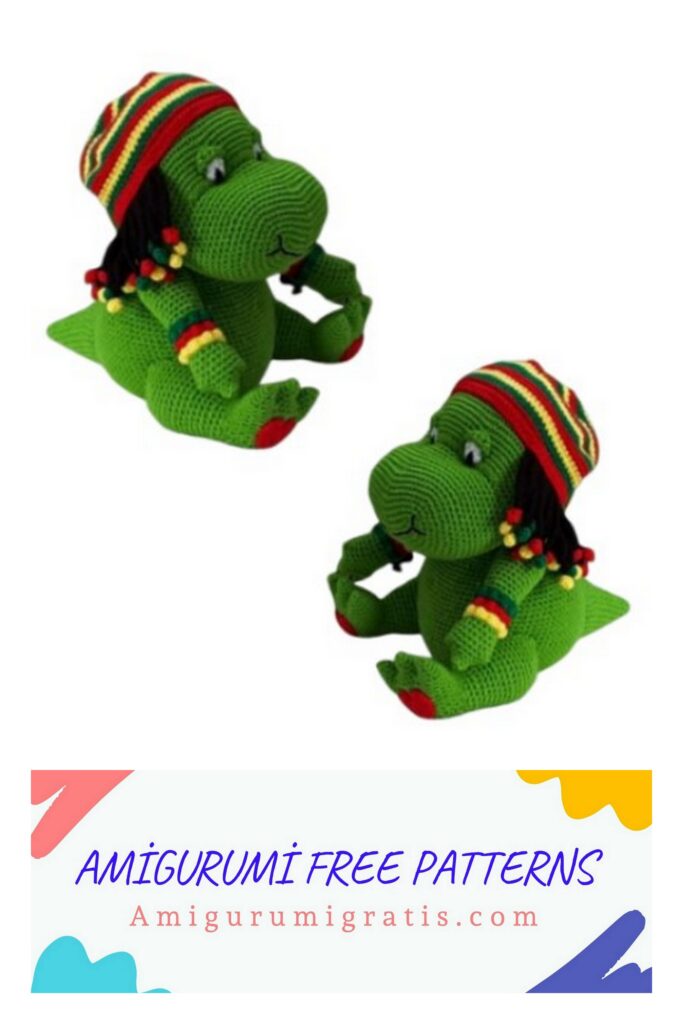
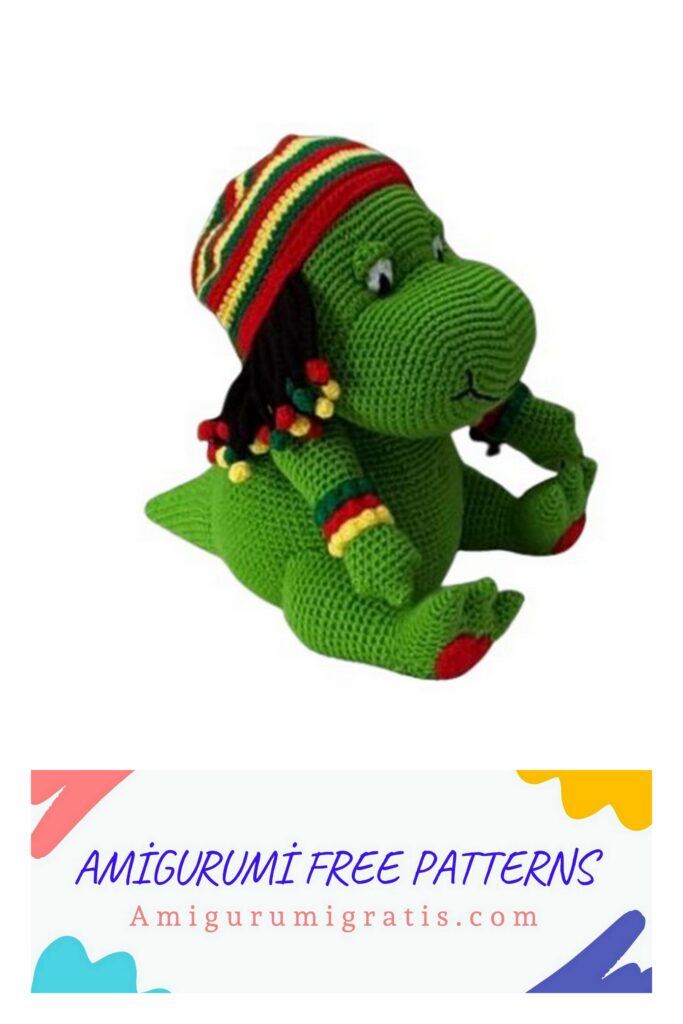
Reggae Rex
US Terms
Materials:
Hayfield Bonus Lemongrass 0699 – 130g
Hayfield Bonus Ladybird 0698 – 22g
Hayfield Bonus Bright Yellow 0819 – 20g
Hayfield Bonus Emerald 0916 – 20g
Hayfield Bonus Black 0965 – 15g
Hayfield Bonus White 0961 – Oddment
Hi-Loft Quality Toy Stuffing
3mm Crochet Hook
Wool Needle (for sewing)
Abbreviations:
ch – chain
sc – single crochet
hdc – half double crochet
dc – double crochet
inc – 2 stitches into next stitch
hdcinc – 2 half double crochets into next stitch
dec – decrease over next two stitches in front loops only
hdcdec – half double crochet decreased over next two stitches in front loops only
BLO – sc into back loops only picking up the extra loop at the back of the previous hdc
row to create a firmer stitch
FLO – sc into front loops only
sl st – slip stitch
f/o – fasten off by slip stitch in next stitch
y/o – yarn over
cl – (y/o, pick up st) x3, y/o, take each stitch individually over last y/o to form single cluster stitch
Note:
Unless stated work in continuous rounds marking last stitch of each row with a stitch
marker before proceeding with the next.
When stuffing parts make sure that you don’t overstuff them as you don’t want the stuffing
to show through when complete.
Each part should be filled just enough that it can be easily squeezed when pinched firmly.
Body :
Using Lemongrass
Row 1: ch2, sc 7 into 2nd st from hook (alternatively sc 7sts into magic ring) (7)
Row 2: inc x7 (14)
Row 3: (sc in next st, inc) x7 (21)
Row 4: (sc in next 2sts, inc) x7 (28)
Row 5: (sc in next 3sts, inc) x7 (35)
Row 6: (sc in next 4sts, inc) x7 (42)
Row 7: (sc in next 5sts, inc) x7 (49)
Row 8: (sc in next 6sts, inc) x7 (56)
Row 9: (sc in next 7sts, inc) x7 (63)
Row 10: (sc in next 8sts, inc) x7 (70)
Row 11: (sc in next 9sts, inc) x7 (77)
Row 12: (sc in next 10sts, inc) x7 (84)
Rows 13 – 27: sc (84) 15 rows
Row 28: (dec, sc into next 10sts) x7 (77)
Rows 29 – 31: sc (77) (3 rows)
Row 32: (dec, sc into next 9sts) x7 (70)
Rows 33 – 34: sc (70) (2 rows)
Row 35: (dec, sc into next 8sts) x7 (63)
Rows 36 – 37: sc (63) (2 rows)
Row 38: (dec, sc into next 7sts) x7 (56)
Rows 39 – 40: sc (56) (2 rows)
Row 41: (dec, sc into next 6sts) x7 (49)
Row 42: sc (49)
Row 43: (dec, sc into next 5sts) x7 (42)
Row 44: sc (42)
Row 45: (dec, sc into next 4sts) x7 (35)
Row 46: sc (35)
F/O leaving a 50cm end
Stuff body
DO NOT CLOSE AS WIDE OPENING IS NEEDED TO SUPPORT HEAD
Arms (x2):
Using Lemongrass
Row 1: ch2, sc 4 into 2nd st from hook (alternatively sc 4sts into magic ring) (4)
Row 2: (sc in next st, inc) x2 (6)
Row 3: (sc into next 2sts, inc) x2 (8)
Row 4: sc into next 4sts, ch4, (Diagram 1) sc into 2nd st from hook, sc into next 2ch,
(Diagram 2) sl st into side of last st of previous 4sts (Diagram 3) (above underlined), sc
into next 4sts, ch4, (Diagram 4) sc into 2nd st from hook, sc into next 2ch, sl st into side of
last st of previous 4sts (above underlined) (18) (Diagram 5)
Row 5: sc into next 6sts, (Diagram 6) sc into end of row, (Diagram 7) sc into next 2sts,
(Diagram 8) miss sl st from previous row, (Diagram 9) sc into next 6sts, (Diagram 10) sc
into end of row, sc into next 2sts, miss sl st from previous row (Diagram 11) (18)
Rows 6 – 11: sc (18) (6 rows)
Row 12: (sc into next 5sts, dec x2) x2 (14)
Rows 13 – 14: sc (14) (2 rows)
Row 15: (sc into next 6sts, inc) x2 (16)
Rows 16 – 19: sc (16) (4 rows)
Row 20: (sc into next 7sts, inc) x2 (18)
Rows 21 – 22: sc (18) (2 rows)
Row 23: (sc into next 5sts, inc) x3 (21)
Rows 24 – 25: sc (21) (2 rows)
Row 26: (sc into next 6sts, inc) x3 (24)
Rows 27 – 29: sc (24) (3 rows)
Row 30: (sc into next 2sts, dec) x6 (18)
Row 31: (sc into next st, dec) x6 (12)
Stuff arm
Row 32: dec x6 (6)
F/O leaving a 30cm end
Left Arm:
Use a running st through front loops of last 6sts and gather tightly.
Secure with a couple of small sts.
Count 7sts in front of F/O join (at back of body) and then thread end directly below in the
join between the 7th and 8th row down from neck.
Then count down another 6 rows, and 7sts across and forward of the point of entry.
Come out at this point.
Count 8 rows down from end circle of arm and then catch in the st (on the arm), making
sure you are central.
Pull tight to position arm.
Pressing arm lightly into body, st where it touches using mattress st making sure to work
through end circle on arm so that it sits flush to the body at top.
Secure with a couple of small sts.
Weave end through body and cut flush.
Right Arm:
Use a running st through front loops of last 6sts and gather tightly.
Secure with a couple of small sts.
Count 7sts in front of F/O join (at back of body) and then thread end directly below in the
join between the 7th and 8th row down from neck.
Then count down another 6 rows, and 7sts across and forward of the point of entry,
making sure Belly Button is central at this point and adjusting if required).
Come out at this point.
Count 8 rows down from end circle of arm and then catch in the st (on the arm), making
sure you are central.
Pull tight to position arm.
Pressing arm lightly into body, st where it touches using mattress st making sure to work
through end circle on arm so that it sits flush to the body at top.
Secure with a couple of small sts.
Weave end through body and cut flush.
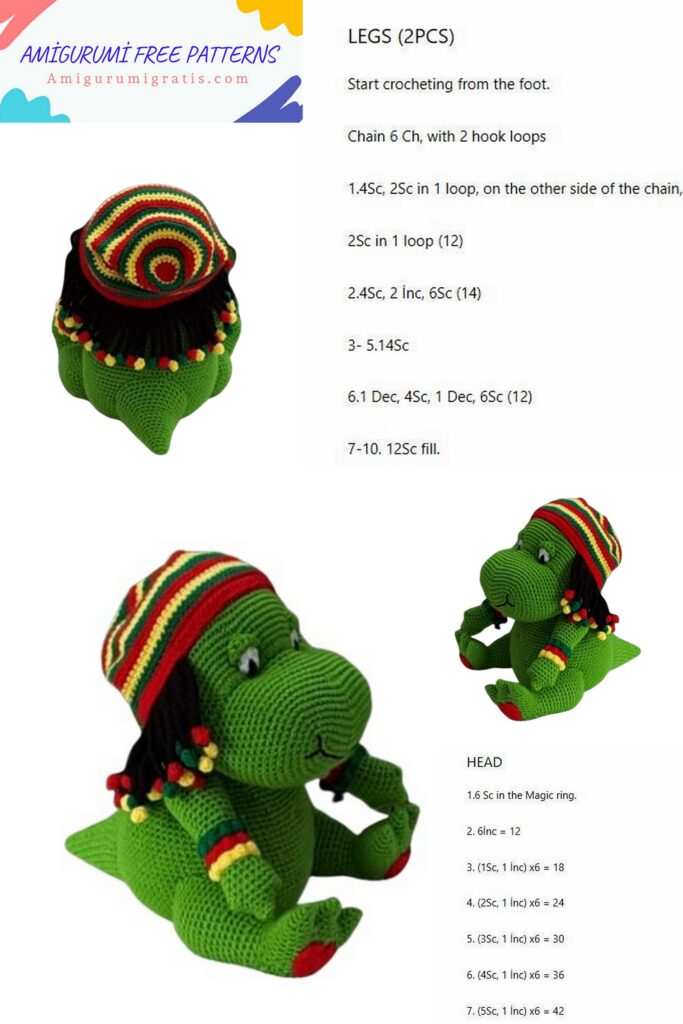
Feet (x2):
Toes x3 per foot:
Using Lemongrass
Row 1: ch2, sc 4 into 2nd st from hook (alternatively sc 4sts into magic ring) (4)
Row 2: (sc in next st, inc) x2 (6)
Row 3: (sc into next 2sts, inc) x2 (8)
Row 4: (sc into next 3sts, inc) x2 (10)
F/O leaving a short end for 1st 2 toes. DO NOT CUT FOR 3RD TOE (Diagram 1)
Row 5: (sc into next 4 sts, sl st into inc, (Diagram 2) pick up next toe and sl st into centre
of inc at opposite side to F/O join) x2, (Diagram 3) sc into next 9sts, (Diagram 4) (sl st into
centre of inc, sl st into inc on next toe, sc into next 4sts) x2, sc into last st (34) (Diagram 5)
Row 6: (sc into next 4sts, dec (Diagram 6)) x2, sc into next 9sts, (dec, (Diagram 7) sc into
next 4sts) x2,sc into last st (30) (Diagram 8)
Rows 7 – 11: sc (30) (5 rows) (Diagram 9)
Row 12: (sc into next 3sts, dec) x6 (24) (Diagram 10)
Row 13: sc into next 15sts, ch8, miss 8, sc into next st (24) (Diagram 11)
Row 14: sc into next 15sts, sc into next 8ch, sc into next st (24)
Row 15: (sc into next 2sts, dec) x6 (18)
Row 16: (sc into next st, dec) x6 (12)
Row 17: dec x6 (6) (Last Image)
F/O leaving a 15cm end.
Thread end through front loops of last 6sts and gather tightly.
Secure with a couple of small sts.
Weave in through foot and cut flush. Stuff foot.
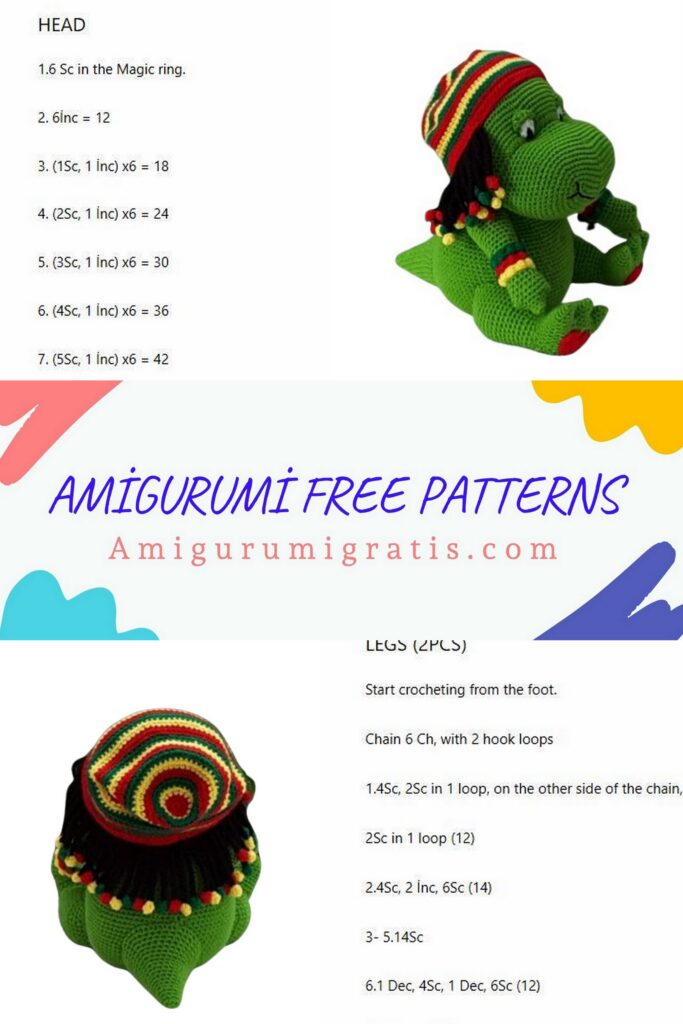
Legs:
Using Lemongrass
Row 1: sl st into last sc at back of foot, sc into side of foot, sc into next 8sts (front of foot),
sc into side of foot, sc into next 8sts (back of foot) (18)
Rows 2 – 3: sc (18) (2 rows)
Row 4: (sc into next 2sts, inc) x6 (24)
Rows 5 – 7: sc (24) (3 rows)
Row 8: (sc into next 3sts, inc) x6 (30)
Rows 9 – 15: sc (30) (7 rows)
Row 16: (sc into next 3sts, dec) x6 (24)
Row 17: sc (24)
Row 18: (sc into next 2sts, dec) x6 (18)
Stuff leg
Left Leg Only:
Row 19: sc into next 10sts, fold flat and working through both layers sc into the next 9sts
(9)
Right Leg Only:
Row 19: sc into next 16sts, fold flat and working through both layers sc into the next 9sts
(9)
F/O leaving a 60cm end
Left Leg
Starting under the arm, count 3sts forward from the back of the arm and then thread end
directly below in the join between the 19
th and 20th rows.
Then come out 10 rows higher, directly above the point of entry.
Catch in the opposite corner of leg and pull tight to position.
Using mattress st and working across the top of leg work forwar d for 6sts. This will hold
the leg in correct position.
Following the natural curve of the leg when pressed into the body, work down 11 rows,
then work across to bottom corner of leg.
Work up in a straight line to starting point and secure with a couple of small sts.
Weave ends through body and cut flush
Right Leg
Starting under the arm, count 3sts forward from the back of the arm and then thread end
directly below in the join between the 9
th and 10th rows.
Then come out 10 rows lower, directly below the point of entry.
Catch in the opposite corner of leg and pull tight to position.
Using mattress st, work up in a straight line to starting point.
Then work across the top of leg for 6sts. This will hold the leg in correct position.
Following the natural curve of the leg when pressed into the body, work down 11 rows,
then work across to bottom corner of leg.
Secure with a couple of small sts.
Weave ends through body and cut flush.
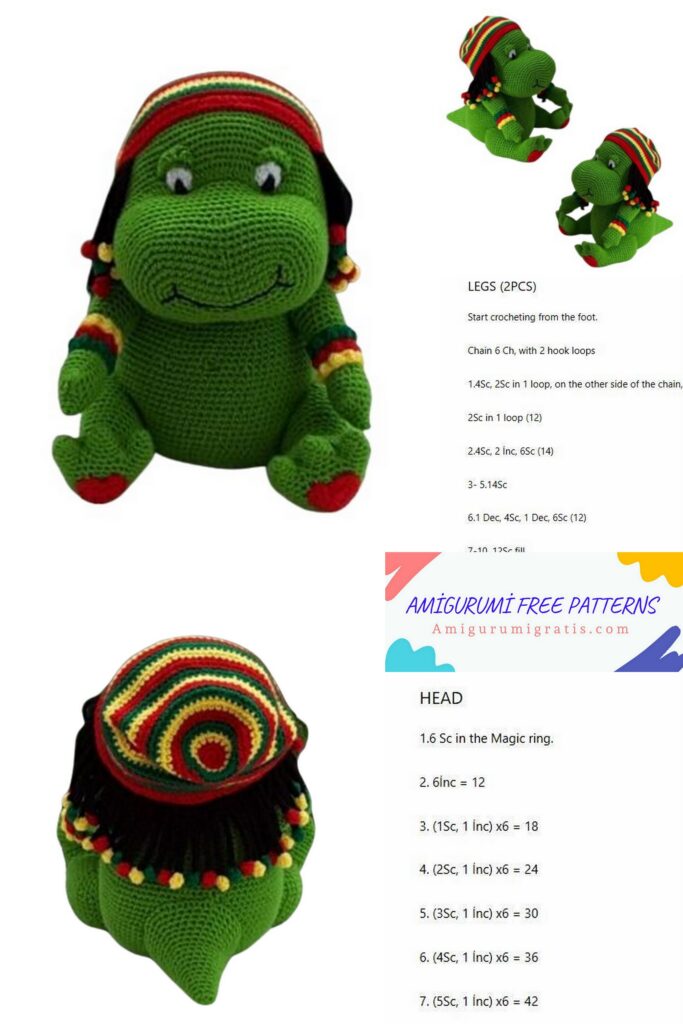
Head:
Using Lemongrass
Row 1: ch16, sc into 2
nd st from hook, sc into next 13sts, 3inc, working along base of ch,
sc into next 13sts, inc (32)
Row 2: inc, sc into next 5sts, dec, sc into next 5sts, (inc x3, sc into next 5sts) x2, inc x3
(41)
Row 3: inc, sc into next 6sts, dec, sc into next 6sts, (inc, sc into next st) x3, sc into next
16sts, (inc, sc into next st) x2 (46)
Row 4: inc, sc into next 15sts, (inc, sc into next 2sts) x3, sc into next 6sts, inc x2, sc into
next 6sts, (inc, sc into next 2sts) x2, inc (55)
Row 5: sc (55)
Row 6: inc, sc into next 8sts, dec, sc into next 8sts, (inc, sc into next 2sts) x4, sc into next
5sts, inc, sc into next 9sts, (inc, sc into next 2sts) x3 (63)
Row 7: inc x2, sc into next 8sts, dec, sc into next 8sts, inc x2, sc into next 19sts, inc x2, sc
into next 20sts (68)
Rows 8 – 10: sc (68) (3 rows)
Row 11: inc x2, sc into next 9sts, dec x2, sc into next 9sts, inc x2, sc into next 42sts (70)
Rows 12 – 17: sc (70) (6 rows)
Row 18: sc into next 49sts (49, incomplete row)
Row 19: sl st into next 70sts (70)
Row 20: working into the sl sts only: sc into next 25sts, hdcinc x21, sc into next 24sts (91)
Rows 21 – 35: sc (91) (15 rows)
Row 36: (dec, sc into next 11sts) x7 (84)
Row 37: (dec, sc into next 10sts) x7 (77)
Row 38: (dec, sc into next 9sts) x7 (70)
Row 39: (dec, sc into next 8sts) x7 (63)
Row 40: (dec, sc into next 7sts) x7 (56)
Row 41: (dec, sc into next 6sts) x7 (49)
Row 42: (dec, sc into next 5sts) x7 (42)
Row 43: (dec, sc into next 4sts) x7 (35)
Row 44: (dec, sc into next 3sts) x7 (28)
Row 45: (dec, sc into next 2sts) x7 (21)
Stuff head
Row 46: (dec, sc into next st) x7 (14)
Row 47: dec x7 (7)
F/O leaving a 15cm end
Thread end through front loops of last 7sts and gather tightly.
Secure with a couple of small sts.
Weave ends through head and cut flush.
Using 50cm end from body, thread through centre base of head 15 rows back from sl st
row between snout and head.
Come out on sl st row at centre base of head.
Catch to centre front of top row of body, in line with the Belly Button.
Pull tight to position.
Using mattress st attach head where it touches the body.
Secure with a couple of small sts.
Weave ends through head and cut flush.
Tail :
Using Lemongrass
Row 1: ch 2, sc 6sts into 2nd st from hook (alternatively sc 6sts into magic ring) (6)
Row 2: (sc into next st, inc) x3 (9)
Row 3: sc (9)
Row 4: (sc into next 2sts, inc) x3 (12)
Row 5: sc (12)
Row 6: (sc into next 3sts, inc) x3 (15)
Row 7: sc (15)
Row 8: (sc into next 4sts, inc) x3 (18)
Row 9: sc (18)
Row 10: (sc into next 5sts, inc) x3 (21)
Row 11: sc (21)
Row 12: (sc into next 6sts, inc) x3 (24)
Row 13: sc (24)
Row 14: (sc into next 7sts, inc) x3 (27)
Row 15: sc (27)
Row 16: (sc into next 8sts, inc) x3 (30)
Row 17: (sc into next 9sts, inc) x3 (33)
Row 18: (sc into next 10sts, inc) x3 (36)
Row 19: sc into the next 11sts, (inc, sc into the next st) x6, inc, sc into the next 12sts (43)
Row 20: sc (43)
F/O leaving a 70cm end.
Stuff tail.
Thread end through centre back of body 8 rows above the starting circle and come out
level to top of legs.
Catch in top middle of tail.
Pull tight to position.
Sew in place using mattress st making sure that the tail remains central.
Secure with a couple of small sts.
Eyes (x2):
Using White
Row 1: leaving a 5cm end, ch2, (hdc x2, dc x2, hdc x2, dc x2) into 2nd st from hook
(alternatively (hdc x2, dc x2, hdc x2, dc x2) into magic ring) (8) sl st to join
F/O leaving a 20cm end
Thread 5cm end through head approximately 3cm from centre of face, 2 rows up from
base of hdcinc row.
Using 20cm end sew around outer edge of eye using small back sts.
Secure end with a couple of small sts, weave through head and cut flush.
Using 50cm length of Lemongrass and using embroidery ch st sew around the outside of
each eye in turn.
Secure end with a couple of small sts, weave through head and cut flush.
Using 1 metre length of Black thread up to just above the centre of 1st eye.
Do 5 back sts from just above centre to base of eye.
Repeat for 2nd eye.
Thread down through the head co ming out at the end of the starting row for mouth.
Mouth:
Embroider mouth, using small back sts, working from one end of starting row to the other,
creating a curve at both ends of the mouth.
Secure end with a small st.
Weave end through head and cut flush.
Eyelids (x2):
Using Lemongrass
Row 1: leaving a 5cm end, ch8, hdc into 2nd ch from hook, hdc into next ch, dc into next
2ch, hdc into next 2ch, sl st into end ch (7)
F/O leaving a 30cm end
Place eyelid on top of eye so that ch is to the base and the right side is to the inside.
Thread short end through head 2 rows up from the base of eye on right hand side as you
look at it.
Thread 30cm end from same point as short end under the eyeball section coming out at
the opposite side, 2 rows up from base of eye.
Catch in opposite end of eyelid.
Using small back sts sew eyelid in place making sure that the top is covering top of eye
and the base sits just above the pupil. Do not stretch or there will be gapping.
Secure with a couple of small sts.
Weave ends through head and cut flush.
Beanie:
Using Ladybird/Bright Yellow/Emerald and changing color every 2 rows
Row 1: ch 2, sc7 into 2nd st from hook (alternatively sc 7sts into magic ring) (7)
Row 2: inc x7 (14)
Row 3: sc (14)
Row 4: (sc into next st, inc) x7 (21)
Row 5: sc (21)
Row 6: (sc into next 2sts, inc) x7 (28)
Row 7: sc (28)
Row 8: (sc into next 3sts, inc) x7 (35)
Row 9: sc (35)
Row 10: (sc into next 4sts, inc) x7 (42)
Row 11: sc (42)
Row 12: (sc into next 5sts, inc) x7 (49)
Rows 13 – 14: sc (49) (2 rows)
Row 15: (sc into next 6sts, inc) x7 (56)
Rows 16 – 17: sc (56) (2 rows)
Row 18: (sc into next 7sts, inc) x7 (63)
Row 19: sc (63)
Row 20: (sc into next 8sts, inc) x7 (70)
Row 21: sc (70)
Row 22: (sc into next 9sts, inc) x7 (77)
Rows 23 – 31: sc (77) (9 rows)
Row 32: starting level to F/O st, sl st to end over front of row 31, then sl st into 1st sl st to
finish (77)
Row 33: ch1, hdc to end working through both the top loops of sl st row 32 (77, ch1
counts as 1st) sl st to join
F/O leaving a 70cm end.
Dreadlocks:
Fold hat in half and mark centre front, then mark again 14sts from centre. (Diagram 1)
Using Black
Row 1: leaving a 10cm end sl st to join on 1st marker, working on the inside edge of row
31, (ch17, sl st into 2nd ch from hook, sl st into next 15ch, sl st into next st) x48 (48
dreadlocks) (Diagram 2)
F/O leaving a 10cm end.
Weave 10CM ends into inside of hat then cut.
DO NOT CUT 70CM END AS NEEDED TO ATTACH HAT TO HEAD
Dreadlock Beads (x16 each of Ladybird, Bright Lemon and Emerald):
Using Ladybird, Bright Lemon or Emerald
Row 1: ch 2, sc4 into 2nd st from hook (alternatively sc 4sts into magic ring) (4)
Row 2: sc (4)
F/O leaving a 15cm end.
Working in sequence of ladybird, bright yellow, emerald, using 15cm end thread through
2
nd chain from end and then catch in opposite end of bead. (Diagram 3)
Pull tight to position making sure you tuck end into bead as you go.
Over-sew using tiny sts and work around each dreadlock twice so can’t work loose.
(Diagram 4)
Thread through bead and cut flush.
Place beanie on head in required position and thread 70cm end though head from back to
front of hat.
Catch in front of beanie and pull tight to position.
Sew around hdc row at base of beanie, using small back sts.
Secure end with a couple of small sts then weave through head and cut flush.
Small Love Hearts (x2):
Using ladybird
Row 1: leaving a 5cm end, ch2, (dc x2, hdc, dc x2, hdc, dc x2, ch2, sl st) into 2nd ch from
hook (10, ch2 at beginning + end count as 1 st each)
Row 2: ch1, inc into side of ch 2, inc x2, sc into next st, (sc, dc and sc into next sp), sc into
next st, inc x3, ch1, sl st into centre (18, ch1 at beginning + end count as 1 st each)
F/O leaving a 30cm end
Thread the 5cm end through centre front of foot, 7 rows up from finishing circle, and pull
tight to foot to anchor love heart in place.
Sew around the outside edge of love heart using small back sts.
Weave ends through foot before cutting flush.
Bracelets (x6):
Making 2 each in Ladybird, Bright Lemon and Emerald
Row 1: ch18, cl into 2nd ch from hook, (sc into next ch, cl) x8 (17)
F/O leaving a 30cm end.
All 6 bracelets in turn, (3 per wrist)
Place bracelet around wrist and over-sew the 2 short ends together.
Using small back sts over the top of each plain sc only, attach bracelet to arm.
Secure end with a couple of small sts.
Weave end through arm and cut flush.