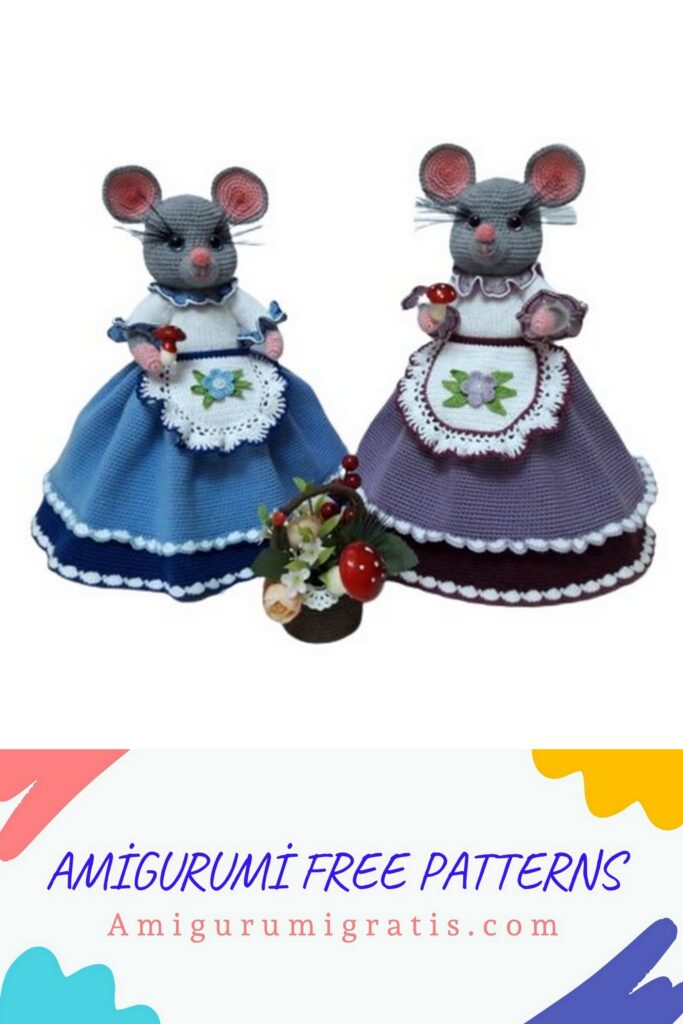
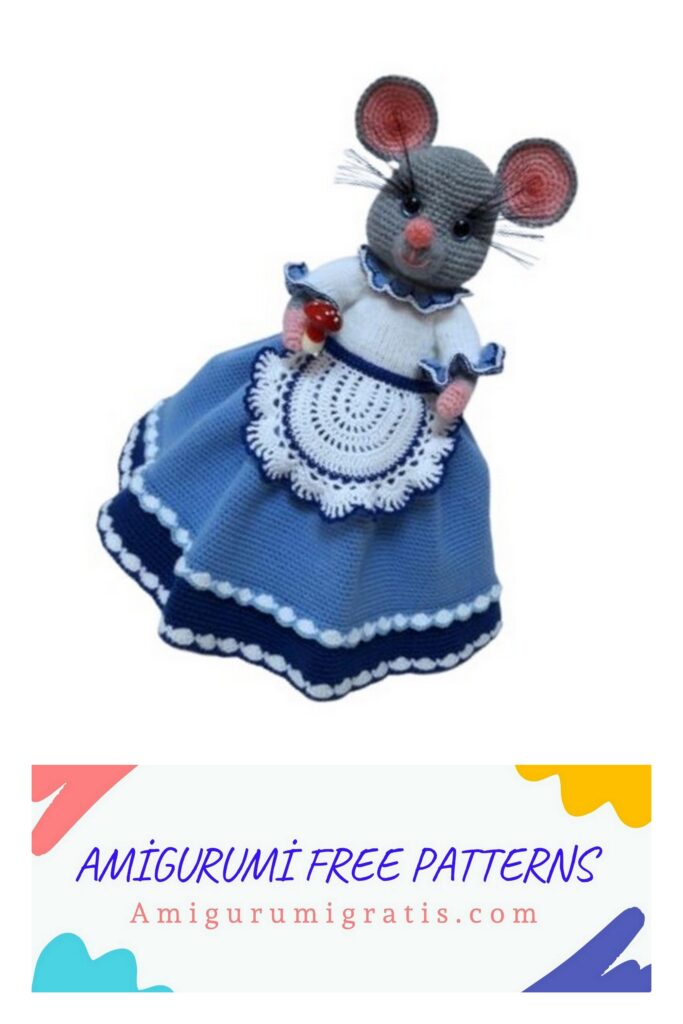
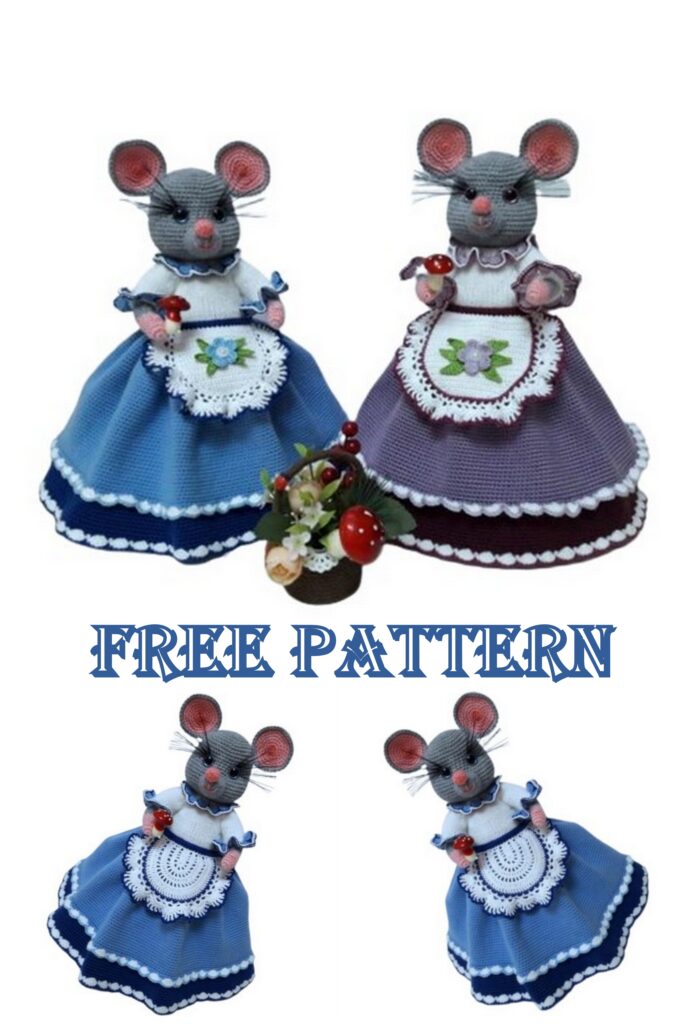
Warmer for the kettle “Mouse-hostess”
Heater height 34cm.
Necessary materials:
• Yarn “Baby Joy” 30% wool, 70% acrylic col. Gray 133m / 50g 50-60g
• Pekhorka ACRYL 300m / 100g color blue 100-120g
• Pekhorka ACRYL 300m / 100g color blue 50g
• Children’s novelty, white color 20g
• Bambino 30% wool, 70% acrylic 130m / 50g pink 15g
• Thin yarn like iris or Coco to match the skirt (blue, white and blue) 10g each
• Crochet hooks No. 1.25; 1.75; 2.0; 2.25. Needles No. 2.0 mm
• 12mm eyes on a secure mount.
• 0.3mm fishing line for eyelashes, 20cm wire for handles, 20mm buttons with
punctures, nylon thread for tightening.
• Filler (synthetic winterizer or synthetic winterizer)
Abbreviations
ch – air loop
ch- air hoist loop
sc – single crochet
HDC – half double crochet
DC – double crochet
sl-st. – connecting post
inc – increase
dec. – decrease
purl. – front loop
knit. – purl loop
* – repeat from sign * to * sign
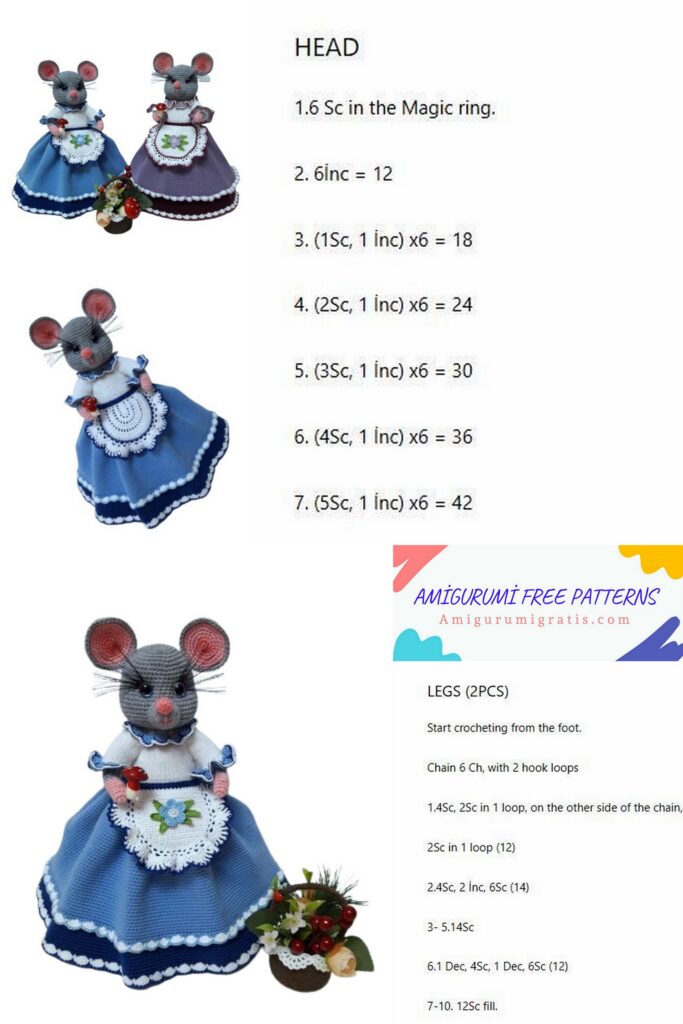
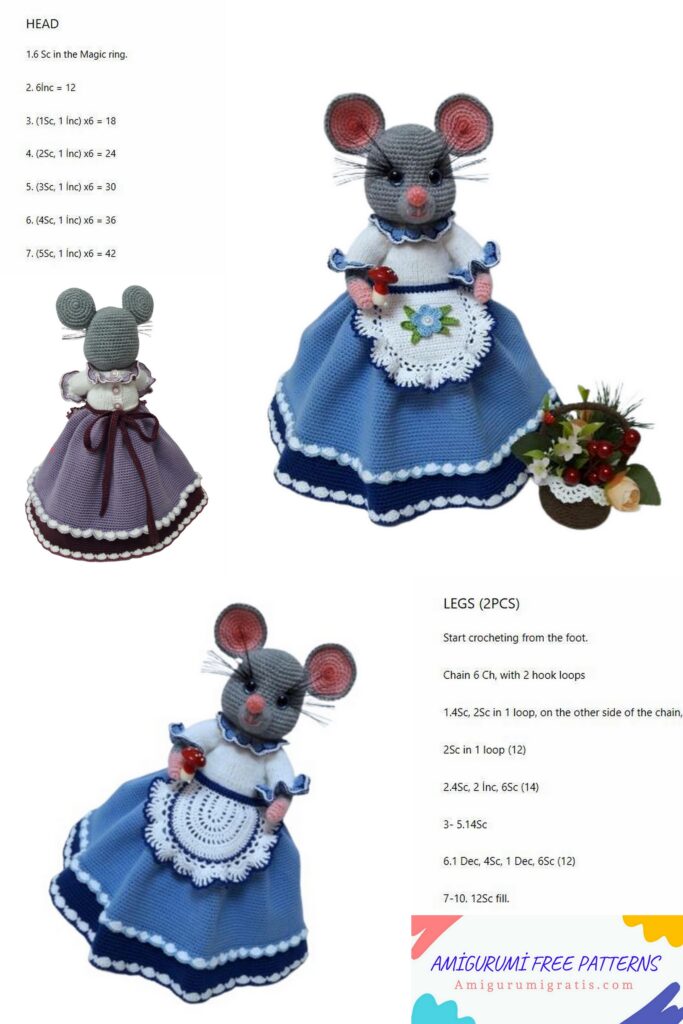
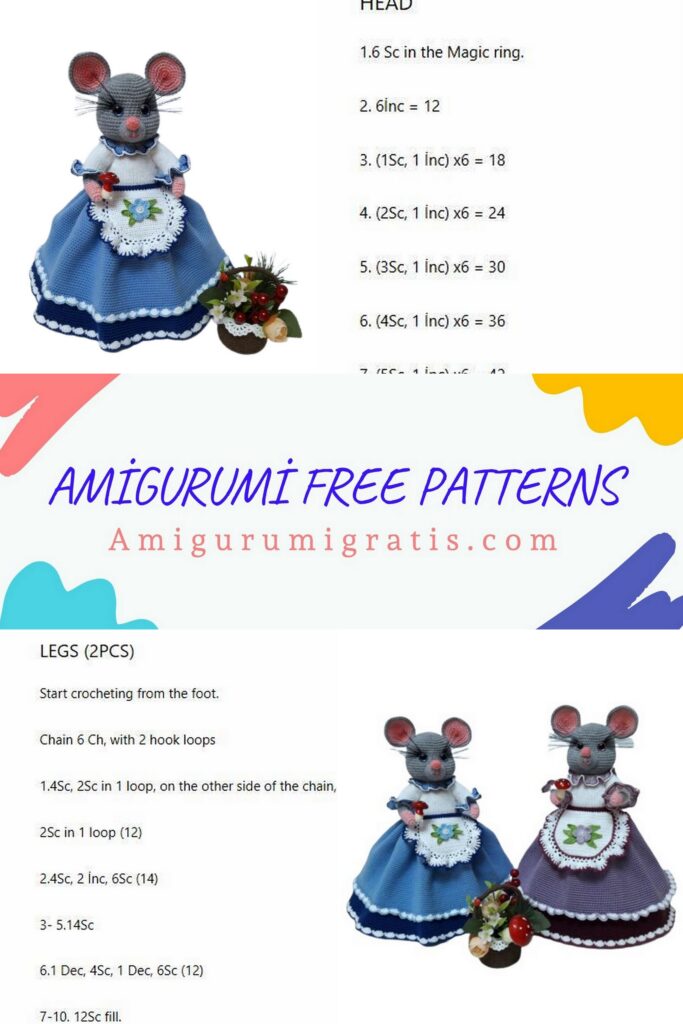
HEAD
Gray yarn, hook number 2. Knitting in a circle, without connecting posts.
1. In spacecraft 6 sc.
2.6inc (12)
3. (1inc, 1 sc) * 6 times (18)
4. (1inc, 2 sc) * 6 times (24)
5. (1inc, 3 sc) * 6 times (30)
6. (1inc, 4 sc) * 6 times (36)
7. (1inc, 5 sc) * 6 times (42)
8. (1inc, 6 sc) * 6 times (48)
9-15 (7 rows) 48sc.
16. (cheeks) 6inc, 7 sc., 6inc, 29 sc. (60)
17-22 (6 rows) 60 sc.
Set aside knitting and insert eyes on a secure attachment and make cilia.
We mark the location of the peephole between the 13th and 14th rows above the last and first increase for the cheeks. Distance between eyes 7 sc.
For cilia, fold the line in 15-20 folds (you can use a cardboard or a ruler) 20-26 cm long.
Tie a knot in the middle and steam with an iron through a wet cloth so that the line takes the desired shape.
Insert one edge into the needle and stretch from the front of the eye to the other, so that the knot is in the center between the eyes on the inside.
Cut only the folds on the cilia, do not cut the length yet. Insert the eyes, immediately correct the direction of the eyelashes and secure with the fastener from the inside.
23. (2 sc., 1 dec.) * 3 times, 7 sc., (2 sc., 1 dec.) * 3 times, 29 sc. (54)
24. (7 sc, 1 dec.) * 6 times (48)
25. (6 sc, 1 dec.) * 6 times (42)
26. (5 sc, 1 dec.) * 6 times (36)
27. (4 sc, 1 dec.) * 6 times (30)
28. (3 sc, 1 dec.) * 6 times (24)
29. (2 sc, 1 dec.) * 6 times (18)
At this stage, fill your head with padding polyester, form cheeks.
Make an eye tightening with a strong nylon thread, according to the photo.
We withdraw the needle near one eye, make a deviation of 2-3 columns horizontally and withdraw the needle with the thread down the head. We insert a new thread into the needle and do the same with the other eye. Pull the ends of the threads downward, thereby making the eyes tighten.
Tie the threads. Complement the head with a padding polyester.
We take a button and insert a nylon thread into the holes, do not tie the knots and insert them into the open hole at the bottom of the head.
30. (1 sc, 1 dec.) * 6 times (12)
31.6 dec. (6)
Pull the hole with a needle, pull the ends of the threads out.
NOSE
The main thread is gray, hook number 2. Knitting in a spiral.
1. In spacecraft 6sc.
2. (1inc, 2 sc.) * 2 times (8).
3. (1inc, 1 sc.) * 4 times (12).
4.12 sc.
5. (1inc, 3 sc.) * 3 times (15).
6. (1inc, 4 sc.) * 3 times (18).
7. (1inc, 5 sc.) * 3 times (21).
8.6 sc., 5 HDC, 1inc from HDC, 5 HDC, 4 sc, sl-st.
Cut the thread, leave a long end for sewing.
A small nose is a ball.
We knit with a pink thread. Hook number 2. Knit in a spiral.
1. In spacecraft 6 sc.
2.6inc (12)
3. 12 sc.
4.6 dec. (6)
Fill with padding polyester, pull off the hole.
Leave the threads for sewing.
Sew the nose to the main nose, guided by the photo.
Pull the pink thread from the center of the spout to embroider the mouth.
Fill the nose with padding polyester, pin to the face and sew, guided by the photo.
We embroider a mouth.
Ears
Pink ears (2 pcs.) We knit with a pink thread, hook number 1.75, in a spiral.
1. İNTO MAGİC RİNG 6 sc.
2.6inc (12)
3. (1inc, 1 sc.) * 6 times (18)
4. (1inc, 2 sc.) * 6 times (24)
5. (1inc, 3 sc.) * 6 times (30)
6. (1inc, 4 sc.) * 6 times, at the end of the row sl-st. (36).
Cut the thread and hide.
Gray ears (2 pcs.). We knit with a gray thread, hook number 2.25, in a spiral.
We knit in the same way as the pink parts, only at the end of the 6th row we do not cut the thread, but continue to knit, combining the two parts together. We fold the parts together with the wrong sides together and from the side of the pink ear we knit a connecting row of 36 single crochets.
Give the ears a concave shape, pin to the head and sew.
Now you can trim your eyelashes.
The mouse head is ready.
Torso
Gray yarn, hook No. 2.
1. İNTO MAGİC RİNG 6 sc.
2.6inc (12)
3. (1inc, 1 sc) * 6 times (18)
4. (1inc, 2 sc) * 6 times (24)
5. (1inc, 3 sc) * 6 times (30)
6. (1inc, 4 sc) * 6 times (36)
7-8 36 sc. (36)
Thread the ends n threads from the head to the center of the first row of the body, pass them through the hole of the button with a needle, pull as tight as possible, tie 2-3 knots and fix with glue.
9. (1inc, 5 sc) * 6 times (42)
10-11 42 sc.
12 (1inc, 6 sc) * 6 times (48)
13-14 48 sc
15. (1inc, 7 sc) * 6 times (54)
16-20 (5 rows) 54 sc.
21.Knit for back stitches 54 sc.
22-23 54 sc for both stitches.
24. for back stitches 54 sc.
25. (7 sc, 1 dec.) * 6 times (48)
26. (6 sc, 1 dec.) * 6 times (42)
27. (5 sc, 1 dec.) * 6 times (36)
28. (4 sc, 1 dec.) * 6 times (30)
29-34 (6 rows) 30 sc.
Fill the body with padding polyester (tight enough), use scissors to make a depression for the handle of the teapot lid, tamp everything well and form the bottom in rows 24.
35 (3 sc, 1 dec.) * 6 times (24)
36. (2 sc, 1 dec.) * 6 times (18)
37. (1 sc, 1 dec.) * 6 times (12)
38.6 dec.
Pull the hole with a needle, leave the thread to secure the bottom inside the body.
Tuck the inside of the bottom inside, once again tamp and shape everything.
Hem the bottom between rows 21 and 24, making inconspicuous stitches, but at the same time, pulling the inside of the bottom to the base of the main bottom.
Knit the depth of the inner part of the bottom, trying on the lid of the teapot. If necessary, you can increase the depth and width by adjusting the number of columns and the number of rows of the inner part of the bottom so that the heating pad sits stably on the teapot.
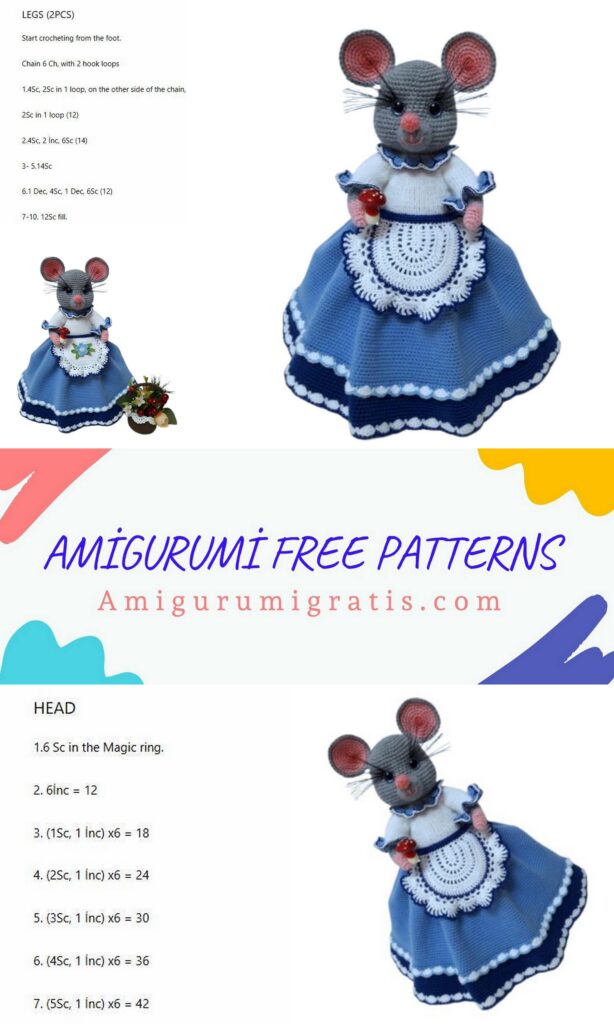
HANDLES (2 parts).
We start knitting with a pink thread, hook number 1.75.
Prepare the wire immediately. When finished, 9cm, wrap the edges with tape or adhesive tape.
1. İNTO MAGİC RİNG 6 sc.
2. 6inc sc. (12)
3-4 12 sc
5. (in this rada we knit a finger) 5 sc, 3 DC not tied in one loop,
6 sc
6.12 sc
7.1 dec, 3 sc, 1 dec, 5 sc (10 sc)
Change the thread to gray, hook number 2.
8-9. 10 sc.
10.1inc, 9 sc (11 sc.)
We insert the wire into the handle, fill it with padding polyester and continue to knit, adding padding polyester during knitting.
11-26. (16 rows) 11 sc
27.5 dec, 1 sc (6).
Pull the loops, hide the threads. Tie the second handle in the same way.
We sew the handles to the body, according to the photo.
We determine the location of the handles with a knitting needle, mark the sewing place with pins and use a long needle and nylon thread in 2 additions to sew the handles.
First, we pierce the body, insert the needle into the marked point from the inside of the first handle, bring it out 1 loop to the left of the pin, skip 2 loops and insert the needle to the right of the pin and bring it to the point where the needle was inserted from the inside of the handle. Next, we insert the needle into the point of the body (at the same point as the needle was taken out) and bring the needle to the original point. We make sure that the thread inside the body does not twist, we check if the thread is pulled by the 2 ends, it should move freely. Next, we sew the second handle in the same way. Pull the threads under the handle, tie 2-3 knots, insert into the needle and hide the threads in the body so that the knot is also hidden inside. To do this, the needle must be inserted into the place where the needle was originally inserted into the trunk. Bend the handles, giving a natural position of your choice.
The main part of the heating pad is ready.
SKIRT
Blue yarn, hook number 2.25. We knit in a spiral.
Before knitting a skirt, you need to measure the height of the skirt (see photo).
1. Dial a chain of 60 ch. Close into a ring.
2. Knit in a circle, 60sc.
3.60inc (120)
4.120 sc.
5. (1inc, 1sc) * 60 times (180)
6-7 180 sc.
8. (1inc, 5sc) * 30 times (210).
9-45. 210 sc.
If necessary, depending on the height of the teapot, the number of rows can be increased, given that the lower part of the skirt made of dark color should be 5-6 cm high.
46.210 sc. behind the front stitches, at the end of the row we do sl-st. , change the thread to white (children’s novelty), cut the blue thread.
47. Knit for 1 sc, skip 1 sc. previous row, 4 DC in 1p. and so on until the end of the row (see diagram # 1)
Cut off the white thread, take a thin blue thread for tying the edge (iris or openwork), change the hook to No. 1.75
48. For back stitches, knit 5 sl-st. along the top of the arches and above the single crochet (red in the diagram), then 1 sc. piercing the hook under the sc of the previous row.
49. For the back stitches of the 46th row in blue (hook number 2), knit 210 sc.
50-59 (10 rows) 210 sc. At the end of the last row, knit sl-st. and cut the thread.
60. In white (children’s novelty), knit 1 row of shells (see diagram # 1), at the end
cut a row of thread.
61. Tie the bottom of the shells with a thin blue thread (see diagram and photo).
The skirt is ready. On the skirt, steam only the white straps with an iron,
you do not need to steam the skirt. The skirt should be tight and hold well
shape. Pin the top of the skirt at the level of 21 rows of the mouse’s body and sew on (see photo).
BLOUSE
Knitting needles # 2, children’s novelty white yarn.
Cast on 33 loops.
1-4 p. K, 31 purl., K (33)
To designate a ragged line, the description will contain the letter “P”, for this you will need to knit 1 crossed loop, 1 purl, 1 crossed loop (instead of a crossed loop, you can make yarn overs)
5.K, 6 purl., P, on the next 4 loops of the sleeves, perform 4 increases (knit 2 loops from each front), P, 7 purl., P, 4 increments, P, 4 purl., 1 yarn, 2 vm.purl., 1 K. (49p.)
6.K, 2 purl., 43 knit., 2 purl., K.
7.K, 7 purl., P, 10 purl., P, 9 purl., P, 10 purl., P, 7 purl., K. (57p.)
8.K, 2purl., 51 knit., 2 purl., K.
9.K, 8 purl., P, 12 purl., P, 11 purl., P, 12 purl., P, 8 purl., K. (65p.)
10.K, 2purl., 59 knit., 2 purl., K.
11.K, 9 purl., P, 14 purl., P, 13 purl., P, 14 purl., P, 9 purl., K. (73p.)
12.K, 2purl., 67 knit., 2 purl., K.
13.K, 10 purl., P, 16 purl., P, 15 purl., P, 16 purl., P, 8 purl., 1 yarn, 2 together front, K. (81p.)
14.K, 2purl., 75 knit., 2 purl., K.
15.K, 11 purl., P, 18 purl., P, 17 purl., P, 18 purl., P, 11 purl., K. (89 p.)
16.K, 2purl., 83 knit., 2 purl., K.
17.K, 13 purl., P, 20 purl., P, 19 purl., P, 20 purl., P, 13 purl., K. (97 p.)
18.K, 2purl., 91 knit., 2 purl., K.
19. K, 15 purl., Then knit the loops of the right sleeve 22 purl., Unfold the knitting, and knit 22 knit. Next, knit only the loops of the sleeves, performing edging, with the front satin stitch 9 rows. From the seamy side of the loop, close the sleeves with front loops.
We attach the working thread to the front of the blouse and knit 23 purl., Then knit the loops of the left sleeve 22 purl., Unfold the knitting, and knit 22 knit. Next, knit only the loops of the sleeves, performing edging, with the front satin stitch 9 rows. From the seamy side of the loop, close the sleeves with front loops.
We attach the working thread to the back half of the blouse and knit 14purl., K.
20.K, 2 purl., 47 knit. (Raglan front loops can be crossed so that there is no hole), 2 purl., K. (53p.)
21.K, 49 purl., 1 nakid., 2 vm.purl., K.
22.K, 2 purl., 47 knit., 2 purl., K (53p)
23. K, 51 purl., K (53p)
24.K, 2 purl., 47 knit., 2 purl., K (53p)
25. K, 51 purl., K. (53p)
26.K, 2 purl., 47 knit., 2 purl., K (53p)
27. K, 51 purl., K. (53p)
28.K, 2 purl., 47 knit., 2 purl., K. (53p)
29.K, 49 purl., 1 nakid., 2 vm.purl., K. (53p)
30-32. K, 51 purl., K.
Close the loop on the seamy side.
Tuck in all the threads, sew the sleeves.
LINING of the neck and bottom of the sleeves of the blouse.
For the transverse bows of the garter stitches, tie 3 rows from the side of the blouse with blue arches from the air loops:
1.1 sc, 3 air loops (skip 1 loop), 1 sc. etc.
2. In each arch tie: 1 sc, 3 DC, 1 sc. (See diagram).
3. Behind the back stitches with a thin blue thread, tie 1 column with a crochet in each column of the previous row. Cut the thread.
4. With a thin white thread, knit 1 row of connecting posts for the back stitches. Cut the thread.
Also make a tie along the bottom of the sleeves.
Tuck in all the threads and sew on the buttons. The blouse is ready.
Apron
White Coco yarn, hook number 1.25.
Dial a chain of 10 ch
1.In the 3rd loop from the hook, tie 7sc, 4 sc. in the last loop, and on the back of the chain we knit 8 sc.
Next, we knit in rotary rows.
2. 2 ch., * 1 ch, skip 1 sc., 1 DC * x4 times, * 1 ch 1 DC * 3 times, * 1 ch, skip 1 sc., 1 DC * x4 times.
3.1ch, 8sc., * 2 sc. under 1 ch of the previous row, 1 sc. in DC * x 3 times, 8 sc.
4.2 ch, * 1 ch, skip 1 loop, 1 DC * 4 times, * 1 ch 1 DC * 9 times, * 1 ch, skip 1 loop, 1 DC * 4 times.
5.2 ch, 34 DC.
6.2 ch, * 1 vp, 1 st skip, 1 DC * x 4 times, * 1 ch 1 DC * 17 times, * 1 ch, 1 st skip, 1 DC * x 4 times.
7.2 ch, 50 DC.
8.2 ch, 15 DC, 1inc, 17 DC, 1inc, 16 DC (53p)
9. The thread is blue. Attach thread from the opposite side of knitting. 1 ch, 52 sc.
10. With a white thread (we do not cut the blue thread), we knit 26 arches from 3 vp 1 ch. * 3 ch, skip 1 loop, 1 sc. * X 26 times
11.1 ch, 1 sc. in the arch, * 4 vp, 1sc. next arch * 25 times, 1 sc. in ch.
12.2ch., * 1 sc in an arch of 4 ch, 7DC in the next arch * x 12 times, 1 sc. in ch.
13. 1 ch. * 1 DC in each DC of the pre-row, 1 ch * x 12 times, 1 sc. in ch.
Further, without turning the work, knit along the top of the apron with single crochet columns, sitting down. Cut the white thread.
14. The thread is blue. 1 ch, * 3 ch, 1 sc. under 1 ch of the previous row * x 84 times.
With blue yarn (acrylic, 300m / 100g), take a chain of air loops 35-40cm long for the first tie, attach on the right side of the apron and knit along the top with single crochet. Next, continue to dial the chain of air loops for the second tie. Expand knitting and knit 2-3 rows (optional) with single crochet.
The apron is ready!
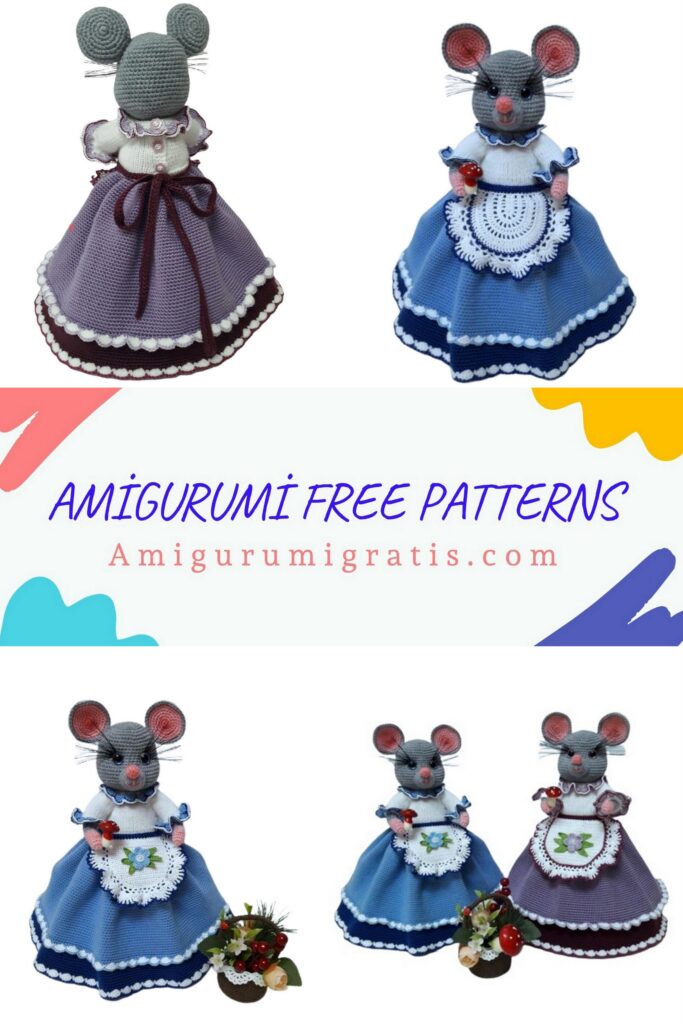
If you wish, you can decorate the apron with knitted flowers or embroider. You can also knit the base of the apron just with single crochets, as in the photo.