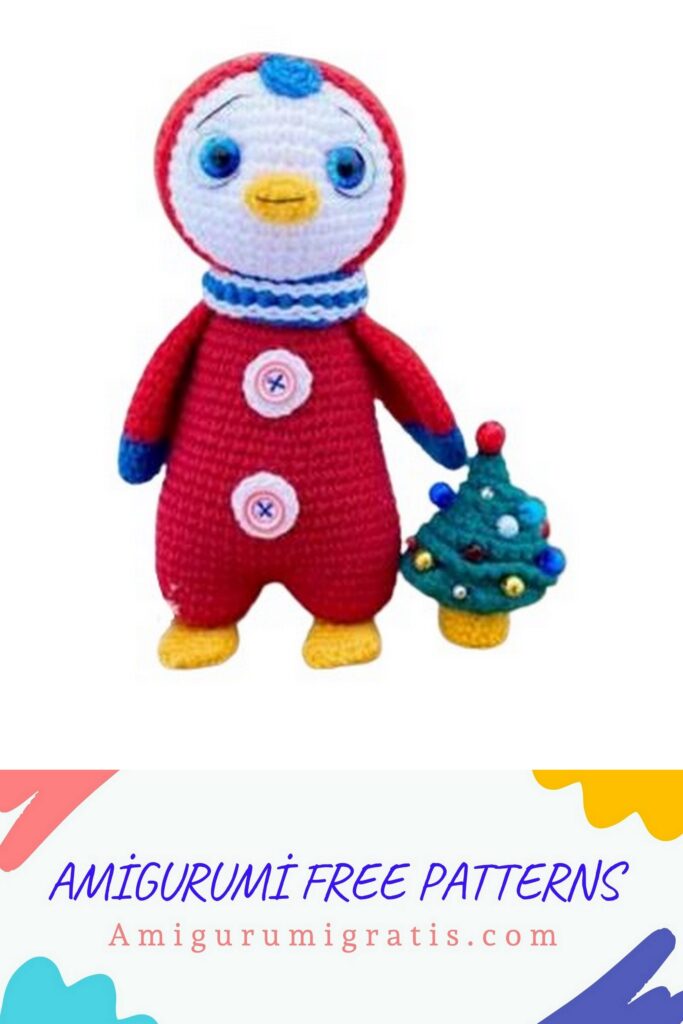
I’m sharing Amigurumi lolo and New Year tree free pattern on the website.
When knitting, I used:
1.Yarn.
* YarnArt Jeans (skein weight: 50 gr., Thread length: 160 m
Composition: 55% cotton, 45% polyacrylic, Manufacturer: Turkey)
Colors: N 90 – red, N 17 – blue, N 01 – white, N 63 – green, N 35 – yellow.
2. Hook N 1.75
3. Filler – holofiber, sintepon
4. Eyes with a diameter of 1 cm.
5.2 buttons with a diameter of 1 cm
6. Basting needles
7. Stitching needle
8. Scissors
9. Threads for sewing.
10. White felt for the decoration of the eyelet (I have sequins)
11. Multicolored beads for decorating a Christmas tree.

Recommended materials and tools:
sc – single crochet
inc – increase = 2 sc in one loop
dec – decrease = knit 2 sc together
sl-st – connecting post
DC – double crochet
CC2H – double crochet
BLO – back half loop
CC3H – Column with three crochets
FLO – front half loop
HDC – half double crochet
p.p. – lifting loop
PSC – half-column without crochet
(…) – the number in brackets means the number of loops in a row
(…) * N – repeat N times what is indicated in brackets
Lolo’s size when using these materials is 16.5 cm.
The size of the Christmas tree when using these materials is 5.5 cm.
Legend
* How to pull off the hole
* How to connect parts
* How to fix the sewing thread on a knitted garment
* How to sew head to body
* How to make a peephole tightening
* How to arrange eyes
* How to change color when crocheting in a spiral
* How to knit by a jumper
* How to attach a loop to a knitted product for the front half loop In the Appendix to the MK you will find:
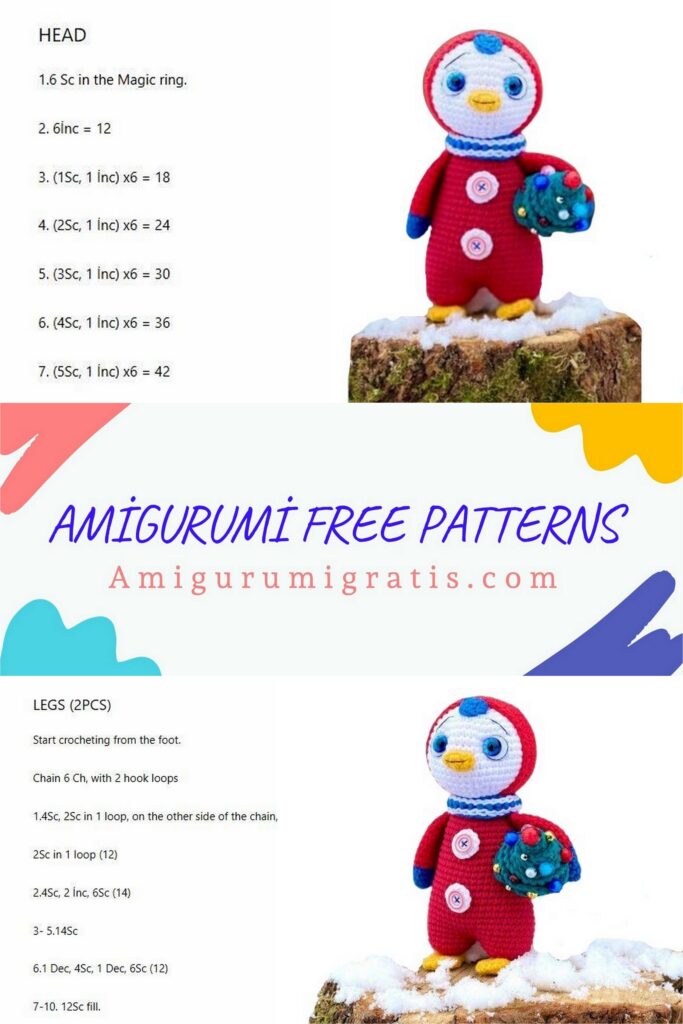
1.HEAD
We knit with white yarn.
We fill the detail in the knitting process.
1.) 6 sc into magic ring (6)
2.) 6 inc (12)
3.) (1 sc, inc) * 6 (18)
4.) 1 sc, inc, (2 sc, inc) * 5, 1 sc (24)
5.) (3 sc, inc) * 6 (30)
6.) 2 sc, inc, (4 sc, inc) * 5, 2 sc (36)
7.) (5 sc, inc) * 6 (42)
8.) 3 sc, inc, (6 sc, inc) * 5, 3 sc (48)
9.) – 14.) 48 sc (48, 6 rows)
15.) 3 sc, dec, (6 sc, dec) * 5, 3 sc (42)
16.) (5 sc, dec) * 6 (36)
17.) 2 sc, dec, (4 sc, dec) * 5, 2 sc (30)
18.) (3 sc, dec) * 6 (24)
19.) 1 sc, dec, (2 sc, dec) * 5, 1 sc (18)
20.) (1 sc, dec) * 6 (12)
We make 2 decreases and tighten the hole.


DESCRIPTION:
2.HOOD
We knit with red yarn.
1.) 6 sc into magic ring (6)
2.) 6 inc (12)
3.) (1 sc, inc) * 6 (18)
4.) 1 sc, inc, (2 sc, inc) * 5, 1 sc (24)
5.) (3 sc, inc) * 6 (30)
6.) 2 sc, inc, (4 sc, inc) * 5, 2 sc (36)
7.) (5 sc, inc) * 6 (42)
8.) 3 sc, inc, (6 sc, inc) * 5, 3 sc (48)
9.) – 15.) 48 sc (48, 7 rows)
We put the “head” on the detail and knit:
16.) 3 sc, dec, (6 sc, dec) * 5, 3 sc (42)
We knit PSC, fix the thread, cut it off.
3 beak
We knit with yellow yarn.
1.) 5 sc into magic ring (5)
2.) 5 inc (10)
3.) 10 sc (10)
We knit PSC, fix the thread, cut it off.
4.BODY (OVERALL)
When knitting, we use red yarn.
We fill in the knitting process.
Detail No. 1.
1.) 6 sc into magic ring (6)
2.) 6 inc (12)
3.) (1 sc, inc) * 6 (18)
4.) 1 sc, inc, (2 sc, inc) * 5, 1 sc (24)
5.) 24 sc (24)
We fix the thread, cut it off.
Detail No. 2.
1.) 6 sc into magic ring (6)
2.) 6 inc (12)
3.) (1 sc, inc) * 6 (18)
4.) 1 sc, inc, (2 sc, inc) * 5, 1 sc (24)
5.) – 6.) 24 sc (24, 2 rows)
We do not cut the thread, we continue to knit.
We connect parts N 1 and N 2.
We knit: 24 sc for detail No. 1, 24 sc for detail No. 2.
It turns out 48 loops in a row. We sew the hole formed at the junction of the parts.
We use a needle with red thread for sewing.
We put a marker, mark the beginning of the row and continue to knit:
7.) – 11.) 48 sc (48, 5 rows)
12.) 11 sc, dec, 22 sc, dec, 11 sc (46)
13.) 10 sc, dec, 21 sc, dec, 11 sc (44)
14.) dec, 42 sc (43)
15.) 9 sc, dec, 32 sc (42)
16.) 19 sc, dec, 21 sc (41)
17.) 29 sc, dec, 10 sc (40)
18.) dec, 38 sc (39)
19.) 8 sc, dec, 29 sc (38)
20.) 17 sc, dec, 19 sc (37)
21.) 27 sc, dec, 8 sc (36)
22.) dec, 34 sc (35)
23.) 7 sc, dec, 26 sc (34)
24.) dec, 14 sc, dec, 16 sc (32)
25.) 6 sc, dec, 14 sc, dec, 8 sc (30)
26.) dec, 12 sc, dec, 14 sc (28)
27.) 5 sc, dec, 12 sc, dec, 7 sc (26)
28.) dec, 10 sc, dec, 12 sc (24)
We knit an additional 5 sc, PSC, fix the thread, cut off.
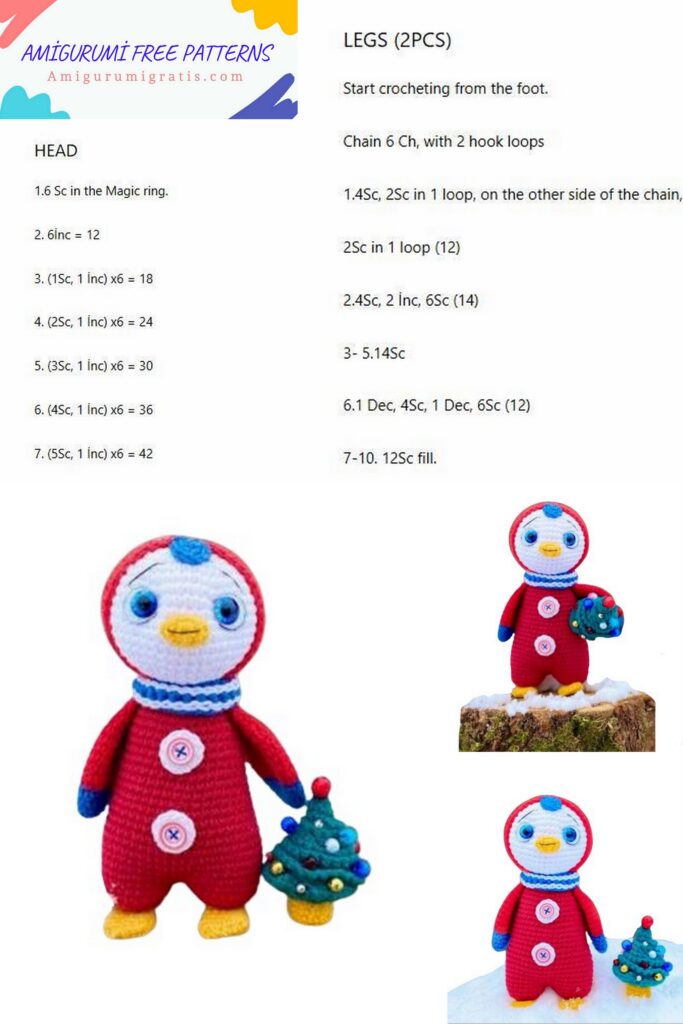

5. LEGS (2 PARTS)
We knit with yellow yarn.
We do not fill in the details.
We collect 5 ch., And knit from the second loop from the hook:
1.) inc, 2 sc, 3 sc in one loop, 2 sc, inc (11)
2.) – 5.) 11 sc (11, 4 rows)
6.) dec, 3 sc, dec, 4 sc (9)
7.) dec, 2 sc, dec, 3 sc (7)
We knit PSC, fix the thread, cut it off.
With the sharp end of the scissors, thread the thread inside the part.
6. FENDERS (2 PARTS)
We start knitting with blue yarn.
1.) 5 sc into magic ring (5)
2.) 5 inc (10)
3.) 10 sc (10)
4.) (1 sc, inc) * 5 (15)
5.) 15 sc (15)
Change the color of the yarn to red.
6.) (2 sc, inc) * 5 (20)
7.) – 12.) 20 sc (20, 6 rows)
13.) (2 sc, dec) * 5 (15)
14.) 15 sc (15)
15.) (1 sc, dec) * 5 (10)
Knit an additional 2 sc, fold the piece in half and knit by both sides 5 sc.
Photo for an example of how to knit for both sides of the part.
Design and assembly:
1) Cut out 2 circles with a diameter of 12 mm from felt.
We glue eyes with a diameter of 1 cm on felt circles on the side as shown in the photo.
2) We fix the beak with basting needles on the 11-12th row of the head and sew it with a needle with a yellow thread for sewing as shown in the photo.
3) Glue the eyes on rows 9-11 of the head at a distance of 8 sc between them.
4) We make a peephole tightening. Mark points from N 1 to N 4 as shown in the photo.
We use a needle and white thread for sewing.
5) We decorate the eyes with black thread for sewing. Do not tighten the thread.
6) We embroider the eyebrows
We mark the points with basting needles.
The upper ones (N 2 and N 3) are between 5 and 6 row at a distance of 4 sc between them.
The lower ones (N 1 and N 4) are between 8 and 9 row at a distance of 15 sc between them as shown in the photo.
We thread a black thread into the needle in two threads, insert the head into the last row, fix the thread and insert the needle in order from N 1 to N 4. Draw the needle next to the last row of the head, fix and cut off.
7.) We embroider a smile.
We use a needle and black thread for sewing.
Mark the points with basting needles located between 2 and 3 next to the left and right as shown in the photo on the next page.
We fix the thread on the last row of the head. We withdraw the needle to point N 1, at N 2, then we introduce it into the last row of the head. We fix the thread, cut it off.
8.) LMIC
We use blue yarn.
We collect 25 ch., We close the sl-st ring. and we knit:
2 ch., 24 DC, sl-st. into the second air loop.
We fix the thread, cut it off.
12
We decorate the snood with two rows of sl-st.
We use white yarn.
To do this, we form a loop, then use a hook to pull it out from the seamy side to the front one and knit sl-st. through each DC from above and below.

9.) HEAD COVER
We use blue yarn.
We knit 25 ch., We knit from the second loop from the hook:
1.) inc in first loop, pp, turn (2)
2.) 1 sc, inc, p.p., turn (3)
3.) 2 sc, inc, p.p., turn (4)
We tie the sl-st part., Fix the thread, cut it off.
We fix the part from 3 to 5 rows of the head (between the eyebrows) and sew with a needle and blue thread for sewing.
10.) We fix the hood with basting needles and sew with a needle and red sewing thread.
12) Sew on the wings.
Using a hook, we hide the ponytails inside the parts.
We fix the wings with basting needles between the 26th and 27th row of the body.
And we sew with a needle with a red thread for sewing.
11) Sew the head to the body.
We put the snood on the “torso” detail with basting needles and fix the body to the head as shown in the photo.
We use a needle with a red thread for sewing (how to fix the thread on a knitted product, see the Appendix) and sew on both half-loops (see Appendix)
13.) Sew / glue the legs to the legs.
14.) We decorate the jumpsuit with two
knitted parts and buttons.
Knitted details (2 pcs):
1.) 5 sc into magic ring (5)
2.) 5 inc (10)
We knit PSC, fix the thread, cut it off.
We place knitted parts from 20 to 23 rows and from 12 to 15 rows of the body. Fix the buttons on top with basting needles. Sew on with a needle and blue sewing thread.
15.) We knit our Christmas tree.
The Christmas tree consists of three parts.
* Detail N 1 (the Christmas tree itself)
We use green yarn.
1.) 6 sc into magic ring (6)
2.) inc, 5 sc (7)
3.) inc, 6 sc (8)
4.) (inc, 3 sc) * 2 (10)
Then we knit only for BLO
5.) (inc, 4 sc) * 2 (12)
6.) (3 sc, inc) * 3 (15)
7.) (2 sc, inc) * 5 (20)
8.) (4 sc, inc) * 4 (24)
9.) (7 sc, inc) * 3 (27)
10.) inc, 13 sc, inc, 12 sc (29)
We knit PSC, fix the thread, cut it off.
We form a loop, attach it to the first loop of the 5th row and knit: 1 pp, sc behind FLO in a spiral.
How to attach a loop to FLO, I consider in the Appendix to the MK.
Straighten down the rows tied from sc behind FLO.
Decorate with beads of different diameters and colors.
Detail No. 2. Bottom.
We use green yarn.
1.) 6 sc into magic ring (6)
2) 6 inc (12)
3.) (1 sc, inc) * 6 (18)
4.) 1 sc, inc, (2 sc, inc) * 5, 1 sc (24)
We knit PSC, fix the thread, cut it off.
We apply the bottom to the Christmas tree with the right side out and sew with a needle and green sewing thread as shown in the photo. In the process, we fill the Christmas tree loosely.
Detail No. 3. Barrel.
We use yellow yarn.
1.) 6 sc into magic ring (6)
2) 6 inc (12)
3.) Knit by the jumper: 12 sc (12)
How to knit for a jumper, see the Appendix to the MK.
4.) – 5.) 12 sc (12, 2 rows)
We knit PSC, fix the thread, cut it off.
We fix the trunk with basting needles to part No. 2 in the middle as shown in the photo and sew.
Hooray! Lolo and the Christmas tree are ready