You can browse our website for amigurumi clown and more beautiful free amigurumi patterns.
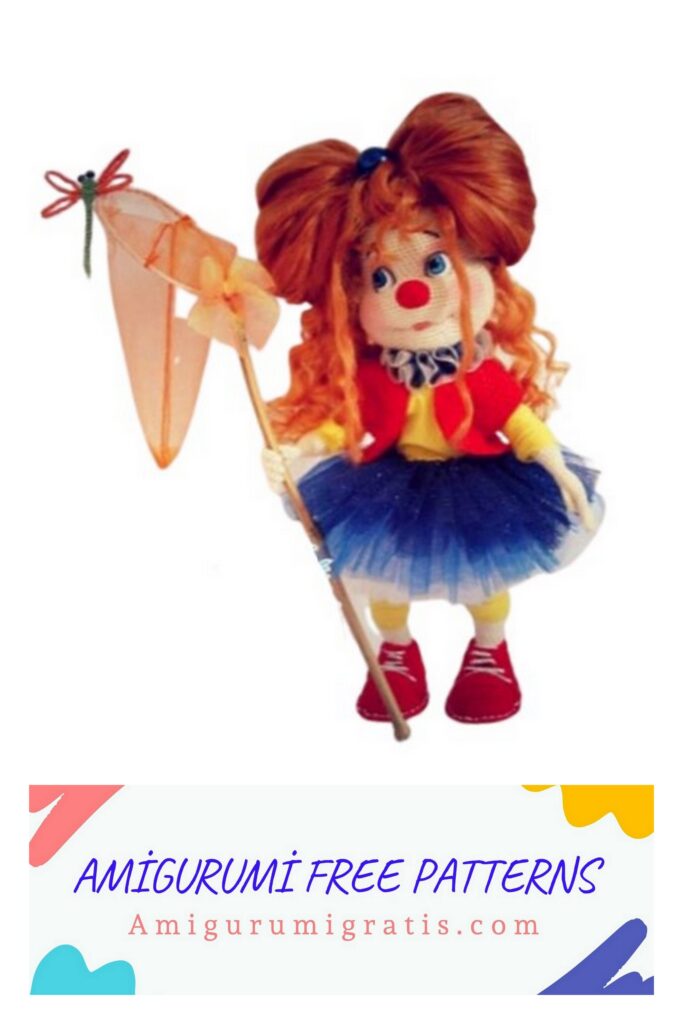
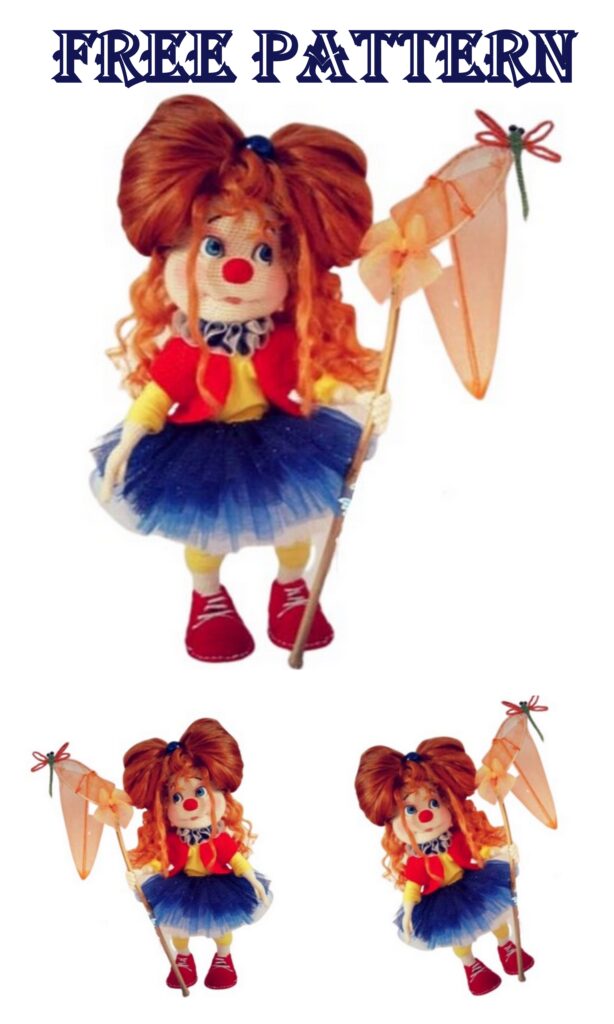
Clowness
MATERIALS:
For the doll’s body we need:
Threads ALPINA “XENIA”, 50gr = 240m-you can pick up cotton threads of the same footage and weight, very similar to Chamomile.
Red threads for the nose of the vest and shoes.
Hook 1.5 clover.
The wire for the body frame is thicker and thinner for the arms.
Wire for fingers with a section of 0.4 beaded.
Toning-dry pastel, eyeshadow or blush.
Eyes – I do not recommend glueing ready-made ones, it is better to draw them according to a template. The glue moment is transparent.
Hair tresses, I have goat tresses. But you can use any tress or mohair.
Any threads for vests and shoes Tulle of different colors and thicknesses A little fabric for pants and blouses, Threads and needles for sewing tulle and clothes.
Cardboard for shoe insoles.
Filler.
Ribbons and all sorts of embellishments for your taste.
Acrylic paints and brushes for drawing eyes, a piece of white chintz.
Abbreviations
sc – single crochet
ch – air loop
dec – decrease
inc – increase
sl-st – connecting post
dc – double crochet
hdc – half double crochet
3 sc. together – knit 3 single crochet together
3 sc in one – knit 3 single crochets in one loop
(…) x times – repeat (x) the required number of times
ch-air hoist loop
+ 1pc- make 1 loop of offset forward


HANDS – 2pcs Hook 1.25
Leave a piece of thread about 25 cm long for sewing on the fingers.
Next knit by continuous knitting.
Tie two thumbs first.
Thumb-2pcs.
Knit separately, but leave the thread for sewing on the finger.
They are assembled in the same way as other fingers.
Leave thread when typing
long 20cm. for sewing.
1p- 6ch, from the second loop from the hook 5sc, turn
2p-ch, 5sc, turn
3p-ch, 5sc
Sew up a finger.
Fingers for the left hand
Pinky 1p-7ch, from the second loop from
hook 6sc, turn
2p-ch, 6sc, turn
3p-ch, 6sc
Untitled
1p- 8ch, from the second loop from the hook 7sc, turn
2p-ch, 7sc, turn
3p-ch, 7sc
Medium
1p – 9ch, from the second loop from the hook 8sc, turn
2p-ch, 8sc, turn
3p-ch, 8sc
Index
1p – 8ch, from the second loop from the hook 7sc, turn
2p-ch, 7sc, turn
3p-ch, 7sc
We take 5 pieces of wire for beads, 15 cm long, bend 2 cm from one edge.
We attach the frame to the finger in the middle and sew the finger over the edge for the back hinges. We pass the thread down through the finger, we also sew the next fingers with a wire.
Fingers for the right hand Pointing
1p-8ch, from the second loop from the hook 7sc, turn
2p-ch, 7sc, turn
3p-ch, 7sc
Medium
1p – 9ch, from the second loop from the hook 8sc, turn
2p-ch, 8sc, turn
3p-ch, 8sc
Untitled
1p- 8ch, from the second loop from the hook 7sc, turn
2p-ch, 7sc, turn
3p-ch, 7sc
Pinky
1p-7ch, from the second loop from the hook 6sc, turn
2p-ch, 6sc, turn
3p-ch, 6sc
We take 5 pieces of wire for beads, 15 cm long, bend 2 cm from one edge. We attach the frame to the finger in the middle and sew the finger over the edge for the back stitches. We pass the thread down through the finger, we also sew the next fingers with a wire.
DO NOT FOLLOW THE MARKER!
Palm The left and right hand are knitted in the same way The working thread on the left hand near the index finger, on the right near the little finger.
1p-knit 2 sc on all fingers in a circle = 16sc
We put a marker!
2p-16sc
3p-dec, 14 = 15
4-5p-15sc – for the right hand, knit 7sc in the fifth row (not a full row)
We attach the thumb. Knit offset stitches to desired location. I have + 6sc.
We put a finger in the right place, do not type loops along it, bypassing the wire frame, continue knitting.
6p-15sc
7p-5sc, dec, 6sc, dec = 13
8p-dec, 2sc, dec, 2sc, dec, 3sc = 10
Sew the thumb in a circle to the palm.
Harbor the thread.
Attach a hand frame to the finger wire. Wrap the end of the wire with adhesive plaster, push the wire into your palm until it stops. And fasten both frames together with adhesive plaster.
DO NOT fill the palm with filler.
9p-2sc, dec, 1sc, dec, 1sc, dec = 7
10-12p-7sc (3 rows)
13p-inc, 1sc, inc, 2sc, inc, 1sc = 10
14p-inc, 5sc, inc, 3sc = 12
15-20r-12sc -6 rows
Then fill the filler every 2cm.
21р-1sc, inc, (2sc, inc) х 3 times, 1sc = 16
22-28p-16sc -6 rows
Lokotok
29r-5sc, dec, (2sc, dec) x 2 times, 1sc = 13-dec from the inside
elbow
30p-dec, 11sc = 12
31p-3sc, 3sc in one loop, 8sc = 14
32p-3sc, inc, 1sc, 3sc in one loop, 8sc = 17
33p-17sc
34p-7sc, dec, 1sc, dec, 5sc = 15-dec are located above the inc elbow.
35р-2sc, inc, (4sc, inc) х 2 times, 2sc = 18
36-42p-18sc
Cut the thread, harbor.
Pens
collected
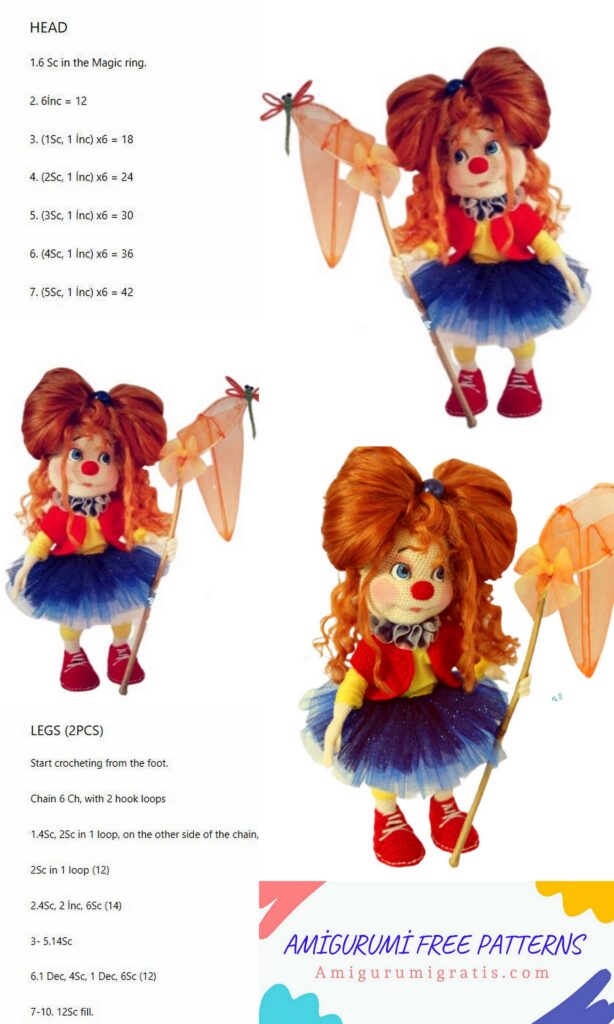
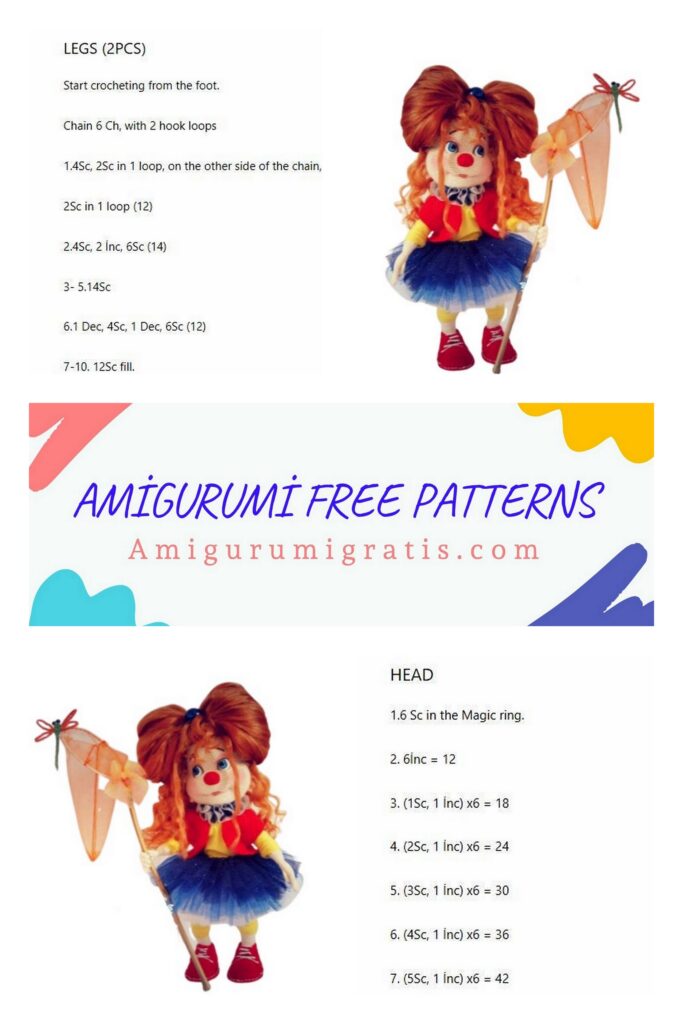
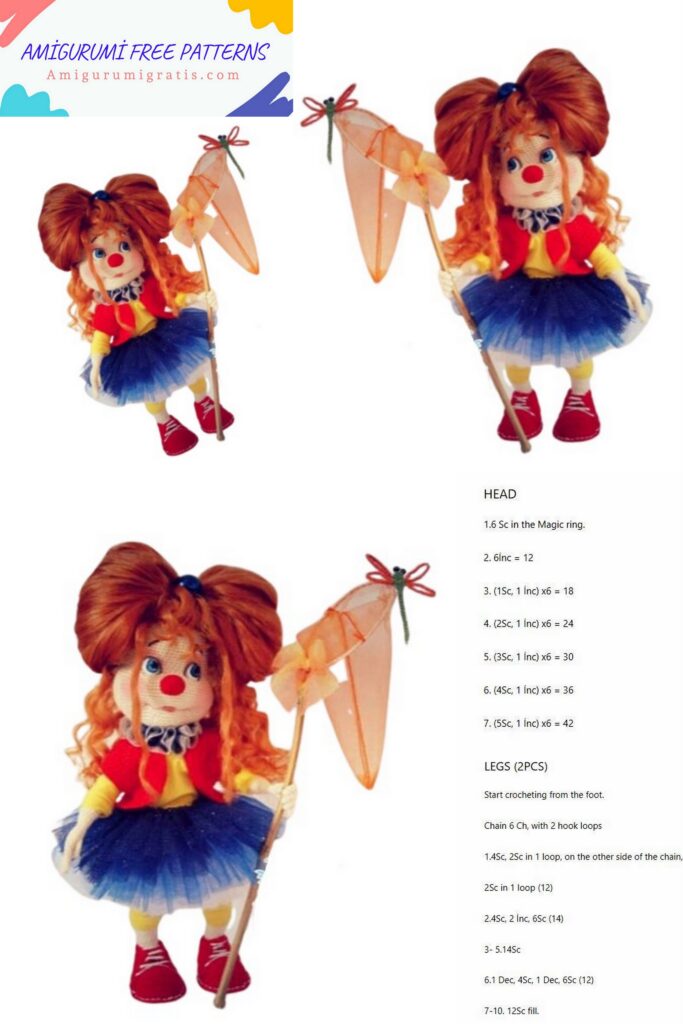
LEGS-
knit the same. Hook 1.5
Left 1p- 7sc in spacecraft
We put the marker in the last loop, then we don’t count the loop under the marker, but ALWAYS we knit it, it is the marker! In each new row, we rearrange the PAPER to the eyelet under the hook (marker).
Then we knit according to the description from the marker to the marker.
2p- (inc, 1sc) x 3 times = 9sc
3p- + 1ps, (inc, 2sc) x 3 times = 12sc
4-10p- 12sc- 7 rows
Further, all inc and dec are arranged symmetrically.
Heel11p- + 1ps, inc, 11sc = 13
12p- + 1ps, 13sc
13p- + 1ps, inc, 12sc = 14
14p- + 1ps, inc x 2 times, 12sc = 17
15p-inc, 2sc, inc, 2sc, inc, 9sc = 19
16p- + 1ps, 19sc
17p- + 1ps, 2sc, dec, 1sc, dec, 1sc, dec, 9sc = 16
18p- + 2ps, dec, 2sc, dec, 10sc = 14
19p- + 1ps, dec, 2sc, dec, 8sc = 12
20p- + 1ps, dec, 2sc, dec, 6sc = 10sc
Then knit + 1pc in each row!
21-22p- 10sc + 3ps, move to the middle of the heel behind.
23p- inc, 9sc = 11
24p- + 2ps, 11sc
25p- + 1ps, inc, 10sc = 12
Then knit + 1pc in each row!
26-27p-12sc
Insert wire cage for legs and torso. Take two pieces of wire, rather stiff and better than copper, preferably in insulation, sold in a store for electricity, the thickness is similar to the needles # 3.
The length of the segments is about 35 cm At the end of the wire, make a loop for the foot If the wire is extra, it will be possible to cut it later.
To fill the foot not much, the heel is stronger. Next, fill in the knitting process, every two cm.
28p – + 1pc, inc, 2sc, inc, 8sc = 14
29p- + 1ps, 14sc
30p- + 3ps, inc, 2sc, inc, 10sc = 16
31p- + 2ps, inc, 3sc, inc, 11sc = 18
32p- + 1ps, 18sc
33p- + 2ps, inc, 2sc, inc, 14sc = 20
Then knit + 1pc in each row!
34-37r- + 1ps, 20sc
Knee is all inc in front.
38p- + 2ps, 14sc, inc psn x 4 times, 2sc = 24
Further, all the increases and decreases in the back.
39p- + 2ps, dec, 2sc, dec, 2sc, dec, 3sc, 9hdc, 2sc = 21-dec behind under the knee
40p- + 1ps, dec, 2sc, dec, 15sc = 19-dec behind under the knee
41p- + 3ps, inc, 18sc = 20-inc exactly in the middle of the back
42p- + 1ps, inc, 19sc = 21
Then knit + 1pc in each row!
43-45r-21sc
46p- + 2ps, inc, 2sc, inc, 17sc = 23
47p- + 1ps, inc, 4sc, inc, 17sc = 25
48p- + 3ps, inc, 3sc, inc, 20sc = 27
49p- + 1pc, inc, 6sc, inc, 19sc = 29
Further, we do not do ps.
50-57r-29sc- 8 rows
For the left leg, + 7ps, move the marker to the inner side of the leg, but not to the middle, so that the leg appears crooked when assembling. Cut the thread, but do not tighten, leave a loop.
Knit the right leg in the same way as the left, do not cut the thread on the right leg.
For the right leg, + 27ps, move the marker to the inside of the leg, but not to the middle, so that the leg appears crooked when assembling.
We connect the legs.
TRUNK
Attention! If someone does not want a bulging tummy, then where we knit hdc, you can just knit regular sc!
We connect the legs Then the marker will be permanently in the middle of the back!
1p-5ch, pick up the loop from the left leg, insert the hook into the next sc on the hook, three loops, knit them together one, then 29sc along the left leg, 5sc along ch, 29sc along the right leg.
We got to the marker, it is in front of 5ch.
2p-68sc
Next, we knit the ass and tummy.
NOTE! – (hdc gives volume, but you can knit simple sc)
3p- + 5ps, marker exactly in the middle of the back, 3sc, 9hdc, 17sc, 10hdc, 17sc, 9hdc, 3sc = 68
4p- + 1ps, 2sc, 11hdc-back, 15sc, 12hdc-front, 15sc, 11hdc-back, 2sc = 68
5p- + 1ps, 2sc, 11hdc-back, 11sc, 20hdc-front, 11sc, 11hdc-back, 2sc = 68
6p- + 1ps, 2sc, 11hdc-back, 11sc, 20hdc-front, 11sc, 11hdc-back, 2sc = 68
Tummy 7p- + 1ps, 20sc, 28hdc-before, 20sc = 68
8p- + 1ps, 21sc, 26hdc-before, 21sc = 68
9p- + 2ps, 22sc, 24hdc, 22sc = 68
10p- + 1ps, 23sc, 22hdc, 23sc = 68
11p- + 1ps, 21sc, 7hdc, (inc.hdc, 2hdc) x 4 times, 7hdc, 21sc = 72-inc on
tummy
POP – all decreases on the pope.
12p- + 1ps, dec, 21sc, 24hdc, 21sc, dec = 68-dec exactly behind on the back in the middle
13p- + 2ps, dec, 2sc, dec, 17sc, 22hdc, 17sc, dec, 2sc, dec = 64
14p- + 2ps, 4sc, (dec, 4sc) x 3 times, 20hdc, (4sc, dec) x 3 times, 4sc = 58
15p- + 1ps, dec, 18sc, 18hdc, 18sc, dec = 56
16p- + 1ps, (dec, 7sc) x 2 times, 20sc, (7sc, dec) x 2 times = 52
17p- + 1ps, (dec, 6sc) x 3 times, 4sc, (6sc, dec) x 3 times = 46
18p- + 1ps, dec, 42sc, dec = 44
19p- + 1ps, 16sc, dec, 8sc, dec, 16sc = 42
Then do + 1pc in each row.
20-22p-42sc
23p- + 1ps, 5sc, inc, 30sc, inc, 5sc = 44
24p- + 1ps, 8sc, (inc, 3sc) x 7 times, 8sc = 51
Then do + 1pc in each row.
25-33r-51sc
34p- + 1ps, 9sc, 8sc together with the left hand, 17sc, 8sc together with the right hand, 9sc
35p- + 1ps, 9sc on the back, 10sc on the left hand, 17sc on the front, 10sc on the right hand, 9sc on the back = 55
We cut the wire on the arms, bend it and hide it in the body.
36-39p-55sc
40p- + 1ps, (3sc, dec) x 2 times, 5sc, dec, 6sc, dec, 5sc, dec, 6sc, dec, 5sc, (dec, 3sc) x 2 times = 47
41p- + 1ps, 11sc, dec, 21sc, dec, 11sc = 45
42p- + 1ps, 10sc, dec, 21sc, dec, 10sc = 43
43p- + 1ps, 9sc, dec, 21sc, dec, 9sc = 41
44p- + 1ps, 8sc, dec, 21sc, dec, 8sc = 39
45p-3sc, dec x 8 times (grab one loop under the marker)
46p-2sc, dec x 8 times (grab one loop under the marker)
47p-1sc, dec x 8 times (grab one loop under the marker)
48-52p-15sc-neck
HEAD
The marker is exactly at the back in the middle.
7sc in spacecraft
1p-inc x6 (12)
2p- (1sc, inc) x 6 times = 18
3p- (inc, 2sc) x 6 times = 24
4p- (3sc, inc) x 6 times = 30
5p- (inc, 4sc) x 6 times = 36
6p- (5sc, inc) x 6 times = 42
7p- (inc, 6sc) x 6 times = 48
8p- (7sc, inc) x 6 times = 54
9p- (inc, 8sc) x 6 times = 60
10-19r- 60sc- 10 rows
20p- 16sc, (1sc, inc) x 5 times, 4sc, put a marker, this is the middle of the front, 4sc, (inc, 1sc) x 5 times, 16sc = 70
21p- + 1ps, 16sc, (2sc, inc) x 5 times, 8sc, (inc, 2sc) x 5 times, 16sc = 80
Next, in each row, do + 1pc.
22p-80sc
23p-16sc, inc, 46sc, inc, 16sc = 82
24-31p- 82sc -8 rows
32p- (dec, 5sc) x 5 times, dec, 8sc, dec, (5sc, dec) x 5 times = 70
33p-70sc
34p- (dec, 4sc) x 5 times, dec, 6sc, dec, (4sc, dec) x 5 times = 58
35p-58sc
36p- (4sc, dec) x 4 times, 1sc, dec, 4sc, dec, 1sc, (dec, 4sc) x 4 times = 48
37p-48
Not much to fill.
38p- (6sc, dec) x 6 times = 42
39p- (dec, 5sc) x 6 times = 36
40p- (4sc, dec) x 6 times = 30
41p- (dec, 3sc) x 6 times = 24
Fill.
42p- (2sc, dec) x 6 times = 18
43p- (dec, 1sc) x 6 times = 12
Fill.
Reduce to the end, sew up the hole.
We take a piece of white fabric, thick chintz is better. We put it on the stencil and circle the eyes.
First, paint over the protein with white paint, let it dry.
Then we apply blue paint or paint according to your preference. Also let it dry. Then we paint over the pupil with black paint. Leave to dry for 30 minutes. Next, draw the border of the iris of the eye in a darker tone than the iris itself. With a white paint with a needle, if someone does not have a thin brush number 0, apply a glare. We leave everything to dry for another 30-40 minutes. Then cover the eyes with two layers of transparent nail polish.
Allowing each layer to dry beforehand. All … our eyes are ready. As they dry completely, cut them along the contour with sharp manicure scissors. Glue on the face according to the stencil.
SPOUT
Red or pink thread.
Hook 1.25
1p- cast on 4ch, from the 2nd loop from the hook 2sc, 3sc into the last loop, on the other side of the chain 1sc, inc = 8
2p- inc, 1sc, inc x 3 times, 1sc, inc x 2 times = 14
3р-1sc, inc, 2sc, inc, (1sc, inc) х 2 times, 2sc, inc, 1sc, inc = 20
4-5p- 20sc
6p-1sc, dec, 2sc, dec, (1sc, dec) x 2 times, 2sc, dec, 1sc, dec = 14
Leave the thread for sewing. Fill the spout with a little filler. Tint the eyes, draw the eyebrows.
Make mouth tightens.
Sew the head to the body.
EARS – 2pcs
Left1p-8sc in ami ring
2p-ch, turn, 5hdc, 3sc
3p-ch, turn, 2sl-st, 2sc, 4hdc
4p-further along the edge 4sc to the spacecraft
5p-ch, turn, 11sc, 1sl-st
6p-12sl-st, leave the thread for sewing, pull off the ring.
Right1p-8sc in spacecraft
2p-ch, turn, 3sc, 5hdc
3p-ch, turn, 4hdc, 2sc, 2sl-st
4p-ch, turn, 3sl-st, 5hdc, then along the edge 4sc to the spacecraft
5p-ch, turn, 1sl-st, 11sc
6p-12sl-st
Leave the thread for sewing, pull off the ring.
Sew on the ears without strapping the ears.
BOLERO
Dial 40 ch.
1 row: in 4 ch. 2DC, next loop (1DC, ch, 1DC), DC next 10 p., In the next loop (1DC, ch, 1DC), DC in the next. 10 p., In the next loop (1DC, ch, 1DC), DC in the next. 10 p., In the next loop (1DC, ch, 1DC), 2DC in the next. n, 1DC, turn
2nd row: 3 ch, 2 DC in the next st, 2 DC, into the next loop (1DC, ch, 1DC), 12 DC, into the next loop (1DC, ch, 1DC), 12 DC, into the next loop (1DC , ch, 1DC), 12 DC, in the next loop (1DC, ch, 1DC), 2DC, 2DC in the next item, 1DC, turn
3rd row: 3 ch, 5 DC, into the next loop (1DC, ch, 1DC), 14 DC, into the next loop (1DC, ch, 1DC), 14 DC, into the next loop (1DC, ch, 1DC), 14 DC , into the next loop (1DC, ch, 1DC), 6DC, turn
4th row: 3 ch, 2 DC together, 4 DC, into the next loop (1DC, ch, 1DC), 16 DC, into the next loop (1DC, ch, 1DC), 16 DC, into the next loop (1DC, ch, 1DC ), 16 DC, into next loop (1DC, ch, 1DC), 4DC, 2DC together, 1DC, turn
5 row: 3 ch, 2 DC together, 4 DC, into the next loop (1DC, ch, 1DC), 18 DC, into the next loop (1DC, ch, 1DC), 18 DC, into the next loop (1DC, ch, 1DC ), 18 DC, into next loop (1DC, ch, 1DC), 4DC, 2DC together., 1DC, turn
6 row: 3 ch., 3 DC together, 4 DC, skip 20 loops, dial 5 ch.,
22 DC, skip 20 loops, dial 5 ch., 4 DC, 3 DC together, 1DC, turn
7 row: 3 ch., 2 DC together, 38 DC, 2 DC together, 1DC, turn
8 row: 3 ch., 3 DC together, 34 DC, 3 DC together, 1 DC, turn
Tying row 1: SC 1 loop in regular posts, 2 loops for the side walls DC, in the corners knit 2 DC from 1 loop.
Row 2: “rachiy step” in each loop of the previous row.
BOOTS –
The thread is white.
Hook 1.5
Bottom sole-2pcs
1p-10 ch and from the second loop from the hook 8sc, 3sc to the last loop, 7sc, inc =
2p- inc, 7sc, inc x 3 times, 7sc, inc x 2 times =
3p- inc, 6sc, 2hdc, 2cc1n, inc.cc1n x 6 times, 2ss1n, 2hdc, 6sc =
4p- inc.hdc, 1hdc, inc.hdc, 6sc, 1hdc, 2cc1n, inc.cc1n x 6 times, 2ss1n, 1hdc, 6sc, 1hdc, inc.hdc, 1hdc, inc.hdc, 1hdc =
5p- (1hdc, inc.hdc) х2 times, 1hdc, 6sc, 3hdc, 7cc1n, 2hdc, inc, 1sc, inc, 2hdc, 4cc1n, 1hdc, 7sc, 1hdc =
6p – Tie in a circle sc.
Cut the thread. Harbor.
Upper sole-2pcs
White thread
Hook 1.5
1p-10 ch and from the second loop from the hook 8sc, 3sc to the last loop, 7sc, inc =
2p- inc, 7sc, inc x 3 times, 7sc, inc x 2 times =
3p- inc, 6sc, 2hdc, 2cc1n, inc.cc1n x 6 times, 2ss1n, 2hdc, 6sc =
4p- inc.hdc, 1hdc, inc.hdc, 6sc, 1hdc, 2cc1n, inc.cc1n x 6 times, 2ss1n, 1hdc, 6sc, 1hdc, inc.hdc, 1hdc, inc.hdc, 1hdc =
5p- (1hdc, inc.hdc) х2 times, 1hdc, 6sc, 3hdc, 7cc1n, 2hdc, inc, 1sc, inc, 2hdc, 4cc1n, 1hdc, 7sc, 1hdc =
6p – Tie in a circle sc.
Cut the thread. Harbor.
Do not cut the thread. Connect the two parts of the lower and upper sole, with the wrong side to each other. Tie the edges with a chain stitch.
Insert a white insole for stability of the shoe.
TOP BOOT – 2 parts
Hook 1.5, tomi alpine thread (thick) red
1p- 8ch, from the second from the hook of the loop 7sc, turn = 8
2p-ch, from first loop inc, 5sc, inc, turn = 9
3p-ch, from first loop inc, 7sc, inc, turn = 11
5p-ch, from first loop inc, 9sc, inc, turn = 13
6p-ch, from first loop inc, 11sc, inc, turn = 15
7-9p-15sc (knitting in rotary rows)
10p-ch, from the first loop dec, 2sc, dec, 3sc, dec, 2sc, dec, turn = 11
11-14r-11sc
Tie sc in a circle up to the tongue.
We knit the tongue 1p-ch, for the front pp, 11sc, turn
2p-ch, 11sc, turn
3p-11sc, turn
4p-ch, dec, 7sc, dec = 9
5p-ch, dec, 5sc, dec = 7
6p-ch, dec, 3sc, dec = 5
Cut off the thread.
BACK – 2 parts
The thread is red, you can take the thread yellow.
1p-dial 25 ch, turn
2p-ch, from the second from the loop hook 24sc, turn = 24
3p-ch, from the first loop from the hook 24sc, turn = 24
4p-ch, from the first loop from the hook 24sc, turn = 24
5p-ch, from the first loop from the hook 24sc, turn = 24
6p-ch, from the first loop from the hook dec, 20sc, dec, turn = 22
7p-ch, from the first loop from the hook dec, 18sc, dec, turn = 20
8p-ch, from the first loop from the hook dec, 16sc, dec, turn = 18
9p-ch, from the first loop from the hook dec, 14sc, dec, turn = 16
– this is the upper part of the back.
Cut the thread, harbor.
Sew the upper of the boot to the sole, correctly position the centers of the sole and upper of the boot.
Sew on the backdrop. Sew on with a thread in the color of the sole. Stuff the filler in the front of the boot to round it off. To prevent the boot from falling off the leg, fasten it with a red thread at the back, sew the back of the boot to the leg. Tie laces from 150 ch. Tie your shoelaces.
Make our doll’s hairstyle.
Our hair is from goat weft. At the top of my head, I divided two strands into two tails. Then one folded in half and secured with an elastic band, the second one also folds and fixes. It turns out a bow of hair.
The size of the toy when using the specified
materials-25-30cm