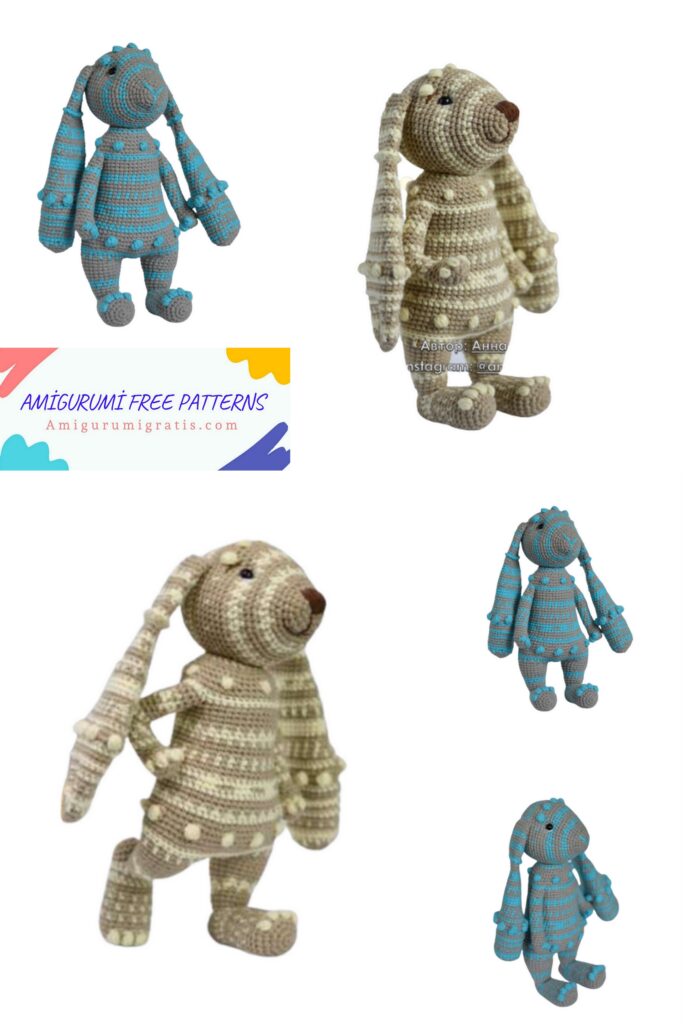
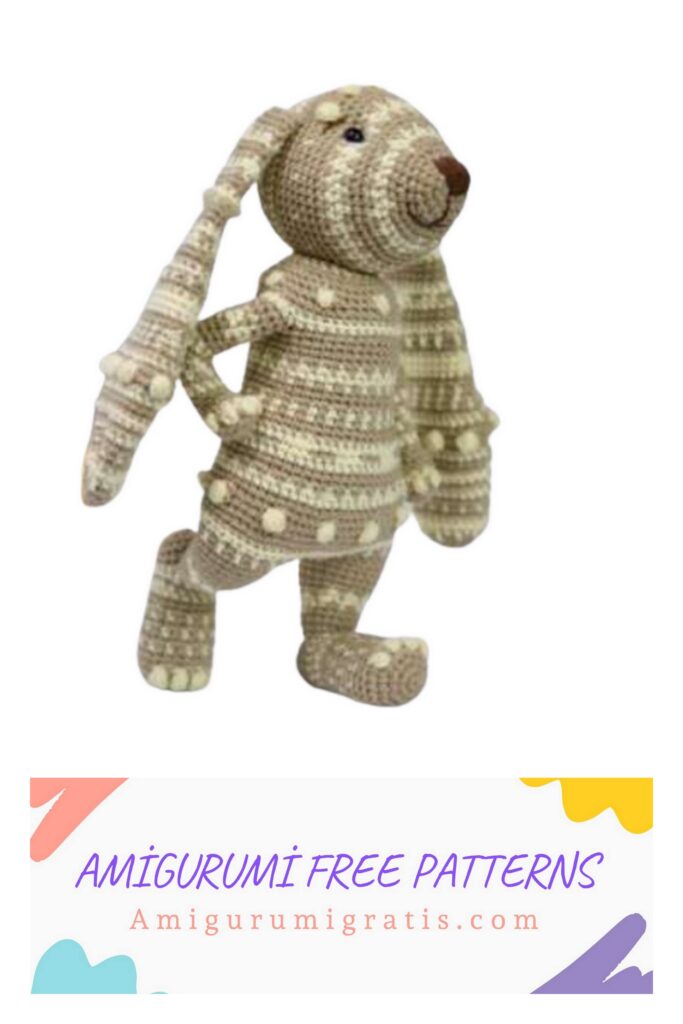
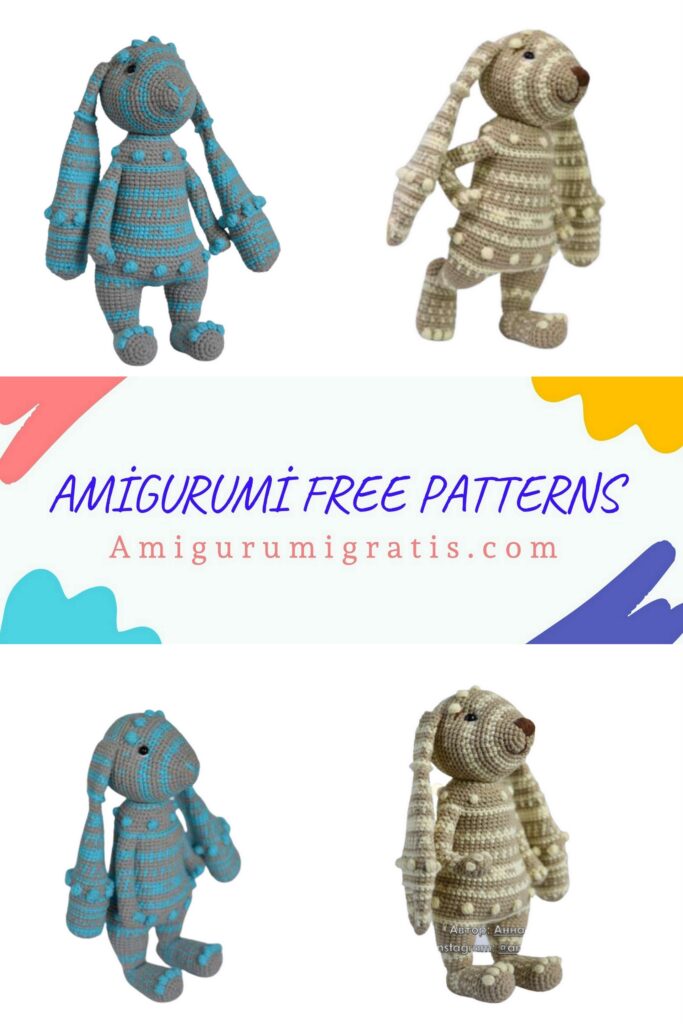
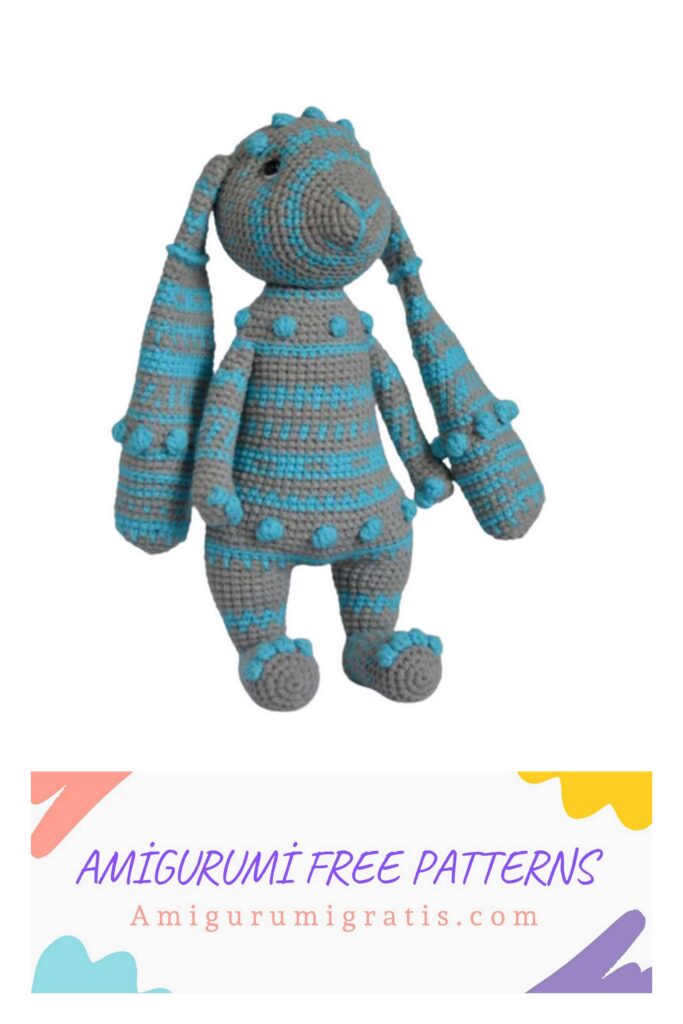
Easter Bunny! The height of the finished toy, with the specified materials, is about 22 cm.
If you have any questions about knitting toys, you can write to me at
Happy knitting!
Necessary materials:
– yarn:
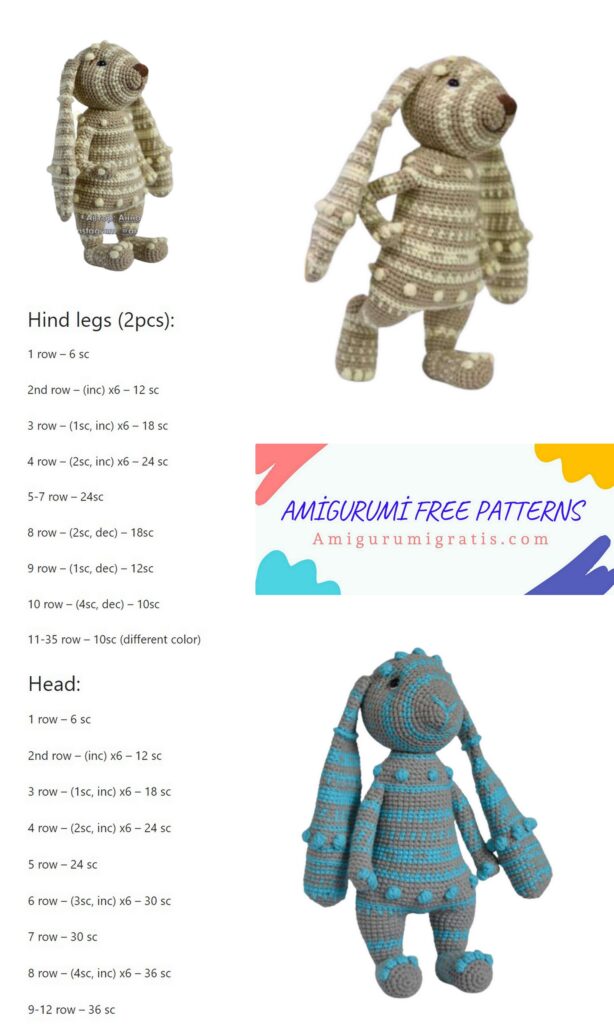
the first version of the rabbit: Yarn Art Jeans 48 (beige) main color, 86 (light lemon) secondary color.
the second version of the rabbit: 46 (gray) main color, 33 (bright blue) additional.
– a little white yarn to decorate the eyes;
– a little 40 (brown) for the spout in the first version.
You can absolutely use
yarn of any color and texture.
Jeans yarn consumption: 1.5 skeins
base color and a little more
half a skein of extra.
– a thin contrast thread – a marker.
Be sure to use a marker!
– a hook of the right size for your yarn, I have it No. 2;
– filler (holofiber, sintepukh);
– eyes on a secure mount 8mm (you can use any eyes);
– a needle for stitching parts;
– scissors;
– wire for the frame of toys. I use braided wire from an electrical store (1.5mm);
– plaster for winding the wire.
The height of the finished toy, with the specified materials, is about 22 cm.
Abbreviations
MR – amigurumi ring, you can start knitting in the second loop of the chain if you do not know how or it is inconvenient to do MR;
SC – single crochet, knit behind both walls of the loop, unless otherwise indicated in the description;
CH – air loop;
SL-ST – connecting column, do not knit it too tight;
DEC – decrease (2SC together behind the front walls)
DEC – increase (2SC from one loop)
HDC – half double crochet
DC – double crochet
knob – several DCs with one top in one loop of the base, first knit the crochets of all DCs, then complete the knitting of all columns with a common knitting.
OC is the main color.
DC is an additional color.
* – after this asterisk, the number of repetitions of knitted loops is indicated
General recommendations for knitting toys:
– First, read the entire description of the toy very carefully, then start knitting, read the description of each row of the toy, take your time and be careful.
– Choose a hook according to your density! There should be no distance between the columns, the filler should not shine through, but you don’t need to knit too tightly either, the fabric should turn out to be plastic, and not be wooden.
– Use a good filler to prevent bumps and bumps when filling the toy.
– All parts are knitted in a spiral, the lifting loop at the beginning of the row and the connecting loop at the end of the row are not used.
– All loops, except for the decrease loop, are knitted behind both walls of the loop.
Knitting loops for the front or back wall is indicated in the description of the row.
– Please note that the connecting column is not knitted tight.
– Use a thin, contrasting marker thread to mark the beginning of the row. Before knitting the first loop of the row, throw it alternately: before knitting and after knitting.
– The toy is knitted face out, fig.1.
– When making the head, insert all the threads and bring them out from the bottom of the head.
– The thread is changed as follows:
You knit the last SC not to the end, i.e. insert the hook behind both walls of the loop (when knitting a decrease, we insert the hook behind the two front walls), bring the thread out – there are two loops on the hook, then take the thread
a different color and knit these loops in a new color.
– The cone is knitted into one loop of the base, at each column we knit only a crochet, at the end we knit all the columns together.
– When knitting a bump and further changing the color of the thread, change the thread on knitting all the columns together.
each DC in the bump
knit only a crochet when changing colors after the bump, knit all the columns of the bump together with a new color
– The bump in each part is knitted with a different number of columns, the number of columns is indicated in the description.
– If the bump does not stick out from the front side, push it with the back of the hook from the wrong side, the bumps should stick out only from the front side, from the wrong side it should look like in the photo.
– If it is difficult for you to change the color of the thread in the row where the bumps are knitted, knit the row in one, contrasting color.
– SC one row below is knitted as follows:
In ordinary knitting, we introduce a hook ok at
points 2 and 4, a row below – points 1 and 3.
a DC is knitted to point 1, a DC is knitted to a point 2, a DC is knitted to a point 3, a DC is knitted to a point 4. loops on the row below are obtained elongated
– in this MK, for convenience, there will be no reference to color, the abbreviations OTs (primary color) and DC (additional color) will be used.
– pay attention to the alternation of colors, in each row it is indicated with
what color to start. So if it is written: alternating 1×1 OC and DC 10SC, then you must first knit one SC with the main color, then one SC with the additional color. If it is written: alternating 1×1 DC and OTs 10SC, then you must first knit one SC with an additional color, then one SC with the main color.

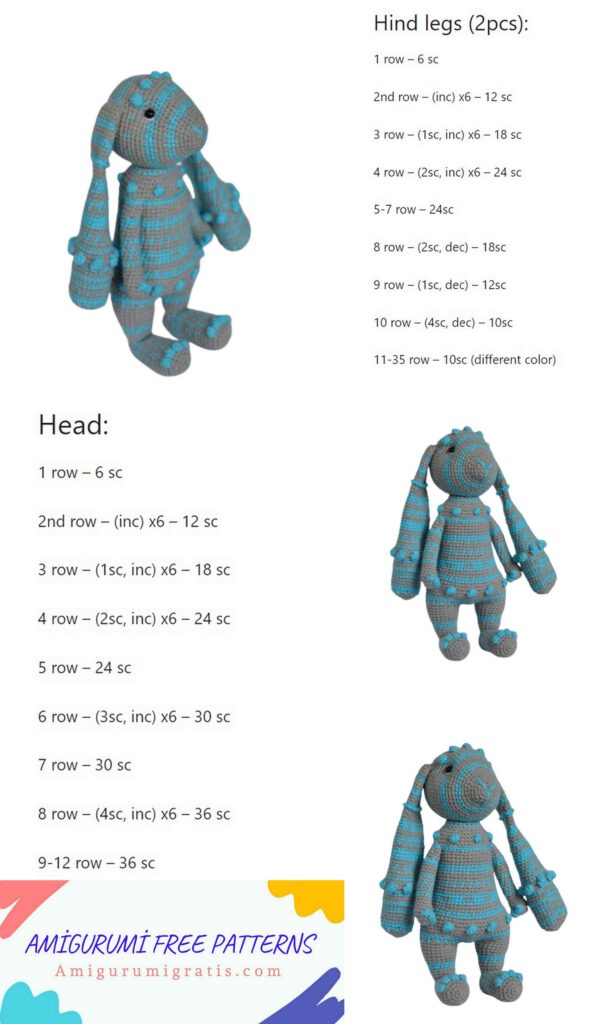
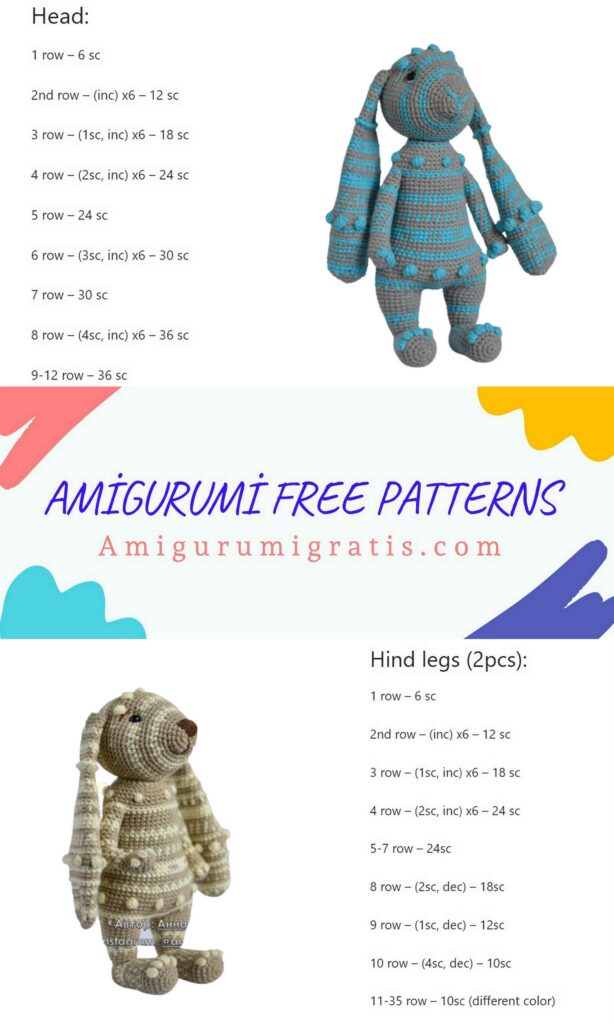
Head:
We begin to knit OTs. Stuff as you knit. The marker passes from the bottom of the head, we do not align it.
1.5SC to MR
2. DEC*5 – 10SC
3. (SC, DEC)*5 – 15SC
4. SC, DEC, (2SC, DEC)*4, SC – 20SC
5.20SC
6. (3SC, DEC)*5 – 25SC
7. 2SC, DEC, (4SC, DEC)*3, 2SC – 30SC
8. alternating 6×1 OC and DC (5SC, DEC) * 5 – 35SC
9. DC: 35SC
10. alternating 1×1 DC and OC 3SC, DEC, (6SC,
DEC)*4, 3SC – 40SC
11. OC: (7SC, DEC) * 5 – 45SC
12. OC: 4SC, DEC, (8SC, DEC)*4, 4SC – 50SC
13. alternating 1×1 OTs and DC 50 SC
14. DC: (9SC, DEC) * 5 – 55SC
15. alternating 1×1 DC and OC 5SC, DEC, (10SC, DEC) * 4, 5SC – 60SC
16. OTs:60SC
17. OTs: 60SC
18. OTs: 60SC
19. alternating 3×1 OC and DC 20SC, then alternating 3SC x bump of 5DC
OTs and DC 20 loops and alternating 3×1 OTs and DC 20 SC (a total of 5 bumps should be obtained in a row)
20. OTs: 60SC
21. OTs: 60SC
Between 15 and 16 rows, insert eyes on
about 18-19SC apart, follow the bumps, eyes should be placed under the first and last bump of the 19th row.
22. OTs: 60SC
23. DC: 60SC
24. OTs: 60SC
25. alternating 1×1 OC and DC 60 SC
26. OC: 4SC, DEC, (8SC, DEC)*5, 4SC – 54SC
27. alternating 1×1 OC and DC 54 SC
28. OTs: (7SC, DEC) * 6 – 48SC
29. DC: 3SC, DEC, (6SC, DEC) * 5, 3SC – 42SC, then we knit only OC
30. (5SC, DEC)*6 – 36SC
31. 2SC, DEC, (4SC, DEC)*5, 2SC – 30SC
32. (3SC, DEC)*6 – 24SC
33.SC, DEC, (2SC, DEC)*5, SC – 18SC
34. (SC, DEC)*6 – 12SC
35. DEC*6 – 6SC
Leave the end of the thread to tighten the hole, fasten and cut the thread, pull the hole, hide the thread in the head.
Muzzle shaping:
Make eye tightening. To do this, enter a strong thread from the bottom of the head, I make the tightening either with the same thread that I knit, or with dental floss. Bring out the needle at point 1, enter at point 2, bring it out at point 3 and enter at point 4, make such a “figure eight” several times, while pulling the thread, but do not overdo it, just drown your eyes slightly. When the desired result is achieved, bring the thread from the bottom of the head and fasten. In the same way, make tightening points 5.6 and 7.8.
Embroider the whites of the eyes with white thread. With the thread of the nose color, embroider the nose between the first row (inserting the needle into MR) and the 5th row of the head. Embroider the nose as you like – filling the entire nose with yarn or just highlighting the outline of the nose, see photo. Embroider a smile and eyebrows.
first nose second nose
Ears:
We begin to knit OTs. Knit two identical parts. marker passes
on the side of the part, make sure that all reductions are on the side.
1.6SC to MR
2. DEC*6 – 12SC
3. (SC, DEC)*6 – 18SC
4. SC, DEC, (2SC, DEC)*5, SC – 24SC
5.24SC
6. alternating 1×1 OC and DC 24SC, while DC
knit a row below.
7. DC: (3SC, DEC)*6 – 30SC
8. OTs: 30SC
9. alternating 1×1 OC and DC 30SC
10. OC: (14SC, DEC)*2 – 32SC
11. DC: 32SC
12. OTs: 32SC
13. DC: (15SC, DEC)*2 – 34SC
14. OTs: behind the back wall 34SC
15. OTs: 34SC
16. DC: (16SC, DEC)*2 – 36SC
17. OTs: 36SC
18. alternating 3SC x 5DC sts OTs and DTs 36 sts
19. OTs: 36SC
20. DC: (DEC, 16SC)*2 – 34SC
21. OTs: 34SC
22. alternating 1×1 OC and DC 34SC
23. alternating 1×1 DC and OC (DEC, 15) * 2 – 32SC, while knitting the first decrease in the DC, the second decrease in the OC, while the loop before the decrease is also OC
24. alternating 1×1 DC and OTs 32SC, while knitting the 17th loop with OTs, thus.
the first and last loops of the row – DC, 16 and 17 loops of the row – OTs.
in photo 1 – this is the 16th loop of the 23rd row, 2 –
17th loop of the 23rd row (DEC)
3-4 – 16 and 17 loops of the 24th row
25. OTs: 32SC
26. DC: (DEC, 14SC)*2 – 30SC
27. DC: 30SC
28. DC: 30SC
29. OC: (DEC, 13SC)*2 – 28SC
30. OTs: 28SC
31. alternating 1×1 OC and DC 28SC, while knitting the DC one row below
32. DC: (DEC, 12SC)*2 – 26SC
33. OTs: 26SC
34. OTs: 26SC
35. DC: (DEC, 11SC)*2 – 24SC
36. alternating 2×2 DC and OTs 24SC
37. DC: 24SC
38. OTs: (DEC, 10SC) * 2 – 22SC
39. OTs: 22SC
40. OTs: 22SC
41. DC: (DEC, 9SC)*2 – 20SC
42. DC: behind the back wall 20SC
43. OTs: 20SC
44. OTs: (DEC, 8SC) * 2 – 18SC
45. alternating 1×1 OC and DC 18SC
46. DC: 18SC
47. alternating 1×1 OC and DC (DEC, 7SC) * 2 – 16SC
48. OTs: 16SC
49. OTs: 16SC
50. DC: (DEC, 6SC)*2 – 14SC
51. alternating 1×1 OTs and DTs 14SC, then we knit only OTs
52.14SC
53. (DEC, 5SC)*2 – 12SC
54.12SC
55.12SC
Fasten the thread, leave a long end for sewing, cut off.
Fold the ear in half and sew behind the front walls. Attach a thread to the 43rd row DC and knit 20SL-ST. Fasten the thread, cut and hide.
Sew the ears to the head at the end of the design of the muzzle, between the 20th and 26th rows of the head, focusing on the knobs of the 19th row of the head.
Upper paws:
We start knitting with the main color, do not fill the paws. Link two Vthe same details. Marker runs sideways, do not align.
1. 6SC to MR – 6SC
2. DEC *6 – 12SC
3. (3SC, DEC)*3 – 15SC
4. OTs: 2SC, DTs: bump of 3 columns with a crochet, (OTs: SC, DTs: knob) * 3, OTs: 6SC – 15 loops
5. OC: 2SC, DEC*3, 7SC – 12SC
6. OC: 12SC
7. OC: 2SC, DEC*2, 6SC – 10SC
8. OTs: 10SC
9. DC: 10SC
10. OTs: 10SC
11. alternating 1×1 OC and DC 10SC
12. alternating 1×1 OC and DC 10SC
13. alternating 1×1 OC and DC 10SC
14. OTs: 10SC
15. DC: 10SC
16. OTs: 10SC
17. OTs: 10SC
18. OTs: 10SC
19. alternating 1×1 OC and DC 10SC
20. DC: 10SC
21. alternating 1×1 DC and OTs 10SC
22. OTs: 10SC
23. OTs: 10SC
24. OTs: 10SC, fasten the thread and cut off. Paws will be tied into the body.
Feet:
We start knitting with the main color. We knit two identical parts.
Marker runs sideways, do not align.
1.6SC to MR
2. DEC*6 – 12SC
3. (SC, DEC)*6 – 18SC
4. (2SC, DEC)*6 – 24SC
5. OTs: 3SC, (DC: 4 double crochet bump, OTs: SC)*4, OTs:
13SC – 24sts
6. OC: 24SC
7. OTs: 24SC
8. alternating 1×1 OC and DC 24SC
9. OC: 24SC
10. alternating 1×1 OC and DC (DEC, 10SC) * 2 – 22SC
11. OTs: 22SC
12. alternating 1×1 OC and DC 22SC
13. OC: (DEC, 9SC)*2 – 20SC
14. OTs: 20SC
15. DC: 20SC
16. OTs: (DEC, 8SC) – 18SC
17. DC: 18SC
18. OTs: 3SC, CH * 5 (when knitting CH, skip 5SC), 10SC – 18 loops
19. OC: 3SC, 5SC on CH, 10SC – 18SC
We put a little filler in the foot, take the wire, fold
its loop to the size of the foot, wrap it with a plaster and insert it into
leg, into the hole between the 17th and 18th rows. We leave about 25 cm
wire. Next, we stuff the foot well.
20. OTs: 18SC
21. OTs: (SC, DEC) * 6 – 12SC, it’s good to fill the heel.
22. OC: DEC*6
Leave the end of the thread to tighten the hole, fasten the thread and cut off.
Pull the hole, hide the thread inside the paw.
Paws:
We knit two identical parts. The marker passes from the side, align if necessary.
Start knitting from the right and left sides for the right and left paws, respectively. Knitting start with the left paw.
knitting of the left paw we start from point 1
we start knitting the right paw from point 2
1. On the edge of the opening of the foot, we collect 12SC OTs, put a marker
2. OC: (SC, DEC) * 6 – 18SC
3. OTs: 18SC
4. OC: 18SC
5. alternating 1×1 OC and DC 18SC
6. DC: (5SC, DEC)*3 – 21SC
7. alternating 1×1 OTs and DTs 21SC, then we knit OTs all rows of paws
8. 3SC, DEC, (6SC, DEC)*2, 3SC – 24SC
9.24SC
10.24SC
11.24SC
Fasten and cut the thread on the left paw, continue knitting on the right paw: knit 4CH and connect with SL-ST to the left paw.
Stuff the paws well, especially pay attention to the junction of the foot and the continuation of the paw.
Body:
We continue to knit from the paws, we fill as we knit. The marker runs along the back, from the 23rd row the marker should be located exactly in the middle of the back.
1. (24SC foot, 4SC CH) *2 – 56SC
2. DEC, 22SC, DEC*6, 22SC, DEC*2, 2SC, DEC – 66SC
Put your paws, find the most successful position in which the future rabbit stands confidently. Bend the wire of the paws towards each other, twist. At a height of about 16 cm from the floor, bend the wire into a loop so that it does not interfere with knitting. Do not wrap with a plaster; when attaching hands, we will unbend it.
3.66SC
4. alternating 1×1 OC and DC 66 SC, while knitting the DC one row below
5. DC: 66SC
6. OTs: behind the back wall 66SC
7. OC: 66SC
8. OC: (9SC, DEC)*6 – 60SC
9. alternating 5SC x 1 bump of 5DC OTs and DC 60 SC
10. OTs: 60SC
11. OTs: 60SC
12. DC: 60SC
13. alternating 1×1 DC and OC 4SC, DEC, (8SC, DEC) * 5, 4SC – 54SC
14. OTs: 54SC
15. OTs: 54SC
16. DC: 54SC
17. alternating 3×3 DC and OTs 54SC
18. DC: 54SC
19. OTs: (7SC, DEC) * 6 – 48SC
20. OTs: 48SC
21. alternating 1×1 OC and DC 48 SC
22. alternating 1×1 OC and DC 48 SC
In the next row, the decrease should be on the sides of the toy.
23. OC: 11SC, DEC, 22SC, DEC, 11SC – 46SC
24. OTs: 46SC
It is good to stuff the body, form a tummy, then do not stuff the body until the upper paws are attached.
25. alternating 1×1 OC and DC 46 SC
26. DC: 10SC, DEC, 22SC, DEC, 10SC – 44SC
27. alternating 1×1 DC and OTs 44 SC
28. OTs: 44SC
29. OC: 10SC, DEC, 20SC, DEC, 10SC – 42SC
30. OTs: 42SC
In the next row we attach paws. We turn the paws with knobs inward.
31. OTs: 9SC, 3SC with foot,18SC, 3SC with
paw, 9SC – 42SC
We put a little filler in the upper paws. We straighten the wire running from the lower paws along the body. We take the wire, make a small loop, wrap it with a plaster, insert it into the paw, wrap the body around the wire, measure the required length of wire for the second paw, cut it off, make a loop, wrap it with a plaster and insert it into the paw. If necessary, we cut off the excess from the wire of the body, bend it with a loop and wrap it well with a plaster along with me paw attachment stoma. We stuff the body well, we do not stuff the upper paws much with a hook or a wooden stick.
32. DC: 9SC, 7SC on the paw, 18SC, 7SC on the paw, 9SC – 50SC
33. OTs: behind the back wall 12SC, DEC, 22SC, DEC, 12SC – 48SC
34. OTs: 3SC, DEC, (6SC, DEC) * 5, 3SC – 42SC
35. alternating 5SC x 1 bump of 4DC OTs and DC 42 SC
36. OTs: 42SC
37. OTs: (5SC, DEC) * 6 – 36SC
38. OTs: 2SC, DEC, (4SC, DEC) * 5, 2SC – 30SC
39. DC: (3SC, DEC) * 6 – 24SC
40. OTs: 24SC, leave a long end for sewing on the head, thread
fasten and cut.
Tail:
We begin to knit OTs. Fill lightly before sewing to the body.
We sew approximately between 6 and 8 rows of the body.
1.6SC to MR
2. DEC*6 – 12SC
3. alternating 1×1 OC and DC 12 SC
4. alternating 1×1 OC and DC 12 SC
5. OC: 2SC, DEC*4, 2SC – 8SC
Fasten the thread, leave the long end of the thread for sewing.
Sew the head to the body.
Your Easter Bunny is ready!