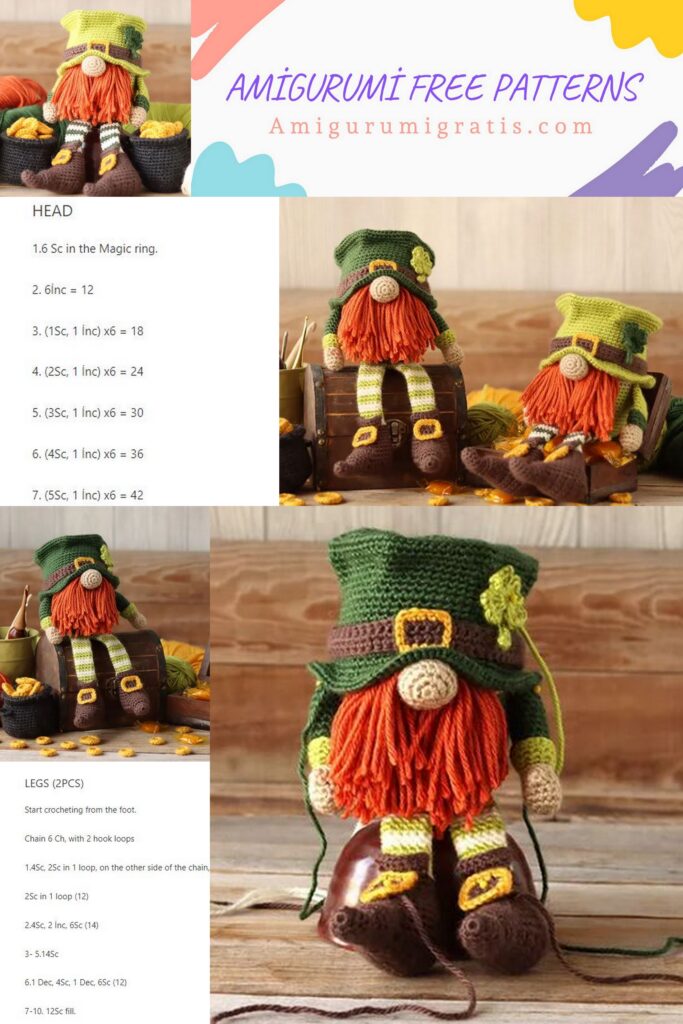
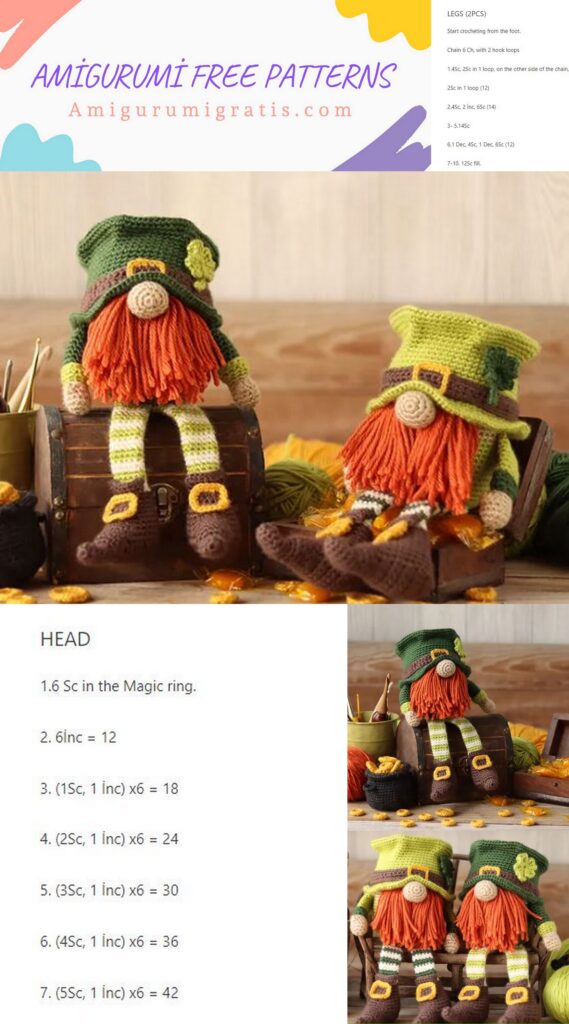
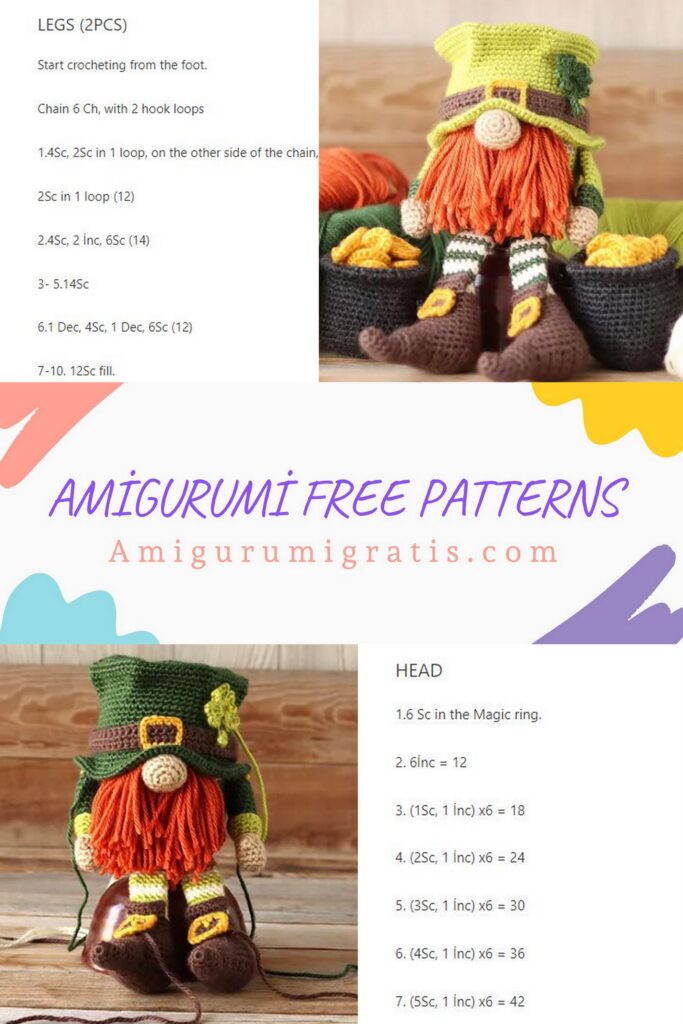
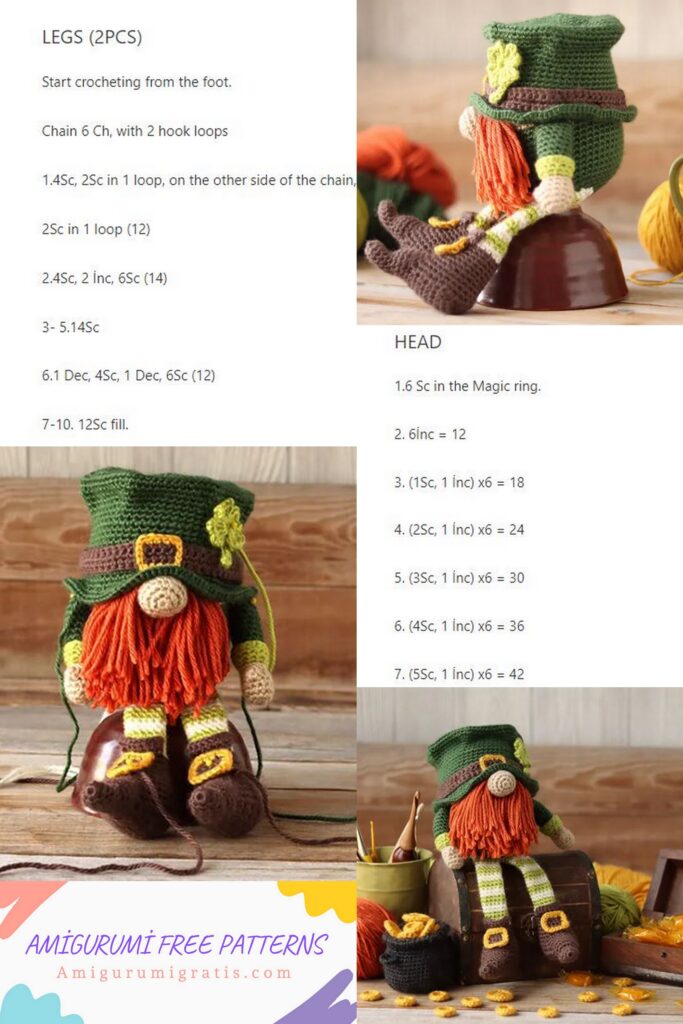
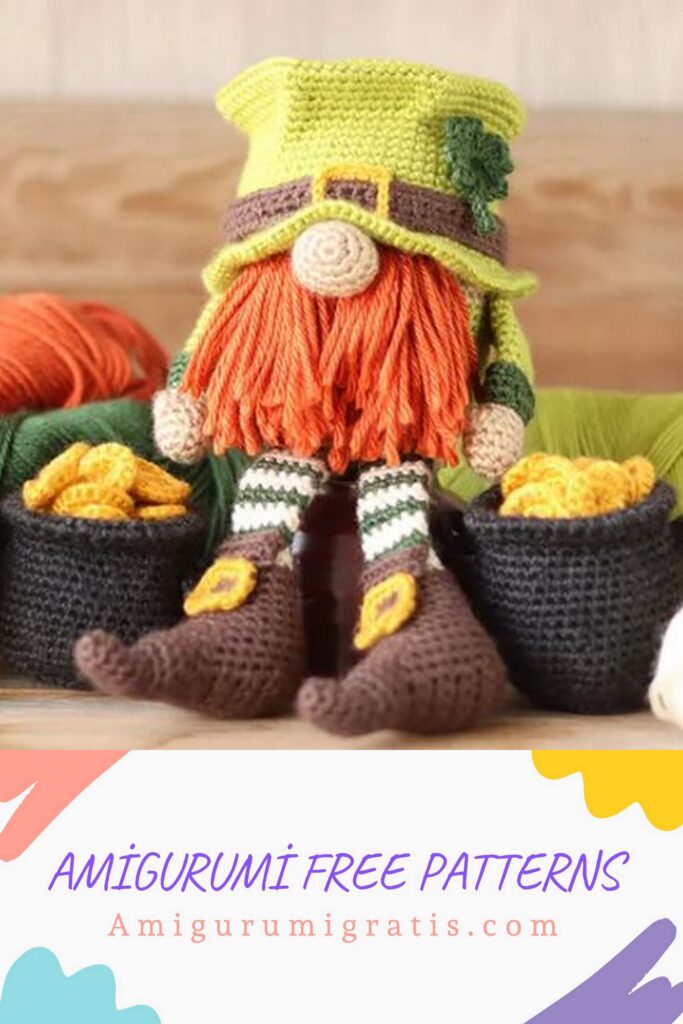
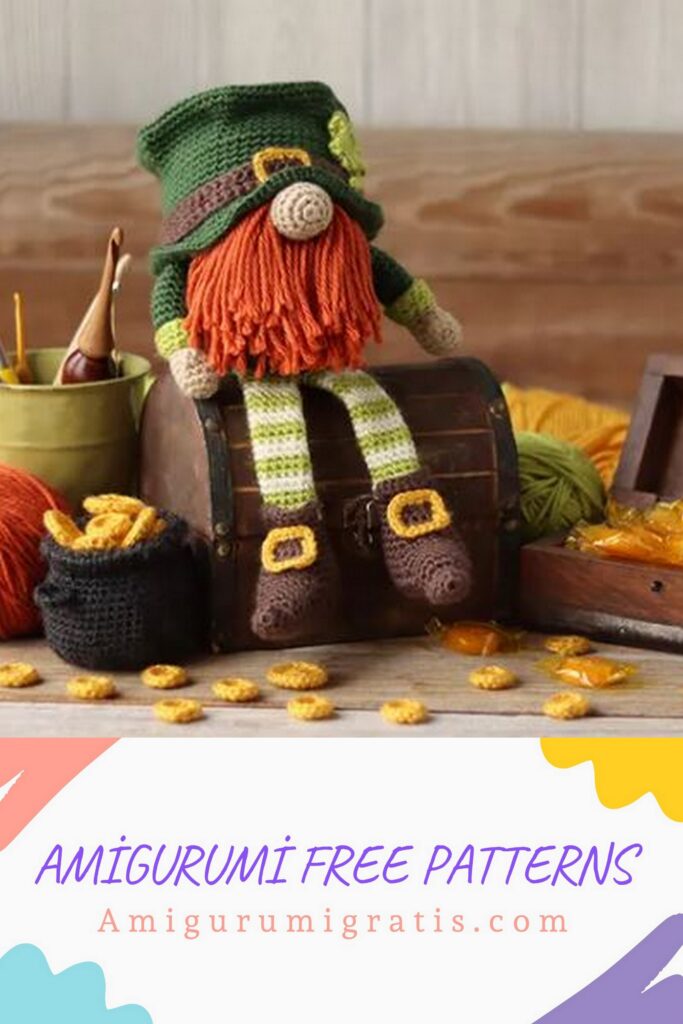
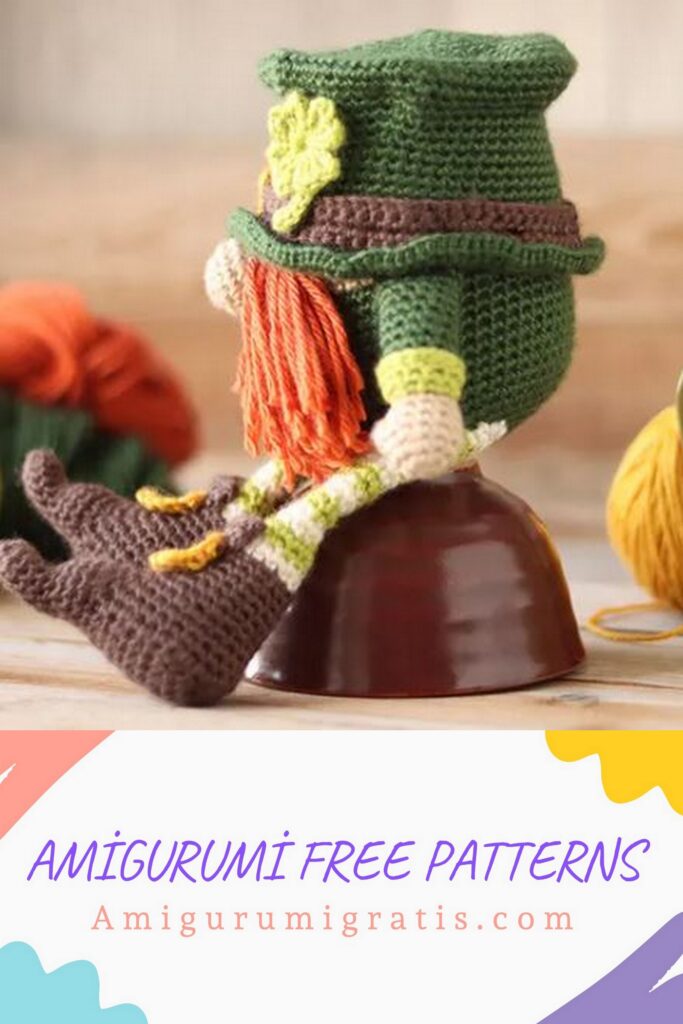
We continue to share beautiful free amigurumi patterns for you. You can visit our website for Amigurumi christmas gnome Free Pattern.
Abbreviations/Stitches Used
back bar of the ch – horizontal bar on the backside of a ch
BLO – work in the back loops only
bo – bobble (described below under special stitches)
ch – chain
dc – double crochet
FLO – work in the front loop only
hdc – half double crochet
invisible finish
Rnd(s) – Round(s)
Row(s) – Row(s)
sc – single crochet (including the standing sc)
sc2tog – single crochet 2 stitches together (use an invisible decrease unless otherwise indicated)
sl st – slip stitch
st(s) – stitch(s)
surface stitch
tr – treble crochet
[ ] / ( ) – work instructions between brackets as many times as directed
magic circle/adjustable ring

Special Stitches
Bobble (bo): A 3dcbo (three double crochet bobble) is used in this pattern. Essentially it’s 3 half-finished double crochets worked all in the same stitch that are joined at the end as one stitch, creating a puffy stitch.
To create a 3dcbo
With the working loop on the hook:
Yarn over, insert hook into the next stitch,
Yarn over and pull up a loop (three loops on the hook),
Yarn over and pull through two loops (one leg made, two loops on the hook),
Yarn over, insert hook into the same stitch,
Yarn over and pull up a loop (four loops on the hook)
Yarn over and pull through two loops (two legs made, three loops on the hook),
Yarn over, insert hook into the same stitch,
Yarn over and pull up a loop (five loops on the hook)
Yarn over and pull through two loops (three legs made, four loops on the hook),
Yarn over and pull through all four loops. (3dcbo completed)
Nose
Make 1
Using Color (B)
Rnd 1: 6sc in adjustable (magic) circle. (6sts)
Rnd 2: 2sc in each st around. (12sts)
Rnd 3: [Sc in the next st, 2sc in next st] 6 times. (18sts)
Rnds 4-5: Sc in each st around. (18sts for 2 Rnds)
Rnd 6: [Sc in the next st, sc2tog] 6 times. (12sts)
Rnd 7: [Sc in the next st, sc2tog] 4 times. (8sts)
Fasten off. Firmly stuff and shape the nose. Set aside for later.
Body
Make 1
Using Color (A)
Rnd 1: 6sc in adjustable (magic) circle. (6sts)
Rnd 1 alternative: If preferred, ch 2 and then 6sc in 2nd chain from hook. (6sts)
Rnd 2: 2sc in each st around. (12sts)
Rnd 3: [Sc in the next st, 2sc in next st] 6 times. (18sts)
Rnd 4: [Sc in the next 2sts, 2sc in next st] 6 times. (24sts)
Rnd 5: [Sc in the next 3sts, 2sc in next st] 6 times. (30sts)
Rnd 6: [Sc in the next 4sts, 2sc in next st] 6 times. (36sts)
Rnd 7: [Sc in the next 5sts, 2sc in next st] 6 times. (42sts)
Rnd 8: [Sc in the next 6sts, 2sc in next st] 6 times. (48sts)
Rnds 9-19: Sc in each st around. (48sts for 11 Rnds)
Switch to Color (B)
Rnd 20: Sl st in the first st (counts as a stitch), sc in the next 47sts. (48sts)
Rnds 21-22: Sc in each st around. (48sts for 2 Rnds)
In the next round, the nose is added seamlessly to the body.
The first stitch of the bottom of the nose being attached seamlessly to the body.
The bottom of the nose attached seamlessly to the body.
Rnd 23: Sc in the next 22sts, now join the nose to the body: With the working loop still on the hook, insert hook into any st on the nose from the wrong side to the right side of the piece, then insert the hook into the next st of the body from the right side to the wrong side of the piece, yo, pull loop through the body and the nose, yo, pull through both loops, continue to join the nose and body sts together for the next 3sts, sc in the next 22sts. (48sts)
The first stitch of the top of the nose being attached seamlessly to the body.
The top of the nose attached seamlessly to the body.
Rnd 24: Sc in the next 22sts, now join the nose to the body: With the working loop still on the hook, insert hook into the next st on the nose from the right side to the wrong side of the piece, then insert the hook into the next st of the body from the right side to the wrong side of the piece, yo, pull loop through the body and the nose, yo, pull through both loops, continue to join the nose and body sts together for the next 3sts, sc in the next 22sts. (48sts)
Rnds 25-33: Sc in each st around. (48sts for 9 Rnds)
Firmly stuff and shape the body and continue to do so as the pattern progresses.
Rnd 34: [Sc in the next 4sts, sc2tog] 8 times. (40sts)
Rnd 35: [Sc in the next 3sts, sc2tog] 8 times. (32sts)
Rnd 36: [Sc in the next 2sts, sc2tog] 8 times. (24sts)
Rnd 37: [Sc in the next st, sc2tog] 8 times. (16sts)
Rnd 38: [Sc in the next 2sts, sc2tog] 4 times. (12sts)
Rnd 39: [Sc in the next st, sc2tog] 4 times. (8sts)
Sl st to the first st and fasten off leaving a long tail to close up the hole. Close the hole with a tapestry needle stitching only through the front loops until the hole pulls nicely closed, secure, and weave in the tail.
Beard
Using Color (G)
Step 1: Cut 60, 6-inch lengths of yarn (more if a fuller beard is desired, longer if a longer beard is desired).
The yarn strands, held together two at a time, are looped to the body to create the beard (See Step 2).
Step 2: Holding two strands together, loop yarn lengths around the stitches onto the body. Suggested Placement: On Rnd 21: Place 4 loops directly under the nose and three loops to each side of these loops for a total of 10 loops. On Rnd 23: Place 4 loops on each side of the nose for a total of 8 loops. The first loops are placed flush with the nose on either side and then move outward in either direction. On Rnd 25: Place 4 loops above the nose and 4 loops to each side of these loops for a total of 12 loops. (30 total loops)
Step 3: Trim if desired. Unravel or brush yarn strands if desired.
Hand and Arm
Make 2
Using Color (B)
Rnd 1: 6sc in adjustable (magic) circle. (6sts)
Rnd 2: 2sc in each st around. (12sts)
Rnd 3: [Sc in the next 3sts, 2sc in next st] 3 times. (15sts)
Rnd 4: [Sc in the next 3sts, sc2tog] 3 times. (12sts)
Rnd 5: Sc in the next 6sts, bo, sc in the next 5sts. (12sts)
Rnd 6: Sc in the next 4sts, [sc2tog] 2times, sc in the next 4sts. (10sts)
Rnd 7: Sc in each st around. (10sts)
Firmly stuff and shape the hand.
Switch to Color (A)
Rnd 8: Working in the BLO: [Sc in the next 4sts, 2sc in the next st] 2 times. (12sts) Mark the 1st st, front loop with a separate stitch marker for later reference.
Rnds 9-17: Working in both loops: Sc in each st around. (12sts for 9 Rnds)
Rnd 18: Sc in the next 3sts, leave the remaining sts unworked. (3sts)
Lightly stuff the arm leaving the last couple of Rnds unstuffed.
Press the tube flat so the top edges line up parallel with the thumb. The 3sts worked in Rnd 18 should leave the working loop on the edge when the tube is pressed together. If needed, add or remove sts so this is the case, ch1, and sc the two edges together across the top. (6sts)
Fasten off leaving a long tail for attaching the arm to the body.
Sleeve Cuff
The hook is inserted into the loop to create the sleeve cuff (See Rnd 1).
Using Color (E)
Rnd 1: Using the front loops previously marked with a stitch marker in Rnd 8 of the Hand and Arm, insert the hook from the bottom up towards the arm, and starting with a standing sc: Sc in each st around. (10sts)
Rnd 2: [Sc in the next 4sts, 2sc in the next st] 2 times. (12sts)
Rnd 3: Sc in each st around. (12sts)
Rnd 4: Sl st in each st around. (12sts)
Fasten off using an invisible finish (or alternatively a regular finish) and weave in the ends.
Shoe and Leg (One Piece)
Starting With the Shoe
Make 2
Using Color (C)
>Design Note: The starting stitch will change several times while making the shoe. When a new starting point is noted the other stitch marker can be removed.
Rnd 1: 6sc in adjustable (magic) circle. (6sts)
Rnd 1 alternative: If preferred, ch2 and then 6sc in 2nd chain from hook. (6sts)
Rnd 2: [Sc in the next st, 2sc in next st] 3 times. (9sts)
Rnds 3-6: Sc in each st around. (9sts for 4 Rnds)
Rnd 7: Sc in the next 2sts, 2sc in the next 2sts, sc in the next st, [sc2tog] 2 times. (9sts)
Rnd 8: [Sc in the next st, 2sc in next st] 4 times, sc in the next st. (13sts)
Rnd 9: Sc in each st around. (13sts)
Rnd 10: Sc in the next 12sts, 2sc in the next st. (14sts)
Rnd 11: Sc in the next 3sts, leave the remaining sts unworked. (3sts)
The next portion of the shoe is worked in rows. The new starting stitch becomes the first st of Row 1. Ch1 and turn at the end of each row.
>Design Tip: Use a regular sc decrease when working in Rows.
Row 1: Ch 1, turn, sc in the next 6sts. (6sts)
Row 2: 2sc in the next st, sc in the next 4sts, 2sc in the next st. (8sts)
Rows 3-5: Sc in each st across. (8sts for 3 Rows)
Row 6: 2sc in the next st, sc in the next 6sts, 2sc in the next st. (10sts)
Row 7: Sc in each st across. (10sts)
Row 8: Sc2tog, sc in the next 6sts, sc2tog. (8sts)
Row 9: Sc2tog, sc in the next 4sts, sc2tog. (6sts)
Row 10: Sc2tog, sc in the next 2sts, sc2tog. (4sts)
Row 11: [Sc2tog] 2 times. (2sts)
The pattern will now return to working in Rounds.
>Design Tip: Use a regular decrease for the first stitch and then return to working the invisible decrease.
Rnd 1: Ch 1, turn, sc2tog (mark this st as the starting st), working in the edges of the rows: sc in the edge of Row 11 back to Row 1 for 11 total sts, working in the 8 unworked sts across the toe: sc2tog, sc in the next 4sts, sc2tog, working in the edges of the rows: sc in the edge of Row 1 back to Row 11 for 11 total sts. (29sts)
Rnd 2: Sc in the next 12sts, sc2tog, sc in the next 4sts, sc2tog, sc in the next 9sts. (27sts)
Rnd 3: Sc2tog, sc in the next 9sts, sc2tog, 2sc in the next st, sc in the next 2sts, 2sc in the next st, sc2tog, sc in the next 8sts. (26sts)
Rnd 4: Sc in the next 9sts, [sc2tog] 5 times, sc in the next 7sts. (21sts)
Rnd 5: Sc in each st around. (21sts)
Firmly stuff and shape the shoe leaving the bent tip unstuffed. Continue to firmly stuff and shape the shoe as the pattern progresses.
Rnd 6: Sc in the next 9sts, sc2tog, sc in the next st, sc2tog, sc in the next 7sts. (19sts)
Rnd 7: Sc in the next 8sts, sc2tog, sc in the next 2sts, sc2tog, sc in the next 5sts. (17sts)
Rnd 8: Sc in the next 8sts, [sc2tog] 2 times, sc in the next 5sts. (15sts)
Rnd 9: Sc in each st around. (15sts)
Rnd 10: Sc in the next 14sts, 2sc in the next st. (16sts)
Making the Leg
>Design Tip: There is no need to cut the yarn at the end of each row. Drop and pick up colors as needed to make the color changes.
>Design Note: The leg is going to alternate between Color (D) – Off White and Color (E) – Chartreuse every 2 Rnds. The color changes (noted in bold when they occur) will happen mid-row in order to keep the color change at the back of the leg when working in the round. Alterations can be made if necessary to ensure that the color changes are not seen at the front of the leg.
Switch to Color (D)
Rnd 11: In BLO: Sl st in the first st, sc in the next 15sts. (16sts)
Rnd 12: [Sc in the next 2sts, sc2tog] 4 times. (12sts)
Add additional stuffing up to the top of the shoe but leave the leg unstuffed as the pattern progresses.
Rnd 13: Sc in the next st, Switch to Color (E): Sl st in the next st (counts as a st here and throughout during a color change), sc in the next 10sts. (12sts)
Rnd 14: Sc in each st around. (12sts)
Rnd 15: Sc in the next 2sts, Switch to Color (D): Sl st in the next st, sc in the next 9sts. (12sts)
Rnd 16: Sc in each st around. (12sts)
Rnd 17: Sc in the next 2sts, Switch to Color (E): Sl st in the next st, sc in the next 9sts. (12sts)
Rnd 18: Sc in each st around. (12sts)
Rnd 19: Sc in the next 2 sts, Switch to Color (D): Sl st in the next st, sc in the next 9sts. (12sts)
Rnd 20: Sc in each st around. (12sts)
Rnd 21: Sc in the next 2sts, Switch to Color (E): Sl st in the next st, sc in the next 9sts. (12sts)
Rnd 22: Sc in each st around. (12sts)
Rnd 23: Sc in the next 3sts, Switch to Color (D): Sl st in the next st, sc in the next 8sts. (12sts)
Rnd 24: Sc in each st around. (12sts)
Rnd 25: Sc in the next 3sts, Switch to Color (E): Sl st in the next st, sc in the next 8sts. (12sts)
Rnd 26: Sc in each st around. (12sts)
Rnd 27: Sc in the next 3sts, Switch to Color (D): Sl st in the next st, sc in the next 8sts. (12sts)
Rnd 28: Sc in each st around. (12sts)
Rnd 29: Sc in the next 3sts, Switch to Color (E): Sl st in the next st, sc in the next 8sts. (12sts)
Rnd 30: Sc in each st around. (12sts)
Rnd 31: Sc in the next 4sts, Switch to Color (D): Sl st in the next st, sc in the next 7sts. (12sts)
Rnd 32: Sc in each st around. (12sts)
Rnd 33: Sc in the next 3sts, leave the remaining 10sts unworked. (3sts) This should position the working loop on the side of the leg in preparation for the next step. Add or remove sts to obtain the needed position.
Cut Color (E) and tuck the tail inside the leg. Press the tube flat so the top edges line up horizontally with the shoe facing forwards, ch1, and sc the two edges together across the top. (6sts)
Fasten off leaving a long tail for attaching the leg to the body.
Tongue of the Shoe
Looking at the front loops that were not worked in Rnd 11 when making the boot, identify the 6sts centered at the front of the boot/leg.
Image Description: The hook is inserted into the far right loop in preparation to make the Tongue of the Boot (See Row 1).
Row 1: Insert the hook in the far right of the 6sts determined above from the bottom of the stitch up towards the leg. Starting with a standing sc, sc in each st across. (6sts)
Row 2: Ch 1, turn, 2sc in the first st, sc in the next 4sts, 2sc in the last st. (8sts)
Row 3: Ch 1, turn, sl st in each st across. (8sts)
Fasten off and weave in the ends.
Buckle for the Shoes
Using Color (C)
Make 2
The buckle is worked in rows to create the center portion of the buckle after which this piece is single crocheted around in the new color to complete the buckle.
Ch 1 and turn at the end of each row.
Ch 5
Row 1: In the back bar of the ch: sc in the 2nd ch from the hook and in each ch across. (4sts)
Rows 2-3: Sc in each st across. (4sts for 2 Rows)
Switch to Color (F). Cut Color (C) leaving a long tail for later attaching the buckle to the shoe.
The work is turned 90 degrees with the hook inserted into the edge of the row to make the gold portion of the buckle.
Turn the work 90 degrees (so the edge of the rows is at the top of the work), Ch 1 (doesn’t count as a st), sc across the edge of the rows for 2sts, in the corner [sc, ch1, sc] in the same st, sc in the next 2sts, in the corner [sc, ch1, sc] in the same st, along the edge of the rows sc for 2sts, in the corner [sc, ch1, sc] in the same st, sc in the next 2sts, in the corner [sc, ch1, sc] in the same st.
Fasten off using the invisible finish or alternatively sl st to the first st and fasten off.
Weave in the extra tails not needed for stitching.
Top Hat
Using Color (A)
Rnd 1: 6sc in an adjustable (magic) circle. (6sts)
Rnd 1 alternative: If preferred, ch2 and then 6sc in 2nd chain from hook. (6sts)
Rnd 2: 2sc in each st around. (12sts)
Rnd 3: [Sc in the next st, 2sc in next st] 6 times. (18sts)
Rnd 4: Sc in the next st, 2sc in the next st, [sc in the next 2sts, 2sc in the next st] 5 times, sc in the next st. (24sts)
Rnd 5: [Sc in the next 3sts, 2sc in the next st] 6 times. (30sts)
Rnd 6: Sc in the next 2sts, 2sc in the next st, [sc in the next 4sts, 2sc in the next st] 5 times, sc in the next 2sts. (36sts)
Rnd 7: [Sc in the next 5sts, 2sc in the next st] 6 times. (42sts)
Rnd 8: Sc in the next 3sts, 2sc in the next st, [sc in the next 6sts, 2sc in the next st] 5 times, sc in the next 3sts. (48sts)
Rnd 9: [Sc in the next 7sts, 2sc in the next st] 6 times. (54sts)
Rnd 10: Sc in the next 4sts, 2sc in the next st, [sc in the next 8sts, 2sc in the next st] 5 times, sc in the next 4sts. (60sts)
Rnd 11: [Sc in the next 9sts, 2sc in the next st] 6 times. (66sts)
Rnd 12: [Sc in the next 10sts, 2sc in the next st] 6 times. (72sts)
Rnd 13: [Sc in the next 11sts, 2sc in the next st] 6 times. (78sts)
Rnd 14: In BLO: Sc in each st around. (78sts)
Rnd 15: [Sc in the next 11sts, sc2tog] 6 times. (72sts)
Rnd 16: [Sc in the next 10sts, sc2tog] 6 times. (66sts)
Rnd 17: Sc in each st around. (66sts)
Rnd 18: [Sc in the next 9sts, sc2tog] 6 times. (60sts)
Rnd 19: Sc in each st around. (60sts)
Rnd 20: [Sc in the next 18sts, sc2tog] 3 times. (57sts)
Rnds 21-30: Sc in each st around. (57sts for 10 Rnds)
Rnd 31: In FLO: Sc in the next st, 2sc in the next st, [sc in the next 2sts, 2sc in the next st] 18 times, sc in the next st. (76sts)
Rnd 32: [Sc in the next 3sts, 2sc in the next st] 19 times. (95sts)
Rnd 33: Sc in the next 2sts, 2sc in the next st, [sc in the next 4sts, 2sc in the next st] 18 times, sc in the next 2sts. (114sts)
Fasten off using the invisible finish (or alternatively sl st in the next 2sts fasten off) and weave in the ends.
Hat Band
The Hat Band is worked in rows. Ch 1 and turn at the end of each row.
Ch 60
Place the top hat on the body so that it’s pulled down, resting on the nose and over the top of the beard, and then ensure that the chain can go all the way around the hat close to the brim with about a 1-2 ch overlap. Add or remove chains if needed.
Row 1: In the back bar of the ch: sc in the 2nd ch from the hook and in each st across. (59sts)
Row 2: Sc in each st across. (59sts)
Check to see that the Hat Band is still fitting appropriately around the hat. It should be pretty taught with the ends able to touch so they can later be seamed together.
Row 3: Sc in each st across. (59sts)
Fasten off leaving a long tail for seaming the belt together. Weave in the starting tail.
Making the Buckle on the Hat Band
Design Options: The Buckle for the Hat Band can be made in a couple of ways. One, with the directions below, or two, make an additional Shoe Buckle and stitch it to the middle of the Hat Band.
Step 1: Find the front center of the Hat Band by folding it in half. Insert the hook with the working yarn two sts to the right of the center stitch to begin making the buckle.
Step 2: Sc in the next 5sts,
Step 3: Ch 1 (doesn’t count as a st here or throughout), rotate the work 180 degrees, and surface crochet up the buckle for 4sts (The first surface st is placed in the same st as the last sc and the last surface st will be into the other edge of the belt. Also, note that the working yarn will be underneath the belt when working the surface sts.),
Step 4: Ch 1, sc in the same st as the last surface crochet st and in the next 4sts along the edge of the belt,
Step 5: ch 1, rotate the work 180 degrees and surface crochet up the buckle for 4sts (The first surface st is placed in the same st as the last sc and the last surface st will be into the other edge of the belt meeting up with the first sc in Step 1, completing all four sides of the buckle. Step 1: Find the front center of the Hat Band by folding it in half. Insert the hook with the working yarn two sts to the right of the center stitch to begin making the buckle.
Step 2: Sc in the next 5sts,
Step 3: Ch 1 (doesn’t count as a st here or throughout), rotate the work 180 degrees and surface crochet up the buckle for 4sts (The first surface st is placed in the same st as the last sc and the last surface st will be into the other edge of the belt. The working yarn will once again be underneath the belt when working the surface sts.),
Step 6: Ch 1, fasten off using the invisible finish (or alternatively sl st to the 2nd st and fasten off). Weave in the ends.
Large Clover
Make 1
>Design Note: The Clover can be made with either 3 or 4 leaves.
Working into a magic ring (or alternatively ch 5, sl st to the first st to form a ring and work into the ring): [Ch 3, tr, dc, tr, ch 3, sl st] 3-4 times depending on the desired number of leaves. Each cluster of stitches creates an additional leaf.
Pull the ring taught. Do not fasten off yet, continue with the stem.
Making the Stem
Ch 8,
Working in the back bars of the ch: Sl st in the 2nd ch from the hook and in each ch across. (7sts)
Sl st into a st at the base of the clover near the stem and fasten off leaving a long tail for stitching. Weave in the starting tail.
Using a tapestry needle weave the finishing tail towards the middle of the clover, leaving the rest of the tail for attaching the clover to the hat.
BONUS: Small Clover
>Design Note: This clover is not found on the Crochet Leprechaun Gnome, but can be if you choose!
>Designer Note: I played around with several clover sizes when designing the Leprechaun Gnome, ultimately liking two sizes for him. I went with the slightly larger clover for my Leprechaun Gnome but thought I’d share this option as well. Enjoy!
Both clovers are very similar in construction.
Make 1
>Design Note: The Clover can be made with either 3 or 4 leaves.
Working into a magic ring (or alternatively ch 5, sl st to the first st to form a ring and work into the ring): [Ch 2, dc, hdc, dc, ch 2, sl st] 3-4 times depending on the desired number of leaves. Each cluster of stitches creates an additional leaf.
Pull the ring taught. Do not fasten off yet, continue with the stem. Amigurumi christmas gnome Free
Making the Stem
Ch 6,
Working in the back bars of the ch: Sl st in the 2nd ch from the hook and in each ch across. (5sts)
Sl st into a st at the base of the clover near the stem and fasten off leaving a long tail for stitching. Weave in the starting tail. Amigurumi christmas gnome Free
Using a tapestry needle weave the finishing tail towards the middle of the clover, leaving the rest of the tail for attaching the clover to the hat. Amigurumi christmas gnome Free
Assembly
Pin all the pieces together to determine the desired placement for the entire Leprechaun Gnome and stitch securely into place using a tapestry needle.
General placement and stitching suggestions:
Hat: The hat is pulled down over the body so it rests on the top of the nose and covers the top of the beard. If desired, invisibly tack the hat to the body in several places just above the brim. Alternatively, the hat can be left removable.
Hat Band: Stitch the two ends of the hat band together to form a loop. Place the band onto the hat just above the brim with the buckle centered over the nose. If desired, the band can then be secured to the hat.
Arms: The arms are attached on either side of the body about an inch (2.5 cm) away from the edge of the beard with the top front corner of the arm at approximately Rnd 21 of the body and angled down so the back corner rests at about Rnd 17. The thumbs on the hands should be facing to the front. Look at the Leprechaun Gnome from the front to ensure that the arms look even before stitching. Stitch the arm to the body along the top of the arm. Amigurumi christmas gnome Free
Buckles for the Shoes: Attach the Shoe Buckles just under the tongue of the shoe, stitching in the middle brown section (on the back side of the piece) so that the outer gold edges of the buckle remain detached.
Legs: Pin the legs side by side at about the bottom center of the body. Attach the leg to the body along the top edge of the leg and along each side of the leg for a couple rows so the top bit of the leg remains flush against the bottom of the body. Amigurumi christmas gnome Free
Clover: If using, stitch the center of the clover to the hat in the desired place, leaving the leaf edges and stem loose. Amigurumi christmas gnome Free