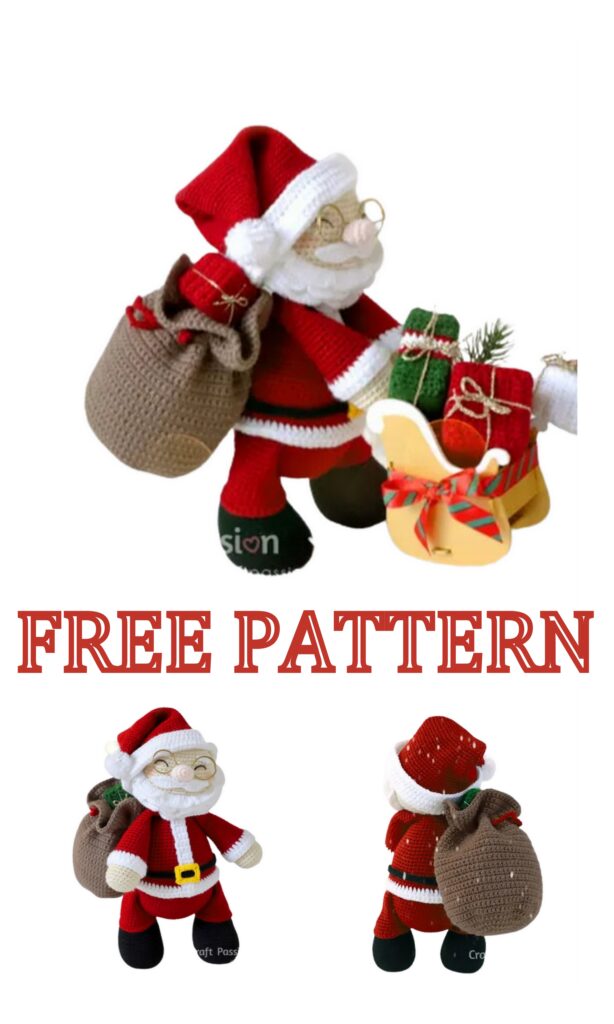
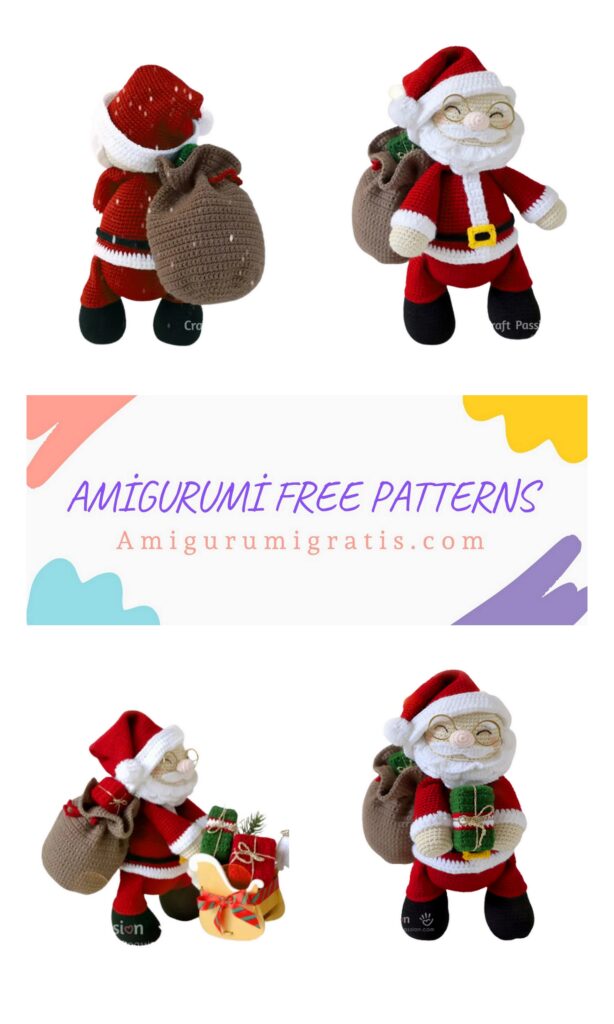
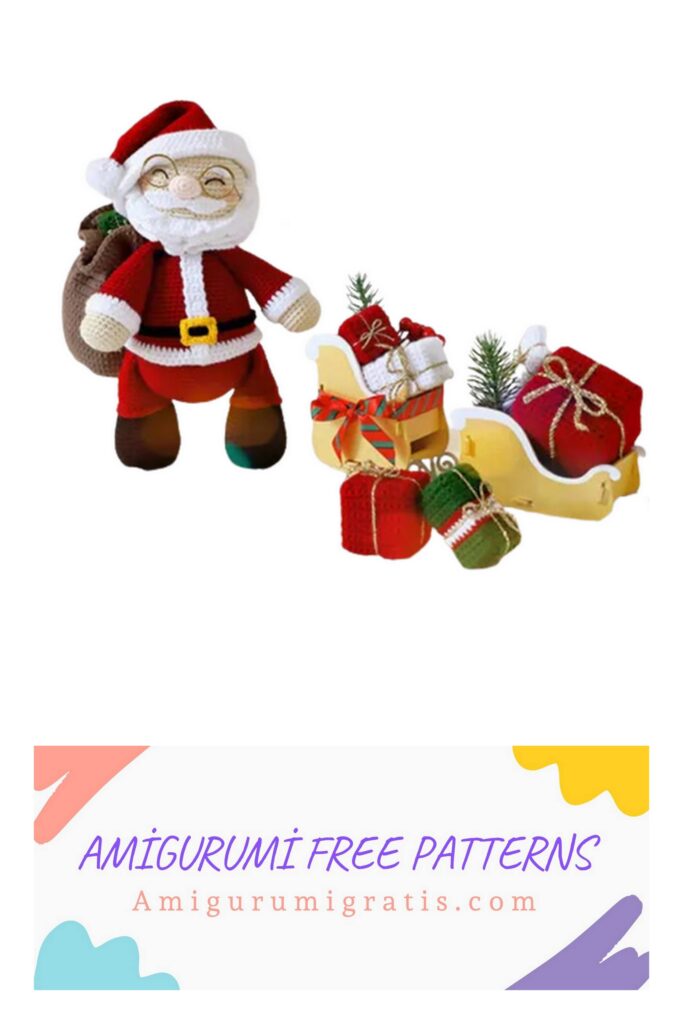
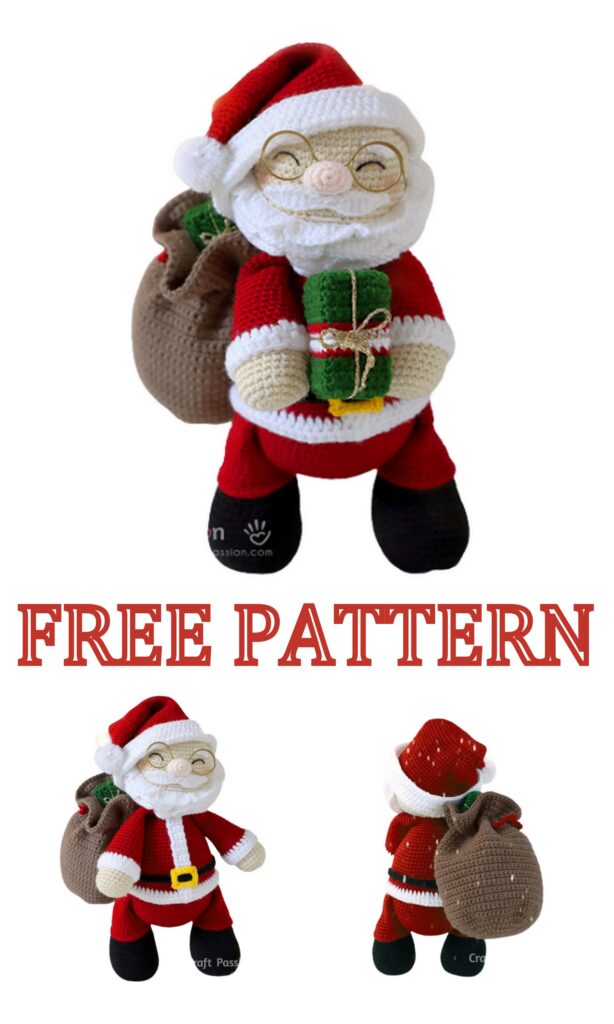
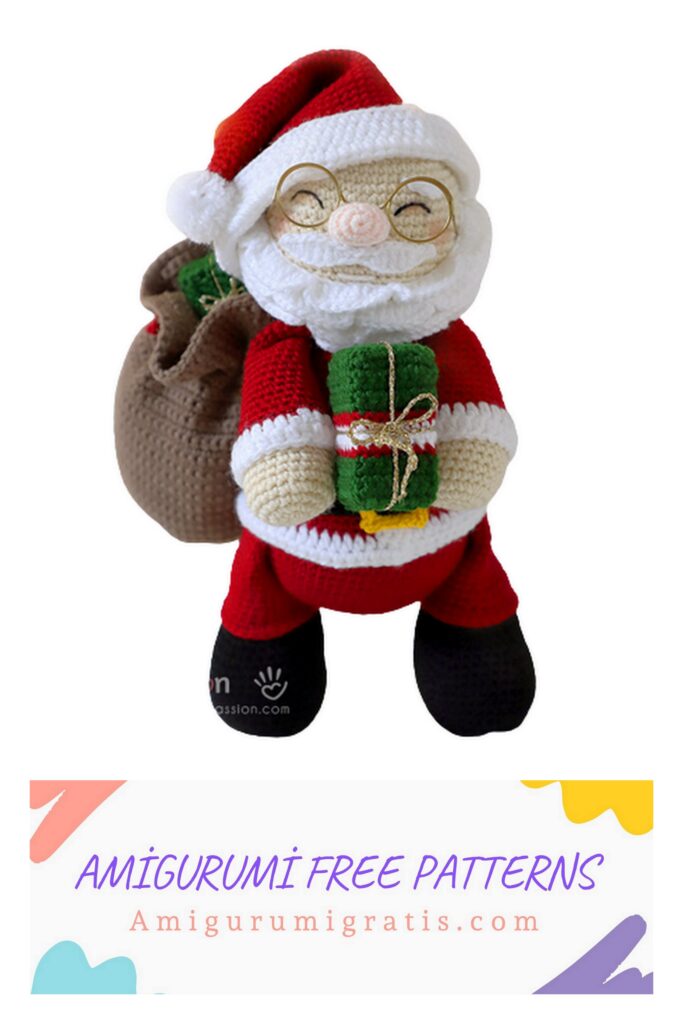
Amigurumi Santa Claus Doll Crochet Pattern We continue to share the best and free amigurumi patterns with you. You can visit our website for Amigurumi Santa Claus Doll and more free patterns.
Materials
Amigurumi Santa Claus
Acrylic yarn, DK/Light Worsted Weight. Color in Red (100-gram ball), Beige, White, Pink, Yellow, and Black.
Embroidery Floss, Black
Wired Eyeglasses
Polyester fiberfill
Santa Claus Hat
Acrylic yarn, DK/Light Worsted Weight. Color in Red and White.
Santa Sack
Acrylic yarn, DK/Light Worsted Weight. Color in Brown, and Red.
Gift Boxes
Acrylic yarn, DK/Light Worsted Weight. Color in Green, White, and Red.
Metallic Gold Lace Thread Yarn
Cardboard (To make boxes of various sizes)
Tools
2.5mm crochet hook
Stitch Markers
Tapestry Needle
Fabric marker (water erasable)
Scissors
Pins
Instructions
AMIGURUMI SANTA CLAUS CROCHET PATTERN
Abbreviations
(In US Crochet Terms)
ch: chain
sc: single crochet
inc: 2sc increase
inv dec: invisible decrease
hdc: half double crochet
dc: double crochet
FL: Front Loop
sk: Skip
ch sp: Chain Space
RS: Right Side
WS: Wrong Side

SANTA’S SUIT
The Santa’s Suit pattern is made by joining the white trim to the body (at Round 18, begin at stitch 47 of the round, and end at stitch 45 of Round 19) to create Santa’s suit.
Trim
Make with White Yarn
Leave enough yarn length for sewing, at least 6″ long, before making your slip knot to begin the pattern.
Foundation Row: ch 3
Row 1: ch, sc in second ch from hook, sc 3, turn. {3}
Row 2 – 21: ch, sc 3, turn. {3}
Row 22: ch, sc 3, ch 62, turn. {65}
Row 23 – 24: ch2 (count as 1 st), hdc in next 64 sts, turn. {65}
Fasten off, weave to hide the yarn end.
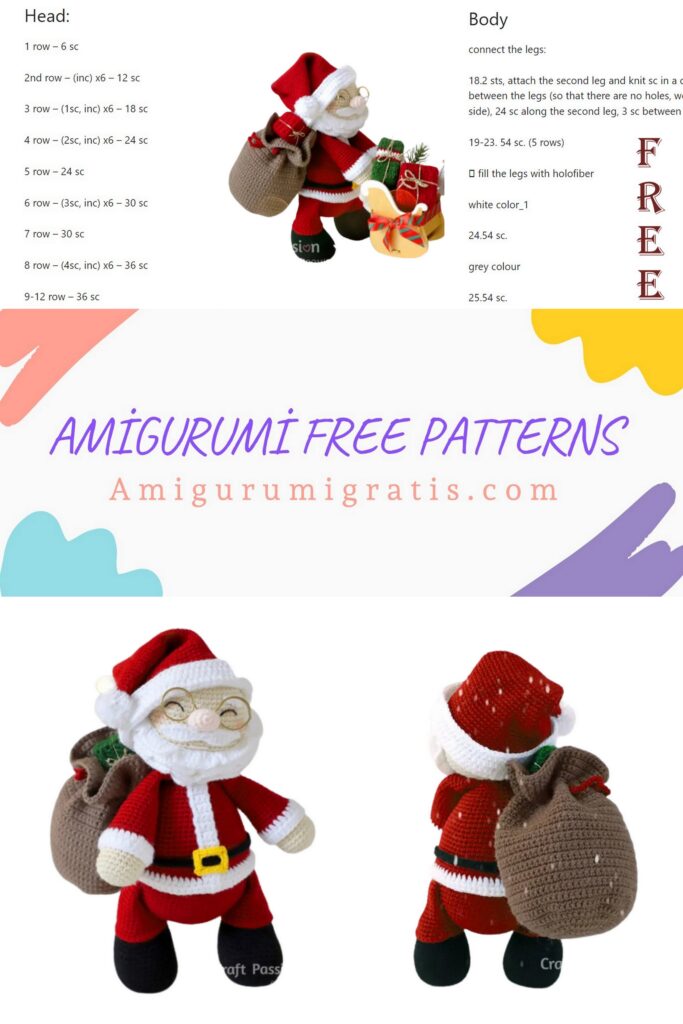
Body
Make with Red Yarn.
Round 1: ch5, Inc in 2nd ch from hook, sc 2, 5sc in the last ch. Continue on the other side of the chain base, sc 2, 3sc in the last ch. {14}
Round 2: Inc, sc 4, [Inc] 3 times, sc 4, [Inc] 2 times. {20}
Round 3: Inc, sc 6, [Inc] 2 times, sc, Inc, sc 6, [Inc] 2 times, sc. {26}
Round 4: Inc, sc 8, [Inc, sc] 2 times, Inc, sc 8, [Inc, sc] 2 times. {32}
Round 5: Inc, sc 10, Inc, sc 2, Inc, sc, Inc, sc 10, Inc, sc 2, Inc, sc. {38}
Round 6: Inc. sc 12, [Inc, sc 2] 2 times, Inc, sc 12, [Inc, sc 2] 2 times. {44}
Round 7: Inc, sc 14, Inc, sc 3, Inc, sc 2, Inc, sc 14, Inc, sc 3, Inc, sc 2. {50}
Round 8: Inc, sc 16, [Inc, sc 3] 2 times, Inc, sc 16, [Inc, sc 3] 2 times. {56}
Round 9: sc around. {56}
Round 10: sc 25, Inc, sc 27, Inc, sc 2. {58}
Round 11: sc 26, Inc, sc 28, Inc, sc 2. {60}
Round 12: sc 27, Inc, sc 29, Inc, sc 2. {62}
Round 13: sc 28, Inc, sc 30, Inc, sc 2. {64}
Round 14 – 17: sc around. {64}
Round 18: sc 46. Begin at st 47, add trim to the body by sc together the trim to the body:
First, insert the hook between the 3rd and 4th hdc post at row 23 of the trim, then, insert the hook to the FL of st 47 of the body. Yarn over, draw through the loops to make an sc stitch. Repeat this for the next 62 stitches.
Round 19: Continue to sc around as usual after the trim is added. {64}
Round 20 – 23: sc around. {64}
Round 24: sc 6, [Inv dec, sc 14] 3 times, Inv dec, sc 8. {60}
Round 25: sc around. {60}
Round 26: sc 6, [Inv dec, sc 13] 3 times, Inv dec, sc 7. {56}
Round 27: sc around. {56}
Round 28: sc 6, [Inv dec, sc 12] 3 times, Inv dec, sc 6. {52}
Round 29: sc around. {52}
Round 30: sc 6, [Inv dec, sc 11] 3 times, Inv dec, sc 5. {48}
Round 31: sc around. {48}
Round 32: sc 6, [Inv dec, sc 10] 3 times, Inv dec, sc 4. {44}
Round 33: sc around. {44}
Round 34: sc 6, [Inv dec, sc 9] 3 times, Inv dec, sc 3. {40}
Round 35: sc around. {40}
Round 36: sc 6, [Inv dec, sc 8] 3 times, Inv dec, sc 2. {36}
Round 37: sc around. {36}
Round 38: [sc 4, Inv dec] around. {30}
Stuff the body firmly with polyester fiberfill.
Round 39: sc around. {30}
Round 40: sc 2, [Inv dec, sc 3] 5 times, inv dec, sc. {24}
Round 41: [sc 2, Inv dec] around. {18}
Round 42: [Inv dec, sc] around. {12}
Round 43: [Inv dec] around. {6}
Fasten and leave a long tail for sewing.
Sew the vertical trim to the body.
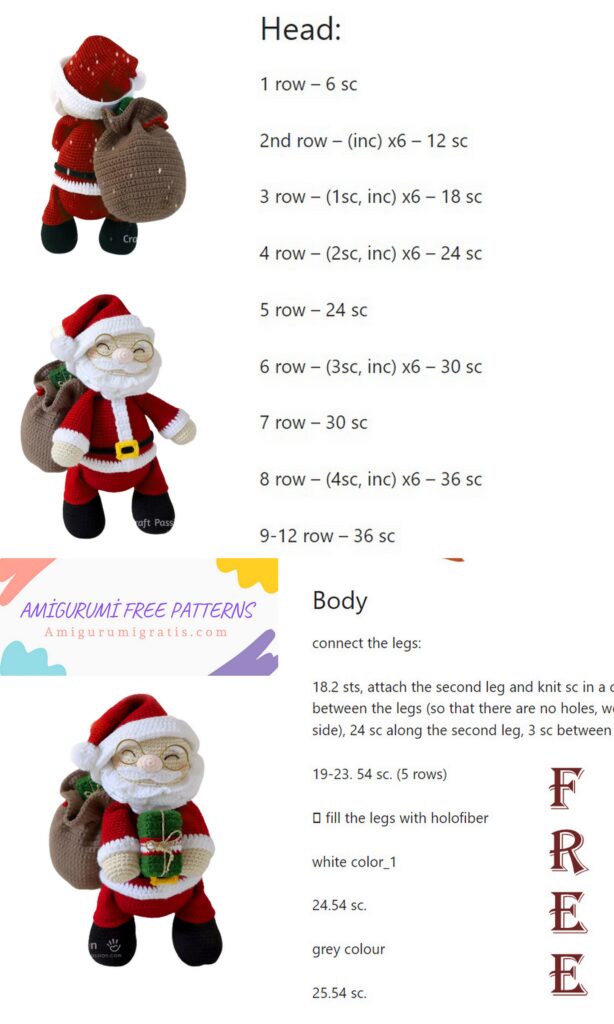
HEAD
Make with Beige Yarn.
Round 1: sc 6 in magic ring. {6}
Round 2: [inc] around. {12}
Round 3: [inc, sc] around. {18}
Round 4: [sc 2, inc] around. {24}
Round 5: [inc, sc 3] around. {30}
Round 6: [sc 2, inc, sc 2] around. {36}
Round 7: [inc, sc 5] around. {42}
Round 8: [sc 3, inc, sc 3] around. {48}
Round 9: [inc, sc 7] around. {54}
Round 10: sc around. {54}
Round 11: [sc 4, inc, sc 4] around. {60}
Round 12: sc around. {60}
Round 13 – 21: sc around. {60}
Round 22: [sc 4, inv dec, sc 4] around. {54}
Round 23: [inv dec, sc 7] around. {48}
Round 24: [sc 3, inv dec, sc 3] around {42}
Round 25: [inv dec, sc 5] around. {36}
Round 26: [sc 2, inv dec, sc 2] around. {30}
Round 27: [inv dec, sc 3] around. {24}
Stuff with polyester fillings.
Round 28: [sc, inv dec, sc] around. {18}
Round 29: [inv dec, sc] around. {12}
Round 30: [inv dec] around. {6}
Fasten off and hide yarn end.
NOSE
Make with Pink yarn:
Round 1: Sc 6 in magic ring. {6}
Round 2: [inc] around. {12}
Round 3: [inc, sc 2] around. {16}
Round 4: sc around. {16}
Round 5: [inv dec, sc 2] around. {12}
Fasten off and leave a long tail for sewing.
Stuff the nose lightly with some polyester filling.
Flatten the nose and sew the bottom together.

EYEBROWS
Make 2 with White yarn.
Foundation row: ch 5,
Row 1: slst in 2nd ch from hook. sc 2, slst.
Fasten off and leave a long tail for sewing.
MUSTACHE
Make with White Yarn.
Foundation row: ch 18,
Row 1 ( Work this row in the back bump of the foundation row): slst in 2 ch from hook, [sc, hdc, dc 3, hdc, sc, slst] repeat 2 times.
Fasten off and leave a long tail for sewing.
BEARD
Make with White Yarn. The beard is constructed with 4 layers of ruffles.
Leave enough yarn length for sewing, at least 8″ long before making your slip knot to begin the pattern.
Layer 1: [pic 1]
Foundation Row: ch 32.
Row 1 (RS): (Work in the FL of the foundation row): Begin at 3rd st from hook [2dc, dc] repeat 2 times, 2dc, ch2, slst, [ch2, (2dc, dc) repeat 2 times, 2dc, ch2, slst] repeat 4 times, turn.
After making this row, you have completed a layer of 5 wide segments of beard pattern.
Layer 2: [pic 2 – 4]
Foundation Row (WS, work this row on the foundation row of layer 1): ch 3, sk 2, hdc, [ch 5, sk 5 sts, hdc] repeat 4 times, ch 3, sk 2, slst, turn.
Row 1 (RS): ch 2, dc 4 in ch sp, ch 2, slst to hdc st of the foundation row, [ch 2, dc 8 in ch sp, ch 2, slst to hdc st] repeat 4 times, ch 2, dc 4 in ch sp, ch 2, slst to hdc st, turn.
After making this row, you have completed a layer of 4 wide segments of beard pattern with a narrower segment at each end respectively.
Layer 3: [pic 5 – 6]
Foundation Row (WS, work this row on the foundation row of layer 2): [ch 7, hdc to the center of the wide segment] repeat 4 times, ch 7, slst to the last st, turn.
Row 1 (RS): [ch 2, dc 10 in ch sp, slst to hdc st of the foundation row] 5 times, turn.
After making this row, you have completed another layer of 5 wide segments of beard pattern.
Layer 4: [pic 7 – 8]
Foundation Row (WS, work this row on the foundation row of layer 3): ch 4, hdc to the center of the segment, [ch 7, hdc to the center of the next segment] repeat 4 times, ch 4, slst to the last st, turn.
Row 1 (RS): ch 2, dc 5 in ch sp, ch 2, slst to hdc st of the foundation row, [ch 2, dc 10 in ch sp, ch 2, slst to hdc st] repeat 4 times, ch 2, dc 5 in ch sp, ch 2, slst to hdc st, turn.
After making this row, you have completed another layer of 4 wide segments of beard pattern with a
narrower segment at each end respectively.
SANTA’S BELT & BUCKLE
Belt
With Black Yarn:
ch 64, slst to the first ch to form a ring.
ch 1, sc 64, slst.
Fasten off and leave a long tail for sewing.
Buckle
With Yellow Yarn:
Foundation Round: ch 16, slst to form a ring.
Round 1: [slst in next 5 sts, ch 2, slst in next 3 sts, ch2] repeat 2 times.
Fasten the yarn end to the first slst st of the round
Leave a long tail for sewing.
ARMS
The Arms are made by joining a white sleeve cuff piece to the hand pattern. Then, continue to crochet the
sleeve with red yarn to make up the arms.
Sleeve Cuffs
Make 2 with White Yarn.
Foundation Round: ch 24, slst to form a ring.
Round 1 – 2: ch 2 (count as 1 st), hdc 23, slst to the first st. {24}
Fasten off and hide yarn.
Hands
Make 2 with Beige Yarn.
Round 1: sc 6 in magic ring. {6}
Round 2: [inc] around. {12}
Round 3: [inc, sc] around. {18}
Round 4: [sc 2, inc] around. {24}
Round 5 – 11: sc around. {24}
Fasten off and hide yarn.
Sleeves
Make 2 with Red Yarn.
Row 1: Place hand-piece into the cuff piece, position to get the first stitches aligned.
Insert the hook between the 1st and 2nd hdc post of the cuff, then, insert the hook to the FL of the hand.
Yarn over, draw through the loops to make an sc stitch. Repeat around. {24}
Round 2 – 5: sc around. {24}.
Round 6: [sc 3, Inv dec, sc 3] around. {21}
Round 7 – 8: sc around. {21}
Round 9: Inv dec, sc 5] around. {18}
Round 10 – 11: sc around {18}
Round 12: [sc 2, Inv dec, sc 2] around. {15}
Round 13 – 21: sc around. {15}
Fasten and leave a long tail for sewing.
Fill the bottom 2/3 of the arms firmly with polyester fiberfill.
LEGS
The Legs are made by joining a hem to the shoe pattern. Then continue to crochet the pants with red
yarn to make up the legs.
Shoes
Make 2. Begin with Black Yarn
Round 1: ch5, Inc in 2nd ch from hook, sc 2, 5sc in the last ch. Continue on the other side of the chain
base, sc 2, 3sc in the last ch. {14}
Round 2: Inc, sc 4, [Inc] 3 times, sc 4, [Inc] 2 times. {20}
Round 3: Inc, sc 6, [Inc] 2 times, sc, Inc, sc 6, [Inc] 2 times, sc. {26}
Round 4: Inc, sc 8, [Inc, sc] 2 times, Inc, sc 8, [Inc, sc] 2 times. {32}
Round 5: Inc, sc 10, Inc, sc 2, Inc, sc, Inc, sc 10, Inc, sc 2, Inc, sc. {38}
Round 6: Inc. sc 12, [Inc, sc 2] 2 times, Inc, sc 12, [Inc, sc 2] 2 times. {44}
Round 7 – 10: sc around. {44}
Round 11: sc 14, Inv dec, sc 12, Inv dec, sc 14. {42}
Round 12: sc 14, Inv dec, sc 10, Inv dec, sc 14. {40}
Round 13: sc 14, Inv dec, sc 8, Inv dec, sc 14. {38}
Round 14: sc 14, Inv dec, sc 6, Inv dec, sc 14. {36}
Round 15: sc 14, Inv dec, sc 4, Inv dec, sc 14. {34}
Round 16: sc 14, Inv dec, sc 2, Inv dec, sc 14. {32}
Round 17: sc 14, Inv dec, Inv dec, sc 14. {30}
Fasten off and hide yarn.
Pants
Make 2 with Red Yarn.
Foundation Round: ch 30, slst to first stitch to form a ring.
Round 1: sc around, slst. {30}
Round 2: Place shoe piece into the pant piece, adjust to get the first stitches aligned.
Insert the hook through the loops of the first stitch, then, insert the hook to the FL of the shoe, crochet both pieces together with an sc stitch. Repeat around. {30}
Round 3: [sc 6, Inv dec] 3 times, sc 6. {27}
Round 4 – 5: sc around. {27}
Round 6: sc 6, [Inv dec, sc 5] 3 times. {24}
Round 7 – 8: sc around. {24}
Round 9: sc 5, Inv dec, sc 10, Inv dec, sc 5. {22}
Round 10 – 11: sc around. {22}
Round 12: sc 5, Inv dec, sc 9, Inv dec, sc 4. {20}
Round 13 – 14: sc around. {20}
Round 15: sc 4, Inv dec, sc 8, Inv dec, sc 4. {18}
Fasten and leave a long tail for sewing.
Fill the bottom 2/3 of the legs firmly with polyester fiberfill.
SANTA HAT CROCHET PATTERN
Abbreviations
(In US Crochet Terms)
ch: chain
sc: single crochet
inc: 2sc increase
hdc: half double crochet
RS: Right Side
WS: Wrong Side
Begin with Red Yarn:
Round 1: sc 3 in magic ring. {3}
Round 2: [inc] around. {6}
Round 3: sc around. {6}
Round 4: [sc, inc] around. {9}
Round 5: sc around. {9}
Round 6: [sc, inc, sc] around. {12}
Round 7: sc around. {12}
Round 8: [sc3, inc] around. {15}
Round 9: sc around. {15}
Round 10: [sc2, inc, sc2] around. {18}
Round 11: sc around. {18}
Round 12: [sc5, inc] around. {21}
Round 13: sc around. {21}
Round 14: [sc3, inc, sc3] around. {24}
Round 15: sc around. {24}
Round 16: [sc7, inc] around. {27}
Round 17: sc around. {27}
Round 18: [sc4, inc, sc4] around. {30}
Round 19: sc around. {30}
Round 20: [sc9, inc] around. {33}
Round 21: sc around. {33}
Round 22: [sc5, inc, sc5] around. {36}
Round 23: sc around. {36}
Round 24: [sc11, inc] around. {39}
Round 25: sc around. {39}
Round 26: [sc6, inc, sc6] around. {42}
Round 27: sc around. {42}
Round 28: [sc13, inc] around. {45}
Round 29: sc around. {45}
Round 30: [sc7, inc, sc7] around. {48}
Round 31: sc around. {48}
Round 32: [sc15, inc] around. {51}
Round 33: sc around. {51}
Round 34: [sc8, inc, sc8] around. {54}
Round 35: sc around. {54}
Round 36: [sc17, inc] around. {57}
Round 37: sc around. {57}
Round 38: [sc9, inc, sc9] around. {60}
Round 39: sc around. {60}
Round 40: [sc19, inc] around. {63}
Round 41: sc around. {63}
Round 42: [sc10, inc, sc10] around. {66}
Round 43: sc around. {66}
Round 44: [sc21, inc] around. {69}
Round 45: sc around, slst. {69}
Fastern off and hide yarn.
Make the cuff with a new strand of white yarn.
Round 1 : ch 2 (count as 1 st) , hdc 68, slst. {69}
Round 2: ch 2 (count as 1 st) , hdc 68, slst, turn. {69}
Round 3 – 6 (WS): ch 2 (count as 1 st) , hdc 68, slst. {69}
Fasten and weave in ends.
Fold the cuff to flip the last 4 rows to right side.
Make a mini pom-pim and sew or glue to the tip of the hat. Learn quick and easy way to make mini pom pom with fingers.
More Details on how to crochet & assemble the Crochet Santa Claus Doll
1. Crochet parts of the Amigurumi Santa Claus and stuff them according to the crochet pattern: Body,
Head, Nose, Eyebrows, Mustache, Beard, Santa Belt, Arms, Legs, and Santa Hat.
2. Sew eyes at Round 12, 9 st apart (measure from center of the eyes). The arch is 1 row high and 4 sts wide.
Sew nose at Round 14, between the eyes.
Sew Mustache at Round 16.
3. Sew to attach the beard to the face of the Santa doll. The sides of the beard are set at Round 15
high and the center is at Round 19.
Sew the mouth with pink yarn between the beard and the mustache.
Add some pink blush on the cheeks.
4. Sew the Santa Belt to the body, then sew the head to the body. Follow by sewing the arms at the sides of the neck.
5. Sew the Legs to Santa’s body, at Round 16.
Complete the Crochet Santa Claus Doll with a Santa’s Hat
SANTA SACK CROCHET PATTERN
Abbreviations
(In US Crochet Terms)
sc: single crochet
inc: 2sc increase
sk: skip
Sack
With Brown Yarn,
Round 1: sc 6 in magic ring, slst, turn. {6}
Round 2: ch, [inc] around, slst, turn. {12}
Round 3: ch, [inc, sc] around, slst, turn. {18}
Round 4: ch, [inc, sc 2] around, slst, turn. {24}
Round 5: ch, [inc, sc 3] around, slst, turn. {30}
Round 6: ch, [sc 2, inc, sc 2] around, slst, turn. {36}
Round 7: ch, [inc, sc 5] around, slst, turn. {42}
Round 8: ch, [sc 3, inc, sc 3] around, slst, turn. {48}
Round 9: ch, [inc, sc 7] around, slst, turn. {54}
Round 10: ch, [sc 4, inc, sc 4] around, slst, turn. {60}
Round 11: ch, [inc, sc 9] around, slst, turn. {66}
Round 12: ch, [sc 5, inc, sc 5] around, slst, turn. {72}
Round 13 – 42: ch, sc around, slst, turn. {72}
Round 43: ch, sc, [ch 2, sk 2, sc 2] repeat 17 times, ch 2, sk 2, sc, slst, turn. {72}
Round 44 – 53: ch, sc around, slst, turn. {72}
Drawstring
With Red Yarn, crochet ch st until it is about 18 long. Fasten off.
Draw through the string at chain spaces created at Round 43 of the sack.
Make 2 knots at the ends, trim off excess loss yarn. You may put some glue to prevent the end from coming off.
GIFT BOXES CROCHET PATTERN
Abbreviations(In US Crochet Terms)
ch: chain
sc: single crochet
Crochet Tension (4″ x 4″): 22 sts x 24 rows
2″ x 2″ x 2″ Gift Box
With your choice of yarn color,
Base:
Row 1: ch 11, sc in the second ch from the hook, sc 9, turn. {10}
Row 2 – 12: ch, sc 10, turn. {10}
Continue to crochet the sides of the gift box by picking 10 sts from each side.
Sides:
Round 1 – 10: ch, sc 40, slst, turn. {40}
Continue to make the top flap.
Top:
Row 1 – 10: ch, sc 10, turn. {10}
Fasten off and leave a long tail for sewing.
Insert a 1.75″ x 1.75″ x 1.75 box into it and sew the Top flap to the edges of the side.
With gold yarn, crochet ch st until it is 24″ long, fasten off.
Tie the gift box.
You may adapt the pattern to create other sizes of gift boxes.
Note: the crochet box is always 0.25″ bigger than the insert.
Notes
Depending on the speed and hours you are spending on the project, the total time needed is only an approximation.
Stuff the parts firmly and densely to give your amigurumi doll a good shape.
You are allowed to crochet and sell Santa Claus Doll on small-scale production. However, you are not allowed to publish the patterns and pictures in any form without the prior written permission of Craft Passion.