
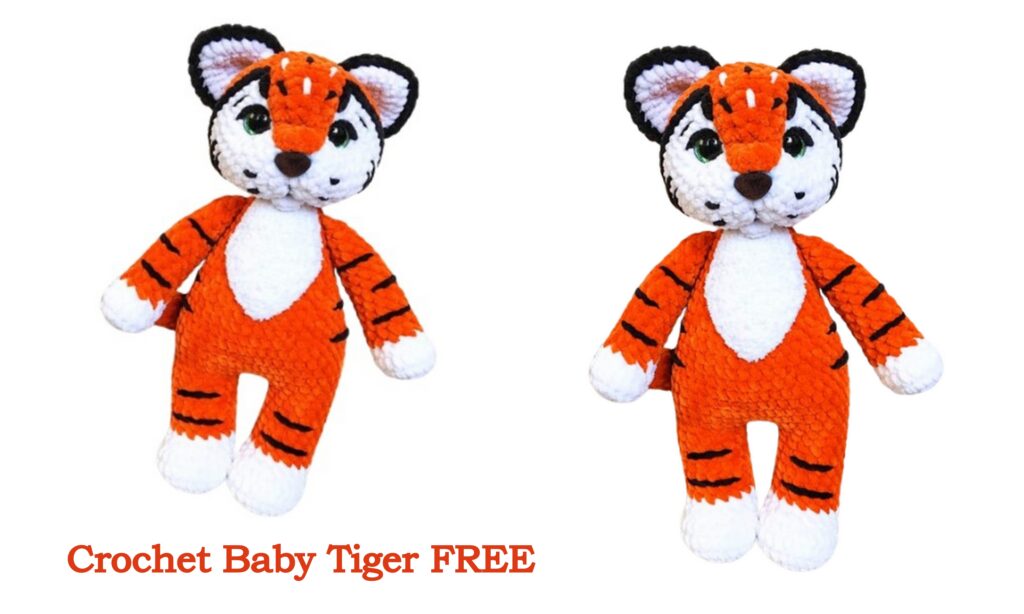
The finished size of the Crochet Baby Tiger will be 30 cm. Are you ready to create an adorable baby tiger amigurumi? Our Crochet Baby Tiger Amigurumi Free Pattern is the perfect project for both beginners and experienced crocheters.
This pattern provides step-by-step instructions to help you craft a charming and cuddly baby tiger. Whether you’re making this cute tiger as a gift for a child or as a unique addition to your collection,
I continue to share animal and doll models. You can be informed about new amigurumi patterns by following our website.
Crochet Baby Tiger Materials
• Plush yarn Himalaya Dolphin Baby 1-1.5 skeins of the main color and 0.5 skeins white and some black. Or any other yarn
• Alize Softy white yarn just a little bit for the throat
• Hook #4mm, #3.5mm or #4.5mm (I use #4)
• Hook No. 2.5mm for the throat
• A pair of 16mm glass eyes (if there are no glass eyes, you can use plastic)
• Black cotton thread
• Glue Moment CRYSTAL
• Spout 13*15mm
• Scissors
• Long needle
• Filler (holofiber, synthetic balls, etc.)
Amigurumi Abbreviations
MR: Magic ring
Ch: Chain
Sc: Single crochet
Hdc: Half double crochet
Dc: Double crochet
Slst: Slip stitch
Inc: Increase
Dec: Decrease
BLO: Back loop only
FLO: Front loop only
Crochet Baby Tiger- Head
(Thread color is additional (white), hook No. 4mm)
Rnd 1. 5ch, from the 2nd loop from the hook inc, 2sc, in the last loop 4sc, on the reverse side of the chain 2sc, inc (12sc)
Rnd 2. 2inc, 2sc, 4inc, 2sc, 2inc (20sc)
Rnd 3. (1sc, inc)*2, 2sc, (1sc, inc)*4, 2sc, (1sc, inc)*2 (28sc)
Rnd 4-5. 28sc (2 rows)
Rnd 6. (3sc, inc)*7 (35sc)
Rnd 7. 6sc , (we put two additional markers in the first sc of the first increase and in the last sc of the sixth increase: markers for the eye), 6 inc, 14 sc, inc, 8 sc (42 sc)
Rnd 8. (5sc, inc)*7 (49sc)
Rnd 9. 49sc
Rnd 10. 39sc, change thread to main thread, 10sc (49sc)
We do not crochet to the end of the row 10sc, we change the thread to the main one. We do this so that the color transition is at the bottom of the muzzle.
Rnd 11-13. 49sc (3 rows)
Rnd 14. (5sc, dec)*7 (42sc)
We fasten the eyes between 7 and 8 rows, where there are additional markers. We fasten the nose in the middle between 2 and 3 rows.
Rnd 15. 2sc, dec, (4sc, dec)*6, 2sc (35sc)
Rnd 16. (3sc, dec)*7 (28sc)
Rnd 17. 1sc, dec, (2sc, dec)*6, 1sc (21sc)
Rnd 18. (1sc, dec)*7 (14sc)
Rnd 19. 7dec
Cut the thread, close the hole, hide the tip.


Nose bridge
(Main thread color, hook No. 4)
Rnd 1. 6ch, from the 2nd loop from the hook 5sc, ch, turn (5sc)
Rnd 2. 5sc
Rnd 3. 2sc, dec, 1sc (4sc)
Rnd 4. 4sc
Rnd 5. 1sc, dec, 1sc (3sc)
Rnd 6. 3sc
Rnd 7. 1sc, dec (2sc)
Rnd 8. 2sc
Without a chain, we begin to tie the part. We tie on three sides (side, top, side), without tying the last 8th row. We make additions in the corners.
Cut the thread, fasten, hide the tip.
Sew on the bridge. We place the part between 10 rows (thread change) and 3 rows, up to the spout. We make a muzzle. We will need black plush thread, white plush thread, black cotton thread.
To begin with, we tie the muzzle with black plush, where the thread was changed. From the bridge of the nose, in both directions, we count 14 sc.
We tie the left side: 14 slst on the head and 3 slst on the bridge of the nose.
We tie the right side: 3 slst on the bridge of the nose and 14slst on the head.
We embroider eyelids with black plush, spots on the muzzle, spots on the bridge of the nose, stripes on the cheeks.
With black cotton we embroider the eyebrows and the middle between the cheeks.
We embroider spots on the bridge of the nose with white plush.
Mouth
(Thread color is white, hook No. 4mm)
Rnd 1. 2ch, in the 2nd loop from the hook 3 hdc, 2ch, sl st.
We cut the thread, leaving a long end for sewing.
Sew the mouth to the muzzle.


Crochet Baby Tiger- Ears
(Thread color is white, hook No. 4mm)
2 parts (inner eyelet)
Rnd 1. 5sc in MR, ch, turn
Rnd 2. 2sc, in one loop (sc, mpa, sc), 2sc, ch, turn (7sc)
Rnd 3. inc, 2sc, in one loop (sc, hdc, sc), 2 sc, inc (11sc)
Rnd 4. inc, 4sc, in one loop (sc, hdc, sc), 4sc, inc (15sc)
Cut the thread, fasten, hide the tip.
Similarly, we crochet the outer eye 2 parts hook No. 4, the color of the main thread.
We cut the thread, fasten it, hide the tip.
Put 2 pieces together. We apply the white part to the main part,
so that their vertices (sc, hdc, sc) coincide. We tie sc black
plush thread, at the top we crochet 3 sc in one loop.
Sew on the ears.
Crochet Baby Tiger- Tail
(Thread color is black, hook No. 4mm)
Rnd 1. 6sc in MR
Rnd 2. 6inc (12sc)
Rnd 3-4. 12sc (2 rows)
Change the thread to the main
Rnd 5. (4sc, dec)*2 (10sc)
Rnd 6-10. 10sc (5 rows)
Rnd 11. 8sc, dec (9sc)
Rnd 12-16. 9sc (5 rows)
We stuff the tail up to the 13th row
Rnd 17. 7sc, dec (8sc)
Rnd 18-20. 8sc (3 rows)
Fold the part in half and knit 4sc together. Cut the thread, hide the tip. We take a black plush thread and embroider stripes.
Legs and Body
(Thread color optional, hook No. 4mm)
Left leg
Rnd 1. 6sc in MR
Rnd 2. 6inc (12sc)
Rnd 3. (1sc, inc)*6 (18sc)
Rnd 4. (2sc, inc)*6 (24sc)
Rnd 5-6. 24sc (2 rows)
Rnd 7. 1sc, 6dec, 11sc (18sc)
Rnd 8. 2sc, dec, 1sc, dec, 5sc, (change thread to main thread), 6sc (16sc)
Rnd 9-15. 16sc (7 rows)
Rnd 16. Incomplete row, 8sc, slst.
Cut the thread, hide the tip. We crochet the second leg in the same way up to the 15th row inclusive. Here we start the body:
Rnd 16. (Right leg), 3sc, 2ch, connect the right leg to the left, crochet the sc in the sl st of the left leg. We continue to crochet on the left leg, 16sc, inc, 2sc in ch, inc, 13sc (40sc)
Crochet Baby Tiger PDF Amigurumi Free Pattern Tail 2
Rnd 17. (9sc, inc)*4 (44sc)
Rnd 18-19. 44sc (2 rows)
Rnd 20. We crochet a ponytail, 2sc, 4sc body + tail, 38sc (44sc)
Rnd 21. 44sc
Rnd 22. (9sc, dec)*4 (40sc)
Rnd 23-25. 40sc (3 rows)
Rnd 26. (8sc, dec)*4 (36sc)
Rnd 27-28. 36sc (2 rows)
Rnd 29. (4sc, dec)*6 (30sc)
Rnd 30-31. 30sc (2 rows)
Rnd 32. (3sc, dec)*6 (24sc)
Rnd 33-34. 24sc (2 rows)
Rnd 35. (2sc, dec)*6 (18sc)
Rnd 36. 18sc
We cut the thread, fasten it, hide the tip.
We sew on the head. We embroider stripes with black plush thread: on legs, on the sides, on the back.


Arms (Make 2)
(Thread color optional, hook No. 4mm)
Rnd 1. 6sc in MR
Rnd 2. 6inc (12sc)
Rnd 3. (1sc, inc)*6 (18sc)
Rnd 4. 18sc
Rnd 5. 1sc, 4dec, 9sc (14sc)
Change the thread to the main
Rnd 6. 1sc, 2dec, 9sc (12sc)
Rnd 7-17. 12sc (7 rows)
Rnd 18. (2sc, dec)*3 (9sc)
We fill the part in half. We fold our part in half and crochet 4sc for both walls (together) – for the right handle. For the left, crochet 1sc additionally, also fold in half and crochet 4 sc together. We embroider stripes of black plush.
Crochet Baby Tiger- Chest
(Thread color is white, Alize Softy yarn, hook No. 2.5mm)
We crochet in rotary rows.
Rnd 1. 10ch, from the 2nd loop from the hook 9sc, ch, turn
Rnd 2-3. 9sc (2 rows)
Rnd 4. inc, 7sc, inc (11sc)
Rnd 5. 11sc
Rnd 6. inc, 9sc, inc (13sc)
Rnd 7-10. 13sc (4 rows)
Rnd 11. dec, 9sc, dec (11sc)
Rnd 12. 11sc
Rnd 13. dec, 7sc, dec (9sc)
Rnd 14. 9sc
Rnd 15. dec, 5sc, dec (7sc)
Rnd 16. 7sc
Rnd 17. dec, 3sc, dec (5sc)
Rnd 18. dec, 1sc, dec (3sc)
Rnd 19. dec from 3sc
Next, we tie sc in a circle, making increments on the turns. Leave a long end for sewing.
Sew on chest and arms.
Congratulations on completing your adorable baby tiger amigurumi! We hope you enjoyed following this Crochet Baby Tiger Amigurumi Free Pattern and found the process both fun and rewarding. Your handmade baby tiger is a delightful addition to any toy collection and a perfect gift for loved ones. Share your finished baby tiger with friends, family, and fellow crochet enthusiasts. If you enjoyed this Crochet Baby Tiger Amigurumi Free Pattern, be sure to check out our other free crochet patterns for more creative and fun projects. Happy crocheting!