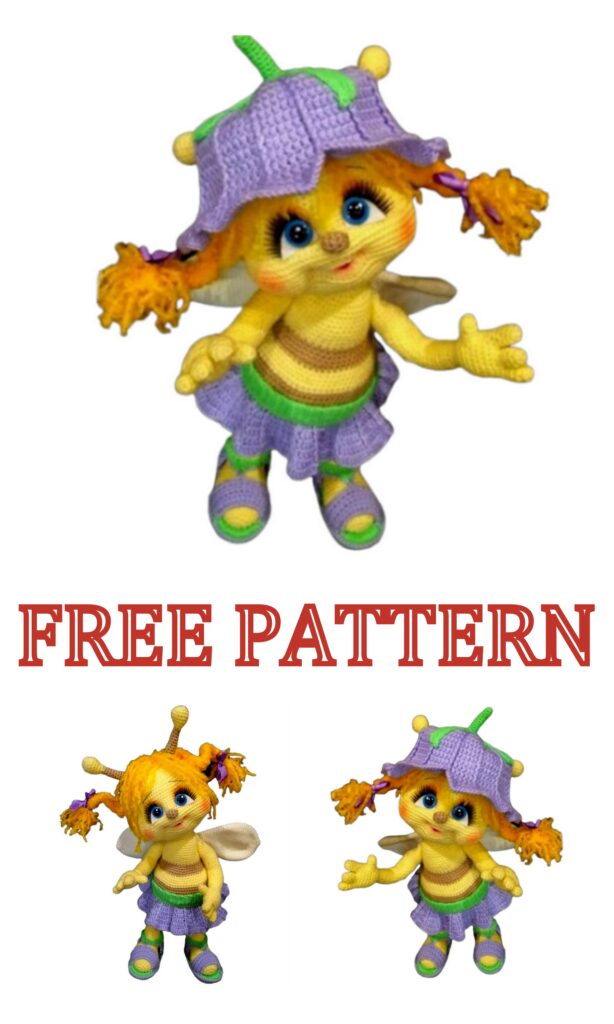
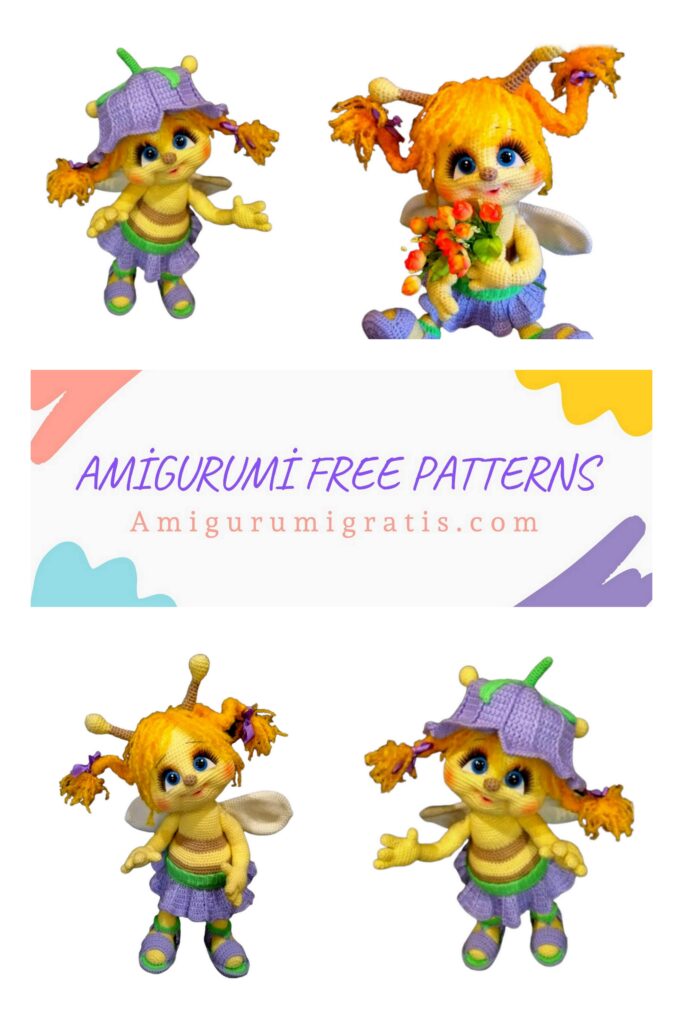
You can browse our website for Amigurumi Bee Doll free pattern and more free patterns.
This master class does not contain crochet lessons. Shoes – a description of the sole and an approximate description of how to knit is given, without an exact calculation of rows and columns.
Necessary materials
For the body of the bee – yarn ALIZE Sekerim Bebe tone 552 and 137
For clothes – KAMTEX yarn Caramel, tone 15 and 44
For wings – KAMTEX yarn Caramel tone 02
1. Yarn of the main color – 100 g (330 m in 100 g)
2. Yarn of additional colors – brown 30 g, white 40 g, lilac 60 g, green 30 g.
3. Hook for your yarn
4. Plastic eyes – diameter 18 mm
5. White felt and eyelashes
6. Transparent glue
7. Any wire – about 1 m
8. Dry pastel or eyeshadow
9. Hard plastic or cardboard
10. Any filler for toys
11. Satin ribbon – about 0.5 m
12. Thin floristic wire – 2 pcs.
13. Black floss
Abbreviations
SC-single crochet
HDC – half double crochet
DC-column with one crochet
SL-ST-connecting post
CH-air loop
PROP- skip
İNC – increase
DEC- decrease
3 in1 – knit three sc in one loop
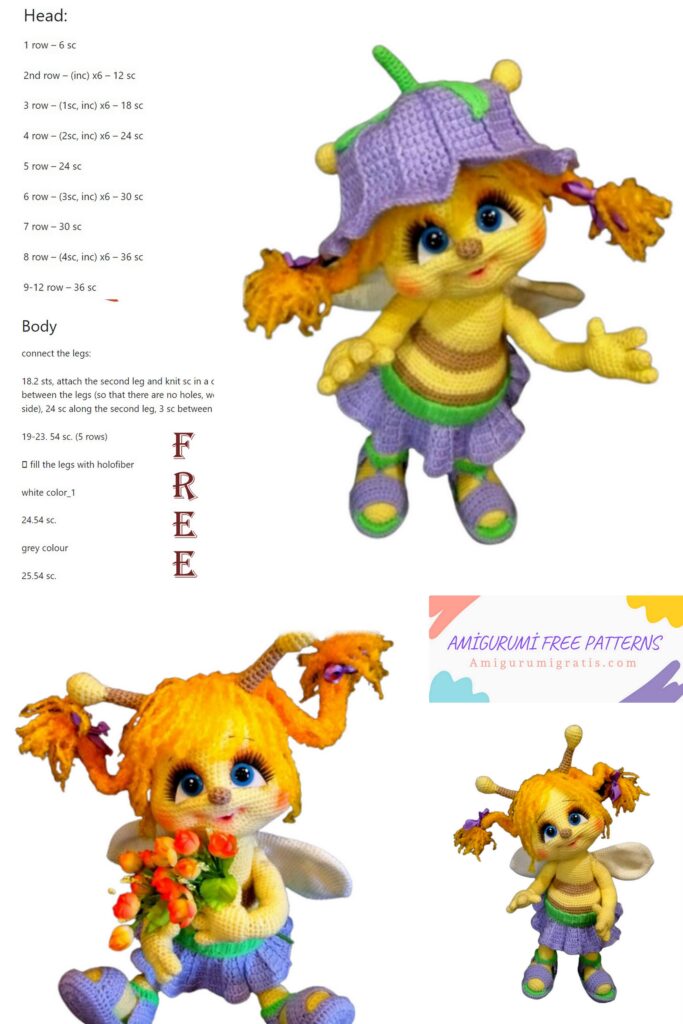
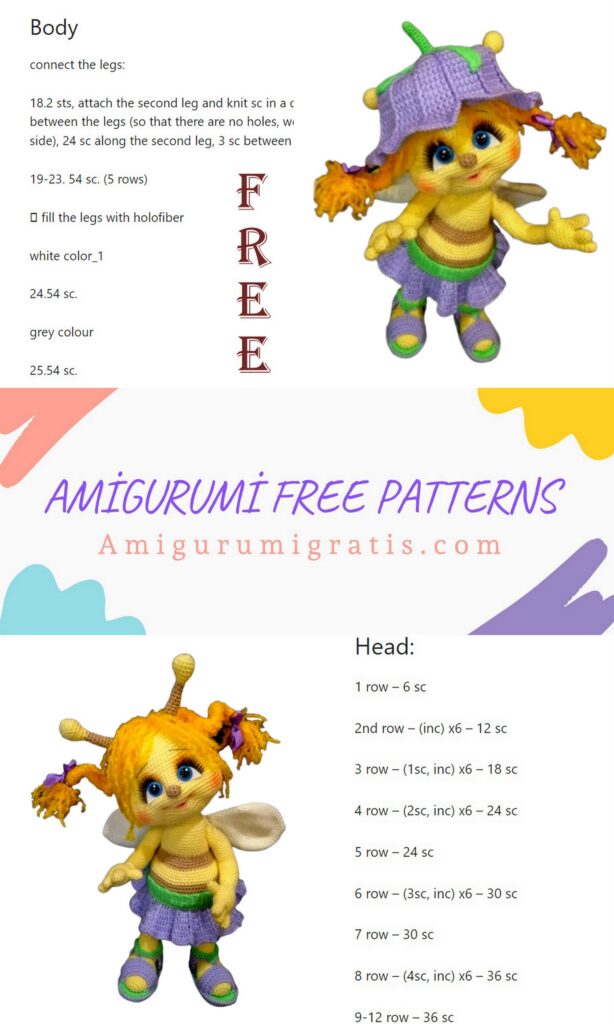
Head
1.6 sc. into magic ring
2.6 inc. – 12
3. (1 sc. Inc.) * 6-18
4. (2 sc. Inc.) * 6-24
5. (3 sc. Inc.) * 6-30
6. (4 sc. Inc.) * 6- 36
7. (5 sc. Inc.) * 6- 42
8. (6 sc. Inc.) * 6- 48
9. (7 sc. Inc.) * 6- 54
10.54 sc
11. (8 sc. Inc.) * 6-60
12. (9 sc. Inc.) * 6-66
13-21 rows – 66 sc each
22.18 sc. 6 inc. 18 sc. 6 inc. 18 sc- 78
23.78 sc
24.18 sc. (1 sc. Inc.) * 6. 18 sc. (1 sc. Inc.) * 6. 18 sc- 90
25-28 rows – 90 sc each
29.40 sc. 10 ch. (10 sc. Prop.) 40 sc- 90
30-31 rows – 90 sc each
32.18 sc. (1 sc. Dec.) * 6. 18 sc. (1 sc. Dec.) * 6. 18 sc- 78
33.18 sc. 6 dec. 18 sc. 6 dec. 18 sc- 66
34.66 sc
35. (9 sc. Dec.) * 6-60
36. (8 sc. Dec.) * 6- 54
37. (7 sc. Dec.) * 6-48
38. (6 sc. Dec.) * 6-42
38. (5 sc. Dec.) * 6- 36
40. (4 sc. Dec.) * 6-30
41. (3 sc. Dec.) * 6-24
42. (2 sc. Dec.) * 6-18- fill
Rotik
For the back loops of the 29th row
1-3 rows – 20 sc each
4. (3 sc. Dec.) * 4-16
5.16 sc
6. (2 sc. Dec.) * 4-12
7-8 rows – 12 sc
9.6 dec. – tie sl-st
Tuck into the main part of the head.
Antennae
Let’s start yellow
1.6 sc. into magic ring
2.6 inc. – 12
3. (3 sc. Inc.) * 3-15
4-6 rows – 15 sc each
7. (3 sc. Dec.) * 3-12
8.6 dec.- 6
9.changing the color – 6 sc. – 6
10.6 sc
11. inc. 5 sc- 7
12-14 rows – 7 sc each
15.6 sc. inc. – 8
16-18 rows – 8 sc each
19. inc. 7 sc- 9
20.8 sc. inc. – ten
21.10 sc. – fill
Leave thread for sewing
Body
Let’s start yellow
1.3 sc. into magic ring
2.3 sc
3.3 inc. – 6
4.6 sc
5. (1 sc. Inc.) * 3- 9
6. (2 sc. Inc.) * 3-12
7. (3 sc. Inc.) * 3-15
8.15 sc
9. (4 sc. Inc.) * 3-18
10. (5 sc. Inc.) * 3-21
11. (6 sc. Inc.) * 3-24
12.24 sc
13. (7 sc. Inc.) * 3- 27
14. (8 sc. Inc.) * 3-30
15.1 sc. (6 sc. Inc.) * 4. 1 sc- 34
16. 1 sc. (7 sc. Inc.) * 4. 1 sc- 38
17.38 sc
18.1 sc. (8 sc. Inc.) * 4. 1 sc- 42
19. (5 sc. Inc.) * 7- 49
20. (6 sc. Inc.) * 7- 56
21. change the color – 56 sc- 56
22. (7 sc. Inc.) * 7- 63
23.63 sc
24. (8 sc. Inc.) * 7- 70
25. (34 sc. Inc.) * 2- 72
26. (11 sc. Inc.) * 6 – 78
Change the color to yellow
27-31 rows – 78 sc each
Change to brown
32-35 rows – 78 sc each
36. (11 sc. Dec.) * 6- 72
Change to yellow
37. (10 sc. Dec.) * 6-66
38.66 sc
39. (9 sc. Dec.) * 6-60
40.60 sc
41. (8 sc. Dec.) * 6- 54
Change to brown
42.54 sc
43. (7 sc. Dec.) * 6- 48
44.48 sc
45. (6 sc. Dec.) * 6- 42
46. (5 sc. Dec.) * 6- 36
Change to yellow
47.36 sc
48. (5 sc. Inc.) * 6-42
49. (6 sc. Inc.) * 6- 48
50-57 rows – 48 sc each
58. (2 sc. Dec.) * 12-36
59.18 dec. – eighteen
60-62 rows – 18 sc each
Stuff, insert the wire and bring it into the neck, while leaving 10-12 cm free for attaching the head.
Wings
2 details
1.6 sc. into magic ring
2.6 sc
3.6 inc. – 12
4. (1 sc. Inc.) * 6-18
5. (2 sc. Inc.) * 6-24
6. (3 sc. Inc.) * 6-30
7. (4 sc. Inc.) * 6- 36
8. (5 sc. Inc.) * 6- 42
9.42 sc
10. (6 sc. Inc.) * 6- 48
11-17 rows – 48 sc each
18. (6 sc. Dec.) * 6-42
19.42 sc
20. (5 sc. Dec.) * 6- 36
21-22 rows – 36 sc each
23. (4 sc. Dec.) * 6-30
24.30 sc
25. (8 sc. Dec.) * 3- 27
26.27 sc
27. (7 sc. Dec.) * 3- 24
28.24 sc
29. (6 sc. Dec.) * 3-21
30.21 sc
31. (5 sc. Dec.) * 3-18
32-33 rows – 18 sc each – do not fill, steam with an iron
Legs
1.6 sc. into magic ring
2.6 inc. – 12
3. (1 sc. Inc.) * 6-18
4. (2 sc. Inc.) * 6-24
5. (3 sc. Inc.) * 6-30
6-8 rows – 30 sc each
9. (13 sc. Dec.) * 2- 28
10.28 sc
11. (12 sc. Dec.) * 2-26
12. (11 sc. Dec.) * 2- 24
13.24 sc
14. (10 sc. Dec.) * 2- 22
15. (9 sc. Dec.) * 2-20
Further turning rows
16.12 sc. ch. turn.
17.12 sc. ch. turn.
18.12 sc. ch. turn.
19.dec. 8 sc. dec. ch. turn.
20.10 sc. ch. turn.
21. dec. 6 sc. dec. ch. turn.
22. dec. 4 sc. dec. ch. turn.
We cast on the sides – 4 sc each, (2 sc. Dec.) * 2 – along the toe, on the heel – 1 sc.
dec. 1 sc. dec. – eighteen
23-29 rows – 18 sc
30. (1 sc. Dec.) * 6-12
31.12 sc
32. (2 sc. Inc.) * 4-16
33-37 rows – 16 sc each
38.6 sl-st (back), 3 sc. 3 inc. 4 sc- 19
39-40 rows – 19 sc each
41.10 sc. dec. 3 sc. dec. 2 sc- 17
42-44 rows – 17 sc each
Fill. We insert the wire, find the center in the 20th row of the body and retreat from the center by 7-8 sc in both directions. We mark the attachment points of the legs. Using a hook or any other object, we make holes and insert the ends of the wire into them, pull them through the entire part and bring them out into the neck. We sew the legs to the body. Photo on page 14.
Pens
We start with the fingers.
8 pcs.
1.6 sc. into magic ring
2.inc. 5 sc- 7
3-5 rows – 7 sc – on every 4th thread, do not cut
We connect in the palm
1.4 sc. on the first (on which the thread was not cut), 4 sc. on the second, 7 sc. on the third, 3 sc. on the second from the other side, 3 sc. on the first – 21 – put a marker
2-4 rows – 21 sc each
5 row for one hand – 2 sc. (finger and palm together), 18 sc. 1 sc (finger and palm together) – 21
5 row for the other hand – 2 sc. (3 sc. On the finger and palm together), 16 sc-21
6 row for one hand – 2 sc. (on the finger), 18 sc. 2 sc. (on the finger) – 22
6 row for the other hand – 2 sc. 4 sc. (on the finger), 16 sc- 22
7-8 rows – 22 sc each
9.11 dec. -eleven
10.11 sc
11. inc. 3 sc. inc. 2 sc. inc. 3 sc. – 14
12-13 rows – 14 sc each
14. inc. 13 sc- 15
15-21 rows – 15 sc each
22.7 sc. inc. 8 sc. – 16
23-26 rows – 16 sc each
27. inc. 15 sc- 17
28-34 rows – 17 sc each
35 for one hand – 4 sc. 3 dec. 7 sc- 14
35 row for other hands – dec. 11 sc. 2 dec. – 14
36.7 dec. – fill, insert the wire
Assembly and design
We knit a nose – in brown
1.6 sc into magic ring
2. (1 sc. Inc.) * 3
From the upper lip we go up 4 rows and sew the nose exactly in the center above the lip.
We find the 22nd row from the beginning of the knitting of the head – mark in this row the extreme increases to the center.
From them, count 4 sc to the center and go up one row – mark these points with pins – these are points 1 and 2.
Points 3 and 4 – corners of the mouth
Through the neck, insert the needle at point 1, grab 1-2 sc and return back to the neck. Repeat the same for point 2.
We again insert the needle at point 1 and output at point 4 (thread inside the part), grabbing near point 4 – 1- 2 sc
Return to point 1 and tighten well. We repeat in the same way for points 2 and 3. If the smile line does not suit you, repeat the tightening again.
Use a wide blush brush to lightly tint the area around points 1 and 2 with brown pastel or eyeshadow.
Rouge the cheeks and tint the mouth with pink pastels.
Attach your eyes, if you are satisfied with the expression on your face – glue them with transparent glue. Embroider eyebrows above the eyes, in black floss.
Sew on the antennae – in the 6th row from the spacecraft. Between them 14 sc.
For the braids, I used yarn from KAMTEX Fantasy tone 104.
The fastening method is the simplest – cut, threaded and tied. This
yarn is ideal for hair and knots are not visible at all.
Well, and how to weave pigtails – everyone knows, here we need a floral wire – weave it into braids and cut off the extra ends. Tie ribbons to match your bee’s outfit.
We also insert a wire into the wings, we put its ends into the body and sew in the center of the back.
It remains to sew handles.
Step 9 rows down from the end of the body knit and sew on the handles with a thread or button fastening.
Bell cap
We start each row with 2 ch. lifting.
1.12 dc into magic ring
2. in each loop of the row we knit – 1 dc. 1 embossed convex column, (hereinafter RVS) – in total we get 24 columns
3. in this row and further under the relief posts we knit embossed ones, under the usual ones – the usual ones – (inc. From dc.) Рвс) * 12-36
4. (1 dc. Inc. Pvs.) * 12-48
5. (2 dc. Inc. Rvs.) * 12-60
6. (3 dc. Inc. Pvs.) * 12- 72
Rows 7-13 – 5 dc. rvs-72
14. (inc. 3 dc. Inc. Pvs.) * 12 – 96
15. (inc. 2 dc. Inc. 2 dc. Inc. (Sc. Instead of pvs.)) * 12 – 132
16. (inc. 3 dc. 2 inc. 3 dc. Inc. Sc.) * 12 – 180
When knitting 5 or 6 rows – make holes for antennae (in which row to make holes depends on where you have them sewn)
Stalk
In green
1.6 sc into magic ring
2-5 rows – 6 sc each
6. inc. 5 sc. – 7
7-9 rows – 7 sc each
10. inc. 6 sc.- 8
11-13 rows – 8 sc each
14. inc. 7 sc- 9
15. (2 sc. Inc.) * 3-12
16. (1 sc. Inc.) * 6-18
17. (2 sc. Inc.) * 6-24
18. (3 sc. Inc.) * 6 – 30
19.15 ch. 3 sc. 9 hdc. 2 dc. sc. 5 sc – repeat 5 times in a circle.
Fill the top of the part a little and sew to the cap.
Skirt
We start knitting in green with an elastic band – only for the back loops.
7 ch. – behind the back loops 6 sc. ch. turn. – continue knitting until the desired waist circumference of your toy.
My clothing sizes may not match yours, make adjustments if necessary.
1. close the elastic in a circle and type 60 sc on it. – 60
2.for back loops – (1 sc. Inc.) * 30 – 90
3.changing the color – 90 dc- 90
Next, we knit according to the principle of knitting a hat.
4.1 dc. inc. rvs. – to the end of the row
5.2 dc. inc. rvs. – to the end of the row
6.4 dc. rvs.- to the end of the row
7. inc. 2 dc. inc. rvs. – to the end of the row
8.2 dc. 2 inc. 2 dc. sc.- until the end of the row
The spoon
1.6 sc. into magic ring
2.6 inc. – 12
3.12 sc
4. (1 sc. Inc.) * 6-18
5. (5 sc. Inc.) * 3-21
6. (6 sc. Inc.) * 3-24
7-11 rows – 24 sc each
12. (2 sc. Dec.) * 6-18
13. (1 sc. Dec.) * 6-12
14. (2 sc. Dec.) * 3-9
15th and subsequent rows – 9 sc each, up to the handle length you need.
Insert wire.
Sandals
Starting with the sole – 4 pieces
Two green and two lilac
1.17 ch. in the 3rd loop from the hook – 7 sc. 7 dc. 7dc in the last loop, on the other side of the chain – 7 dc. 7 sc.
2.4 sc. in one loop, 3 ch. and here is 1 dc. , 14 dc. (5 inc. Of dc), 16 dc. 3 dc. in 1, 4 dc. at 1., 3 dc. in 1, sl-st.
3.3 ch. 16 dc. inc. 1 dc. inc. 1 dc. 3 dc to 1.3 dc. in 1 . 1 dc. inc. 1dc. inc. 16 dc. 1 dc. inc. 1 dc. inc. 2 dc to 1.2 dc. in 1.1 dc. inc. 1 dc. inc. sl-st.
Take the green piece – fold it in half and mark the center column. Then place the sole against the bee’s leg and decide where your toe will begin. Count the required number of stitches from the center loop and attach a working thread as you knit.
Tie the number of rotary rows you need and sew on the toe on the other side of the sole – for those who can handle it, you can attach it immediately when knitting.
Attach the sandal to the leg again and decide where your heel will be – mark these posts with markers. Work the first row sc – from marker to marker, in the second and subsequent rows, make one decrease at the beginning of the row. Knit to the height you want.
On one sandal – continue knitting and cast on 7 ch. , find the center column on the toe and knit 1 sc into it, then cast on another 10 ch. – cut the thread. Attach yarn in a contrasting color and tie chains from ch. dc. by making three decreases at the junction ch. And a toe in the center.
On the second sandal, the fastener should be on the other side, so cut the thread. Dial 10 ch. , connect to the toe and continue typing ch. – 7. Now join the outer heel row. And also strap dc.
Now cut out the insole, insert it between 2 different colored sole pieces and connect in a circle sc.
Make buttonholes and sew on buttons.
You can sew on Velcro instead of buttons.
All! The bee is ready!