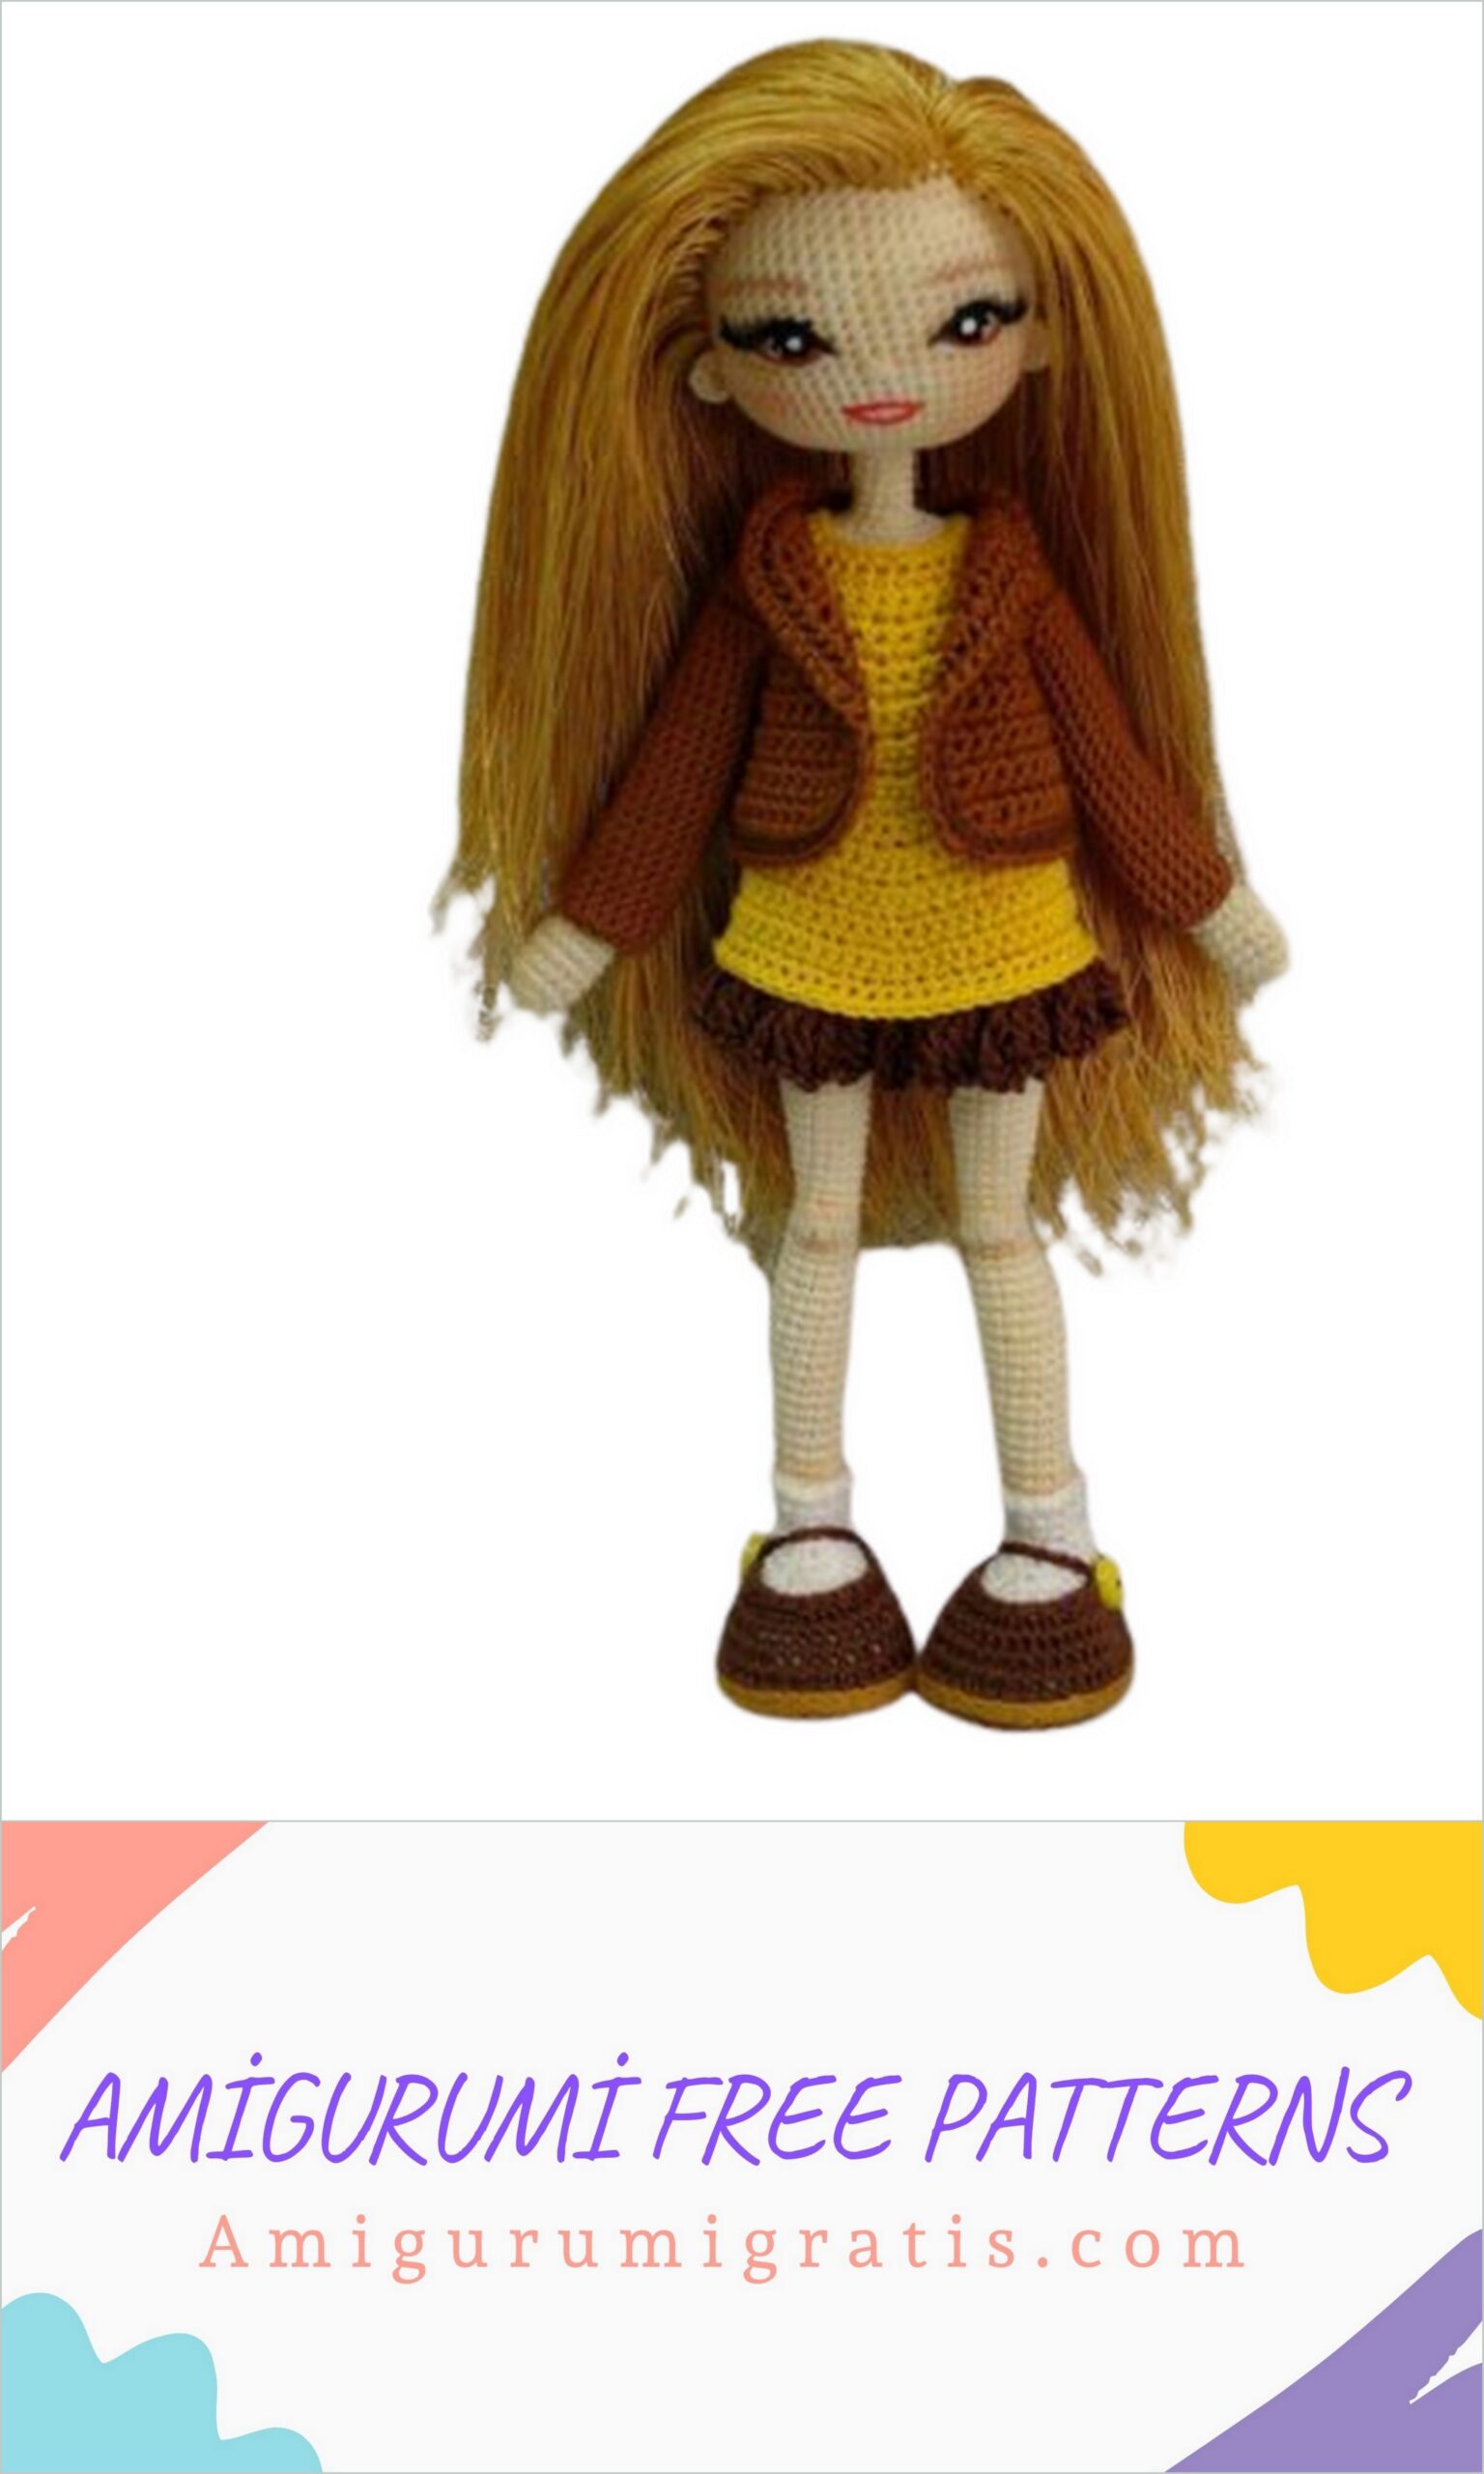
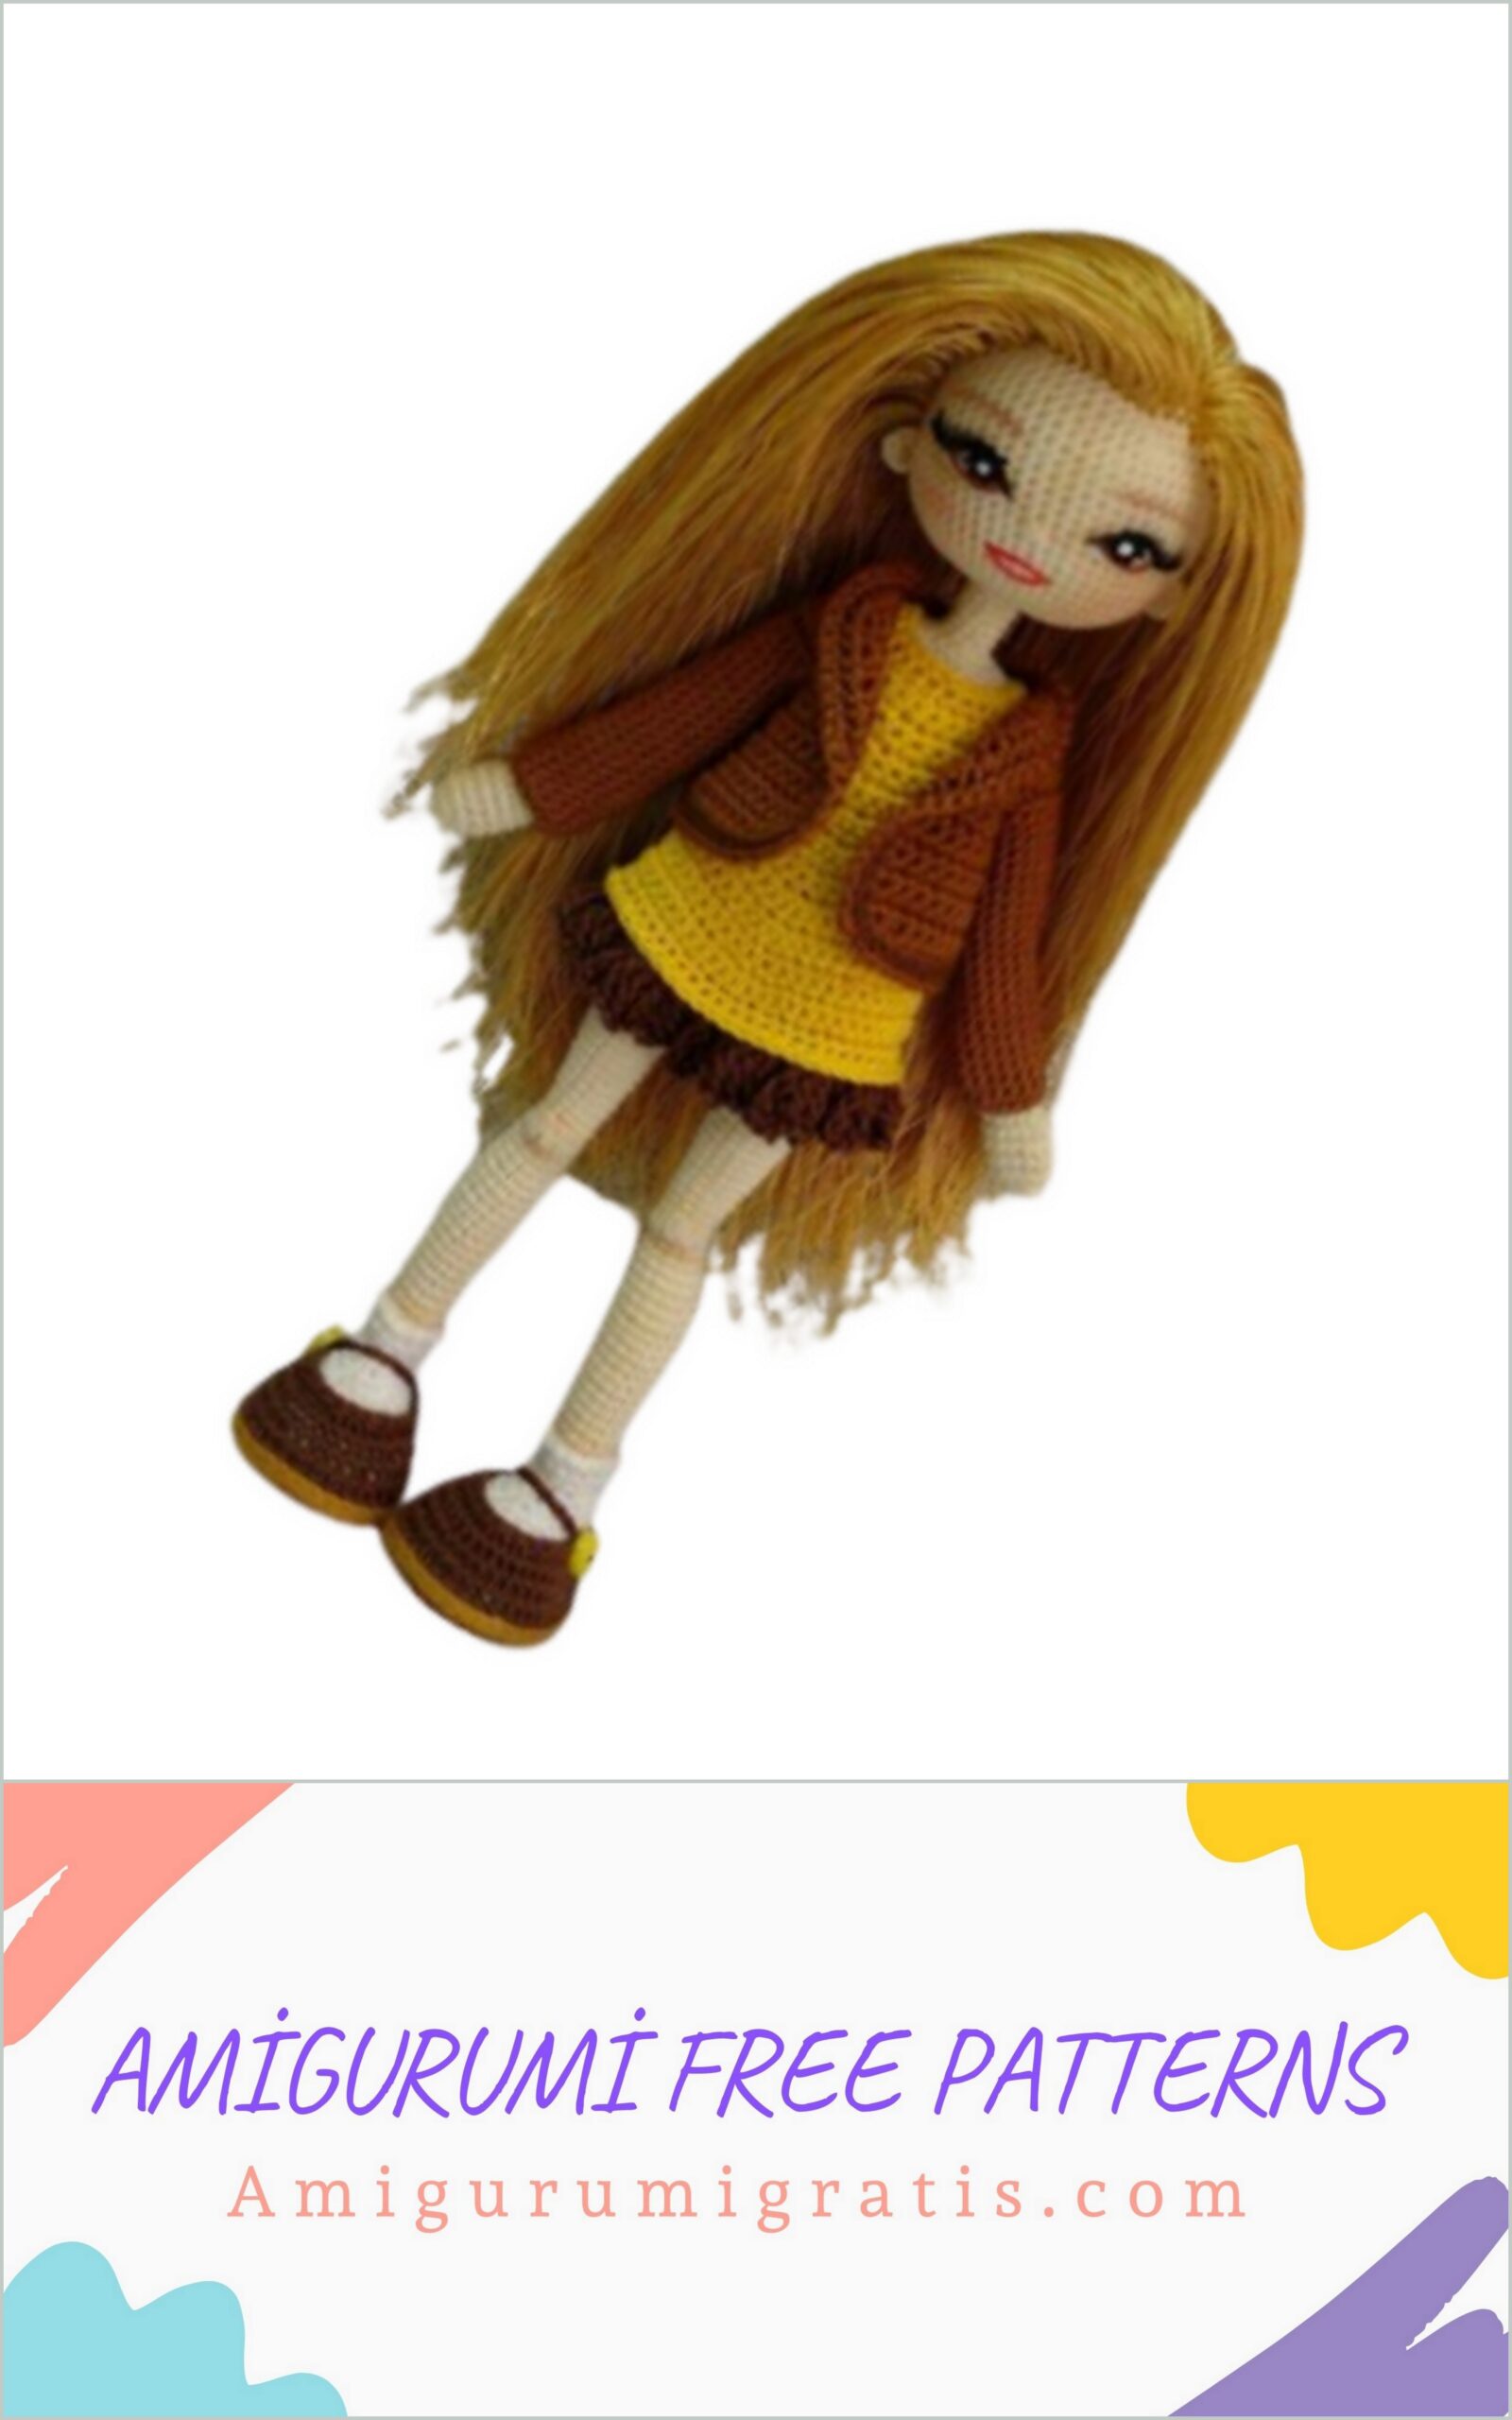
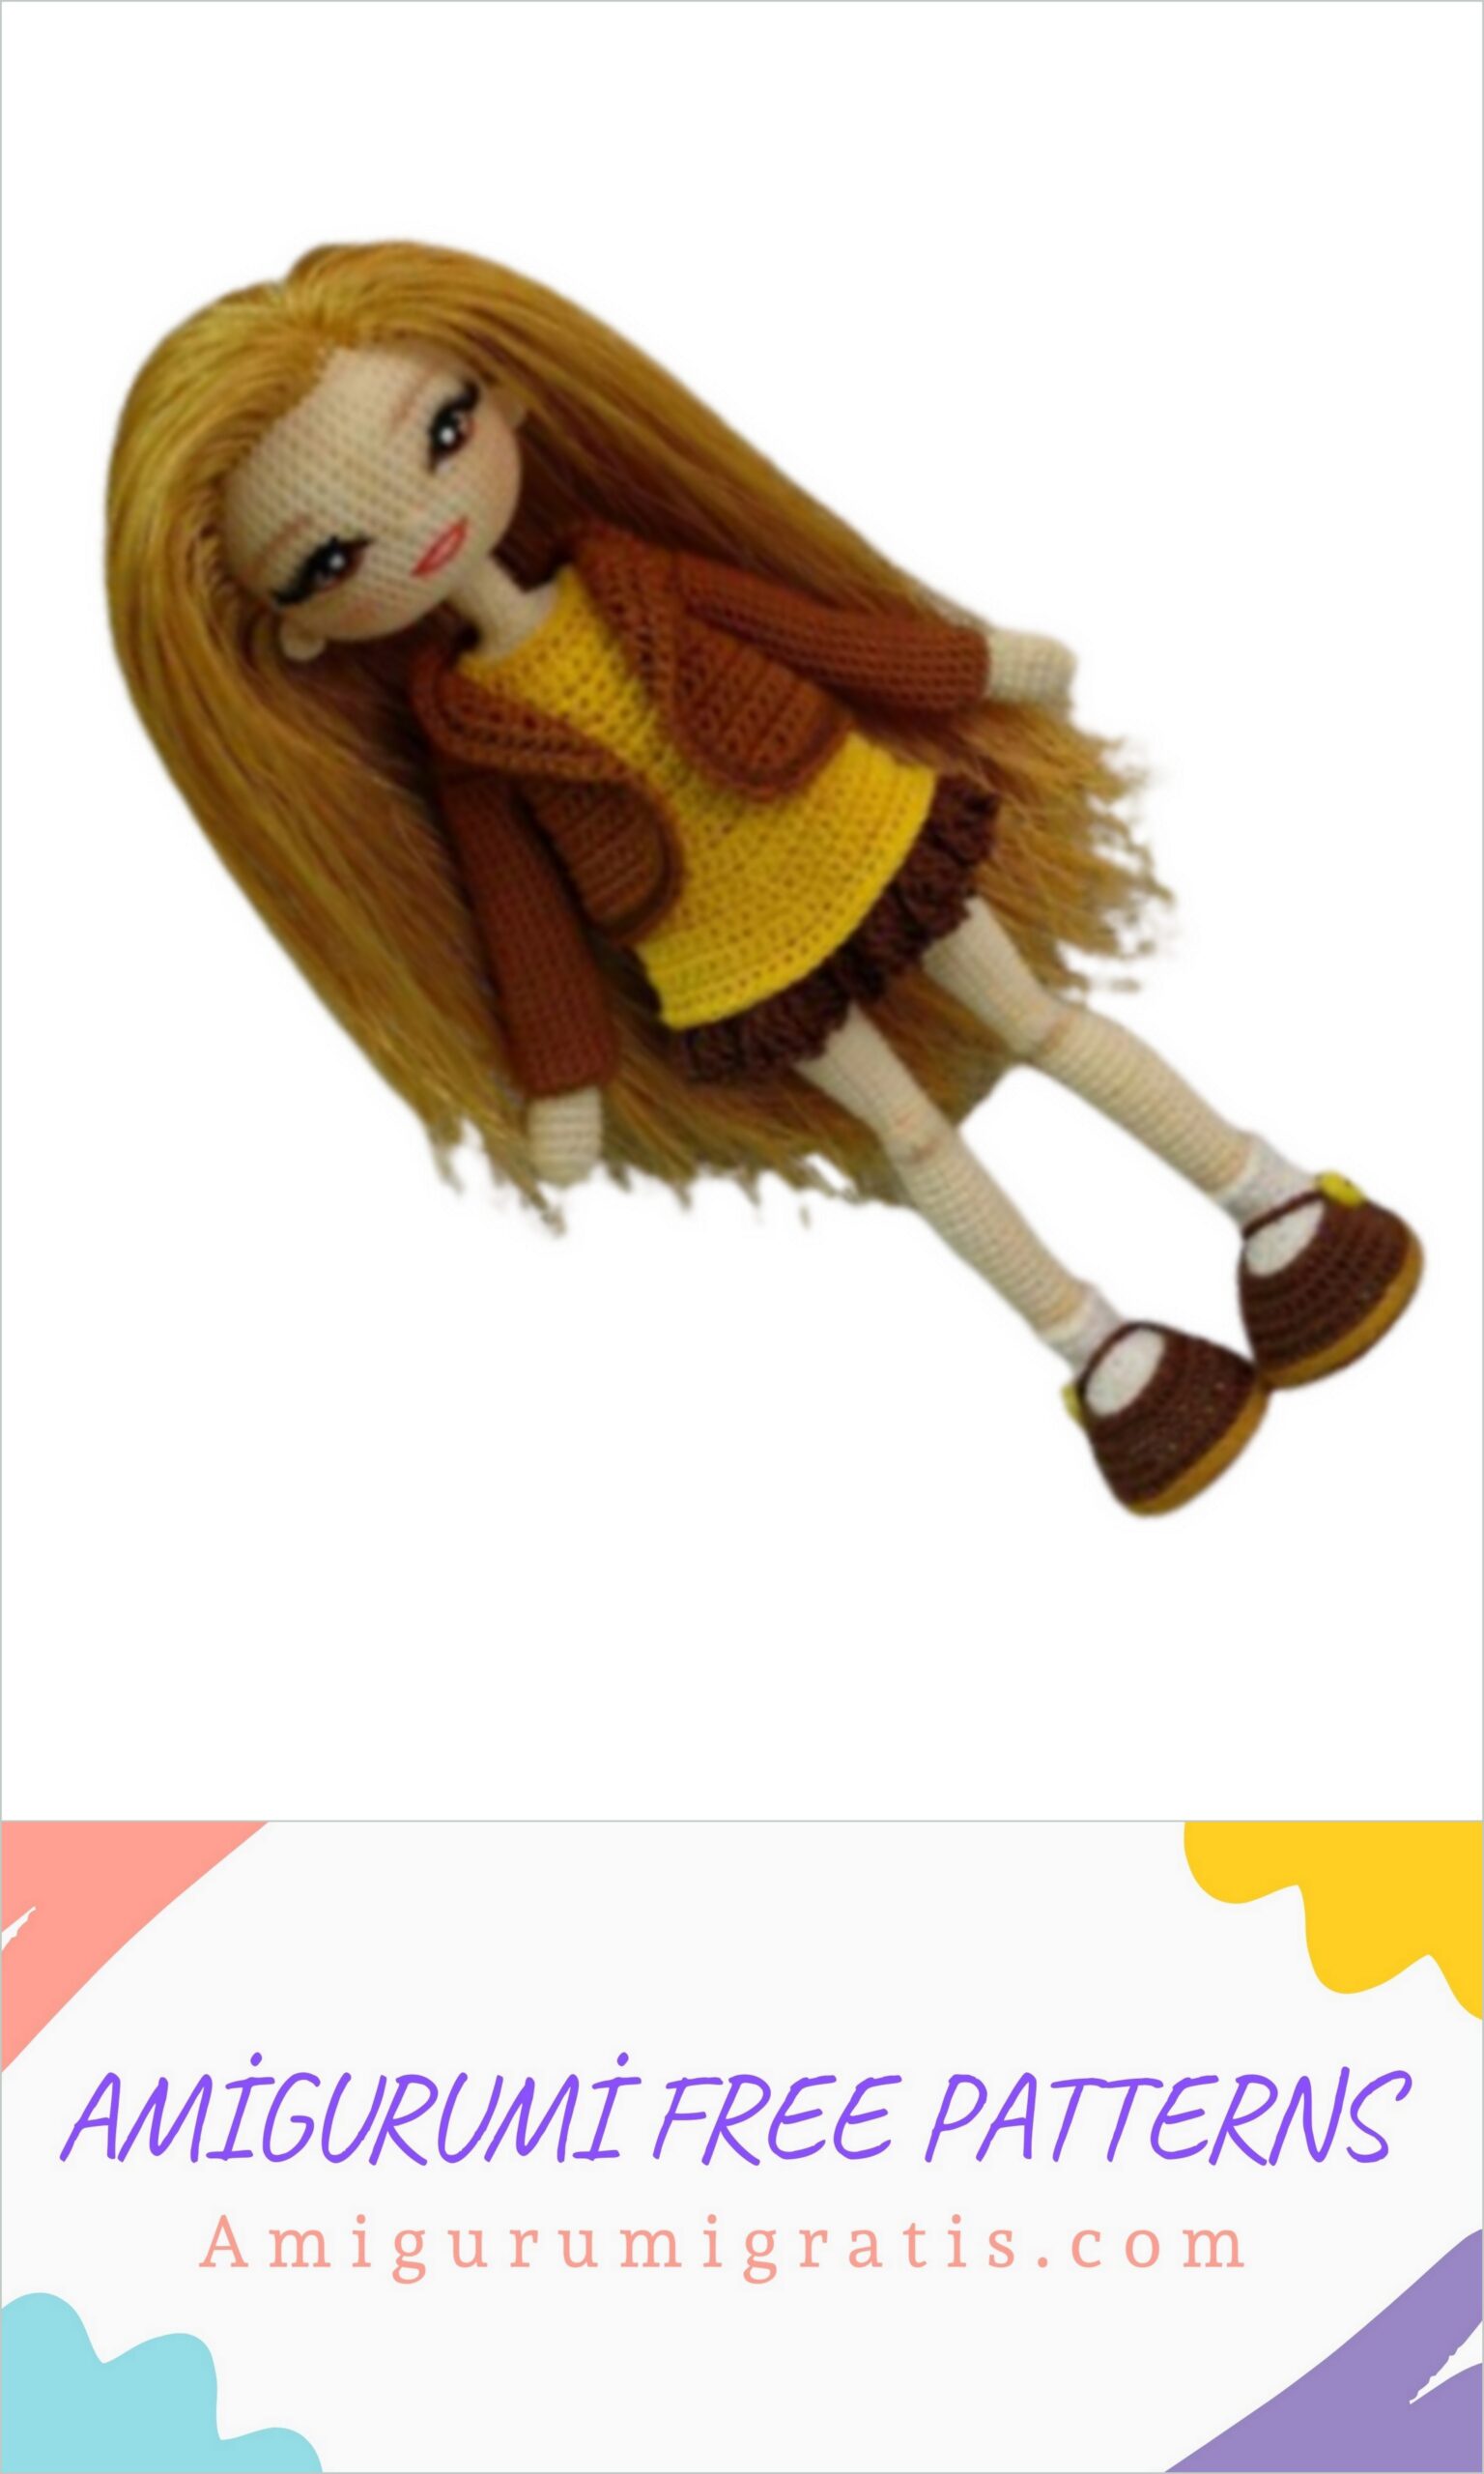
The materials necessary to create a doll, I knit a pelican from Vita yarn, also you can use yarnart violet (alize miss, alize forever, pekhorka openwork, vita daisy)
Copper wire for the frame, preferably 1.5 mm winding in cross section
Filler
Floss for peephole
Fine hair yarn (I use silk threads for machine embroidery)
hook 0.75-1
plastic for insole
Filler
Legend
sc – single crochet
ch – air loop
inc – increase
dec – decrease
hdc double crochet
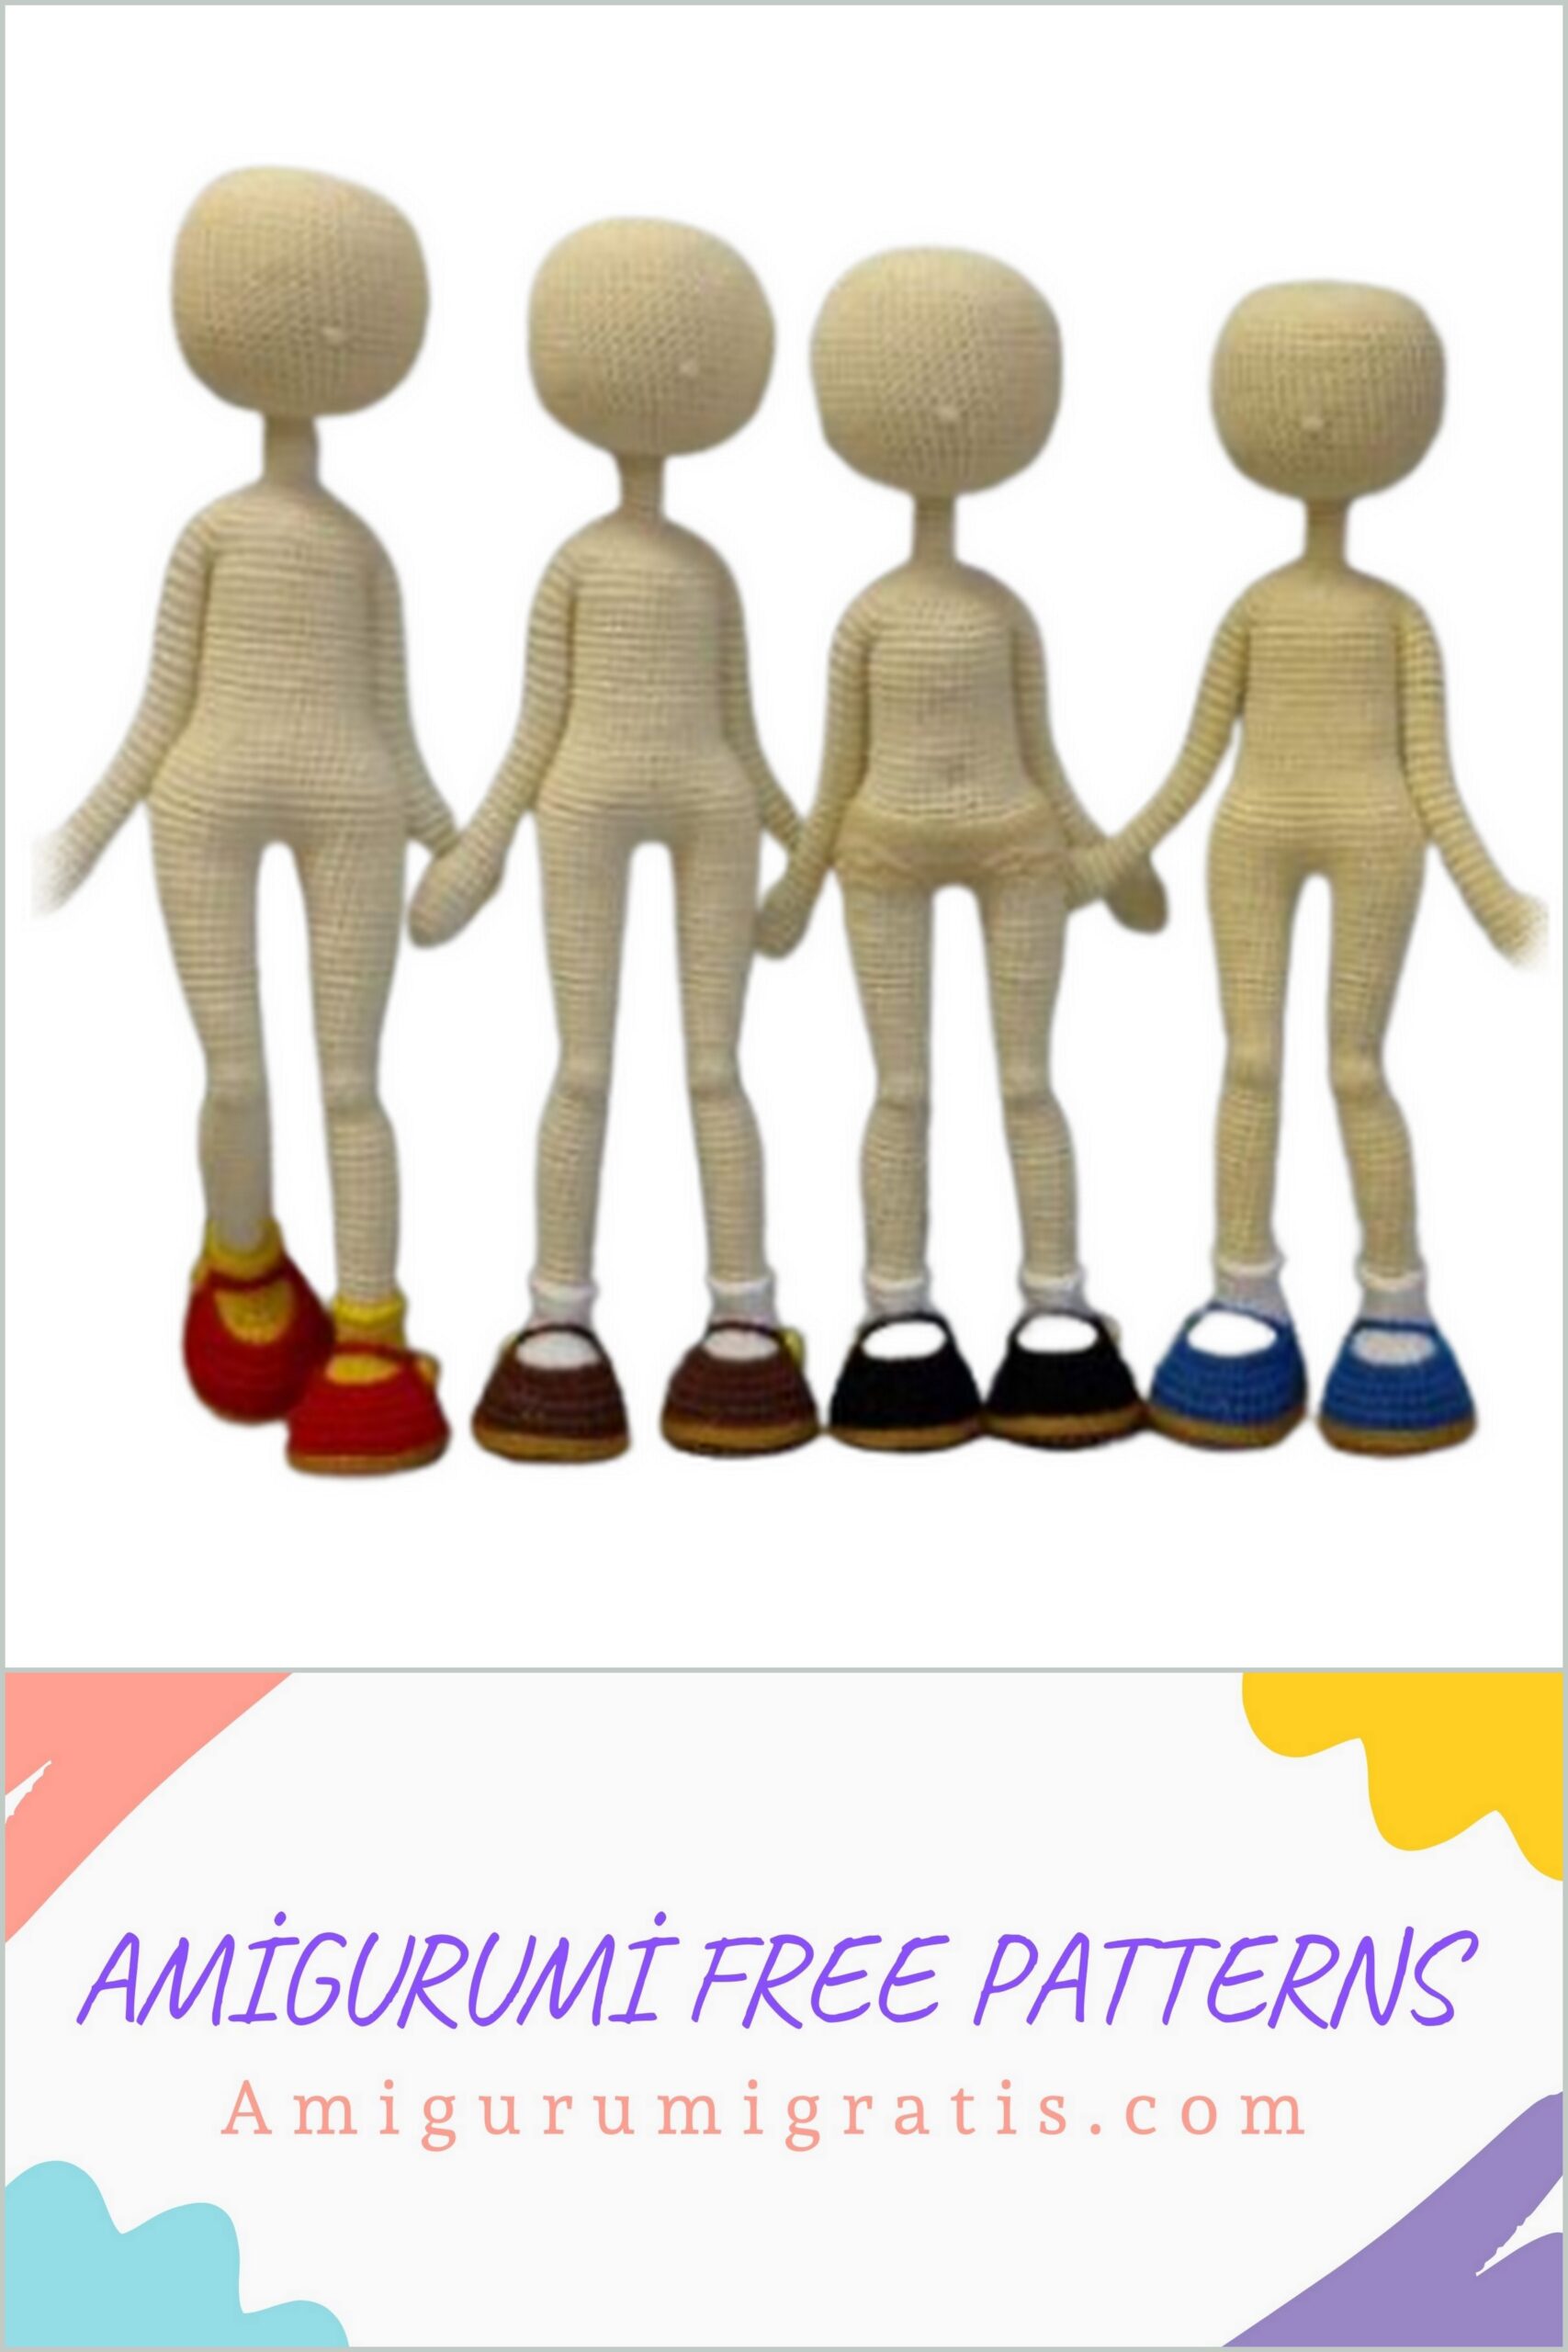
Hands knit 2 parts in a circle, without a lifting loop
1/6 sc in ring
2/6 inc
3-5 / 12 sc
6 / inc (3 hdc in one loop), 11 sc
7 / dec of 3 x sc, 11 sc
8 / dec of 3 x sc, 9 sc
9-27 / 10 sc. + 4 sc, cut the thread, leaving a small piece of thread for sewing
hands to the body.
It is necessary to finish the row on the hands in the place where they will be sewn to the body, with the inside of the hand, leaving the thread to sew on.
We begin to knit from the left leg of the doll.
We knit in a circle without a lifting loop:
1/7 ch (sole color)
2 / In a circle in 2 sts along a chain of 5 sc, 5 sc in one extreme loop of the chain, then 4
sc in chain, 3 sc in one loop.
3 / inc, 4 sc, 5 inc, 4 sc, 3 inc.
4/6 sc, (inc, 1 sc) -5 times, 8 sc, inc, 1 sc.
5/9 sc, inc, 3 sc, inc, 3 sc, inc, 12 sc, offset start of row marker.
Color change. I do not cut the sole thread, leave it inside the work, then with it
I make out the edge of the sole (see photo)
At this stage, we cut out plastic insoles in the shape of the sole, I make them here this form, mirror (see photo)
6-10 / 35 sc. (5 rows) in shoe color.
Now you need to insert the insole and arrange the edge of the sole (see photo)
Then, behind the back wall of the loop of the previous row, I knit socks with white yarn, thread we do not cut the shoes, we leave them before work.
When you tie the socks, tie the edge of the shoe with this thread, behind the front wall loops, in the same way as the first row of socks. With decreases.
11/9 sc, 8 dec, 10 sc and further by description
12/8 sc, 5 dec, 9 sc
13/8 sc, 3 dec, 8 sc
14/7 sc, dec, 1 sc, dec, 7 sc
15/6 sc, dec, 1 sc, dec, 6 sc
16 / for the back wall of the loop we knit in the main color (for the body), the white thread is not
cut it off, leave it before work, then we will tie it to the top of the socks,
5 sc, dec, 1sc, dec, 5 sc.
17/5 sc, dec, 6 sc.
Then we knit according to the description.
To knit the upper part of the socks, we knit by the front wall of the loop, white yarn three rows of 15 sc, in a circle, connecting the last loop, thread fix and hide inside the legs. And fill the toe of the shoe with filler, leaving
while the heel is free to make it easier to insert the loop of the frame


Doll’s left leg
18-21) 12 sc
22) inc, 11 sc
23-24) 13 sc + 1 sc (offset of the beginning of the row)
25) inc, 12 sc
26-27) 14 sc + 1 sc (offset of the beginning of the row)
28) inc, 13 sc
29-34) 15 sc
Now you can insert the wire for the frame and fill it with filler.
35) 2 dec, 11 sc,
36) dec, 11 sc + 1 sc (offset of the beginning of the row)
37) (knee) 4 sc, 4 inc double crochet, 4 sc
38) 4 sc, 4 dec, 4 sc
39) 12 sc
40) inc, 2 sc, inc, 8 sc
41-42) 14 sc
43) inc, 2 sc, inc, 10 sc
44-45) 16 sc + 1 sc (offset of the beginning of the row)
46) inc, 2 sc, inc, 12 sc
47-48) 18 sc. +2 sc (offset of the beginning of the row)
49) inc, 17 sc
50) 19 sc
51) inc, 18 sc
52) 20 sc + 1 sc (start of row offset)
53) inc, 19 sc
54-55) 21 sc, do not tie the last row to the end, (we find visually the middle
the inner side of the thigh, at this point we end the row).
Doll’s right leg
18-21) 12 sc
22) inc, 11 sc
23-24) 13 sc +1 sc (row start offset)
25) inc, 12 sc
26-27) 14 sc + 1 sc (offset of the beginning of the row)
28) inc, 13 sc
29-34) 15 sc
Now you can insert the wire for the frame and remind the filler.
35) 2 dec, 11 sc,
36) dec, 11 sc
37) (knee) 4 sc, 4 inc double crochet, 4 sc
37) 4 sc, 4 dec, 4 sc
39) 12 sc + 1 sc (start of row offset)
30) 8 sc, inc, 2 sc, inc
41-42) 14 sc
43) 10 sc, inc, 2 sc, inc
44-45) 16 sc
46) 12 sc, inc, 2 sc, inc
47) 18 sc.
48) 16 sc (start of row offset)
49) inc, 17 sc
50) 19 sc
51) inc, 18 sc
52) 20 sc + 1 sc (start of row offset)
53) inc, 19 sc
54-55) 21 sc
57) we continue to knit a row until the middle of the inner side of the thigh, we collect three
chain stitches (to connect the legs together, then knit 21 sc along the right leg, 3 sc along the chain, 21 sc along the left leg, 3 sc along the chain. (48)
56) 3 sc, 5 inc half crochet, 29 sc, 5 inc hdc, 4 sc, dec
57) 55 sc, dec
58-62) 56 sc + 1 sc (start of row offset)
63) 2 sc, 4 dec, 8 sc, dec, 14 sc, dec, 8 sc, 4 dec, 4 sc, dec
64) 14 sc, dec, 12 sc, dec, 12 sc, dec
65) 13 sc, dec, 12 sc, dec, 12 sc
66) 3 sc, dec, 28 sc, dec, 5 sc
67-79) 38 sc
Sew the arms to the body in the armpits with one loop of the arm and body, it turns out on the back 17 sc between the arms, and on the chest 19 sc.
80) 9 sc for back, 9 sc for arm, 19 sc for chest, 9 sc for arm, 8 sc for back.
81) 8 sc, dec (raglan), 7 sc, dec (raglan), 17 sc, dec (raglan), 7 sc, dec (raglan), 7 sc (50)
82) 16 sc, dec, 15 sc, dec, 15 sc (48)
83) (dec, 6 sc) – 6 times
84) (dec, 5 sc) -6 times
85) (dec, 4 sc) -6 times
86) (dec, 3 sc) -6 times
87) (dec, 2 sc) -6 times
88) (dec, 1 sc) -6 times
89-95) 12 sc (neck)
Head:
1/12 inc (24)
2 / (2 sc inc) – 8 times. (32 sc)
3 / (3 sc inc) -8 times. (40 sc)
4/2 sc, inc, (4 sc inc) -7 times, 2 sc. (48 sc)
5 / (7 sc, inc) -6 times. (54 sc)
6-19 / 54 sc
20 / (7 sc, dec) – 6 times. (48 sc)
21 / (6 sc, dec) – 6 times. (42 sc)
22 / (5 sc, dec) – 6 times. (36 sc)
23 / (4 sc, dec) – 6 times. (30 sc)
24 / (3 sc, dec) – 6 times. (24 sc)
25 / (2 sc, dec) – 6 times. (18 sc)
26 / (1 sc, dec) -6 times. (12 sc)
27/6 dec.
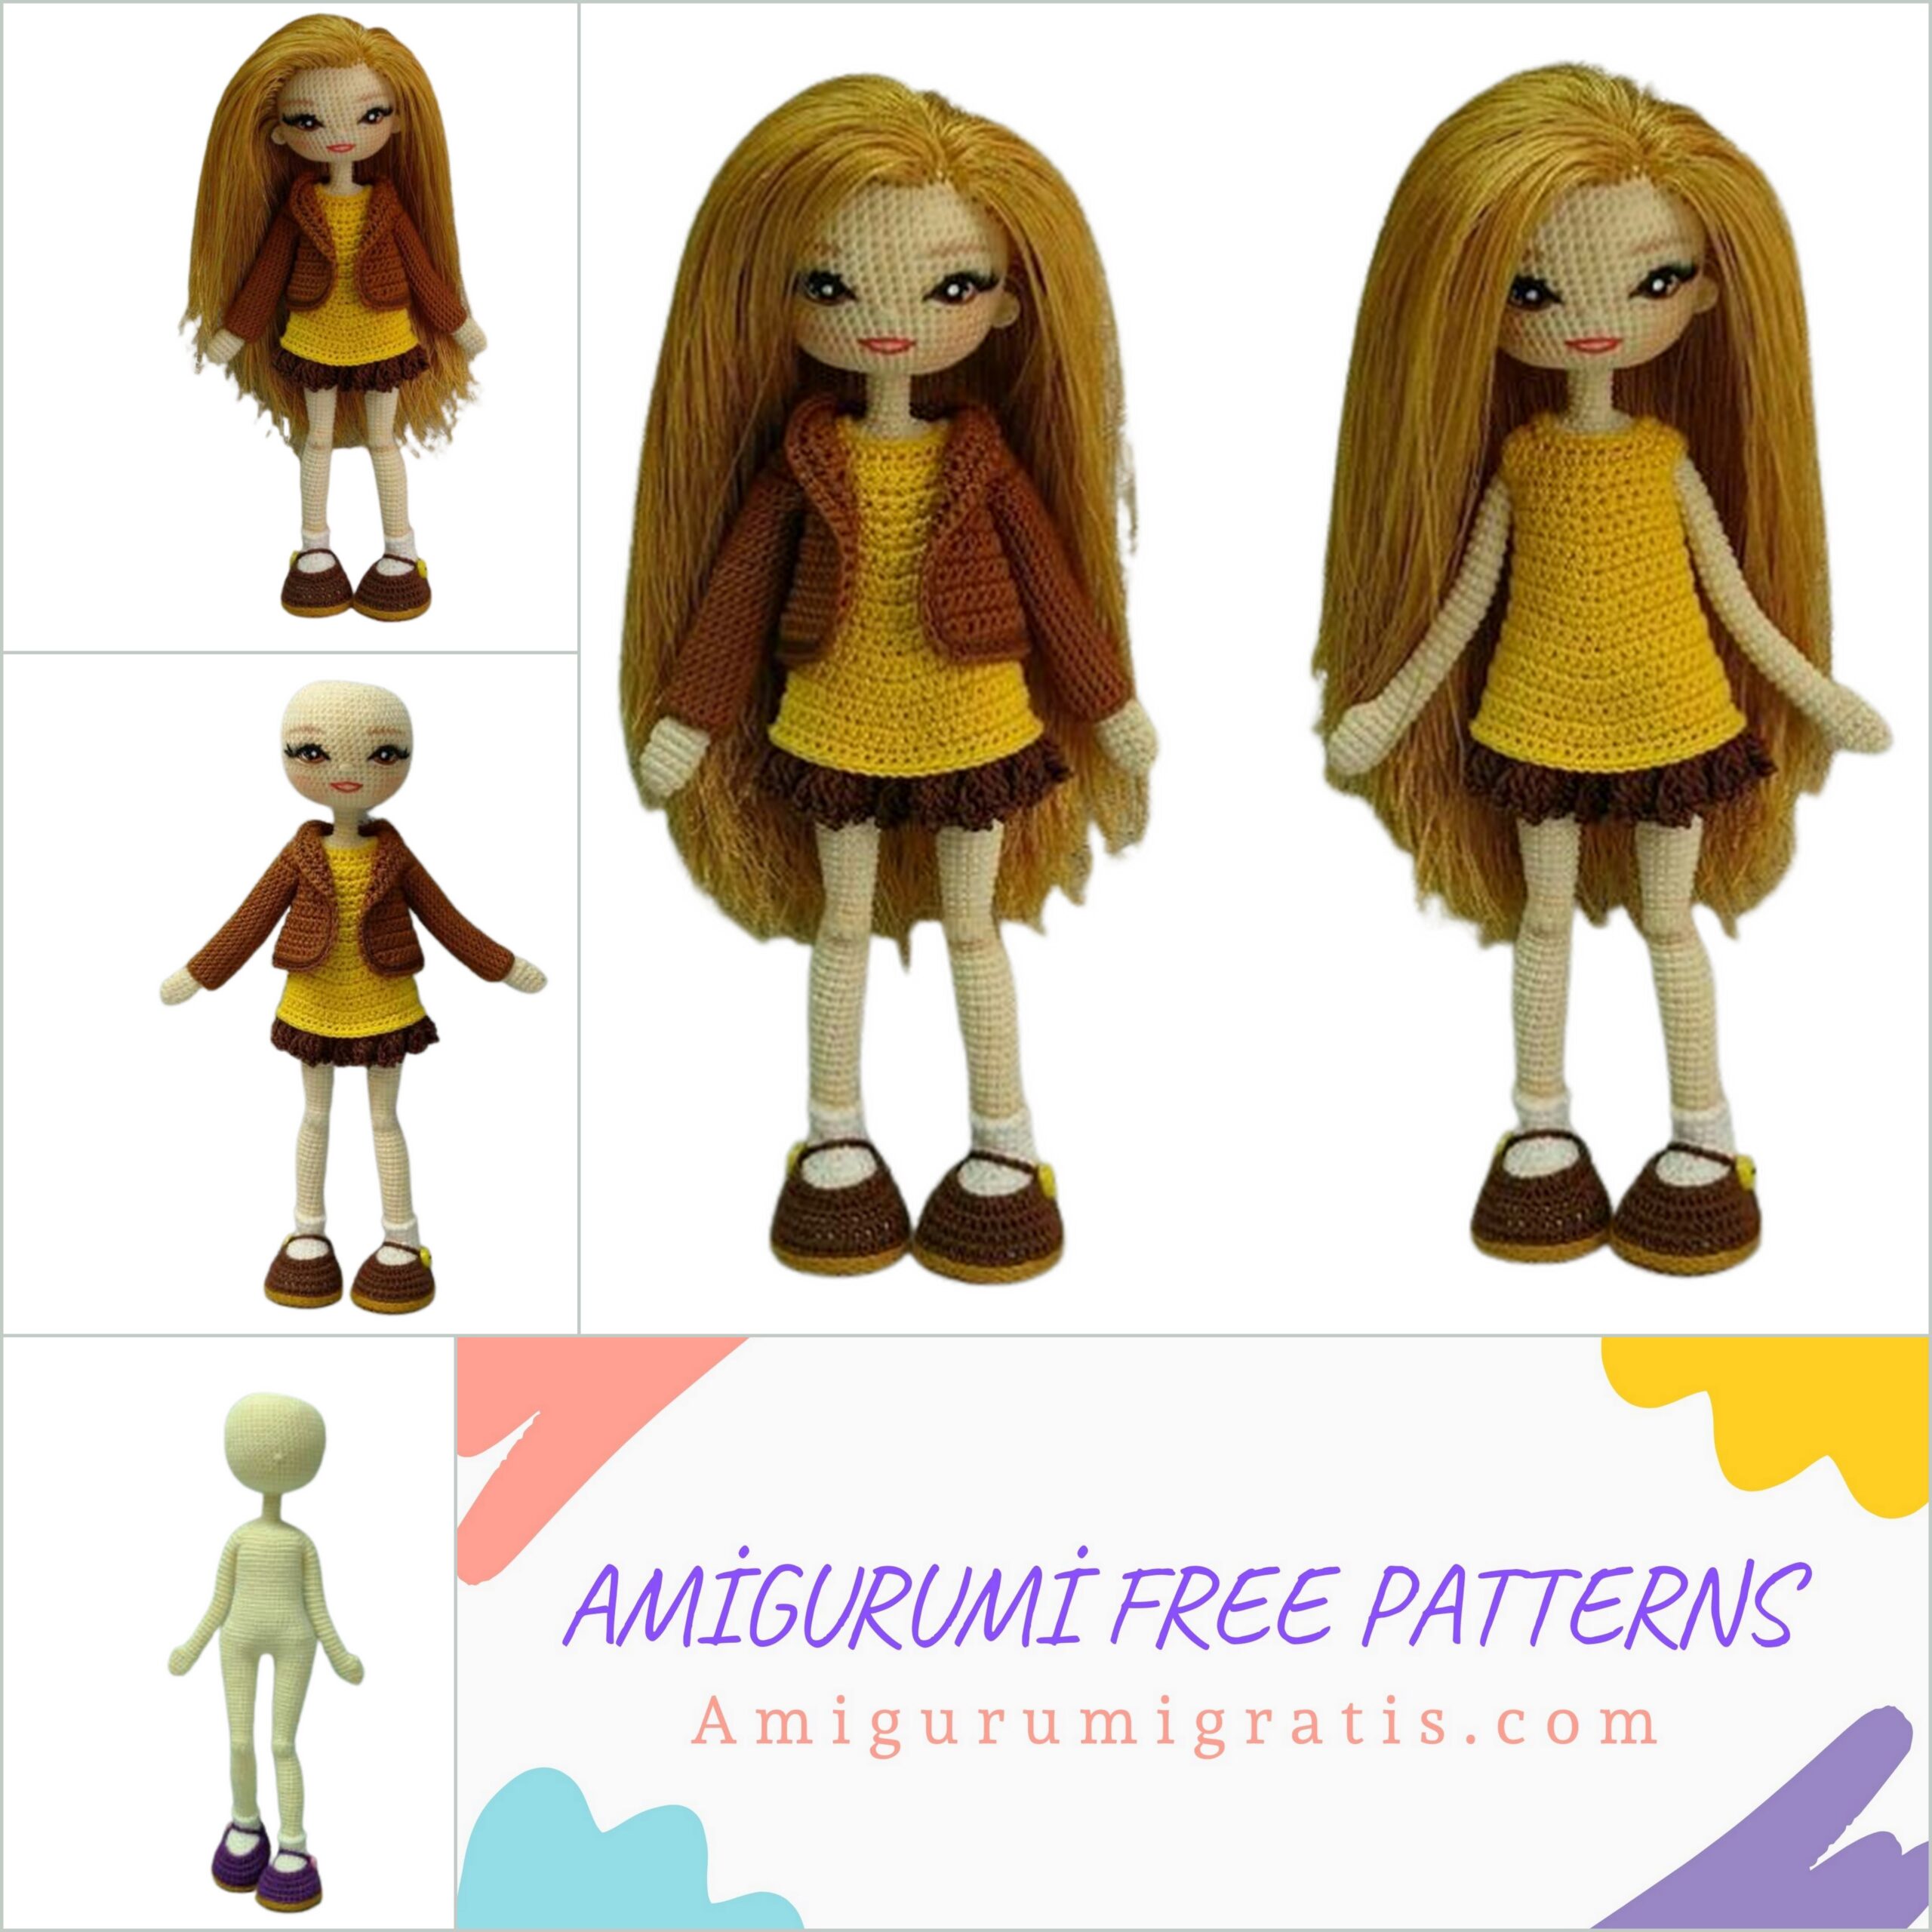
We do not tighten the last row much, leaving a hole in which we will later hide the knots when shaping the face. At this stage, you must first issue
face, and then add hair.
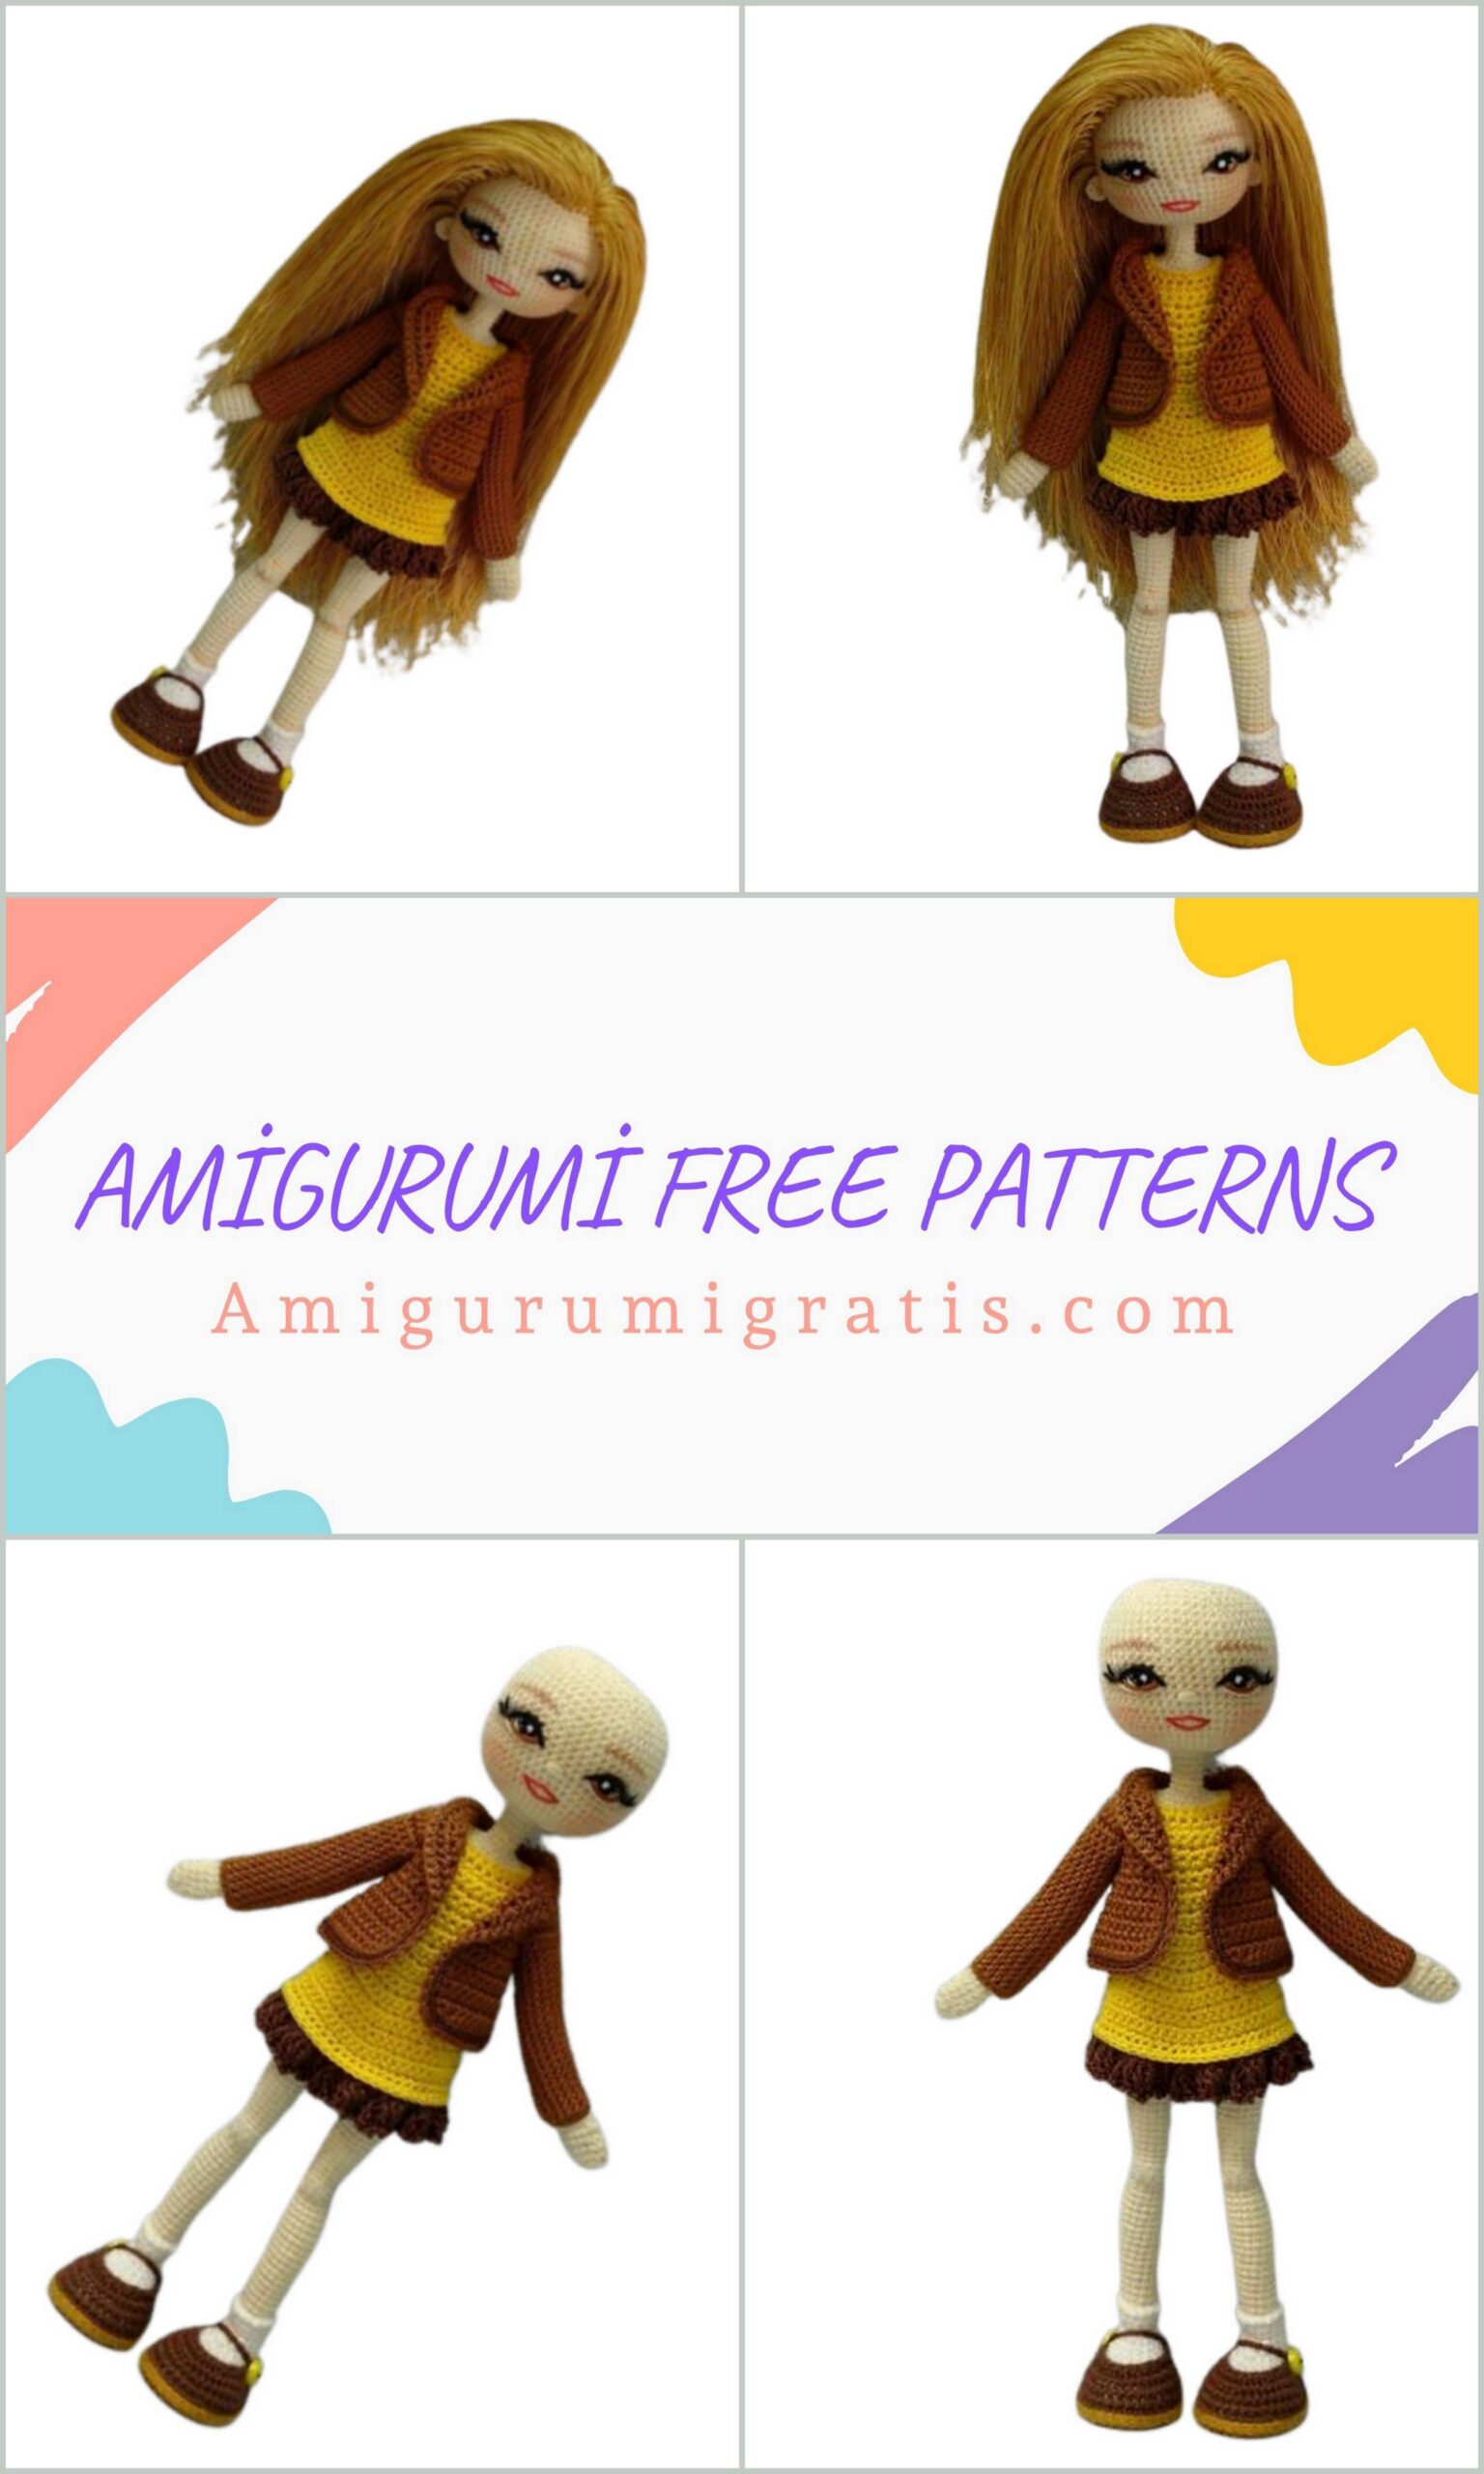
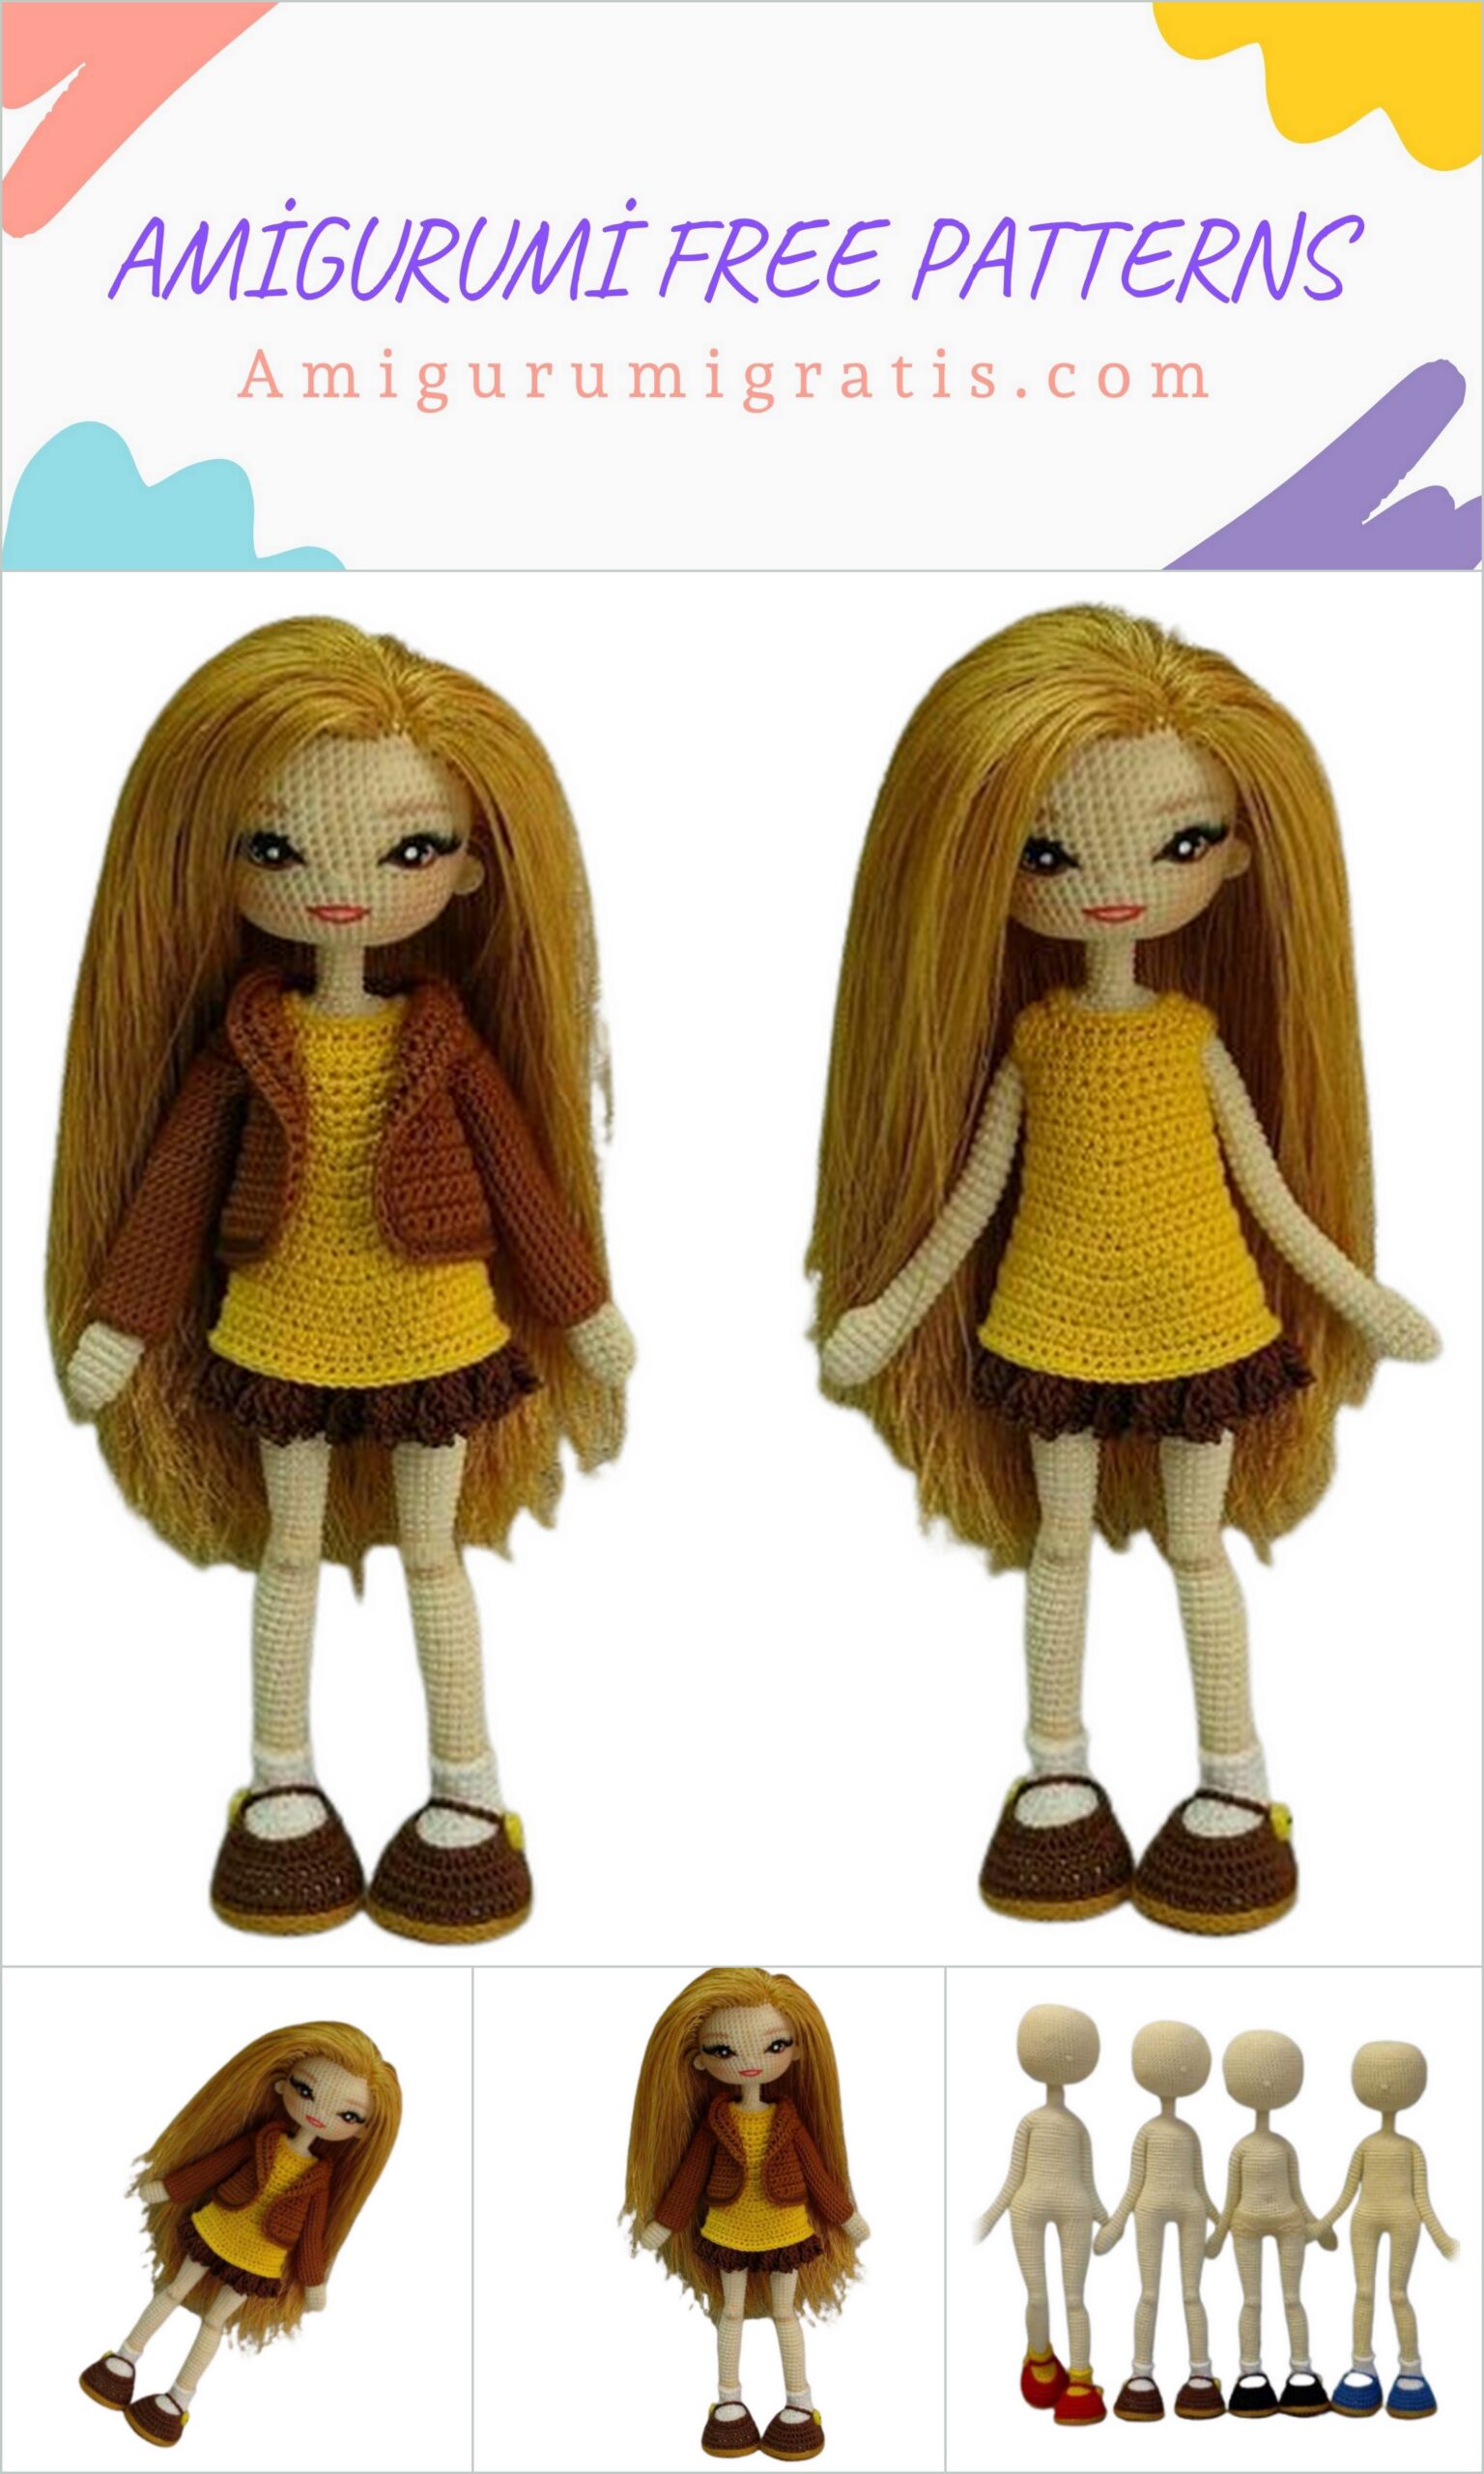
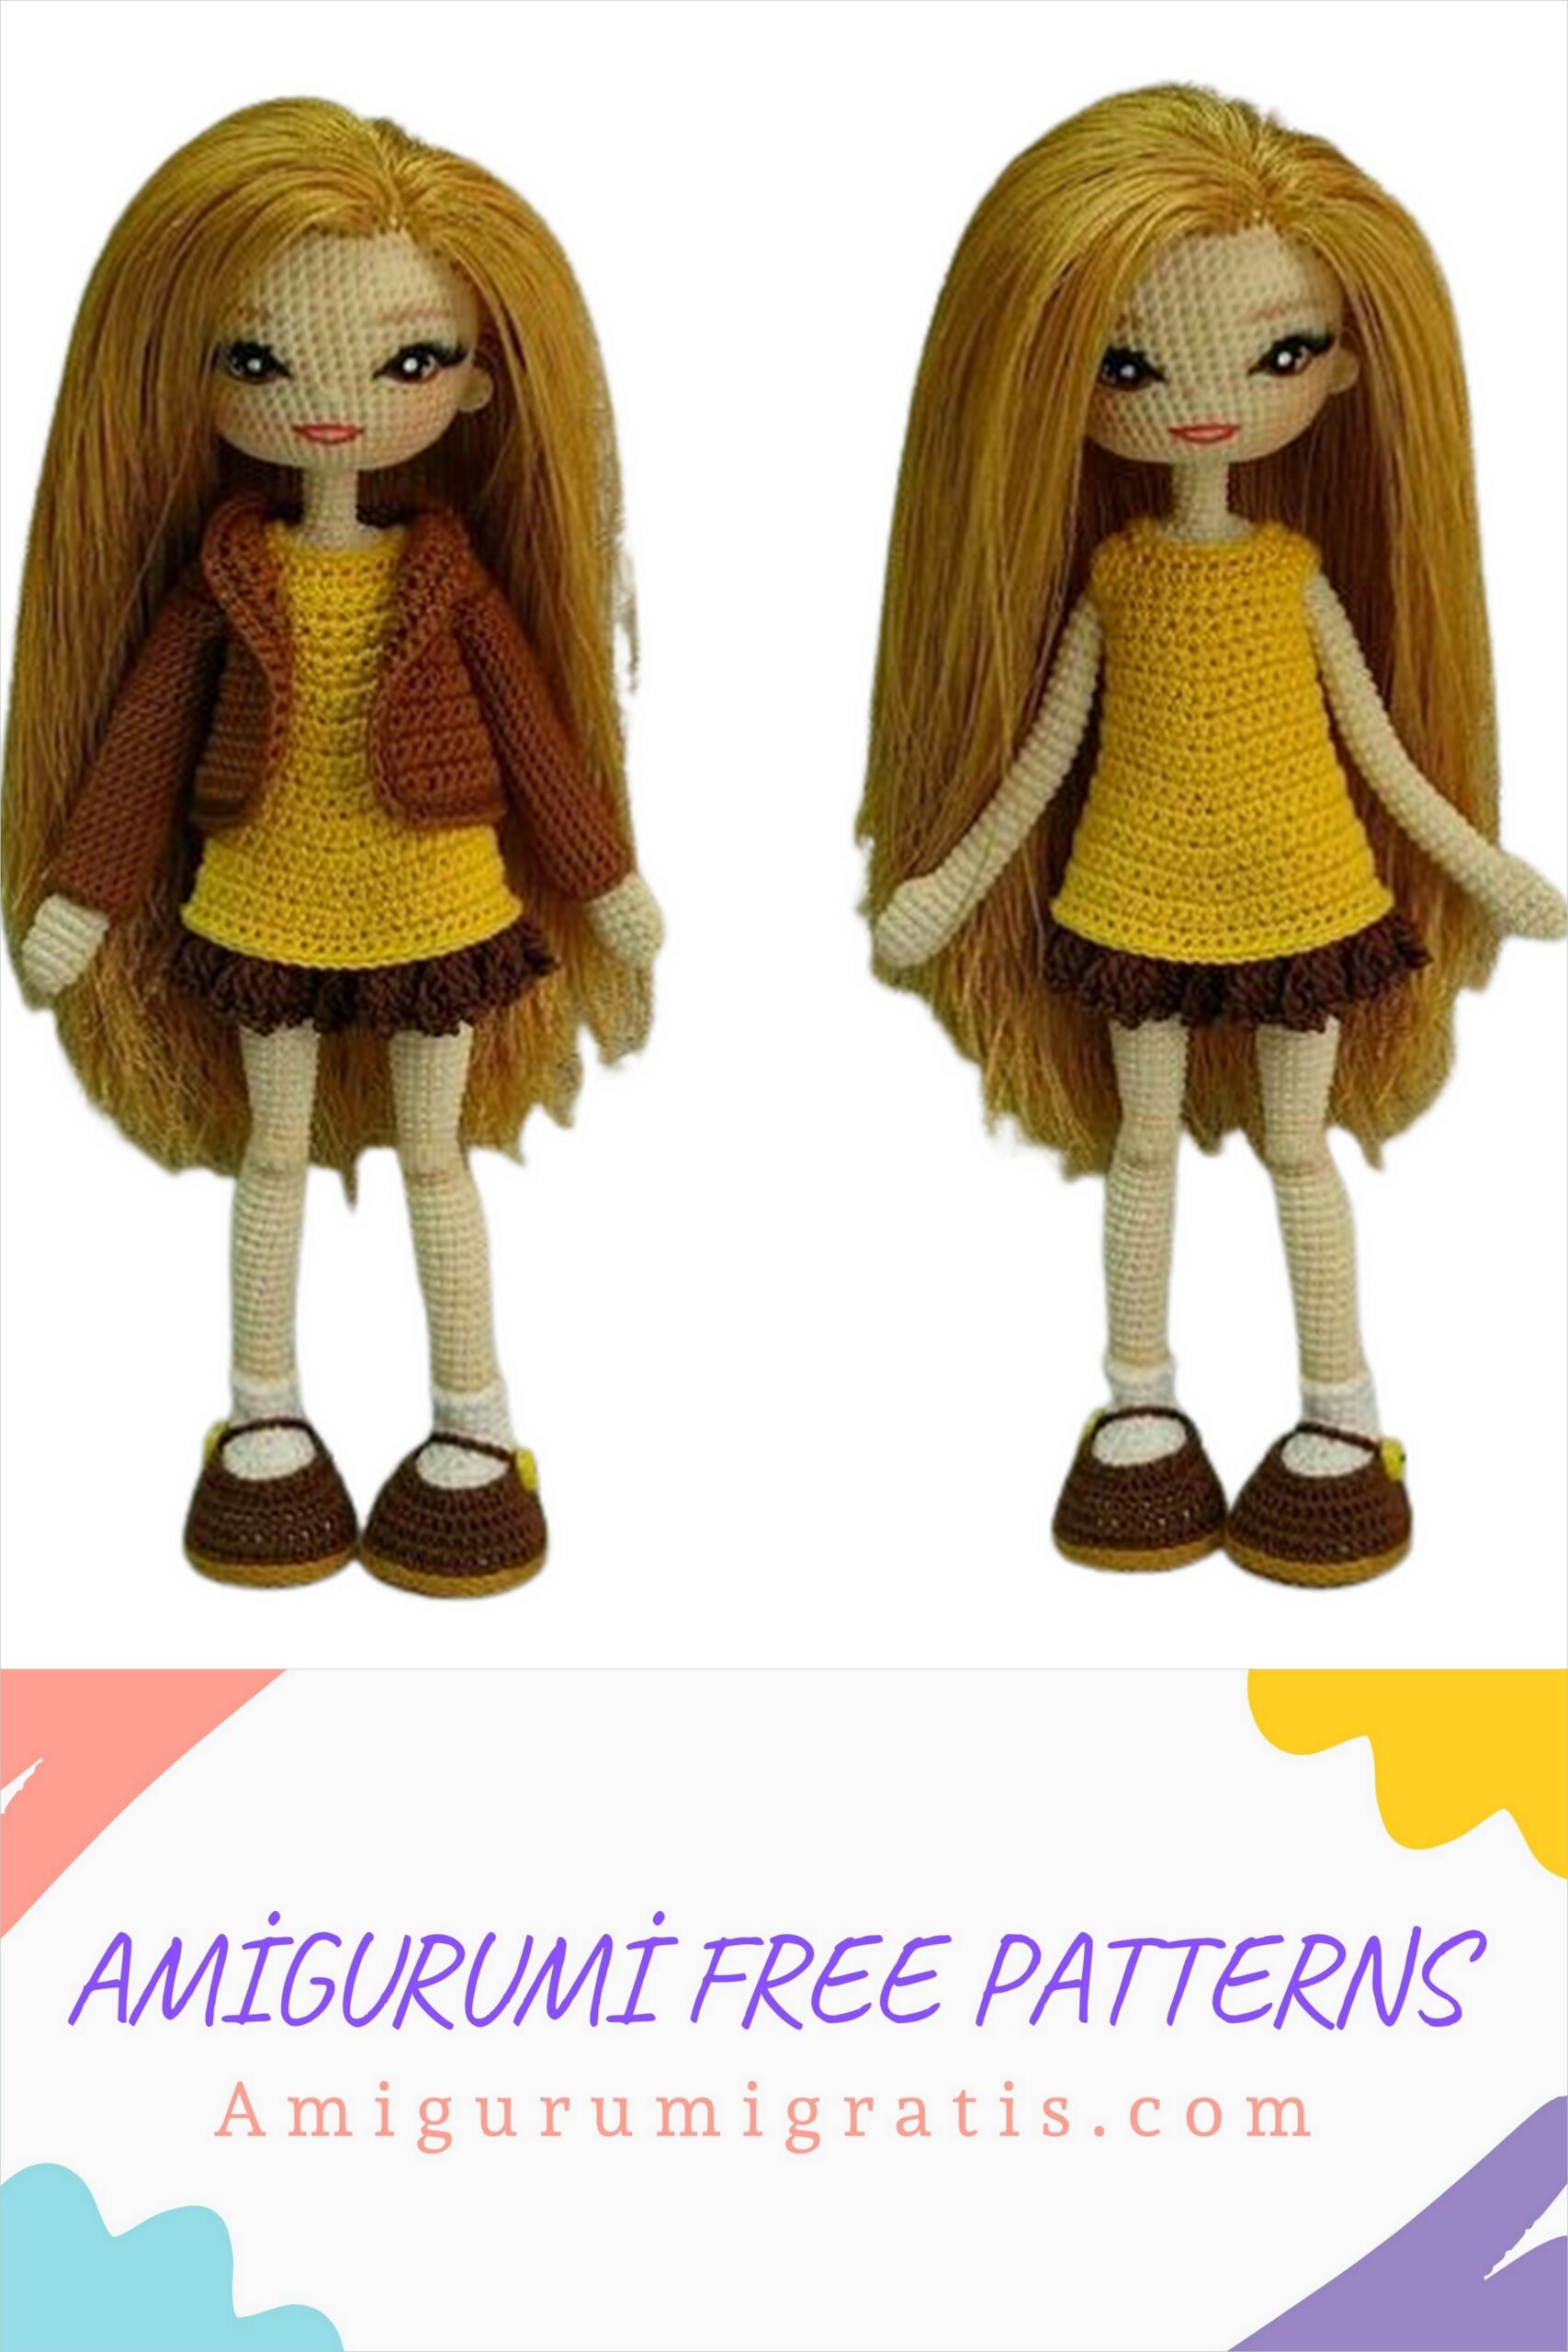
We embroider the eyes from the photo for a master class on face design, I make glare on the pupils with white acrylic paint for fabric.
Eyebrows can be drawn with a pencil (pastel or ordinary for drawing) and you can even tint your face with ordinary cosmetic shadows.
Hair is best fixed according to MK Yunia Filonova https://youtu.be/puFSe3kPxjE. it
the most successful and reliable way in my opinion.
I sew the ears after the complete design of the head, face and hair, I visually find the place where they should be and sew.
Ears: in the ring am 6 sc, cut the thread, leaving the tail for sewing.
We knit the dress in rotary rows, not forgetting to do the ch rise at the beginning of each row.
1) chain of 29 ch, along the chain from the second loop from the hook we knit 28 sc.
2) 4 sc, 3 sc in one loop of the previous row, 4 sc, 3 sc in one loop of the previous row, 8 sc, 3 sc in one loop of the previous row, 4 sc, 3 sc in one loop of the previous row, 4 sc.
3) 36 sc
4) 5 sc, 3 sc in one loop of the previous row, 6 sc, 3 sc in one loop of the previous row, 10 sc, 3 sc in one loop of the previous row, 6 sc, 3 sc in one loop of the previous row, 5 sc.
5) 6 sc, 3 ch, skip 10 sts from previous row, 12 sc, 3 ch, skip 10 sts from previous row, 6 sc.
6) 14 sc, 2 inc, 14 sc.
7) 32 sc.
8) 15 sc, 2 inc, 15 sc.
9) 34 sc.
10) 16 sc, 2 inc, 16 sc.
11) 36 sc.
12) 17 sc, 2 inc, 17 sc.
13-14) 38 sc.
15) 8 sc, inc, 20 sc, inc, 8 sc.
16) 19 sc, 2 inc, 19 sc.
17) 42 sc.
18) 20 sc, 2 inc, 20 sc.
19) 44 sc.
20) 9 sc, inc, 24 sc, inc, 9 sc.
21) 22 sc, 2 inc, 22 sc.
22-24) 48 sc. (the thread is not cut)
25) we knit for the back wall of the loop a frill with a contrasting thread according to the pattern as in the photo. (See photo) photo by Alena Dudakova.
Cut and fasten the thread.
26) we knit with the main thread on the front wall of the loop, then in a circle we tie the edges and the neck sc, not forgetting to make holes for the buttons from ch.
We knit the jacket in rotary rows, not forgetting to do the ch rise at the beginning of each row.
1) Chain of 31 ch, from the second loop from the hook 30 sc.
2) 4 sc, 3 sc in one loop of the previous row, 5 sc, 3 sc in one loop of the previous row, 8 sc, 3 sc in one loop of the previous row, 5 sc, 3 sc in one loop of the previous row, 4 sc.
3) 38 sc.
4) 5 sc, 3 sc in one loop of the previous row, 7 sc, 3 sc in one loop of the previous row, 10 sc, 3 sc in one loop of the previous row, 7 sc, 3 sc in one loop of the previous row, 5 sc.
5) 46 sc.
6) 6 sc, 4 ch, skip 11 sts from previous row, 12 sc, 4 ch, skip 11 sts from previous row, 6 sc.
7) 15 sc, 2 inc, 15 sc.
8) 34 sc.
9) 4 sc, inc, 11 sc, 2 inc, 11 sc, inc, 4 sc.
10) 38 sc.
11) 18 sc, 2 inc, 18 sc.
12) 40 sc.
13) 19 sc, 2 inc, 19 sc.
14) 42 sc.
15) 8 sc, inc, 11 sc, 2 inc, 11 sc, inc, 8 sc.
16) 46 sc.
17) 46 sc. Next we knit in a circle, tying the edges and neck of the jacket in two rows sc. The second row of harness can be tied to the back of the loop.
At this stage, you can finish and get a nice vest, and for a jacket you need to knit the sleeves. Cast in a circle (hand holes) 16 sc and knit the desired sleeve length in a circle.
If you want to knit a coat, then knit a few more rows to the desired length.
For the hair, I use silk threads for machine embroidery. Knitting of boots (they are knitted according to the description of the shoes, only the lifting height increases by one row.
we knit in a circle without a lifting loop
1/7 ch (sole color)
2 / In a circle in 2 sts along a chain of 5 sc, 5 sc in one extreme loop of the chain, then 4 sc in a chain, 3 sc in one loop.
3 / inc, 4 sc, 5 inc, 4 sc, 3 inc.
4/6 sc, (inc, 1 sc) -5 times, 8 sc, inc, 1 sc.
5/9 sc, inc, 3 sc, inc, 3 sc, inc, 12 sc, offset start of row marker.
Color change. I do not cut the thread of the sole, I leave it inside the work, then I shape the edge of the sole with it.
At this stage, we cut out plastic insoles in the shape of the sole.
6-11 / 35 sc. (6 rows) Now you need to insert the insole and shape the edge of the sole.
12/9 sc, 8 dec, 10 sc
13/8 sc, 5 dec, 9 sc
14/8 sc, 3 dec, 8 sc
15/7 sc, dec, 1 sc, dec, 7 sc (change thread color)
we leave the thread of the boot with the last loop extended before work, we will then knit the upper edge of the boot with it.
16 / behind the back wall of the hinge with the main color (for the body) 6 sc, dec, 1 sc, dec, 6 sc
17/5 sc, dec, 1 sc, dec, 5 sc
18/5 sc, dec, 6 sc (hereinafter we knit the legs according to the description)
Knit several rows of the leg with the main thread, finish knitting the boot so that the threads do not get tangled.
To knit the upper part of the boots, knit by the front wall of the loop 17 sc in a circle, height 9 rows, the last loop is connecting, fasten the thread and hide it inside the leg. And fill the toe of the boot with filler, leaving the heel free for now to make it easier to insert the loop of the frame.